Tag Archives: Android

How To Build CyanogenMod Android (oneplus/bacon) On Linux

This article is mainly about the compilation of onePlus mobile phone (OnePlus/Bacon) Rom after repo Sync has completed all cm12 source code.
Other versions can be drawn by analogy.
1.Nexus 7 (” grouper “) Build for reference
The following link is a method for compiling the Nexus 7 (” grouper “) under Linux for reference.
http://wiki.cyanogenmod.org/w/Build_for_grouper
2. Download the respective Device and Kernel
After repo Sync has all the source code for CM12, you also need to download the device related files and the kernel source code.
from cm’s official https://github.com/CyanogenMod search equipment making page code, one plus is oneplus, has two results: android_device_oneplus_bacon, android_kernel_oneplus_msm8974, then search android_device_qcom_common, point in the three projects git clone & lt; ssh url> Go down, or click Download ZIP to Download and unzip.
using breakfast bacon automatically pulls everything you need from github, so you only need to download the device part of oneplus.
3. Configure device and kernel
After downloading the device and kernel above, it is necessary to put them in the correct place. Here is a good specification that the file name of the download indicates the corresponding directory
(Android stands for root). Go to the root directory of the source.
Mkdir -p device/oneplus/bacon
mkdir -p kernel/oneplus/msm8974
Mkdir -p device/qcom/common
unzip the device and kernel you just downloaded and put them in the three new directories above.
4. Configuration vendor
Sh
first connect the oneplus phone via USB, make sure the system version is consistent with the source version, then go to the source /device/oneplus/bacon/ directory and execute the above instructions.
the main function of this script is to pull out the driver so library in the mobile phone, and then create /vendor/oneplus/bacon/ directory.
Then put the appropriate library files in it.
Method 2: The above method requires the phone to have the system installed, and a method called github search for proprietary_vendor_oneplus to download
Into the source/vendor/directory, execute the git clone https://github.com/withyou/proprietary_vendor_oneplus.git
After downloading the proprietary_vendor_oneplus, the proprietary_vendor_oneplus was renamed to oneplus, and then git branch-av looked at the branch. If it was not in the corresponding source branch such as 6.0, it should checkout to cm-13.0.
Configure the USB please refer to this article: http://blog.csdn.net/lechengyuyuan/article/details/21091245
5. Compile
The source build/envsetup. Sh
Breakfast bacon
Brunch selects Cm-Kon-userdebug enter (which is lunch & AMP; & Make)
The whole compilation process can take several hours depending on the PC configuration, and the compilation can also be based on CPU performance plus -j4 parameter (4 for core number) brunch Cm-Cock-Userdebug-j4. If you see the Package Complete:… The out/target/product/bacon/cm – 12.1-20151102 – UNOFFICIAL – bacon. Zip, compile all finished.
6. Compilation may be a problem
1.
Make: * * * No rule to make target `/out/host/Linux x86/bin/dtbToolCM ‘, men by ‘/ out/target/product/bacon/dt. Img’. Stop
Solution: from cm’s official making page https://github.com/CyanogenMod search android_device_qcom_common, Download the ZIP.
The mkdir -p device/end/common
Unzip the downloaded android_device_qcom_common.zip and put it in the newly created directory.
Similarly, if a file under /device/oppo/common/ is not found, download android_device_oppo_common.zip and unzip it into the corresponding directory.
2.
The system/vold/cryptfs. C: In the function ‘load_crypto_mapping_table’ :
System/vold/cryptfs. C: 1031:3: error: implicit declaration of the function ‘is_ice_enabled [- Werror = implicit function – declaration]
if (is_ice_enabled ())
^
Means in the system/vold/cryptfs. C is not found in the is_ice_enabled method, and this method is in the source root directory/device/end/common/cryptfs_hw/statement under the defined, but in CM making download device/end/common (that is, the problem 1 download folder) and repo sync up code out of sync.
Solution to download http://download.csdn.net/download/lechengyuyuan/9237537, download directly after the/device/end/common/cryptfs_hw/directory three files to replace it.
3.
The out/target/product/bacon/obj/KERNEL_OBJ /… Stop.
Do not manually compile the kernel with make or make uImage in the kernel directory, it will interfere with compiling the entire code tree and cause an error. If you have done this before, you can by removing the out/target/product/bacon/obj/KERNEL_OBJ entire folders, hand in hand to the kernel (kernel) directory inside make mrproper down to clean off the kernel source directory. It is also recommended to make mrproper before brunch in the kernel’s source directory.
 
Original articles, reprint must indicate the source: http://blog.csdn.net/lechengyuyuan/article/details/49514319
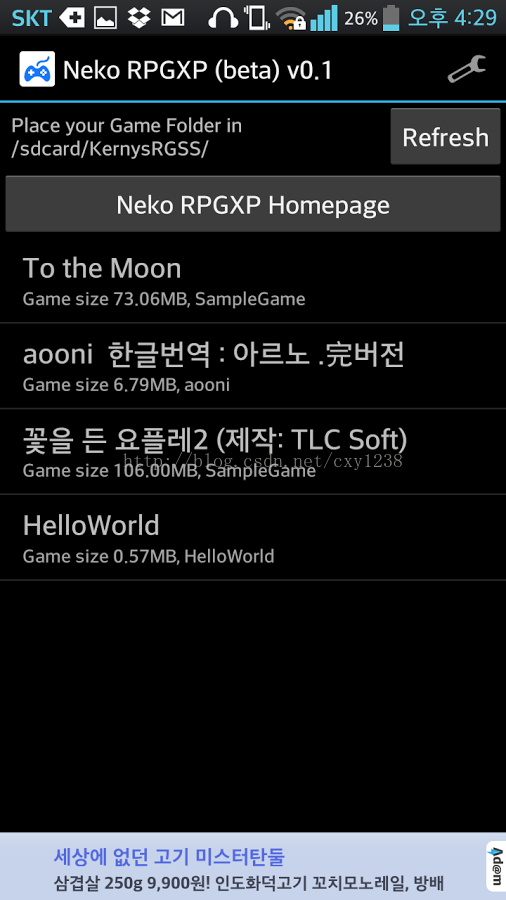
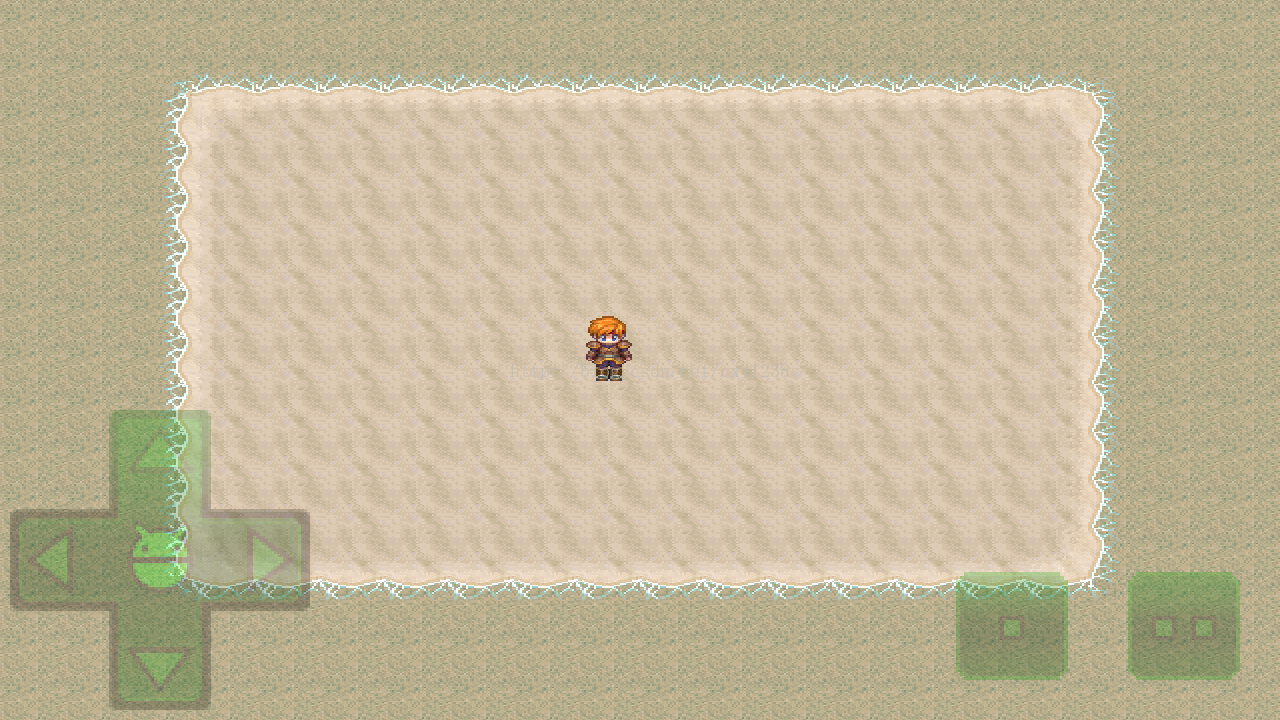
Neko RPGXP player for Korea

Neko RPGXP Player is an Android version of RMXP emulator developed by Koreans. You can find it on Google Play, which I recommend, and it’s much faster than the RMXP4Droid.  
Because the two products are implemented in completely different ways.
Rmxp4droid is developed in pure Java and can use Java code in the game. Neko RPGXP Player was developed in C++.
Java has its limitations compared to C++, so I stopped working on the rmxp4droid project.
If a team is willing to take over, I will consider providing the source code on Github. Rmxp4droid supports running on all Java-supported platforms, including ios and Linux.
 
The user experience on Neko RPGXP Player is now the best choice, if one wants to own a classmate, recommend a reference of the project: htts://github.com/Ancurio/mkxp
 
Here, I provide the download address of Neko RPGXP Player, no credits are charged, and it is difficult for Google Play to directly download apps in China…
 
Instructions for use:
1. Install Neko RPGXP Player
2. Copy RMXP complete game into/SDcard /KernysRGSS folder
3. If you have more than one RMXP game you can store this way
/sdcard/KernysRGSS
– Aooni
– To_the_moon
 
The following is the original:
Description
Play your games created with RPG Maker XP in your Android !
* Features
– RPG XP Game 100% Compatible
– Can load encrypted packaged game.
* How to use
– Place your game folder in /sdcard/KernysRGSS
Also, if you want to play multiple games, place like below.
/sdcard/KernysRGSS
– Aooni
– To_the_moon
* Feature roadmap
– Multiplay socket Win32API emulation
 
Neko RPGXP Player Instructions
 
Here are the screenshots and download addresses:


Download Address:
http://download.csdn.net/download/cxy1238/6798457

Retrofit displays the downloaded content

        HttpLoggingInterceptor interceptor = new HttpLoggingInterceptor();
        interceptor.setLevel(HttpLoggingInterceptor.Level.BODY);
        OkHttpClient client = new OkHttpClient.Builder()
                .addInterceptor(interceptor)
                .retryOnConnectionFailure(true)
                .connectTimeout(15, TimeUnit.SECONDS)
                .build();


        Retrofit retrofit = new Retrofit.Builder().baseUrl(api_url).client(client).addConverterFactory(GsonConverterFactory.create()).build();
                RetrofitService service = retrofit.create(RetrofitService.class);

        Call<ApiGetMapFarms> getMapFarms = service.getMapFarms(api_token, farm_group_id);
        getMapFarms.enqueue(new Callback<ApiGetMapFarms>() {

Note: if the parse line to the parse line, if the copy of the parse will not resolve because of the whitespace problem

Perfect solution for IntelliJ idea error “CreateProcess error = 2, system cannot find the specified file”

I. Background of the problem
The blogger was using Intellij IDEA normally, but Intellij IDEA suddenly sounded wrong for unknown reasons. The error hints were as follows:

Error:Cannot run program “F:\WINDOWS Application Installation \ JRE \bin\ Java “(in directory “C:\Users\ Li Junde \.IntelliJIdea2018.1\ System \ Compile-Server “): CreateProcess Error =2, the system could not find the specified file.


Ii. Problem analysis
By observing the Intellij IDEA error, we know that it was caused by a failure to find the correct installation path for the JDK(Java Development Kit). There are many reasons why Intellij IDEA might not find the JDK: Maybe you accidentally removed it; Or if you install the JDK in a path with Chinese characters, Intellij IDEA does not recognize paths with Chinese characters; Or maybe you accidentally configured the WRONG ENVIRONMENT variable for the JDK on your computer.
The wrong solution
1. Make sure we have the JDK installed on our computer
In 2019, the new version of the JDK(also known as Java) already has the JDK and JRE bundled in it, so installing the JDK is equivalent to installing the JDK and JRE.
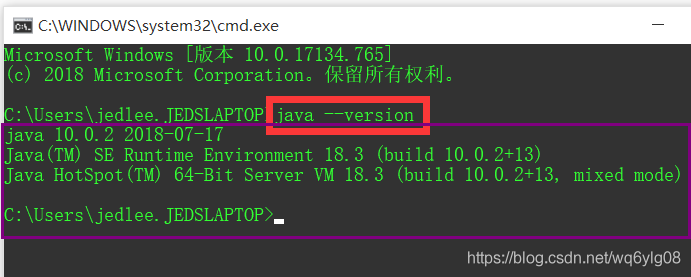
Press and hold Windows+R on the computer keyboard, pops out and run program, enter CMD and to confirm. enter Java --version in the black box console to view the Java version number.

If your computer pops up a prompt like the one above (describing the Java version number, release date, etc.), then your computer has the JDK installed correctly, and we go straight to the next step. Otherwise, it means that your computer did not properly install the JDK, you still have to search the latest version of Java in 2019 Java10 and above Java installation tutorial, the bloggers do not recommend small white users to install the old version of Java, the old version of Java needs to install the Java JDK and JRE, also need to configure environment variables, small white users are easy to make mistakes.
2. Properly set the JDK installation path at Intellij IDEA
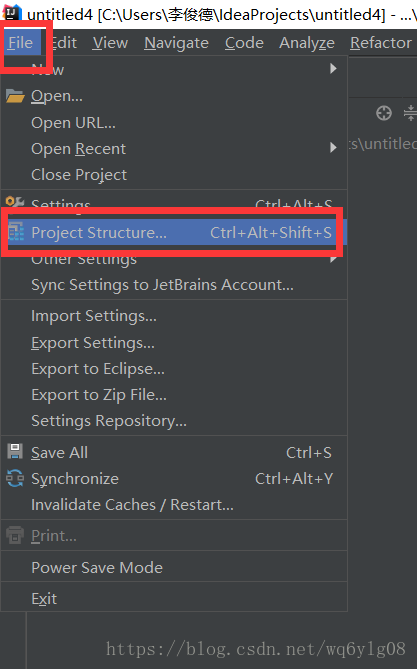
Click the File option in the upper-left menu bar of Intellij IDEA, and then click the Project Structure sub-option.

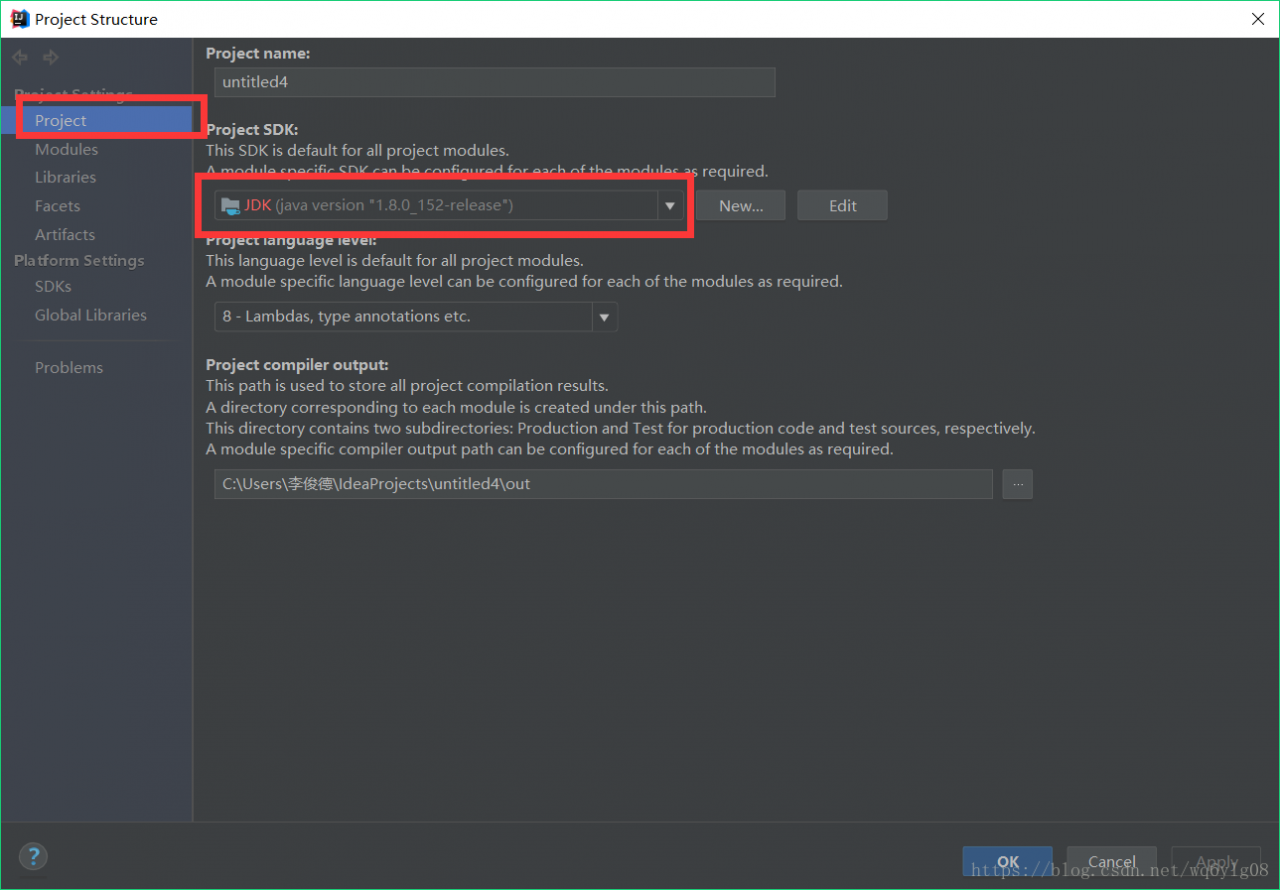
In the configuration page for Project Structure, the project-JDK must not be red as shown in the figure below, because red indicates that there is no corresponding JDK under the file path.

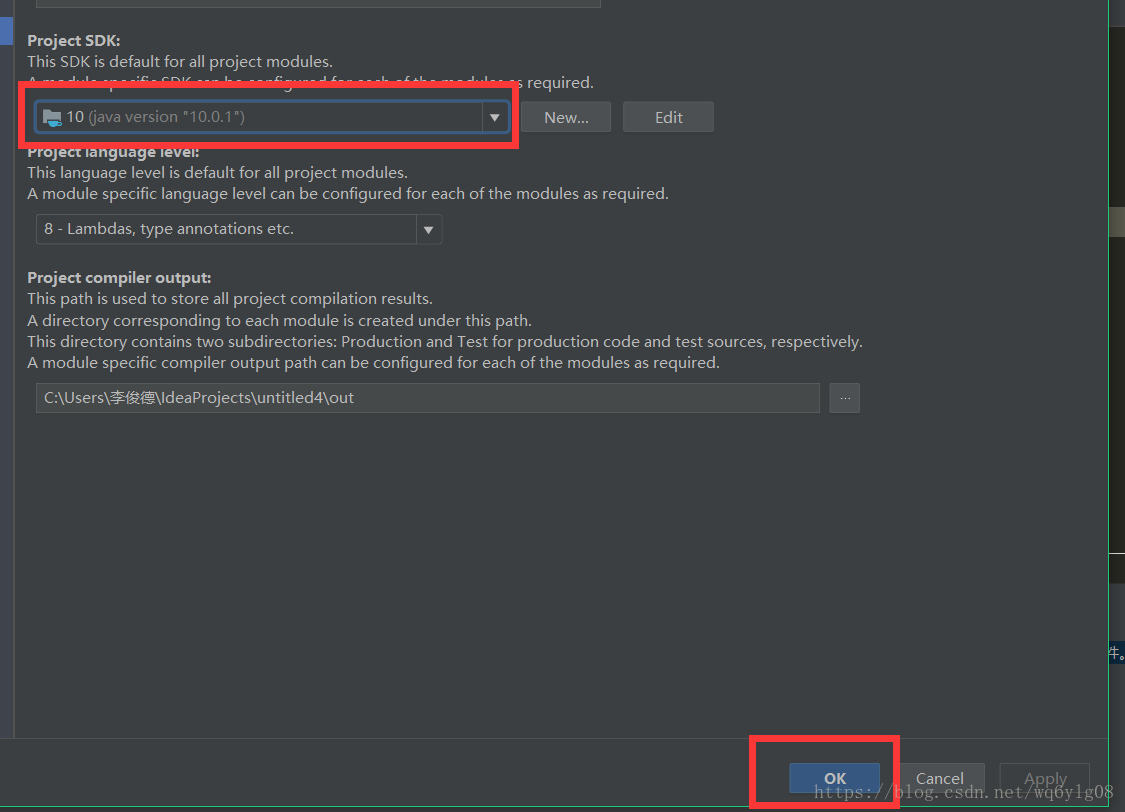
First, make sure that you have followed the first step above to find the current Java version on your computer through the black box command Java — Version. Otherwise, you will have to reinstall the JDK before you see this step. Under the Project SDK TAB, we clicked on the small triangle arrow in the drop-down box to see if Intellij IDEA had helped us find an alternative JDK version. If so, we checked that Intellij IDEA was basically back to normal by selecting the existing JDK in the drop-down box.

If there is no existing JDK version in the drop-down box, we need to manually click New… , then select the “install the latest JDK on our computer properly” installation path. If you’ve just reinstalled the JDK you must remember the JDK installation path. If you’ve forgotten where you installed the JDK, type Java –verbose — in the black box and the JDK installation path appears at the end of the command line.
3. Save the configuration of Project Structure and recompile it to run the Java program normally
After OK, compile Run again to Run the Java program as normal.

Invalid keystore format

When signing the app, the keyStore changes, causing all the projects to fail to run

find debug.keystore and delete
path User\ User name \android\debug.keystore
after deletion re-run the project, it will automatically generate a file.

curl: (22) The requested URL returned error: 404 Not Found Server does not provide clone.bundle; ig

Android source code download, Repo Sync, report:
curl: (22) The requested URL returned error: 404 Not Found
Server does not provide clone.bundle; ignoring.Server does not provide clone.bundle; ignoring.
 
Solutions:
Ignore it…
1. Reference: Tsinghua University Open source software mirroring station – Help for Android mirroring
https://mirrors.tuna.tsinghua.edu.cn/help/AOSP/

2. Also see: 404 Not Found when repo init or repo sync
https://blog.csdn.net/QQ2010899751/article/details/81347599

Twitter share failed, HTTP 403 error

Twitter shares frequently. Due to the small change in the content of the Shared copy, sharing failure is easy to occur. HTTP 403 error is prompted, and Exception information and “Status is a duplicate” are seen through the breakpoint.
Check: It’s because Twitter thinks you’re sharing content over and over again
The official documentation at https://developer.twitter.com/en/docs/tweets/post-and-engage/api-reference/post-statuses-update


A question on the Twitter developer forum asked how long it would take for the judgment to be repeated, but the official response did not make the rule public, presumably to prevent it from being exploited
https://twittercommunity.com/t/duplicate-tweets/13264