PHP error: call to undefined function curl_ init() window

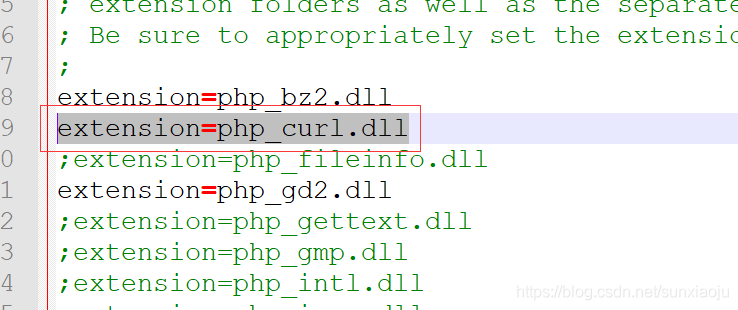
1. First, remove the extension=php_curl. DLL comment in php.ini file, as shown in the figure below:

2. To configure ext directory, absolute path is required, extension_dir = “D:/InstallFile/ PHp-5.6.9-win32-vc11-x64 /ext”, as shown in the figure below:

3, the apache/bin directory requires libssh2. DLL, ssleay32. DLL, libeay32. DLL, due to my lack of libssh2. DLL, so you need to download a, will libssh2. DLL in the apache/bin directory, and then restart the apache.

Cloud computing learning route Courseware: XFS file system

= = = = = = = = = = = = = = = = = = = = = = = = = = = = = = = = = = = = = = = = = = = = = = = = = = = = = = = = = = = = = = = = = = = = = = = = = = = = = = = = = = = =
Centos7’s default file system, why abandon the EXT family?
EXT family has the most support:
But creating a file system (formatting) is slow!
But the repair is slow!
But file system storage capacity is limited!
XFS is also a journaling file system:
High capacity, support for large storage
High performance, fast file system creation/repair
Both inodes and blocks are generated dynamically when the system needs them
XFS file system
• Data section
The data area is the same as the ext family we learned about earlier, including information such as inode/data block/superblock.
• File system log section
• RealTime Section
Fix XFS file system XFS_repair
[root@tianyun ~]# xfs_repair /dev/vda1
xfs_repair: /dev/vda1 contains a mounted filesystem
xfs_repair: /dev/vda1 contains a mounted and writable filesystem
Fatal error – Couldn’t initialize XFS Library
[root@tianyun ~]# umount /dev/vda1
[root@tianyun ~]# xfs_repair /dev/vda1
Phase 1 – Find and Verify Superblock…
Phase 2 – using internal log
Zero the log… Scan filesystem freespace and inode maps… found root inode chunk

mac gem install nokogiri error

Gem::Ext::BuildError: ERROR: Failed to build gem native extension.

    /Users/angela/.rbenv/versions/1.9.3-p545/bin/ruby -r ./siteconf20170106-59264-robjdg.rb extconf.rb --use-system-libraries
checking if the C compiler accepts ... yes
checking if the C compiler accepts -Wno-error=unused-command-line-argument-hard-error-in-future... no
Building nokogiri using system libraries.
libxml2 version 2.6.21 or later is required!
*** extconf.rb failed ***
Could not create Makefile due to some reason, probably lack of
necessary libraries and/or headers.  Check the mkmf.log file for more
details.  You may need configuration options.

Provided configuration options:
	--with-opt-dir
	--without-opt-dir
	--with-opt-include
	--without-opt-include=${opt-dir}/include
	--with-opt-lib
	--without-opt-lib=${opt-dir}/lib
	--with-make-prog
	--without-make-prog
	--srcdir=.
	--curdir
	--ruby=/Users/angela/.rbenv/versions/1.9.3-p545/bin/ruby
	--help
	--clean
	--use-system-libraries
	--with-zlib-dir
	--without-zlib-dir
	--with-zlib-include
	--without-zlib-include=${zlib-dir}/include
	--with-zlib-lib
	--without-zlib-lib=${zlib-dir}/lib
	--with-xml2-dir
	--without-xml2-dir
	--with-xml2-include
	--without-xml2-include=${xml2-dir}/include
	--with-xml2-lib
	--without-xml2-lib=${xml2-dir}/lib
	--with-libxml-2.0-config
	--without-libxml-2.0-config
	--with-pkg-config
	--without-pkg-config
	--with-xslt-dir
	--without-xslt-dir
	--with-xslt-include
	--without-xslt-include=${xslt-dir}/include
	--with-xslt-lib
	--without-xslt-lib=${xslt-dir}/lib
	--with-libxslt-config
	--without-libxslt-config
	--with-exslt-dir
	--without-exslt-dir
	--with-exslt-include
	--without-exslt-include=${exslt-dir}/include
	--with-exslt-lib
	--without-exslt-lib=${exslt-dir}/lib
	--with-libexslt-config
	--without-libexslt-config

extconf failed, exit code 1

Gem files will remain installed in /Users/angela/.rbenv/versions/1.9.3-p545/lib/ruby/gems/1.9.1/gems/nokogiri-1.6.7.2 for inspection.
Results logged to /Users/angela/.rbenv/versions/1.9.3-p545/lib/ruby/gems/1.9.1/extensions/x86_64-darwin-13/1.9.1-static/nokogiri-1.6.7.2/gem_make.out
/Users/angela/.rbenv/versions/1.9.3-p545/lib/ruby/site_ruby/1.9.1/rubygems/ext/builder.rb:89:in `run'
/Users/angela/.rbenv/versions/1.9.3-p545/lib/ruby/site_ruby/1.9.1/rubygems/ext/ext_conf_builder.rb:36:in `block in build'
/Users/angela/.rbenv/versions/1.9.3-p545/lib/ruby/1.9.1/tempfile.rb:320:in `open'
/Users/angela/.rbenv/versions/1.9.3-p545/lib/ruby/site_ruby/1.9.1/rubygems/ext/ext_conf_builder.rb:19:in `build'
/Users/angela/.rbenv/versions/1.9.3-p545/lib/ruby/site_ruby/1.9.1/rubygems/ext/builder.rb:161:in `block (2 levels) in build_extension'
/Users/angela/.rbenv/versions/1.9.3-p545/lib/ruby/site_ruby/1.9.1/rubygems/ext/builder.rb:160:in `chdir'
/Users/angela/.rbenv/versions/1.9.3-p545/lib/ruby/site_ruby/1.9.1/rubygems/ext/builder.rb:160:in `block in build_extension'
<internal:prelude>:10:in `synchronize'
/Users/angela/.rbenv/versions/1.9.3-p545/lib/ruby/site_ruby/1.9.1/rubygems/ext/builder.rb:159:in `build_extension'
/Users/angela/.rbenv/versions/1.9.3-p545/lib/ruby/site_ruby/1.9.1/rubygems/ext/builder.rb:198:in `block in build_extensions'
/Users/angela/.rbenv/versions/1.9.3-p545/lib/ruby/site_ruby/1.9.1/rubygems/ext/builder.rb:195:in `each'
/Users/angela/.rbenv/versions/1.9.3-p545/lib/ruby/site_ruby/1.9.1/rubygems/ext/builder.rb:195:in `build_extensions'
/Users/angela/.rbenv/versions/1.9.3-p545/lib/ruby/site_ruby/1.9.1/rubygems/installer.rb:702:in `build_extensions'
/Users/angela/.rbenv/versions/1.9.3-p545/lib/ruby/site_ruby/1.9.1/rubygems/installer.rb:250:in `install'
/Users/angela/.rbenv/versions/1.9.3-p545/lib/ruby/gems/1.9.1/gems/bundler-1.6.5/lib/bundler/source/rubygems.rb:90:in `block in install'
/Users/angela/.rbenv/versions/1.9.3-p545/lib/ruby/gems/1.9.1/gems/bundler-1.6.5/lib/bundler/rubygems_integration.rb:130:in `preserve_paths'
/Users/angela/.rbenv/versions/1.9.3-p545/lib/ruby/gems/1.9.1/gems/bundler-1.6.5/lib/bundler/source/rubygems.rb:89:in `install'
/Users/angela/.rbenv/versions/1.9.3-p545/lib/ruby/gems/1.9.1/gems/bundler-1.6.5/lib/bundler/installer.rb:105:in `block in install_gem_from_spec'
/Users/angela/.rbenv/versions/1.9.3-p545/lib/ruby/gems/1.9.1/gems/bundler-1.6.5/lib/bundler/rubygems_integration.rb:162:in `with_build_args'
/Users/angela/.rbenv/versions/1.9.3-p545/lib/ruby/gems/1.9.1/gems/bundler-1.6.5/lib/bundler/installer.rb:104:in `install_gem_from_spec'
/Users/angela/.rbenv/versions/1.9.3-p545/lib/ruby/gems/1.9.1/gems/bundler-1.6.5/lib/bundler/installer.rb:262:in `block in install_sequentially'
/Users/angela/.rbenv/versions/1.9.3-p545/lib/ruby/1.9.1/forwardable.rb:201:in `each'
/Users/angela/.rbenv/versions/1.9.3-p545/lib/ruby/gems/1.9.1/gems/bundler-1.6.5/lib/bundler/installer.rb:261:in `install_sequentially'
/Users/angela/.rbenv/versions/1.9.3-p545/lib/ruby/gems/1.9.1/gems/bundler-1.6.5/lib/bundler/installer.rb:91:in `run'
/Users/angela/.rbenv/versions/1.9.3-p545/lib/ruby/gems/1.9.1/gems/bundler-1.6.5/lib/bundler/installer.rb:15:in `install'
/Users/angela/.rbenv/rbenv.d/exec/gem-rehash/rubygems_plugin.rb:27:in `install'
/Users/angela/.rbenv/versions/1.9.3-p545/lib/ruby/gems/1.9.1/gems/bundler-1.6.5/lib/bundler/cli/install.rb:78:in `run'
/Users/angela/.rbenv/versions/1.9.3-p545/lib/ruby/gems/1.9.1/gems/bundler-1.6.5/lib/bundler/cli.rb:145:in `install'
/Users/angela/.rbenv/versions/1.9.3-p545/lib/ruby/gems/1.9.1/gems/bundler-1.6.5/lib/bundler/vendor/thor/command.rb:27:in `run'
/Users/angela/.rbenv/versions/1.9.3-p545/lib/ruby/gems/1.9.1/gems/bundler-1.6.5/lib/bundler/vendor/thor/invocation.rb:121:in `invoke_command'
/Users/angela/.rbenv/versions/1.9.3-p545/lib/ruby/gems/1.9.1/gems/bundler-1.6.5/lib/bundler/vendor/thor.rb:363:in `dispatch'
/Users/angela/.rbenv/versions/1.9.3-p545/lib/ruby/gems/1.9.1/gems/bundler-1.6.5/lib/bundler/vendor/thor/base.rb:440:in `start'
/Users/angela/.rbenv/versions/1.9.3-p545/lib/ruby/gems/1.9.1/gems/bundler-1.6.5/lib/bundler/cli.rb:9:in `start'
/Users/angela/.rbenv/versions/1.9.3-p545/lib/ruby/gems/1.9.1/gems/bundler-1.6.5/bin/bundle:20:in `block in <top (required)>'
/Users/angela/.rbenv/versions/1.9.3-p545/lib/ruby/gems/1.9.1/gems/bundler-1.6.5/lib/bundler/friendly_errors.rb:5:in `with_friendly_errors'
/Users/angela/.rbenv/versions/1.9.3-p545/lib/ruby/gems/1.9.1/gems/bundler-1.6.5/bin/bundle:18:in `<top (required)>'
/Users/angela/.rbenv/versions/1.9.3-p545/bin/bundle:23:in `load'
/Users/angela/.rbenv/versions/1.9.3-p545/bin/bundle:23:in `<main>'
An error occurred while installing nokogiri (1.6.7.2), and Bundler cannot continue.
Make sure that `gem install nokogiri -v '1.6.7.2'` succeeds before bundling.

Solutions:

brew install --force libxml2 libxslt
brew install --force libiconv

xcode-select --install

Python FileNotFoundError: [Errno 2] No such file or directory: ‘objects/epsilon.pkl

Directory:

The preface explains in detail

preface
Go to WeChat and put on a fun application reinforcement learning. But go on the run and come across the problem before you go:
FileNotFoundError: [Errno 2] No such file or directory: ‘objects/ ingfix.pkl
has to learn and come up with a solution:
explain
There is no folder or file, that is, you have access to a file that does not exist, but in fact, if the file you are accessing does not exist, the method w is used to cut access, it will create a new document, so the main problem is, there is no folder, just create a new one.
Explain in detail
Python, the OS library, is required to read and write files. Due to open the way to your files is “w”, namely file does not exist when they create a file, so the PKL documents (I mean the relative path of the PKL) does not exist is automatically created, this is not the problem, the problem is the relative path, that is the path exists, this folder does not exist as a problem. So we have to determine if this path exists. Create if it doesn’t exist.

import os
if not os.path.exists(path):
    os.mkdir(path)

Also, note that you can only create one layer at a time for paths, meaning that the layer above your Objects exists, or you will still get an error.

R language learning problem solving error in output $nodeid: $operator is invalid for atomic vectors

Problem: Error in output$nodeID: $operator is invalid for atomic Vectors when viewing variable columns using the “$” operator

output <- data$score
output <- cbind(nodeID=dat$nodeID,score=output)
head(output$nodeID)
 Error in output$nodeID : $ operator is invalid for atomic vectors
# Check the type of output and find out it's matrix.
class(output)
 [1] "matrix"
#"data.frame" can only be used with "$", just use [,] here.
head(output[,1])


solve java.util.prefs . backingstoreexception error

Thank you for sharing

The server log shows that an error is reported every half a minute:

Mar 29, 2016 10:37:23 AM java.util.prefs.FileSystemPreferences checkLockFile0ErrorCode

WARNING: Could not lock User prefs.
Unix error code 2.

Mar 29, 2016 10:37:23 AM java.util.prefs.FileSystemPreferences checkLockFile0ErrorCode

WARNING: Could not lock User prefs.
Unix error code 2.

Mar 29, 2016 10:37:23 AM java.util.prefs.FileSystemPreferences syncWorld

WARNING: Couldn’t flush user prefs: java.util.prefs.BackingStoreException: Couldn’t get file lock.

Mar 29, 2016 10:37:23 AM java.util.prefs.FileSystemPreferences syncWorld

WARNING: Couldn’t flush user prefs: java.util.prefs.BackingStoreException: Couldn’t get file lock.

Mar 29, 2016 10:37:25 AM java.util.prefs.FileSystemPreferences checkLockFile0ErrorCode

WARNING: Could not lock System prefs. Unix error code 0.

Mar 29, 2016 10:37:25 AM java.util.prefs.FileSystemPreferences checkLockFile0ErrorCode

WARNING: Could not lock System prefs. Unix error code 0.

Mar 29, 2016 10:37:25 AM java.util.prefs.FileSystemPreferences syncWorld

WARNING: Couldn’t flush system prefs: java.util.prefs.BackingStoreException: Couldn’t get file lock.

Mar 29, 2016 10:37:25 AM java.util.prefs.FileSystemPreferences syncWorld

WARNING: Couldn’t flush system prefs: java.util.prefs.BackingStoreException: Couldn’t get file lock.

It was harmless enough, but it made me very sad, so I decided to solve it. After many queries, I found that the cause of this problem was that the JDK could not be locked when locking user configuration. In fact, it was a variety of permission problems

Read the following two articles

http://www.ithao123.cn/content-10680341.html

http://www-01.ibm.com/support/docview.wss?uid=swg21515420

I got some inspiration

Then I found that I needed to assign /etc/java operation permission to the tomcat logon user. Since it came with tomcat6, I opened the tomcat6.conf file and found this line:

TOMCAT_USER=”tomcat”

To be lazy, change it decisively to root, and at this point, the problem is solved

Now that’s the point

After all, it is not safe for Tomcat to get the root permission. If the group security check is carried out in the future, the vulnerability will be swept out. Therefore, all privileges of Tomcat users should be assigned:

# chown tomcat:tomcat -R /etc/.java/.systemPrefs

# chown tomcat:tomcat -R /etc/.java

# chown tomcat:tomcat -R /var/lock/subsys/tomcat6

# chown tomcat:tomcat -R /var/log/tomcat6

# chown tomcat:tomcat -R /var/lib/tomcat6

# chown tomcat:tomcat -R /var/cache/tomcat6

# chown tomcat:tomcat -R /etc/rc.d/init.d/tomcat6

# chown tomcat:tomcat -R /etc/logrotate.d/tomcat6

# chown tomcat:tomcat -R /etc/sysconfig/tomcat6

# chown tomcat:tomcat -R /etc/tomcat6

# chown tomcat:tomcat -R /usr/sbin/tomcat6

# chown tomcat:tomcat -R /usr/share/tomcat6

# chown tomcat:tomcat -R /usr/share/java/tomcat6

Then change the logged-in Tomcat user back to Tomcat and restart, and there is still no problem
With regard to coredata storage, the operation could’t be completed. (cocoa error 133020.)


self.context=[[NSManagedObjectContext alloc] initWithConcurrencyType:NSPrivateQueueConcurrencyType];
    [self.context setPersistentStoreCoordinator:dm.PSC];
    [[NSNotificationCenter defaultCenter] addObserver:self selector:@selector(mocDidSaveNotification:) name:NSManagedObjectContextDidSaveNotification object:nil];
    [self.context setMergePolicy:NSMergeByPropertyObjectTrumpMergePolicy];//important!!!


Solution: PIP install MySQL Python has the following problems

Question 1:
Error: Microsoft Visual C++ 9.0 is required
Install mysql-Python with PIP on Windows with the following error message and see http://aka.ms/vcPython27 for a solution
Error: Microsoft Visual C++ 9.0 is required (Unable to find vcvarsall.bat). Get it from http://aka.ms/vcpython27
Open the http://aka.ms/vcpython27 will jump to http://www.microsoft.com/en-us/download/confirmation.aspx?id=44266
Download the installation package
Microsoft Visual C++ Compiler for Python 2.7
solves the problem after installation
Problem 2:
Resolve ‘C:\ Users\\Administrator\\AppData\\Local\\ Microsoft\\Visual C++ for Python\\9.0\\VC\\Bin\\ Cl.exe ‘failed with exit 2

Error: Cannot open include file: ‘config-win.h’: No such file or Directory

Problem description:
pip instal MySQL-python
The following error occurs:

Operating environment:
Python 2.7.14
Setuptools 16.0
PIP 7.0.1
Operating system: Windows7.0.10240 64-bit

Solutions:
1) Install the mysql Connector. Install the 32-bit or 64-bit version of the system at the following download address:
http://dev.mysql.com/downloads/connector/c/6.0.html#downloads
2) install Microsoft Visual C++ Compiler for Python 2.7. If the installation of mysql-python requires even some vc runtime, the download address is:
http://www.microsoft.com/en-us/download/confirmation.aspx?id=44266
(refer to the previous blog: http://blog.csdn.net/xxm524/article/details/47360229)
Once the dependency software is installed as described above, running PIP Install mysql-Python again should succeed;
However, I encountered this problem again. After a careful look at the error message, I found the following prompts:

** Note * : If ‘C:\ Users\\Administrator\\AppData\\ Common\\Microsoft\\Visual C++ for Python\\9.0\\VC\\Bin\\ cl.Exe ‘failed with exit 2 still appears, maybe the version you installed is different from your Python and PIP version, maybe Python is 32 bits, You have a 64-bit Connector installed
The mysql Connector installed was 64-bit and was installed in the Directory C:\Program Files \ mysql \ mysql Connector C 6.0.2. However, from the prompt I see that it wants to install to C:\Program Files (x86)\ mysql \ mysql Connector C 6.0.2, so a 32-bit mysql connector should be installed.


Reinstall the 32-bit mysql Connector, re-run PIP Install mysql-Python, and the installation was successful!
In summary, the main reason for this is that python and PIP are both 32-bits installed on the system.
Reference article:
http://www.cnblogs.com/yuguoguo/p/4089427.html
http://blog.csdn.net/xxm524/article/details/47360229

Certificate chaining error in sphere

When trying to connect to the LDAP server via SSL in Websphere, I encountered the following error:

used by:com.ibm.jsse2.util:KIX path building failed: java.security.cert.CertPathBuilderException: PKIXCertPathBuilderImpl could not build a valid CertPath.; internal cause is:

java.security.cert.CertPathValidatorException: The certificate issued by CN=VeriSign class 3 xxxxxxx [color=red]is not trusted[/color]; internal cause is:

java.security.cert.CertPathValidatorException: [color=red]Certificate chaining error[/color]

at com.ibm.jsse2.util.h.b(h.java:86)

at com.ibm.jsse2.util.h.b(h.java:2)

at com.ibm.jsse2.util.g.a(g.java:27)

check the data, it should be in the default trust store list did not add the address I connected to.

specific method

operates on the IBM Websphere console interface as follows:

[b]1# [/b] Security > SSL certificate and key management > Key stores and certificates > NodeDefaultTrustStore > Signer certificates > Retrieve from port

fill in the form entry: Host\Post\Alias

click: Retrieve signer information > Apply

[b]2# [/b] Security > SSL certificate and key management > Manage endpoint security configurations > Inbound(CellDefaultSSLSettings) > Key stores and certificates > CellDefaultTrustStore > Signer certificates > Retrieve from port

fill in the form entry: Host\Post\Alias

click: Retrieve signer information > Apply

——————————————-
Note: if the CA certificate has already been imported into the keystore. If there is no import, search for import methods.

“reference” [url] http://stackoverflow.com/questions/27701181/certificate-chaining-error-in-websphere [/ url]

c:\Git\bin\ssh.exe: *** Couldn’t reserve space for cygwin’s heap, Win32 error 487

Today, suddenly uploading code to the code cloud with AS failed and there was a problem
Tried to save uncommitted changes in stash before Update, but failed with an error. stash file://D:/AndroidStudioProjects/VRvr: 0 [main] us 0 init_cheap: VirtualAlloc pointer is null, Win32 error 487 AllocationBase 0x0, BaseAddress 0x68550000, RegionSize 0x1E0000, State 0x10000 C:\Program Files (x86)\Git\bin\sh.exe: *** Couldn’t reserve space for cygwin’s heap, Win32 error 0
Found click Git bash flash back
Looked up a lot of data on the net also made along while, my solution is as follows
1. Reinstalled git client first
Find it useless
2. Run the CMD window
perform

c:\msysgit\bin>rebase.exe -b 0x50000000 msys-1.0.dll

Found in

ReBaseImage (Msys-1.0.DLL) failed with last error = 6
A few more runs still won’t do
3. According to the Internet
It is still useless to copy out the Msys-1.0.DLL under C:\Program Files (x86)\Git\bin and then copy it in.
Solutions;
Finally, I executed step 2 as an administrator and it was successful
Run as an administrator:
Find the CMD. Exe file under C:\Windows\System32, right-click and select Run as administrator — ‘OK

How to Fix Ubuntu(Linux) mount error(22)

error log
execute an order

sudo mount -t cifs //ip/sharename /tmp/1 -o username=11,password=tmp

error log

mount error(22): Invalid argument
Refer to the mount.cifs(8) manual page (e.g. man mount.cifs)

solution
View root cause:

tail -f /var/log/kern.log

Note:

No dialect specified on mount. Default has changed to a more secure dialect, SMB2.1 or later (e.g. SMB3), from CIFS (SMB1). To use the less secure SMB1 dialect to access old servers which do not support SMB3 (or SMB2.1) specify vers=1.0 on mount.

The solution has been specified in the prompt, and the version of cifs shared is not specified, cifs is divided into smb1.0/2.0/3.0/3.1.
Solution

sudo mount -t cifs //ip/sharename /tmp/1 -o username=11,password=tmm,vers=1.0
