1. Parallel processing
parallel processing is a mode of operation in which tasks are run simultaneously in multiple processors on the same computer. The purpose of this mode of work is to reduce the total task processing time, but there is an additional overhead associated with communicating between processes, so for small tasks, the total task time increases rather than decreases.
in the Python language, the multiprocessing module runs a separate parallel process by using child processes instead of threads. It allows you to take advantage of multiple processors on your machine (Windows and Unix), that is, multiple processes can run
in memory completely independently
2. How many parallel processing can your device do at most
the maximum number of processes that can be run at one time is limited by the number of processors in the computer. You can use the cpu_count() function in the multiprocessing module to display
import multiprocessing as mp

print("Number of processers: ", mp.cpu_count())
like my computer only has four:

3. Execute synchronously and asynchronously </h3 b> In
parallel processing, there are two types of execution: synchronous and asynchronous
synchronous execution means that each process completes in the order in which it was started. This is done by locking the main program until the corresponding process has finished executing.
asynchronous execution , in other words, the execution of a process does not involve locking, and as a result, the order in which the process results are returned may be confusing, but in general, asynchronous execution completes faster.
There are two objects in the
multiprocessing module to implement parallel function execution: Pool class and Process class
</ strong> 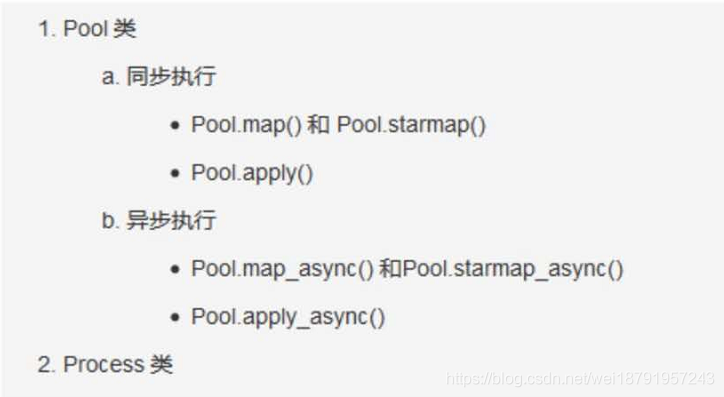
</ p>
4. Practical problem solving example: calculate the number of elements </h3 b> within a given numerical range in each row
given a two-dimensional matrix (or list and multidimensional list), calculate the number of elements
within a given numerical range in each row
import numpy as np
from time import time

# RandomState()是一个伪随机数生成器
np.random.RandomState(100)
# 0, 10 : 生成0到10的随机整数
# size=[200000, 5]  即生成200000行,一列的 ndarray(二维矩阵的形式,每个里面5个元素)
arr = np.random.randint(0, 10, size=[200000, 5])
data = arr.tolist()  # 将numpy.ndarray 转化为list
# 因为是随机的,所以每次的数字不确定
data = data[:5]
print("数据为:", data)

"""
运行结果:
数据为: [[5, 6, 7, 0, 9], [4, 0, 6, 7, 4], [7, 3, 8, 3, 9], [2, 1, 9, 3, 2], [0, 0, 9, 5, 2]]


"""
4.1 </ strong> don’t use parallel processing reference code </ strong> </ p>
The
function howmany_within_range() is repeated to check howmany diseases the number in the range has returned a count
"""不使用并行处理"""

def howmany_within_range(row, minimum, maximum):
    count = 0
    for n in row:
        if minimum <= n <= maximum:
            count += 1
    return count


result = []
for row in data:
    result.append(howmany_within_range(row, minimum=4, maximum=8))
print("给定数值范围中的元素个数:", result[:10])
"""
注意:以下只是参考输出,因为输入序列是随机的,每次输出结果并不固定
运行结果:
给定数值范围中的元素 [3, 2, 3, 4, 2, 3, 3, 2, 2, 2]
"""
4.2 parallelize the function
The usual way to parallelize code is to take a specific function that can be run multiple times, put it on a different processor, and run it. To do this, you need to use the Pool class to initialize the number of n processors, and then pass the function you want to run and run to the parallel method in the Pool class.
The apply(), map() and starmap() methods are provided in the Pool() to run the passed functions in parallel.
What’s the difference between
apply() and map()?
apply() and map() both take the function to be parallelized as the main parameter, but the difference is that apply() takes the args parameter, which passes each parameter to the function to be parallelized, while map takes only one iterator as the parameter.
Therefore, it is better to use map() for simple, iterative operations for parallel processing, and for faster completion of work
2 Pool. The apply () for parallel processing </ strong> </ p>
if __name__ == '__main__':

    # 1.初始化 multiprocessing.Pool()
    pool = mp.Pool(mp.cpu_count())

    # 2.使用apply(), 将函数howmany_within_range作为主参传进去
    results = [pool.apply(howmany_within_range, args=(row, 4, 8)) for row in data]

    # 3. 不要忘记关闭进程
    pool.close()

    print(results[:10])
note: </ strong> use if __name__ = = “__main__ ‘: put your code in the following to perform, or complains </ p>
The freeze_support “()” line can be omitted if The program
is not going to be frozen to produce an executable. </ p>
if we print outside of this program, we’ll see that it’s going to run in parallel, so we’ll print outside of this program </p b> multiple times
4.2.2 Parallelizing using the Pool. The map () </ strong> </ p>
pool.map () takes only one iterator argument. A simple change to howmany_within_range() is to howmany_within_range_rowonly(), which sets the minimum and maximum to fixed values, that is, . Accepting only the row data list iterator as input is not the best approach, but it clearly shows how it differs from apply()
import multiprocessing as mp

    def howmany_within_range_rowonly(row, minimum=4, maximum=8):
        count = 0
        for n in row:
            if minimum <= n <= maximum:
                count += 1
        return count

    pool = mp.Pool(mp.cpu_count())
    results = pool.map(howmany_within_range_rowonly,[row for row in data])
    pool.close()
    print(results[:10])
holdings using the Pool. The starmap to parallelize () </ strong> </ p>
, like pool.map (), pool.starmap () takes only one iterator argument, but in starmap() each element in the iterator is also an iterator. This internal iterator allows you to pass arguments to the parallelized function and unwrap them sequentially at execution time, as long as they are passed and unwrapped in the same order
actually, pool. starmap() is like a pool. map() version
that takes arguments
    import multiprocessing as mp

    pool = mp.Pool(mp.cpu_count())
    results = pool.starmap(howmany_within_range, [(row, 4, 8) for row in data])
    pool.close()
    print(results[:10])
5. Asynchronous parallel processing </h3 b>
and synchronous parallel processing peer asynchronous parallel processing functions apply_async(), map_async(), and starmap_async() allow parallel execution of processes asynchronously, that is, the next process can be started as soon as the previous one completes, regardless of the order in which it was started. Therefore, there is no guarantee that the result will be in the same order as the input
6. The use of the Pool. Apply_async to parallelize () </ strong> </ p>
keep updating


 there should be no my red line mark.