Category Archives: Linux

How to Use Annotations in Flutter & Dart

How to use annotations in Flutter & Dart

This is a concise article on Flutter and Dart annotations.

Single Line Comments (Format Comments)

Just put two slash symbols at the beginning of the line you want to comment out.

// This is a comment
print('abc');

Multi-line comments (block comments)

syntax:

/* ... */

This method is often used to comment out a piece of code like this:

/*
class HomeScreen extends StatelessWidget {
  @override
  Widget build(BuildContext context) {
    return Scaffold(
      appBar: AppBar(
        title: Text('Kindacode.com'),
      ),
      body: Center(),
    );
  }
}
*/

Documentation comments

Using DOC comments allows the dartdoc library to automatically generate documentation for your code based on the content of your comments.

example:

/// Deletes the file at [path].
/// Throws an [IOError] if the file could not be found. 

Use hotkeys in Visual Studio Code

If you’re using Visual Studio Code, you can use keyboard shortcuts to comment out a line or block of code. Just select the line you want to comment with your mouse and press the following key combination:

  • If you are using Windows, press Ctrl + K then Ctrl + C

  • If you’re on a Mac, press Command + K then Command + C

To uncomment a block of code, select it with the mouse, then use the following key combinations:

  • Ctrl + K then Ctrl + U if you are on Windows

  • If you’re on a Mac, Command + K then Command + U

You can also switch by pressing Ctrl + / (Windows), Command + / (Mac).

How to encode/decode JSON in Flutter

shorthand

This article will show you how to encode/decode JSON in Flutter. The steps you need to follow are:

1. Import the dart:convert library:

import 'dart:convert';

2. Use:

  • json.encode() or jsonEncode() for encoding.

  • json.decode() or jsonDecode() for decoding.

example

Example 1: JSON encoding

import 'dart:convert';void main() {
  final products = [
    {'id': 1, 'name': 'Product #1'},
    {'id': 2, 'name': 'Product #2'}
  ];print(json.encode(products));
}

output:

[{"id":1,"name":"Product #1"},{"id":2,"name":"Product #2"}]

Example 2: JSON decoding

import 'dart:convert';
import 'package:flutter/foundation.dart';void main() {
  const String responseData =
      '[{"id":1,"name":"Product #1"},{"id":2,"name":"Product #2"}]';
​
  final products = json.decode(responseData);if (kDebugMode) {
    // Print the type of "products"
    print(products.runtimeType);// Print the name of the second product in the list
    print(products[1]['name']);
  }
}

output:

List<dynamic>
Product #2

Hope this helps you.

hive: How to Process Data (Delete, View, Query, and etc)

Operation command

Data preprocessing: Eliminate any fields in the data with null values

INSERT OVERWRITE TABLE result01
    select * from salary
    where userid is not null and dept_id is not null and salarys is not null

Eliminate values ​​other than 0-100 in the identity field

INSERT OVERWRITE TABLE result
    SELECT * FROM hittable
    WHERE identity between 0 and 100 ;

View total

select count(*) from item;

Query the total number of rows for the first product (Item01) that offers beer or wine

select count(*) as num from item where item='Beer' or item01 = 'Wine';

Query the ranking of the best-selling products in the first-purchased products (item01)

select item01,count(item01) as num from item 
group by item01 
order by num desc;

Query the probability of milk appearing in each row to buy offerings

select b.num/a.num as rate from(
select count(*) num from item) a,
(select count(*) num from item
where item01=='Milk' 
or item02=='Milk' 
or item02=='Milk'
or item03=='Milk'
or item04=='Milk') b ;

Linux Traceroute Command Examples

In some cases, one wants to know the route the connection follows. Routes here refer to the IP addresses of all forwarding entities (eg, intermediate routers).

While there is no guarantee that all packets of a connection are routed the same, they are usually the same. This routing related information is very handy when debugging network related issues.

The traceroute utility prints out the complete route to a specific destination. In this article, we’ll discuss how traceroute works and see some practical examples.

How does Traceroute work?

Before we start with an example, let’s first understand the concept of how traceroute works.

The Traceroute utility uses the TTL field in the IP header for its operation. For those unfamiliar with the TTL field, this field describes how many hops a particular packet will take to travel across the network.

So this effectively outlines the life cycle of a packet on the network. This field is usually set to 32 or 64. Every time a packet is saved on an intermediate router, it decrements the TTL value by 1. When a router finds a TTL value of 1 in a received packet, the packet is not forwarded, but discarded.

After dropping the packet, the router sends a “timed out” ICMP error message back to the source of the packet. The ICMP packets sent back contain the IP address of the router.

So now it’s easy to understand that traceroute works by sending packets with a TTL value that starts at 1 and increments by 1 each time. Every time a router receives a packet, it checks the TTL field, and if the TTL field is 1, it drops the packet and sends an ICMP error packet containing its IP address, which is what traceroute requires. Therefore, traceroute gradually gets the IPs of all routers between the source and the destination.

You should also be aware of the IP header fields we discussed a while ago .

Traceroute example

1. How to run traceroute?

$ traceroute <server-name>

The server-name above is the target name or IP address. For example, traceroute is used to find the network path from my machine to google.com:

$ traceroute google.com
traceroute to google.com (74.125.236.132), 30 hops max, 60 byte packets
1  220.224.141.129 (220.224.141.129)  89.174 ms  89.094 ms  89.054 ms
2  115.255.239.65 (115.255.239.65)  109.037 ms  108.994 ms  108.963 ms
3  124.124.251.245 (124.124.251.245)  108.937 ms  121.322 ms  121.300 ms
4  * 115.255.239.45 (115.255.239.45)  113.754 ms  113.692 ms
5  72.14.212.118 (72.14.212.118)  123.585 ms  123.558 ms  123.527 ms
6  72.14.232.202 (72.14.232.202)  123.499 ms  123.475 ms  143.523 ms
7  216.239.48.179 (216.239.48.179)  143.503 ms  95.106 ms  95.026 ms
8  bom03s02-in-f4.1e100.net (74.125.236.132)  94.980 ms  104.989 ms  104.954 ms

Each line provides details of interaction with each router encountered. So we see that traceroute not only gives the IP address of the intermediate router, but also the three round-trip times for that particular router, because the traceroute command fires three packets for each router.

“*” field in output

Sometimes “*” may be encountered instead of a value in the output. This means that the required fields cannot be obtained. The reason could be anything from a failed reverse DNS lookup, to the packet not reaching the destination router, to the packet being lost on the way back. So we see that there could be many reasons, but for all these types of cases, the traceroute utility provides a * in the output.

2. Disable IP address and hostname mapping

Traceroute provides an option to disable the mapping of IP addresses to hostnames (traceroute attempts). The option to do this is ‘-n’. The following example illustrates this:

$ traceroute google.com -n
traceroute to google.com (173.194.36.7), 30 hops max, 60 byte packets
1  220.224.141.129  109.352 ms  109.280 ms  109.248 ms
2  115.255.239.65  131.633 ms  131.598 ms  131.573 ms
3  124.124.251.245  131.554 ms  131.529 ms  131.502 ms
4  115.255.239.45  131.478 ms  131.464 ms  199.741 ms
5  72.14.212.118  199.674 ms  199.637 ms  199.603 ms
6  209.85.241.52  199.578 ms  199.549 ms  209.838 ms
7  209.85.241.187  199.488 ms  177.264 ms  177.196 ms
8  173.194.36.7  177.159 ms  187.463 ms  187.434 ms

So we see that the hostname is not shown in the output.

3. Configure the response waiting time

You can also configure how long the traceroute utility waits after issuing a probe. This can be done with the “-w” option it provides. The -w option requires a value that the utility will wait as the response time. In this example, the wait time is 0.1 seconds, and the traceroute utility cannot wait for any response, it prints all *.

$ traceroute google.com -w 0.1
traceroute to google.com (74.125.236.101), 30 hops max, 60 byte packets
1  * * *
2  * * *
3  * * *
..
26  * * *
27  * * *
28  * * *
29  * * *
30  * * *

So we see that traceroute tries 30 attempts (max hop attempts) and then gives up because it didn’t receive an ICMP packet in 0.1 seconds.

4. Configure the number of queries per hop

As mentioned earlier, the traceroute utility sends 3 packets per hop to provide 3 round-trip times. This default value of 3 is configurable with option “-q”. This option requires an integer, which is set to the new value of probes per hop.

$ traceroute google.com -q 5
traceroute to google.com (173.194.36.46), 30 hops max, 60 byte packets
1  220.224.141.129 (220.224.141.129)  91.579 ms  91.497 ms  91.458 ms  91.422 ms  91.385 ms
2  115.255.239.65 (115.255.239.65)  91.356 ms  91.325 ms  98.868 ms  98.848 ms  98.829 ms
3  124.124.251.245 (124.124.251.245)  94.581 ms  107.083 ms  107.044 ms  107.017 ms  106.981 ms
4  115.255.239.45 (115.255.239.45)  106.948 ms  106.918 ms  144.432 ms  144.412 ms  144.392 ms
5  72.14.212.118 (72.14.212.118)  115.565 ms  115.485 ms  115.446 ms  115.408 ms  115.381 ms
6  72.14.232.202 (72.14.232.202)  115.351 ms  87.232 ms  117.157 ms  117.123 ms  117.049 ms
7  209.85.241.189 (209.85.241.189)  126.998 ms  126.973 ms  126.950 ms  126.929 ms  126.912 ms
8  bom04s02-in-f14.1e100.net (173.194.36.46)  126.889 ms  95.526 ms  95.450 ms  95.418 ms  105.392 ms

So we see that after configuring the number of probes to 5, the output starts showing 5 round trip times per hop.

5. Configure the starting TTL value

The Traceroute utility is flexible enough to accept the TTL value at which the user wants to start the utility. By default, it has a value of 1, which means it starts at the first router in the path, but using the “-f” option (expect a new value for TTL) can set a new value for the TTL field. For example, I tried normal traceroute operation and then traceroute with different TTL values.

$ traceroute google.com
traceroute to google.com (74.125.236.132), 30 hops max, 60 byte packets
1  220.224.141.129 (220.224.141.129)  89.181 ms  101.540 ms  101.503 ms
2  115.255.239.65 (115.255.239.65)  101.468 ms  101.431 ms  101.324 ms
3  124.124.251.245 (124.124.251.245)  121.373 ms  121.350 ms  158.694 ms
4  115.255.239.45 (115.255.239.45)  101.223 ms  141.135 ms  123.932 ms
5  72.14.212.118 (72.14.212.118)  123.867 ms  123.832 ms  123.802 ms
6  72.14.232.202 (72.14.232.202)  123.773 ms  123.742 ms  587.812 ms
7  216.239.48.179 (216.239.48.179)  587.723 ms  587.681 ms  587.642 ms
8  bom03s02-in-f4.1e100.net (74.125.236.132)  577.548 ms  577.524 ms  587.512 ms

$ traceroute google.com -f 8
traceroute to google.com (74.125.236.129), 30 hops max, 60 byte packets
8  bom03s02-in-f1.1e100.net (74.125.236.129)  96.961 ms  96.886 ms  96.849 ms

So we see that after using the -f option with a value of 8, only the last (8th) line of the previous output is displayed.

Docker -v Directory Mount (How to Use)

I. Introduction

DockerWhen the container starts, if you want to mount a directory of the host, you can -vspecify it with parameters.

For example, to start a centoscontainer, mount the /test directory of the host to the /soft directory of the container, which can be specified in the following ways:

docker run -it -v /test:/soft centos /bin/bash

In this way, after the container is started, the /soft directory will be automatically created in the container. In this way, we can make it clear that in the -v parameter, the directory before the colon “:” is the host directory, and the following directory is the directory in the container.

It seems simple, but it’s not. Let’s verify it:

2. The container directory cannot be a relative path

[root@localhost ~]# docker run -it -v /test:soft centos /bin/bash
invalid value "/test:soft" for flag -v: soft is not an absolute path
See 'docker run --help'.

An error is reported directly, indicating that soft is not an absolute path. The so-called absolute path must start with the following slash “/”.

3. If the host directory does not exist, it will be automatically generated

If the /test directory exists on the host, delete it first

[root@localhost ~]# rm -rf /test
[root@localhost ~]# ls /
bin  boot  dev  etc  home  lib  lib64  media  mnt  opt  proc  root  run  sbin  srv  sys  tmp  usr  var

start the container

[root@localhost ~]# docker run -it -v /test:/soft centos /bin/bash
[root@a487a3ca7997 /]# ls
bin  dev  etc  home  lib  lib64  lost+found  media  mnt  opt  proc  root  run  sbin  soft  srv  sys  tmp  usr  var

Check the host and find that a new /test directory has been added

[root@localhost ~]# ls /
bin  boot  dev  etc  home  lib  lib64  media  mnt  opt  proc  root  run  sbin  srv  sys  test  tmp  usr  var

4. What if the host’s directory is a relative path?

This time, let’s try changing the directory name test1

docker run -it -v test1:/soft centos /bin/bash

Then go to the host to see if a new /test1 directory has been added. The result is not. Is it because I used a relative path, so the generated test1 directory is in the current directory, and it turns out that there is still no. Where is the /soft directory in the container mounted? We can get the answer to this question by looking at the “Mounts” part of the container with the docker inspect command.

"Mounts": [
    {
        "Name": "test1",
        "Source": "/var/lib/docker/volumes/test1/_data",
        "Destination": "/soft",
        "Driver": "local",
        "Mode": "z",
        "RW": true
    }
],

It can be seen that the /soft directory in the container is mounted on the /var/lib/docker/volumes/test1/_data directory on the host

It turns out that the so-called relative path refers to /var/lib/docker/volumes/, which has nothing to do with the current directory of the host.

5. If only -v specifies a directory, how does this correspond?

start a container

[root@localhost ~]# docker run -it -v /test2 centos /bin/bash
[root@ea24067bc902 /]# ls
bin  dev  etc  home  lib  lib64  lost+found  media  mnt  opt  proc  root  run  sbin  srv  sys  test2  tmp  usr  var

Also use the docker inspect command to view the mount directory of the host

"Mounts": [
     {
         "Name": "96256232eb74edb139d652746f0fe426e57fbacdf73376963e3acdb411b3d73a",
         "Source": "/var/lib/docker/volumes/96256232eb74edb139d652746f0fe426e57fbacdf73376963e3acdb411b3d73a/_data",
         "Destination": "/test2",
         "Driver": "local",
         "Mode": "",
         "RW": true
     }
 ],

It can be seen that it is similar to the result in 3, except that it is not a directory name of a relative path, but a randomly generated directory name.

6. If the owner and group of a directory are modified in the container, will the corresponding mount point be modified?

First open a container and view the properties of the /soft directory in the container

[root@localhost ~]# docker run -it -v /test:/soft centos /bin/bash
[root@b5ed8216401f /]# ll -d /soft/
drwxr-xr-x 2 root root 6 Sep 24 03:48 /soft/

View the properties of the /test directory in the host

[root@localhost ~]# ll -d /test/
drwxr-xr-x 2 root root 6 Sep 24 11:48 /test/

Create a new user in the container, modify the owner and group of /soft

[root@b5ed8216401f /]# useradd victor
[root@b5ed8216401f /]# chown -R victor.victor /soft/
[root@b5ed8216401f /]# ll -d /soft/
drwxr-xr-x 2 victor victor 6 Sep 24 03:48 /soft/

Let’s see if the owner and group of the /test directory in the host will change?

[root@localhost ~]# ll -d /test/
drwxr-xr-x 2 mycat mycat 6 Sep 24 11:48 /test/

Turned into mycat. . .

It turns out that this is related to UID. UID, that is, “user identification number”, is an integer, which is used internally by the system to identify users. In general, it corresponds to the user name one-to-one.

First, check the UID corresponding to the victor in the container.

[root@b5ed8216401f /]# cat /etc/passwd | grep victor
victor:x:1000:1000::/home/victor:/bin/bash

The UID of victor is 1000, so who is the user corresponding to 1000 in the host?

[root@localhost ~]# cat /etc/passwd |grep 1000
mycat:x:1000:1000::/home/mycat:/bin/bash

It can be seen that the user corresponding to UID 1000 in the host is mycat.

7. If the container is destroyed, will the newly created mount directory on the host disappear?

Here, two situations are mainly verified: 1. The host directory is specified, ie -v /test:/soft. 2. No host directory is specified, ie -v /soft

The first case:

[root@localhost ~]# rm -rf /test    --First delete the /test directory on the host
[root@localhost ~]# ls /    --As you can see, there is no /test directory on the host
bin  boot  dev  etc  home  lib  lib64  media  mnt  opt  proc  root  run  sbin  srv  sys  tmp  usr  var
[root@localhost ~]# docker run -it --name=centos_test -v /test:/soft centos /bin/bash  --To start the container, I specified the name of the container with the --name parameter for ease of removal
[root@82ad7f3a779a /]# exit
exit
[root@localhost ~]# docker rm centos_test   --delete container
centos_test
[root@localhost ~]# ls /   --Found that the / test directory still exists
bin  boot  dev  etc  home  lib  lib64  media  mnt  opt  proc  root  run  sbin  srv  sys  test  tmp  usr  var

It can be seen that even if the container is destroyed, the newly created mount directory will not disappear. It can be further verified that if the owner and group of the host directory are changed, after the container is destroyed, the owner and group of the host directory will not be restored to the state before mounting.

In the second case, through the above verification, we know that if the host’s directory is not specified, the container will randomly configure a directory in /var/lib/docker/volumes/, then we will see if the container destruction in this case will Causes the deletion of the corresponding directory

Start the container first

[root@localhost ~]# docker run -it --name=centos_test -v /soft centos /bin/bash
[root@6b75579ec934 /]# exit
exit

docker inspectView the mount directory generated by the container on the host through the command

"Mounts": [
    {
        "Name": "b53164cb1c9f1917788638692fb22ad11994cf1fbbc2461b6c390cd3e10ea301",
        "Source": "/var/lib/docker/volumes/b53164cb1c9f1917788638692fb22ad11994cf1fbbc2461b6c390cd3e10ea301/_data",
        "Destination": "/soft",
        "Driver": "local",
        "Mode": "",
        "RW": true
    }
],

corresponds to the /var/lib/docker/volumes/b53164cb1c9f1917788638692fb22ad11994cf1fbbc2461b6c390cd3e10ea301/_datadirectory

Destroy the container and see if the directory exists

[root@localhost ~]# docker rm centos_test
centos_test
[root@localhost ~]# ll /var/lib/docker/volumes/b53164cb1c9f1917788638692fb22ad11994cf1fbbc2461b6c390cd3e10ea301
total 0
drwxr-xr-x 2 root root 6 Sep 24 14:25 _data

It is found that the directory still exists, even if the docker service is restarted, the directory still exists

[root@localhost ~]# systemctl restart docker
[root@localhost ~]# ll /var/lib/docker/volumes/b53164cb1c9f1917788638692fb22ad11994cf1fbbc2461b6c390cd3e10ea301
total 0
drwxr-xr-x 2 root root 6 Sep 24 14:25 _data

8. After mounting the existing directory on the host, operate it in the container and report “Permission denied”.

It can be solved in two ways:

  1. Close selinux.Temporarily closed:setenforce 0Permanently close: Modify the /etc/sysconfig/selinuxfile, set SELINUXthe value of disabled.
  2. Start the container as privilegedSpecify --privilegedparameterslike:docker run -it --privileged=true -v /test:/soft centos /bin/bash
How to Enable X11-forwarding with MobaXterm

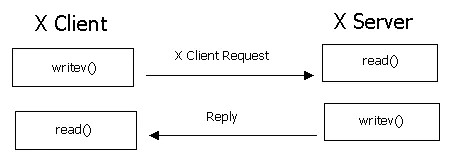
Linux system also has a graphical interface. Its way is different from Windows, called X Window, using the X11 protocol. The X in X11 refers to the X protocol; the 11 refers to the 11th version using the X protocol.
image.png
The schematic is above. So when we use the client to log in to a server, when we display the image interface, which is the X client and which is the X server?
The answer is that the client is the X server. For example, we use MobaXterm to log in to the server. MobaXterm is the X Server, and the Linux server is the X Client.
image.png
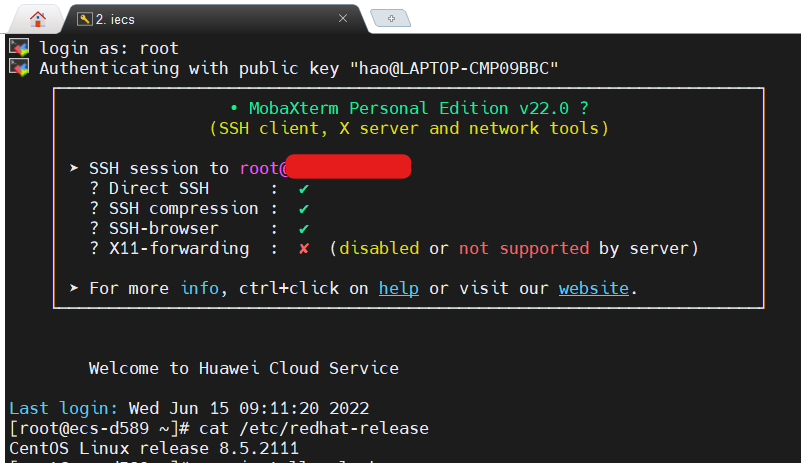
When I log in to my ECS, this graphical interface is unavailable at first: X11-forwarding : ✘ (disabled or not supported by server).
That is to say, when I run a program to display a graphical interface on the server, the result will fail, like the following:

[root@ecs-d589 ~]# xclock
Error: Can't open display:

So what to do? In fact, it can be operated in two places, one is to install the X authentication package, and the other is to open ssh forwarding.
The command to install the X authentication package is: yum install xorg-x11-xauth
its description is as follows:
Summary : X.Org X11 X authority utilities
Description : xauth is used to edit and display the authorization information used in connecting to an X server.
The way to open ssh forwarding is to edit /etc/ssh/sshd_config:

#AllowAgentForwarding yes
AllowTcpForwarding yes   #enable
#GatewayPorts no
X11Forwarding yes      #default is enable
#X11DisplayOffset 10
#X11UseLocalhost yes
#PermitTTY yes

Then restart the sshd service:
[root@ecs-d589 ~]# service sshd restart
Redirecting to /bin/systemctl restart sshd.service

And log out and log back in.
image.png
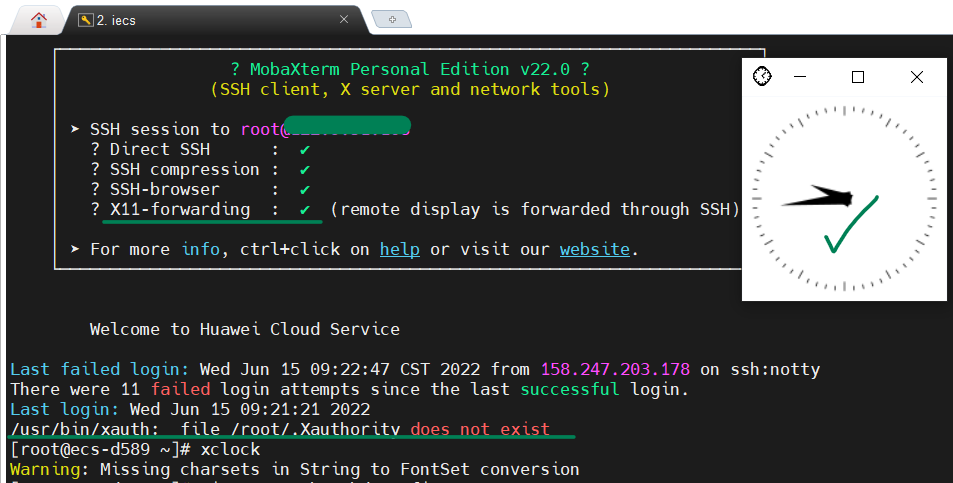
It can be seen that the first prompt X11-Forwarding is that it has been opened normally, and then we run a simple program xclock on the server, and the clock graphical interface of the program can be correctly displayed on the screen.
In addition, there is an additional error message after logging in as follows, we can ignore it for the time being.
/usr/bin/xauth: file /root/.Xauthority does not exist

How to Create Threads in Linux

In this article, we’ll focus on how to create and identify threads. We’ll also provide an example of a working C program that explains how to do basic thread programming.

thread identification

Just as processes are identified by process ID, threads are identified by thread ID. But interestingly, the similarities between the two end there.

  • Process IDs are unique across the system, while thread IDs are unique only within the context of a single process.
  • Process IDs are integer values, but thread IDs are not necessarily integer values. it is most likely a struct
  • Process IDs can be easily printed, while thread IDs are not.

The above points give an idea about the difference between process ID and thread ID.

The thread ID is represented by the type “pthread_t”. As we’ve already discussed, in most cases this type is a struct, so there must be a function that can compare two thread IDs.

#include <pthread.h>
int pthread_equal(pthread_t tid1,pthread_t tid2);

As you can see, the above function takes two thread IDs and returns a non-zero value if the two thread IDs are equal, and zero otherwise.

Another situation may arise when a thread wants to know its own thread ID. For this case, the following function provides the required service.

#include <pthread.h>
pthread_t pthread_self(void);

So we see that the function ‘pthread_self()’ is used by a thread to print its own thread ID.

Now, one would ask the situation where the above two functions are required. Suppose there is a case where a linked list contains data from different threads. Each node in the list contains a thread ID and corresponding data. Now whenever a thread tries to get its data from the linked list, it first gets its own ID by calling ‘pthread_self()’, then it calls ‘pthread_equal()’ on each node to see if the node contains its data.

An example of the general case discussed above is where the main thread gets jobs to process and then pushes them into a linked list. Now the individual worker threads parse the linked list and extract the jobs assigned to them.

thread creation

Normally, when a program starts and becomes a process, it starts with the default thread. So we can say that every process has at least one thread of control. A process can create additional threads using the following functions:

#include <pthread.h>
int pthread_create(pthread_t *restrict tidp, const pthread_attr_t *restrict attr, void *(*start_rtn)(void), void *restrict arg)

The above function takes four arguments, let’s discuss them first:

  • The first parameter is an address of type pthread_t. Once the function call is successful, the variable whose address is passed as the first parameter will hold the thread ID of the newly created thread.
  • The second parameter may contain some properties we want the new thread to contain. It could be priority etc.
  • The third parameter is the function pointer. The thing to remember is that each thread starts with a function and the function address is passed here as the third parameter so that the kernel knows which function to start the thread from.
  • Since the function (whose address is passed in the third parameter above) can also accept some parameters, we can pass these parameters as pointers to void type. Now, why choose the void type? This is because if a function accepts multiple parameters, then the pointer may be a pointer to a structure that may contain those parameters.

A practical thread example

Below is sample code where we try to use all three functions discussed above.

#include<stdio.h>
#include<string.h>
#include<pthread.h>
#include<stdlib.h>
#include<unistd.h>

pthread_t tid[2];

void* doSomeThing(void *arg)
{
    unsigned long i = 0;
    pthread_t id = pthread_self();

    if(pthread_equal(id,tid[0]))
    {
        printf("\n First thread processing\n");
    }
    else
    {
        printf("\n Second thread processing\n");
    }

    for(i=0; i<(0xFFFFFFFF);i++);

    return NULL;
}

int main(void)
{
    int i = 0;
    int err;

    while(i < 2)
    {
        err = pthread_create(&(tid[i]), NULL, &doSomeThing, NULL);
        if (err != 0)
            printf("\ncan't create thread :[%s]", strerror(err));
        else
            printf("\n Thread created successfully\n");

        i++;
    }

    sleep(5);
    return 0;
}

So what this code does is:

  • It creates two threads using pthread_create() function
  • The start function of both threads remains the same.
  • Inside the function ‘doSomeThing()’, the thread uses the pthread_self() and pthread_equal() functions to identify whether the executing thread is the first thread or the second thread when it was created.
  • Also, run a for loop in the same function ‘doSomeThing()’ to simulate some time consuming work.

Now, when the above code runs, the output is as follows:

$ ./threads
Thread created successfully
First thread processing
Thread created successfully
Second thread processing

As the output shows, create the first thread and start processing, then create the second thread and start processing. One thing to note here is that the execution order of threads is not always fixed. It depends on the scheduling algorithm of the operating system.

Note: All explanations in this article are done on Posix threads. As can be understood from the type, the pthread_t type represents a POSIX thread. If an application wants to test whether POSIX threads are supported, the application can use the macro _POSIX_THREADS for compile-time testing. To compile code that contains calls to the posix API, use the compile option “-pthread”.

How to Solve Mujoco Install Error in Ubuntu (Pycharm Run Error)

When I install Mujoco on Ubuntu 18.04 LTS (Bionic Beaver):

There is no error in the terminal test, but the following error is reported when pycharm runs the test program:

Please add the following line to .bashrc
export LD_LIBRARY_PATH=$LD_LIBRARY_PATH:/home/shubhom/.mujoco/mjpro150/bin

However, my .bashrc file has the path already added;

Solution:

  1. This problem occurs when you run it on terminal.

You should check your ~/.bashrc
add

export LD_LIBRARY_PATH= /path/to/.mujoco/mjpro150/bin {LD_LIBRARY_PATH}}
export MUJOCO_KEY_PATH= /path/to/.mujoco${MUJOCO_KEY_PATH}

and “source ~/.bashrc”

  1. The problem occurs when you run it on PyCharm.

You should first check if it can run successfully on the terminal.
If it’s ok on the terminal then:

Click Run -> Edit Configuration -> Environment Variables

Add to

LD_LIBRARY_PATH /path/to/.mujoco/mjpro150/bin
MUJOCO_KEY_PATH /path/to/.mujoco


Attach the test code:

import mujoco_py
import os
mj_path, _ = mujoco_py.utils.discover_mujoco()
xml_path = os.path.join(mj_path, 'model', 'humanoid.xml')
model = mujoco_py.load_model_from_path(xml_path)
sim = mujoco_py.MjSim(model)
print(sim.data.qpos)
#[0.  0.  1.4 1.  0.  0.  0.  0.  0.  0.  0.  0.  0.  0.  0.  0.  0.  0.
# 0.  0.  0.  0.  0.  0.  0.  0.  0.  0. ]
sim.step()
print(sim.data.qpos)
#[-1.12164337e-05  7.29847036e-22  1.39975300e+00  9.99999999e-01
#  1.80085466e-21  4.45933954e-05 -2.70143345e-20  1.30126513e-19
# -4.63561234e-05 -1.88020744e-20 -2.24492958e-06  4.79357124e-05
# -6.38208396e-04 -1.61130312e-03 -1.37554006e-03  5.54173825e-05
# -2.24492958e-06  4.79357124e-05 -6.38208396e-04 -1.61130312e-03
# -1.37554006e-03 -5.54173825e-05 -5.73572648e-05  7.63833991e-05
# -2.12765194e-05  5.73572648e-05 -7.63833991e-05 -2.12765194e-05]


spack install failed with bootstrapping [How to Solve]

spack install failed with bootstrapping

An error occurs when spack is used for the first time,

[tools_adm@computing-host-001 ~]$ spack install python
==> Bootstrapping clingo from pre-built binaries
==> Bootstrapping clingo from sources
==> Error: cannot bootstrap the "clingo" Python module from spec "clingo-bootstrap@spack+python %gcc target=x86_64" due to the following failures:
    'spack-install' raised ConflictsInSpecError: Conflicts in concretized spec "clingo-bootstrap@spack%[email protected]~docs~ipo+python~static_libstdcpp build_type=Release arch=linux-centos7-x86_64/6hb2rkn"

    List of matching conflicts for spec:

    clingo-bootstrap@spack%[email protected]~docs~ipo+python~static_libstdcpp build_type=Release arch=linux-centos7-x86_64
        ^[email protected]%[email protected] arch=linux-centos7-x86_64
            ^[email protected]%[email protected] arch=linux-centos7-x86_64
                ^[email protected]%[email protected] libs=shared,static arch=linux-centos7-x86_64
            ^[email protected]%[email protected]+sigsegv patches=9dc5fbd0d5cb1037ab1e6d0ecc74a30df218d0a94bdd5a02759a97f62daca573,bfdffa7c2eb01021d5849b36972c069693654ad826c1a20b53534009a4ec7a89 arch=linux-centos7-x86_64
                ^[email protected]%[email protected] arch=linux-centos7-x86_64
            ^[email protected]%[email protected]+cpanm+shared+threads arch=linux-centos7-x86_64
                ^[email protected]%[email protected]+cxx~docs+stl patches=b231fcc4d5cff05e5c3a4814f6a5af0e9a966428dc2176540d2c05aff41de522 arch=linux-centos7-x86_64
                ^[email protected]%[email protected]~debug~pic+shared arch=linux-centos7-x86_64
                ^[email protected]%[email protected] arch=linux-centos7-x86_64
                    ^[email protected]%[email protected] arch=linux-centos7-x86_64
                        ^[email protected]%[email protected]~symlinks+termlib abi=none arch=linux-centos7-x86_64
                            ^[email protected]%[email protected] arch=linux-centos7-x86_64
                ^[email protected]%[email protected]+optimize+pic+shared arch=linux-centos7-x86_64
        ^[email protected]%[email protected]~doc+ncurses+openssl+ownlibs~qt build_type=Release arch=linux-centos7-x86_64
            ^[email protected]%[email protected]~docs certs=system arch=linux-centos7-x86_64
        ^[email protected]%[email protected]+bz2+ctypes+dbm~debug+libxml2+lzma~nis~optimizations+pic+pyexpat+pythoncmd+readline+shared+sqlite3+ssl~tix~tkinter~ucs4+uuid+zlib arch=linux-centos7-x86_64
        ^[email protected]%[email protected] arch=linux-centos7-x86_64

1. "%gcc@:5" conflicts with "clingo-bootstrap" [C++14 support is required to bootstrap clingo]

    Please run `spack -d spec zlib` for more verbose error messages

According to the error message, I need a compiler that supports C++14. I installed a new version of gcc/11.2.0 and added its bin directory to the PATH variable.

[tools_adm@computing-host-001 ~]$ setenv PATH /tools/oss/gcc/11.2.0/bin:$PATH
[tools_adm@computing-host-001 ~]$ spack -d spec zlib %[email protected]
==> [2022-05-24-10:03:13.206293] Imported spec from built-in commands
==> [2022-05-24-10:03:13.211112] Imported spec from built-in commands
Input spec
--------------------------------
zlib%[email protected]

Concretized
--------------------------------
==> [2022-05-24-10:03:13.222579] Reading config file /tools/oss/spack-0.17.2/etc/spack/defaults/config.yaml
==> [2022-05-24-10:03:13.298617] Reading config file /tools/oss/spack-0.17.2/etc/spack/defaults/bootstrap.yaml
==> [2022-05-24-10:03:13.333346] Reading config file /tools/oss/spack-0.17.2/etc/spack/defaults/config.yaml
==> [2022-05-24-10:03:13.387447] DATABASE LOCK TIMEOUT: 3s
==> [2022-05-24-10:03:13.387643] PACKAGE LOCK TIMEOUT: No timeout
==> [2022-05-24-10:03:13.388771] Reading config file /tools/oss/spack-0.17.2/etc/spack/defaults/bootstrap.yaml
==> [2022-05-24-10:03:13.412265] DATABASE LOCK TIMEOUT: 3s
==> [2022-05-24-10:03:13.412528] PACKAGE LOCK TIMEOUT: No timeout
==> [2022-05-24-10:03:13.412772] [BOOTSTRAP CONFIG SCOPE] name=_builtin
==> [2022-05-24-10:03:13.413841] [BOOTSTRAP CONFIG SCOPE] name=defaults, path=/tools/oss/spack-0.17.2/etc/spack/defaults
==> [2022-05-24-10:03:13.413961] [BOOTSTRAP CONFIG SCOPE] name=defaults/linux, path=/tools/oss/spack-0.17.2/etc/spack/defaults/linux
==> [2022-05-24-10:03:13.414080] [BOOTSTRAP CONFIG SCOPE] name=bootstrap, path=/home/tools_adm/.spack/bootstrap/config
==> [2022-05-24-10:03:13.414180] [BOOTSTRAP CONFIG SCOPE] name=bootstrap/linux, path=/home/tools_adm/.spack/bootstrap/config/linux
==> [2022-05-24-10:03:13.416454] Reading config file /home/tools_adm/.spack/bootstrap/config/linux/compilers.yaml
==> [2022-05-24-10:03:13.504704] [BOOTSTRAP ROOT SPEC] clingo-bootstrap@spack+python %gcc target=x86_64
==> [2022-05-24-10:03:13.504904] [BOOTSTRAP MODULE clingo] Try importing from Python
==> [2022-05-24-10:03:13.505664] Reading config file /tools/oss/spack-0.17.2/etc/spack/defaults/bootstrap.yaml
==> [2022-05-24-10:03:13.533487] Bootstrapping clingo from pre-built binaries
==> [2022-05-24-10:03:13.539614] Reading config file /tools/oss/spack-0.17.2/etc/spack/defaults/config.yaml
==> [2022-05-24-10:03:13.602270] DATABASE LOCK TIMEOUT: 3s
==> [2022-05-24-10:03:13.602520] PACKAGE LOCK TIMEOUT: No timeout
==> [2022-05-24-10:03:13.656899] Reading config file /tools/oss/spack-0.17.2/etc/spack/defaults/mirrors.yaml
==> [2022-05-24-10:03:14.404023] Cached index for https://mirror.spack.io/bootstrap/github-actions/v0.1 already up to date
==> [2022-05-24-10:03:14.477810] Imported buildcache from built-in commands
==> [2022-05-24-10:03:14.502955] Imported buildcache from built-in commands
==> [2022-05-24-10:05:40.274042] Reading config file /tools/oss/spack-0.17.2/etc/spack/defaults/config.yaml
==> [2022-05-24-10:05:40.351266] Reading config file /home/tools_adm/.spack/bootstrap/config/linux/config.yaml
==> [2022-05-24-10:05:40.627291] [BOOTSTRAP MODULE clingo] The installed spec "clingo-bootstrap@spack+python %gcc target=x86_64 ^[email protected] /vcipwnf57slgoo7busvvkzjkk7vydeb5" provides the "clingo" Python module
==> [2022-05-24-10:05:40.691909] Reading config file /tools/oss/spack-0.17.2/etc/spack/defaults/repos.yaml
==> [2022-05-24-10:05:40.876049] Reading config file /home/tools_adm/.spack/linux/compilers.yaml
==> [2022-05-24-10:05:40.914061] Reading config file /tools/oss/spack-0.17.2/etc/spack/defaults/config.yaml
==> [2022-05-24-10:05:40.969529] Reading config file /tools/oss/spack-0.17.2/etc/spack/defaults/packages.yaml
==> [2022-05-24-10:05:41.244816] build(zlib)
[email protected]%[email protected]+optimize+pic+shared arch=linux-centos7-sandybridge

Problem-solving.

Done.

[Solved] prometheus Startup Error: opening storage failed

Modify prometheus.yml file and failed to start:

1. Configuring prometheus + node_exporter monitoring, the solution to the failure to start after modifying the prometheus.yml file.
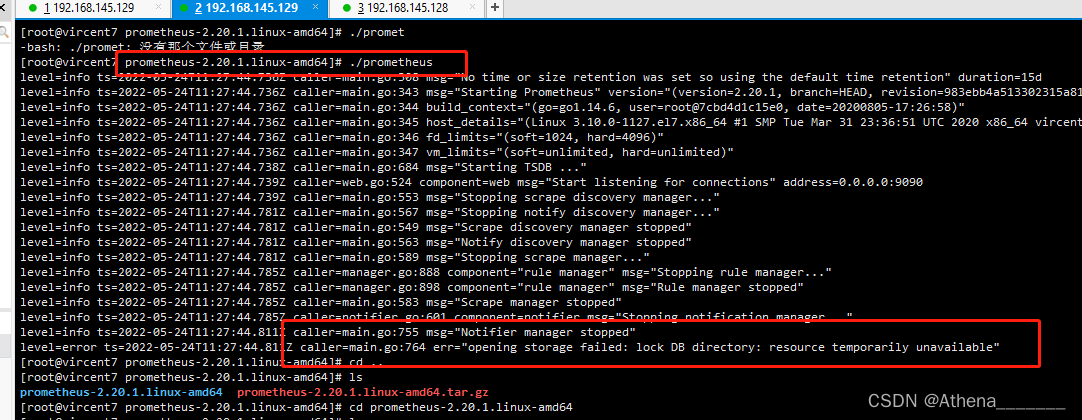
2. Error message 1: err=”opening storage failed: lock DB directory: resource temporarily unavailable”

Solution: Check whether the current directory has generated files plus data/lock, need to delete the lock file: rm -rf lock
Delete and restart again

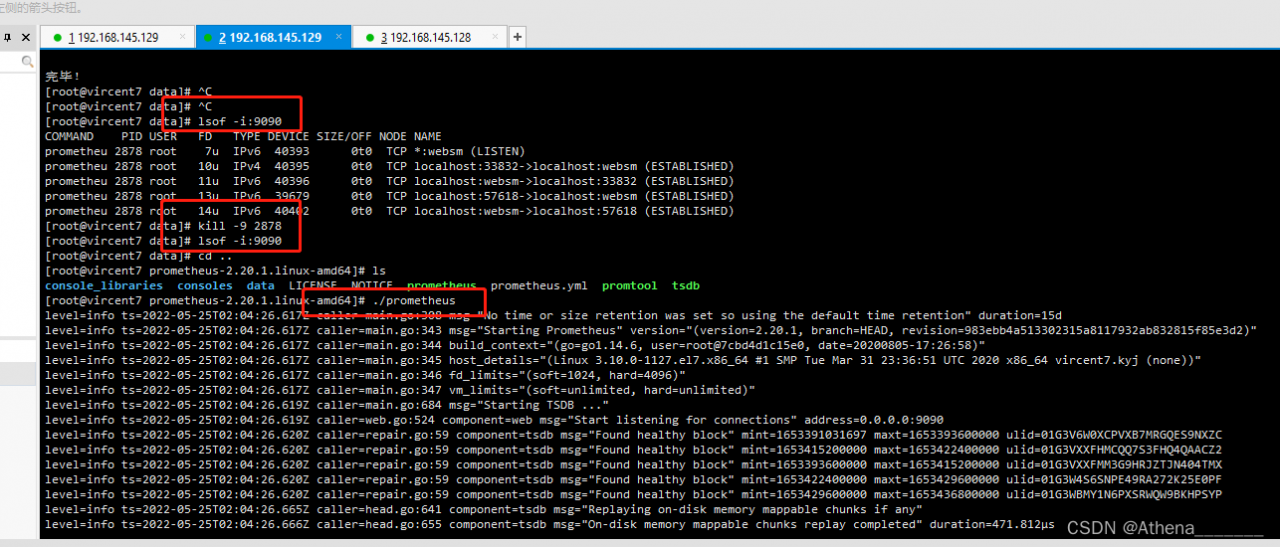
error message 2:err= “error starting web server: listen TCP 0.0.0:9090: bind: address ready in use”
installation command: yum install lsof -y
view command: lsof -i:9090
end command: kill -9 2878
restart command: ./prometheus
restart succeeded after operation


[Solved] Linux ECDSA key Error: Host key verification failed

Project scenario:

Under Linux Ubuntu system, use SCP command to transfer files from another server to this server.


Problem description

tips: describe the problems encountered in the project here:

@@@@@@@@@@@@@@@@@@@@@@@@@@@@@@@@@@@@@@@@@@@@@@@@@@@@@@@@@@@
@    WARNING: REMOTE HOST IDENTIFICATION HAS CHANGED!     @
@@@@@@@@@@@@@@@@@@@@@@@@@@@@@@@@@@@@@@@@@@@@@@@@@@@@@@@@@@@
IT IS POSSIBLE THAT SOMEONE IS DOING SOMETHING NASTY!
Someone could be eavesdropping on you right now (man-in-the-middle attack)!
It is also possible that a host key has just been changed.
The fingerprint for the ECDSA key sent by the remote host is
SHA256:'A string of characters'.
Please contact your system administrator.
Add correct host key in /home/tonnn/.ssh/known_hosts to get rid of this message.
Offending ECDSA key in /home/tonnn/.ssh/known_hosts:12
ECDSA host key for 'External Server IP' has changed and you have requested strict checking.
Host key verification failed.

Cause analysis:

Tip: fill in the problem analysis here:

I found out after Google that the ECDSA key of the cloud server was changed because I reinstalled my Aliyun server system, and the ECDSA key left in /home/tonnn/.ssh/known_hosts on the target server was still the original ECDSA key, resulting in failed Host key verification.


Solution:

Clear the ECDSA key corresponding to the IP address in the target server /home/tonnn/.ssh/known_hosts, and then add a new one.
Use the ssh-keygen -R ip-address command, and go to the official website https://www.ssh.com/academy/ssh/keygen#command-and-option-summary to check out how-to-use, which means that the known_hosts file belongs to a host all the keys of the hostname are cleared.

After clearing, reconnect the corresponding host, and the server will record the new ecdsa key.

[Solved] failed to start remount root and kernel file system

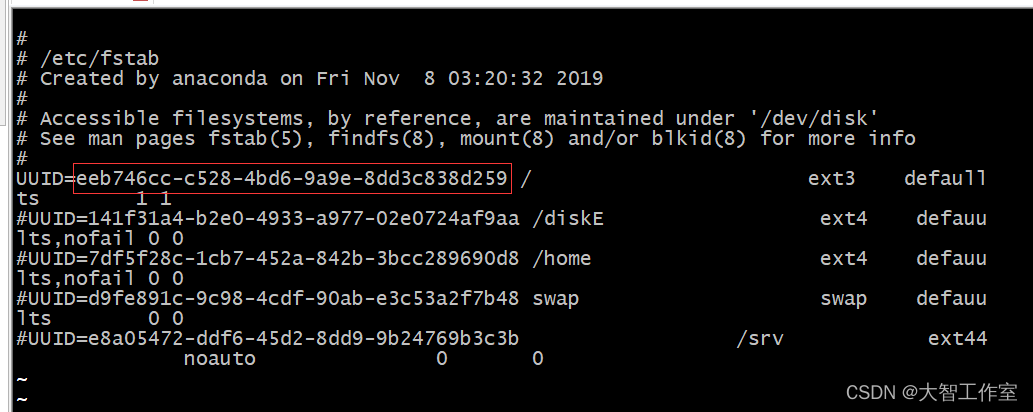
1. The problem that appears, this problem comes from the file system is backed up out. The problem does not occur if you install it yourself using the CD

failed to start remount root and kernel file system

What it means is: Failed to mount root and kernel. 2.

2. the cause of the problem:

The uuid in /etc/fatab is different from the actual uuid.

It is better to comment the unused disk mount

When system boots, it will mount the file system in the order specified in fatab.

3. how to solve:

(1) Go to live cd (the disk where you install Ubuntu) or other linux system

(2) Open terminal, type sudo blkid, check the uuid of all partitions

(3) Go to the /etc folder under the root partition where you normally enter the system, open a terminal in the folder, and type sudo gedit fstab (or sudo vim fstab ) to modify fstab

Change it to your own and comment out the rest

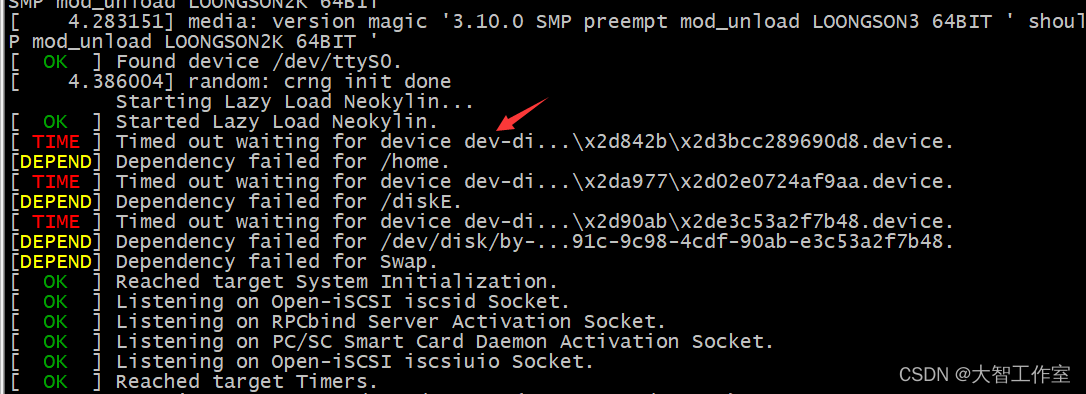
In addition to the above problems, it also causes the system to wait overtime:

The problem of waiting timeout can be solved by adding the above unused mount notes.

The timeout here is still caused by the file mount in the fstab.

[Solved] YarnClientSchedulerBackend: Yarn application has already exited with state FAILED

In starting spark shell –master yarn, we will find an error when spark shell is started

YarnClientSchedulerBackend: Yarn application has already exited with state FAILED

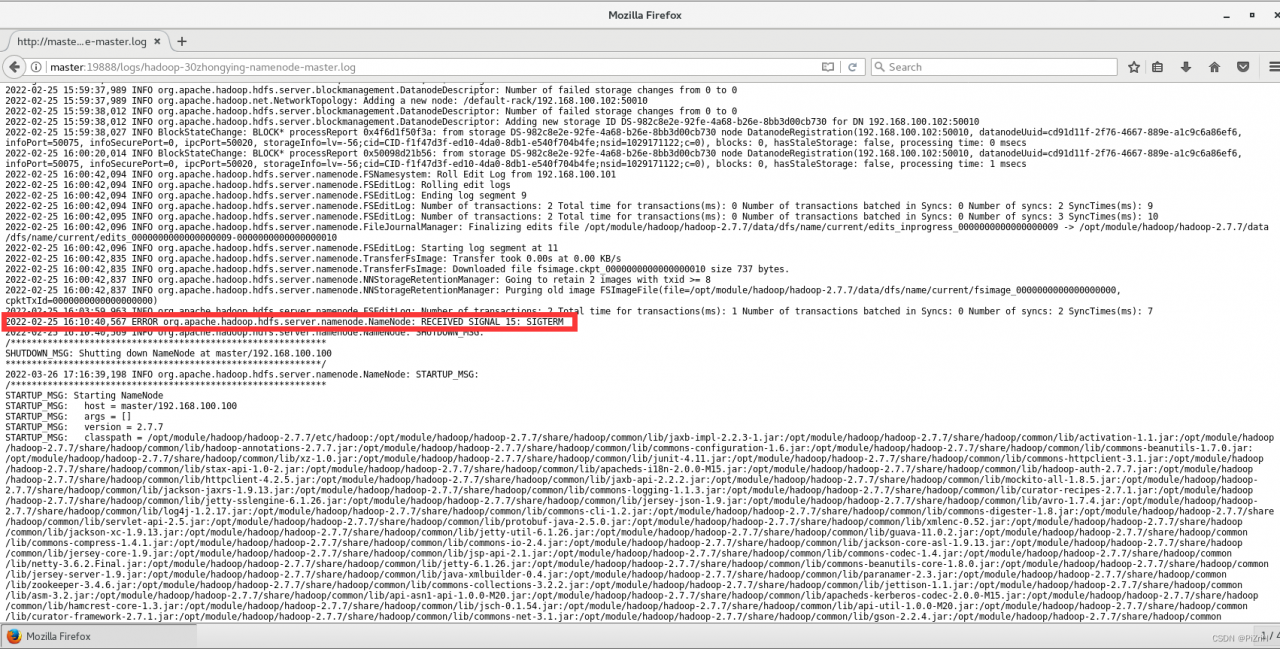
At this point we visit the yarn process to see the history of the start-up time error exception: ERRORorg.apache.hadoop.hdfs.server.namenode.NameNode: RECEIVED SIGNAL 15: SIGTERM (as shown), the general access to the port number is http://Localhost_name+8088 (default)

Solution:

This problem often occurs when the jdk version is 1.8. You can directly modify the configuration of yarn-site.xml in hadoop and distribute it to each cluster, and restart the cluster.
 <property>
    <name>yarn.nodemanager.vmem-pmem-ratio</name>
    <value>10</value>
</property>
<property>
    <name>yarn.nodemanager.vmem-check-enabled</name>
    <value>false</value>
</property>