Error report of xv6 operating system make Makefile:192 : * * solutions to receive comments before first target. Stop
Hello everyone, my name is Qi Guanjie (Q í Gu ā NJI é). I record the learning process in CSDN. Time flies and the future is promising. Come on ~ the blog address is Qi Guanjie’s blog, and the nickname of station B is
Qi Guanjie, and the address is Qi Guanjie’s station BThis article is original for Qi Guanjie, please support the original, part of the platform has been stealing articles from bloggers!!!
there are many small partners who often encounter errors when doing experiments with the xv6 operating system Makefile:192 : *** recipe commences before first target. Stop. , and then I don’t know where the error is. Here is a possible error reporting situation and the solution (at present, only this method is used to review the error reporting. If there are other errors, you can send a makefile file to have a look).
Here, I will review the contents of makefile for error reporting
OBJS = \
bio.o\
console.o\
exec.o\
file.o\
fs.o\
ide.o\
ioapic.o\
kalloc.o\
kbd.o\
lapic.o\
log.o\
main.o\
mp.o\
picirq.o\
pipe.o\
proc.o\
sleeplock.o\
spinlock.o\
string.o\
swtch.o\
syscall.o\
sysfile.o\
sysproc.o\
trapasm.o\
trap.o\
uart.o\
vectors.o\
vm.o\
# Cross-compiling (e.g., on Mac OS X)
# TOOLPREFIX = i386-jos-elf
# Using native tools (e.g., on X86 Linux)
#TOOLPREFIX =
# Try to infer the correct TOOLPREFIX if not set
ifndef TOOLPREFIX
TOOLPREFIX := $(shell if i386-jos-elf-objdump -i 2>&1 | grep '^elf32-i386$$' >/dev/null 2>&1; \
then echo 'i386-jos-elf-'; \
elif objdump -i 2>&1 | grep 'elf32-i386' >/dev/null 2>&1; \
then echo ''; \
else echo "***" 1>&2; \
echo "*** Error: Couldn't find an i386-*-elf version of GCC/binutils." 1>&2; \
echo "*** Is the directory with i386-jos-elf-gcc in your PATH?" 1>&2; \
echo "*** If your i386-*-elf toolchain is installed with a command" 1>&2; \
echo "*** prefix other than 'i386-jos-elf-', set your TOOLPREFIX" 1>&2; \
echo "*** environment variable to that prefix and run 'make' again." 1>&2; \
echo "*** To turn off this error, run 'gmake TOOLPREFIX= ...'." 1>&2; \
echo "***" 1>&2; exit 1; fi)
endif
# If the makefile can't find QEMU, specify its path here
# QEMU = qemu-system-i386
# Try to infer the correct QEMU
ifndef QEMU
QEMU = $(shell if which qemu > /dev/null; \
then echo qemu; exit; \
elif which qemu-system-i386 > /dev/null; \
then echo qemu-system-i386; exit; \
elif which qemu-system-x86_64 > /dev/null; \
then echo qemu-system-x86_64; exit; \
else \
qemu=/Applications/Q.app/Contents/MacOS/i386-softmmu.app/Contents/MacOS/i386-softmmu; \
if test -x $$qemu; then echo $$qemu; exit; fi; fi; \
echo "***" 1>&2; \
echo "*** Error: Couldn't find a working QEMU executable." 1>&2; \
echo "*** Is the directory containing the qemu binary in your PATH" 1>&2; \
echo "*** or have you tried setting the QEMU variable in Makefile?" 1>&2; \
echo "***" 1>&2; exit 1)
endif
CC = $(TOOLPREFIX)gcc
AS = $(TOOLPREFIX)gas
LD = $(TOOLPREFIX)ld
OBJCOPY = $(TOOLPREFIX)objcopy
OBJDUMP = $(TOOLPREFIX)objdump
CFLAGS = -fno-pic -static -fno-builtin -fno-strict-aliasing -O2 -Wall -MD -ggdb -m32 -Werror -fno-omit-frame-pointer
CFLAGS += $(shell $(CC) -fno-stack-protector -E -x c /dev/null >/dev/null 2>&1 && echo -fno-stack-protector)
ASFLAGS = -m32 -gdwarf-2 -Wa,-divide
# FreeBSD ld wants ``elf_i386_fbsd''
LDFLAGS += -m $(shell $(LD) -V | grep elf_i386 2>/dev/null | head -n 1)
# Disable PIE when possible (for Ubuntu 16.10 toolchain)
ifneq ($(shell $(CC) -dumpspecs 2>/dev/null | grep -e '[^f]no-pie'),)
CFLAGS += -fno-pie -no-pie
endif
ifneq ($(shell $(CC) -dumpspecs 2>/dev/null | grep -e '[^f]nopie'),)
CFLAGS += -fno-pie -nopie
endif
xv6.img: bootblock kernel
dd if=/dev/zero of=xv6.img count=10000
dd if=bootblock of=xv6.img conv=notrunc
dd if=kernel of=xv6.img seek=1 conv=notrunc
xv6memfs.img: bootblock kernelmemfs
dd if=/dev/zero of=xv6memfs.img count=10000
dd if=bootblock of=xv6memfs.img conv=notrunc
dd if=kernelmemfs of=xv6memfs.img seek=1 conv=notrunc
bootblock: bootasm.S bootmain.c
$(CC) $(CFLAGS) -fno-pic -O -nostdinc -I. -c bootmain.c
$(CC) $(CFLAGS) -fno-pic -nostdinc -I. -c bootasm.S
$(LD) $(LDFLAGS) -N -e start -Ttext 0x7C00 -o bootblock.o bootasm.o bootmain.o
$(OBJDUMP) -S bootblock.o > bootblock.asm
$(OBJCOPY) -S -O binary -j .text bootblock.o bootblock
./sign.pl bootblock
entryother: entryother.S
$(CC) $(CFLAGS) -fno-pic -nostdinc -I. -c entryother.S
$(LD) $(LDFLAGS) -N -e start -Ttext 0x7000 -o bootblockother.o entryother.o
$(OBJCOPY) -S -O binary -j .text bootblockother.o entryother
$(OBJDUMP) -S bootblockother.o > entryother.asm
initcode: initcode.S
$(CC) $(CFLAGS) -nostdinc -I. -c initcode.S
$(LD) $(LDFLAGS) -N -e start -Ttext 0 -o initcode.out initcode.o
$(OBJCOPY) -S -O binary initcode.out initcode
$(OBJDUMP) -S initcode.o > initcode.asm
kernel: $(OBJS) entry.o entryother initcode kernel.ld
$(LD) $(LDFLAGS) -T kernel.ld -o kernel entry.o $(OBJS) -b binary initcode entryother
$(OBJDUMP) -S kernel > kernel.asm
$(OBJDUMP) -t kernel | sed '1,/SYMBOL TABLE/d; s/ .* / /; /^$$/d' > kernel.sym
# kernelmemfs is a copy of kernel that maintains the
# disk image in memory instead of writing to a disk.
# This is not so useful for testing persistent storage or
# exploring disk buffering implementations, but it is
# great for testing the kernel on real hardware without
# needing a scratch disk.
MEMFSOBJS = $(filter-out ide.o,$(OBJS)) memide.o
kernelmemfs: $(MEMFSOBJS) entry.o entryother initcode kernel.ld fs.img
$(LD) $(LDFLAGS) -T kernel.ld -o kernelmemfs entry.o $(MEMFSOBJS) -b binary initcode entryother fs.img
$(OBJDUMP) -S kernelmemfs > kernelmemfs.asm
$(OBJDUMP) -t kernelmemfs | sed '1,/SYMBOL TABLE/d; s/ .* / /; /^$$/d' > kernelmemfs.sym
tags: $(OBJS) entryother.S _init
etags *.S *.c
vectors.S: vectors.pl
./vectors.pl > vectors.S
ULIB = ulib.o usys.o printf.o umalloc.o
_%: %.o $(ULIB)
$(LD) $(LDFLAGS) -N -e main -Ttext 0 -o $@ $^
$(OBJDUMP) -S $@ > $*.asm
$(OBJDUMP) -t $@ | sed '1,/SYMBOL TABLE/d; s/ .* / /; /^$$/d' > $*.sym
_forktest: forktest.o $(ULIB)
# forktest has less library code linked in - needs to be small
# in order to be able to max out the proc table.
$(LD) $(LDFLAGS) -N -e main -Ttext 0 -o _forktest forktest.o ulib.o usys.o
$(OBJDUMP) -S _forktest > forktest.asm
mkfs: mkfs.c fs.h
gcc -Werror -Wall -o mkfs mkfs.c
# Prevent deletion of intermediate files, e.g. cat.o, after first build, so
# that disk image changes after first build are persistent until clean. More
# details:
# http://www.gnu.org/software/make/manual/html_node/Chained-Rules.html
.PRECIOUS: %.o
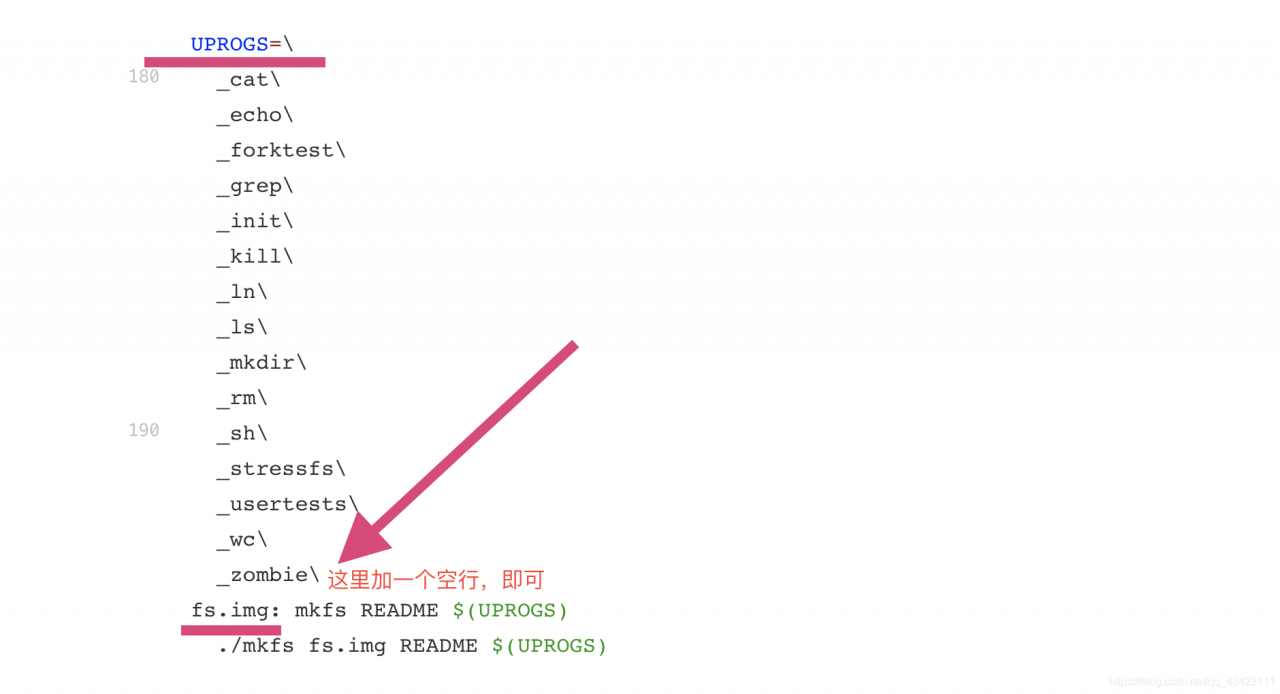
UPROGS=\
_cat\
_echo\
_forktest\
_grep\
_init\
_kill\
_ln\
_ls\
_mkdir\
_rm\
_sh\
_stressfs\
_usertests\
_wc\
_zombie\
fs.img: mkfs README $(UPROGS)
./mkfs fs.img README $(UPROGS)
-include *.d
clean:
rm -f *.tex *.dvi *.idx *.aux *.log *.ind *.ilg \
*.o *.d *.asm *.sym vectors.S bootblock entryother \
initcode initcode.out kernel xv6.img fs.img kernelmemfs \
xv6memfs.img mkfs .gdbinit \
$(UPROGS)
# make a printout
FILES = $(shell grep -v '^\#' runoff.list)
PRINT = runoff.list runoff.spec README toc.hdr toc.ftr $(FILES)
xv6.pdf: $(PRINT)
./runoff
ls -l xv6.pdf
print: xv6.pdf
# run in emulators
bochs : fs.img xv6.img
if [ ! -e .bochsrc ]; then ln -s dot-bochsrc .bochsrc; fi
bochs -q
# try to generate a unique GDB port
GDBPORT = $(shell expr `id -u` % 5000 + 25000)
# QEMU's gdb stub command line changed in 0.11
QEMUGDB = $(shell if $(QEMU) -help | grep -q '^-gdb'; \
then echo "-gdb tcp::$(GDBPORT)"; \
else echo "-s -p $(GDBPORT)"; fi)
ifndef CPUS
CPUS := 2
endif
QEMUOPTS = -drive file=fs.img,index=1,media=disk,format=raw -drive file=xv6.img,index=0,media=disk,format=raw -smp $(CPUS) -m 512 $(QEMUEXTRA)
qemu: fs.img xv6.img
$(QEMU) -serial mon:stdio $(QEMUOPTS)
qemu-memfs: xv6memfs.img
$(QEMU) -drive file=xv6memfs.img,index=0,media=disk,format=raw -smp $(CPUS) -m 256
qemu-nox: fs.img xv6.img
$(QEMU) -nographic $(QEMUOPTS)
.gdbinit: .gdbinit.tmpl
sed "s/localhost:1234/localhost:$(GDBPORT)/" < $^ > $@
qemu-gdb: fs.img xv6.img .gdbinit
@echo "*** Now run 'gdb'." 1>&2
$(QEMU) -serial mon:stdio $(QEMUOPTS) -S $(QEMUGDB)
qemu-nox-gdb: fs.img xv6.img .gdbinit
@echo "*** Now run 'gdb'." 1>&2
$(QEMU) -nographic $(QEMUOPTS) -S $(QEMUGDB)
# CUT HERE
# prepare dist for students
# after running make dist, probably want to
# rename it to rev0 or rev1 or so on and then
# check in that version.
EXTRA=\
mkfs.c ulib.c user.h cat.c echo.c forktest.c grep.c kill.c\
ln.c ls.c mkdir.c rm.c stressfs.c usertests.c wc.c zombie.c\
printf.c umalloc.c\
README dot-bochsrc *.pl toc.* runoff runoff1 runoff.list\
.gdbinit.tmpl gdbutil\
dist:
rm -rf dist
mkdir dist
for i in $(FILES); \
do \
grep -v PAGEBREAK $$i >dist/$$i; \
done
sed '/CUT HERE/,$$d' Makefile >dist/Makefile
echo >dist/runoff.spec
cp $(EXTRA) dist
dist-test:
rm -rf dist
make dist
rm -rf dist-test
mkdir dist-test
cp dist/* dist-test
cd dist-test; $(MAKE) print
cd dist-test; $(MAKE) bochs || true
cd dist-test; $(MAKE) qemu
# update this rule (change rev#) when it is time to
# make a new revision.
tar:
rm -rf /tmp/xv6
mkdir -p /tmp/xv6
cp dist/* dist/.gdbinit.tmpl /tmp/xv6
(cd /tmp; tar cf - xv6) | gzip >xv6-rev10.tar.gz # the next one will be 10 (9/17)
.PHONY: dist-test dist
Solution: it’s actually very simple, because you’re in fs.img : a blank line is missing, which may be due to the careless deletion of the blank line during modification, resulting in his error. Add a blank line at the end of uprogs in the position shown in the figure.
Hello everyone, my name is Qi Guanjie (Q í Gu ā NJI é). I record the learning process in CSDN. Time flies and the future is promising. Come on ~ the blog address is Qi Guanjie’s blog, and the nickname of station B is
Qi Guanjie, and the address is Qi Guanjie’s station BThis article is original for Qi Guanjie, please support the original, part of the platform has been stealing articles from bloggers!!!


