Question:
Javac compiles the source code and executes the Java Mainclassname Error: Could not find or Load main class *** Error
The reason:
The runtime cannot find the main class, either because it did not write the full name of the main class (it requires the full package name) or because it wrote the wrong name of the main class (not the name of the main class, but the file name of the main class), or because it did not specify a directory with the classpath.
Solution 1:
Java classpath – [classpath directory] package1, package2. Mainclassname
Such as:
Run the command as in ***/target/classes/hello directory
java -cp ../hello/HelloWorld
or
java -cp ../hello. The HelloWorld
(-classpath here can also be -cp.)
Note that the path after 1: -classpath is in the directory of the top-level package name (package1) and in the directory of the package1 folder (if the source program does not start with any packages, that is the current compiled directory, -cp./ The current path can be without specifying the -cp parameter), or.. Relative or absolute paths to /target/classes/
Note 2: run the file must be full name, to add all the package name (if you have any package program starts packagename) until the main class name, such as: packagename. Mainclassname (note that there is the main class name for the file name is not the main class, also is not generated by the * * *. The class files, is the main method in the name of the class)
Solution 2
The directory from CD to the classpath, if there is a package name (the directory where the top-level package name package1 folder is located, or.. If the source program does not have a package at the beginning, run the following command in the path of the ***.class file after compilation.
Java package1. Package2. Mainclassname
Such as:
Run the following command in the ***/target/classes directory where the package name hello resides
Java hello/HelloWorld
or
Java hello. The HelloWorld
Conclusion:
The problem is that the main class cannot be found, it must run with the full main class name including the package name, and it needs to specify the directory of the class path.
Appendix:
Java usage methods and parameters table after running Java-help
Usage: java [-options] class [args…] (to execute a class) or Java [-options] -jar jarfile [args…] (to execute a jar file) where options include: -d32 use a 32-bit data model if available -d64 use a 64-bit data model if available -server to Select the “server” VM the default VM is server.
– cp & lt; class search path of directories and zip/jar files> – the classpath & lt; class search path of directories and zip/jar files> A: separated list of directories, JAR archives, and ZIP archives to search for class files. name> =< value> set a system property -verbose :[class|gc|jni] enable verbose output -version print product version and exit -version :< value> Warning: This feature is deprecated and will be removed in a future release. requires the specified version to run -showversion print product version and Restrict-search continue -re-search restricb-no-re-search Warning: continue -re-search restricb-search Removed in a future release. include/exclude user private JREs in the version search -?-help print this help message -x print help on non-standard options -ea [:<packagename>…|:<classname> classname>] [: & lt; – enableassertions packagename>… | : & lt; classname>] enable assertions with specified granularity -da [:<packagename>…|:<classname>] [: & lt; the -disableassertions packagename>… | : & lt; classname>] disable assertions with specified coverage -esa | -enablesystemassertions enablesystem enabling -dsa |-disablesystemassertions Disable the system assertions – agentlib: & lt; libname> [=<options>] load native agent library < libname> -agentlib:hprof see also, -agentlib: JDWP =help and -agentlib:hprof=help -agentpath :< pathname> [=<options>] load native agent library by full pathname -javaagent :< jarpath> [=<options>] load Java programming language agent, see java.lang. Instrument -splash :< imagepath> show splash screen with the specified image See http://www.oracle.com/technetwork/java/javase/documentation/index.html for more details.
Helloworld.java :(notice the package name)
package hello;

public class HelloWorld {
    public static void main(String[] args) {
        Greeter greeter = new Greeter();
        System.out.println(greeter.sayHello());
    }
}
Greeter.java
package hello;

public class Greeter {
    public String sayHello() {
        return "Hello world!";
    }
}
Installation environment: ubuntu14.04 + Hasee k550-i7 d1. Unique display: Nvidia GTX950. There’s also an integrated graphics card.
1. Install the cuda
1. Download CUDa Toolkit from nvidia official website, such as download runFile type. Installation steps. Complete the selection according to resources:
Run ‘sudo sh cuda_8.0.61_375.26_linux.run’ Follow the command-line prompts
2. Since the Nouveau driver (nvidia open source driver) is installed by default on Linux system, it will conflict with cudA drivers, so nouveau driver needs to be disabled. Follow Resources -4.1.2.2. Runfile Installer.
Q1: After installing CUDA environment in accordance with the tutorial, the sample can be compiled, but it cannot be run. If the error is reported, the driver version is invalid for the running version. If the driver is replaced, the screen will be black. The reason is that my laptop is a dual graphics card and requires nvidia-Prime to perform the default driver selection. When the DPKG has Nvidia-Settings, it can also be executed to switch.
After installing Nvidia-Prime and Nvidia-Settings, it is found that the default driver is Nouveau. If the manual change is invalid, nouveau will be selected automatically. Changing Blacklist.conf to add it to the blacklist is also invalid, so the problem becomes how to disable nouveau driver and use the installed Nvidia driver.
List of questions:
Insufficient RUNNING of compiled CUDa sample: Cuda driver version is insufficient for CUDa runtime version
2. Download the new CUDA8.0 installation file and check checksum to be inconsistent. damn
3. My N card and integrated video card cannot be identified in the nvidia-Settings installation.
Reinstall 1. Change the default driver to X.Org Xserver(in system Settings -> Software and updates -& GT; Additional drive; Or search driver – & gt; As you can see, it should be set to Nouveau.
2. Switch to command line mode (CTRL + Alt +f1, aka tty1),log in; Sudo Service LightDM Restart. if restart to lightdm,open a terminal and use the next step,if not,use tty1, as before;
3. Delete Nvidia related files.
sudo apt-get remove –purge nvidia-*
4. Check for nvidia related file residue
DPKG –get-selection | grep nvidia ensures there are no nvidia residues
5. Look at the additional drivers again and select the one that is most available.
6.go back to tty1 and issue sudo service lightdm restart, lightdm should restart and you should have the latest driver, for your system.
___
7. Because my laptop is a dual video card, which is a very painful thing, I need to install nvidia-prime and nvidia-settings to switch the video card. (During installation, go to YouTube and listen to Linus say it again: “So fuck you, Nividia!” )
Note: another way mentioned to disable nouveau is to change the boot mode in grub. To:
edit /etc/default/grub file.
—-
the For Ubuntu 12.04 the setting is stored in/etc/default/grub. You add it to the line titled GRUB_CMDLINE_LINUX_DEFAULT. If the line says:
After adding NOMODESET to this line you should run sudo update-grub to allow grub2 to see it the next time you boot.
——
### error message after changing the use of video card in nvidia-settings:
ERROR: NVIDIA driver is not loaded
ERROR: Error querying enabled displays on GPU 0 (Missing Extension).
ERROR: Error querying connected displays on GPU 0 (Missing Extension).
** Message: PRIME: Requires offloading
** Message: PRIME: is it supported?yes
ERROR: nvidia-settings could not find the registry key file. This file should
have been installed along with this driver at
/usr/share/nvidia/nvidia – application profiles – key – documentation. The
application profiles will continue to work, but values cannot be
prepopulated or validated, and will not be listed in the help text.
Please see the README for possible values and descriptions.
execute prime-select query to get information: unknow
finally passed
Prime -select Nvidia completed the selection of N card compiled to run CUDA samples through.
— — –
Cuda installation verifies the pre-installation conditions, such as whether the GPU is supported, whether the OS is supported, etc. It should be noted that this machine is a dual graphics card, which is specifically mentioned in the installation tutorial:
If the target system includes both an integrated GPU (iGPU) and a discrete GPU
(dGPU),
the –no-opengl-libs option must be used. Otherwise, the openGL library used
by the graphics driver of the iGPU will be overwritten and the GUI will not work. In
addition, the xorg.conf update at the end of the installation must be declined.
installation files: cuda-tookit and Nvidia drivers and official files are in the removable hard drive.
reference tutorial:
1. Runfile installation and disable nouveau driver: http://blog.csdn.net/masa_fish/article/details/51882183
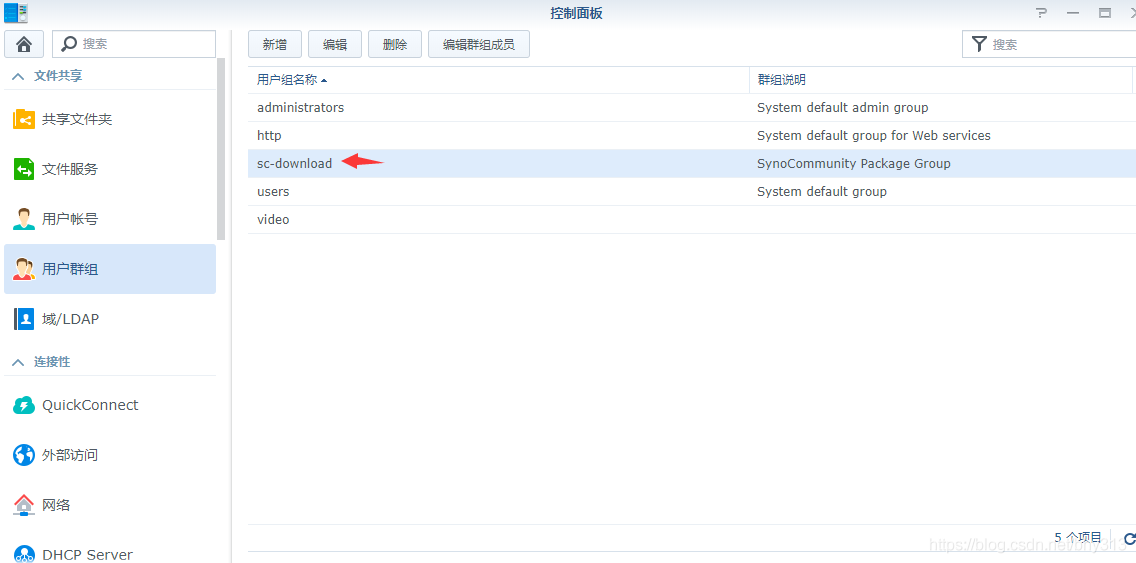
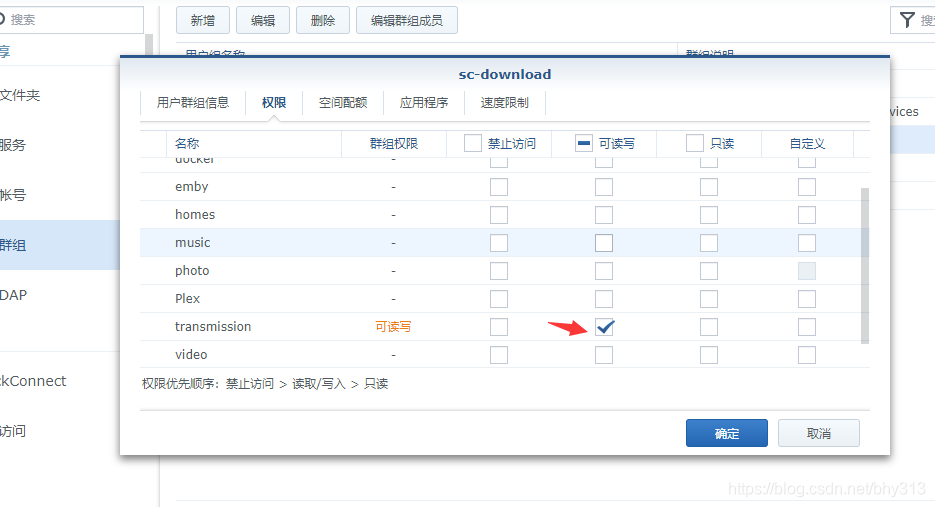
Download the page without permission, prompt: Permission denied, go to the user group, give the scDownload user group read and write permission, close tr first when changing the permission.
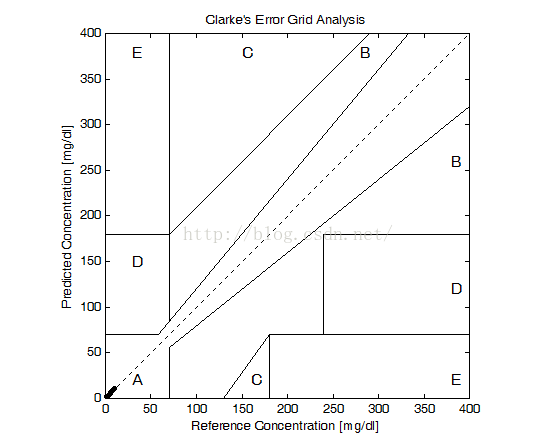
This is an analysis of the accuracy of the parity blood sugar prediction, as shown in the picture below. A lot of blood sugar monitors will say what’s the probability that our device is level A, which is the area A in the picture below, which is A very good area. In fact, it is very simple to draw such a graph. The Y-axis represents the predicted blood sugar value, and the X-axis is the reference value, which is generally considered to be the accurate value. Generate Clarke error network analysis chart matlab procedures can be private I oh, matlab. As a result of somebody else paper in, so post directly not good.
Whether port 0 and 5666 have been opened
Yum install Telnet
Telnet 172.16.1.1 5666
1. Confirm that OpensSL has been installed
#yum install openssl
2. Modify allowed_hosts of NRPE. CFG
vim /usr/local/nagios/etc/nrpe.cfg
Wildcards are not supported for #allowed_hosts and multiple ips are separated by commas
172.16.1.1 allowed_hosts = 127.0.0.1
3. Modify the IP for xinetd startup configuration (if starting with xinetd)
vim /etc/xinetd.d/nrpe
Only_from = 127.0.0.1 172.16.1.1
4. Restart NRPE service /usr/local/nagios/bin/nrpe - c /usr/local/nagios/etc/nrpe CFG - d
5. Test and display the version description successfully
#/usr/lib/nagios/plugins/check_nrpe - H 172.16.1.1 # NRPE v2.13
A quick introduction to Ajax:
Simply put, an Ajax request sends a request through an XMLHttpRequest object, which has four states (readyStates) :
0- uninitialized, 1- initializing, 2- sending data, 3- sending data, 4- done.
When XMLHttpRequest. ReadyState is 4, said ajax request has been completed can get the result.
Ajax’s success and Error methods are triggered based on the response status code. Success () is triggered when XMLHttprequest.status is 200, indicating a successful response. Other status codes trigger error().
In addition to the response status code, Ajax can also use an error method in the following situations:
return data type is not JSON network interrupt background response interrupt
While the program was running, this error popped up, calling functions on the stack, and it was very confusing.
After searching on the Internet, I found a prompt to disable the ActivationContext: afxAmbientActCtx= FALSE in CApp::InitInstance(). this “solves” the problem, but upon closer inspection it turns out to be a hidden problem. Junfeng Zhang in their blog to the comparatively detailed explanation (http://blogs.msdn.com/b/junfeng/archive/2006/03/19/sxs-activation-context-activate-and-deactivate.aspx). Basically, this error occurred because an exception was thrown in the code, which skipped the Deactivation corresponding to Context Activation, leading to subsequent Deactivation and the discovery that the Context in the stack was incorrect. the MSDN BBS, net friend MMDev in response to someone else’s post (http://social.msdn.microsoft.com/Forums/en-US/vcgeneral/thread/c3feab0f-601b-4ca6-beb2-8d4d615438cc/) gives a better solution: in Visual Studio, the choice of the Debug | Exceptions menu items, in the pop-up dialog, check all the Win32 Exceptions to this exception is thrown in Win32, the program will interrupt, so you have the opportunity to () before the exception handling in the first time to see what happened in your own code error exception is thrown, so as to correct errors, eliminate hidden dangers in the program.
WINDOWS 7 : SYSPREP 3.14 : A FATAL ERROR HAS OCCURRED DURING SYSPREP.
01/29/20148 Comments
Firstly, run this command on command prompt slmgr. vbs /dlv
Then check the re-arm counter value, if it’s 0 and you sysprep you will receive errors in the setupact.log and setuperr.log files like these:
Error [0x0f00a8] SYSPRP WinMain: Hit failure while processing sysprep generalize providers; hr = 0xc004d307
Error [0x0f0073] SYSPRP RunExternalDlls:Not running DLLs; either the machine is in an invalid state or we couldn’t update the recorded state, dwRet = 31
Error [0x0f0082] SYSPRP LaunchDll: Failure occurred while executing ‘C:\Windows\System32\slc. dll, SLReArmWindows’, returned error code -1073425657
Error [0x0f0070] SYSPRP RunExternalDlls: An error occurred while running registry sysprep DLLs, halting sysprep execution. dwRet = -1073425657
If this does not work, then last option is Windows Product Activation (WPA) vulnerability that was introduced in Windows 7
When the WPA registry key is deleted, the status of Windows 7 is re-initiated to the Initial Grace Period as if Windows 7 has just been installed. The deletion of the WPA registry key is achieved via the following method.
· Create a .bat file with following text and place it in C:, like C:\Reset.bat
At this time, if our scheme is written in a position other than the first page, an error will appear. This error, I think, is due to the conflict between the previous url and the url of the jump Activity. The method to deal with this situation is as follows:
In WebView, override shouldOverrideUrlLoading method in WebViewClient class, the specific code is as follows
@Override
				public boolean shouldOverrideUrlLoading(WebView view, String httpurl) {
					if (httpurl.startsWith("scheme:") || httpurl.startsWith("scheme:")) {
						Intent intent = new Intent(Intent.ACTION_VIEW, Uri.parse(httpurl));
						startActivity(intent);
					}
					return false;
				}
The method is, as long as the url starts with scheme, we jump to the url. So we solved…