When using latex to edit articles, you will encounter the problem of adding various symbols on the letters. Let’s summarize
Enter the plus sign in either ‘hat’ or ‘widehat’
Underline input
Wavy line input
Add one dot and two dots
When using latex to edit articles, you will encounter the problem of adding various symbols on the letters. Let’s summarize
Enter the plus sign in either ‘hat’ or ‘widehat’
Underline input
Wavy line input
Add one dot and two dots
Question:
Rendering Problems
Exception raised during rendering:××
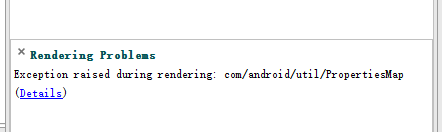
Solution:
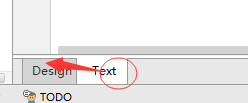
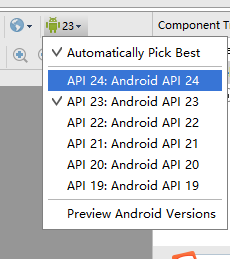
Switch the text to the design interface and reduce the API version
The operation is shown in the figure below
After using the English version of the system, some Chinese version of the software code, software options and so on are a pile of incomprehensible.
The solution is as follows:
1. Open the control panel.
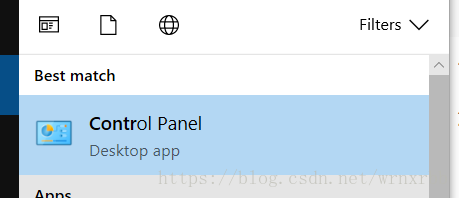
2. Open area
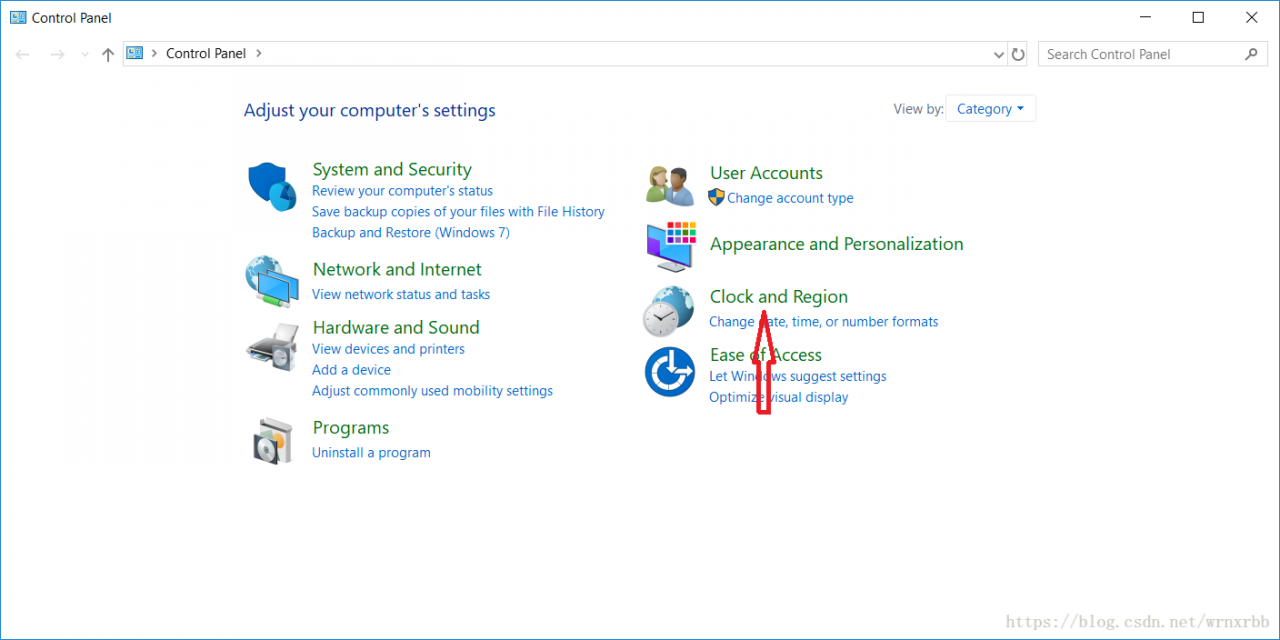
3. Set the non Unicode application language to Chinese
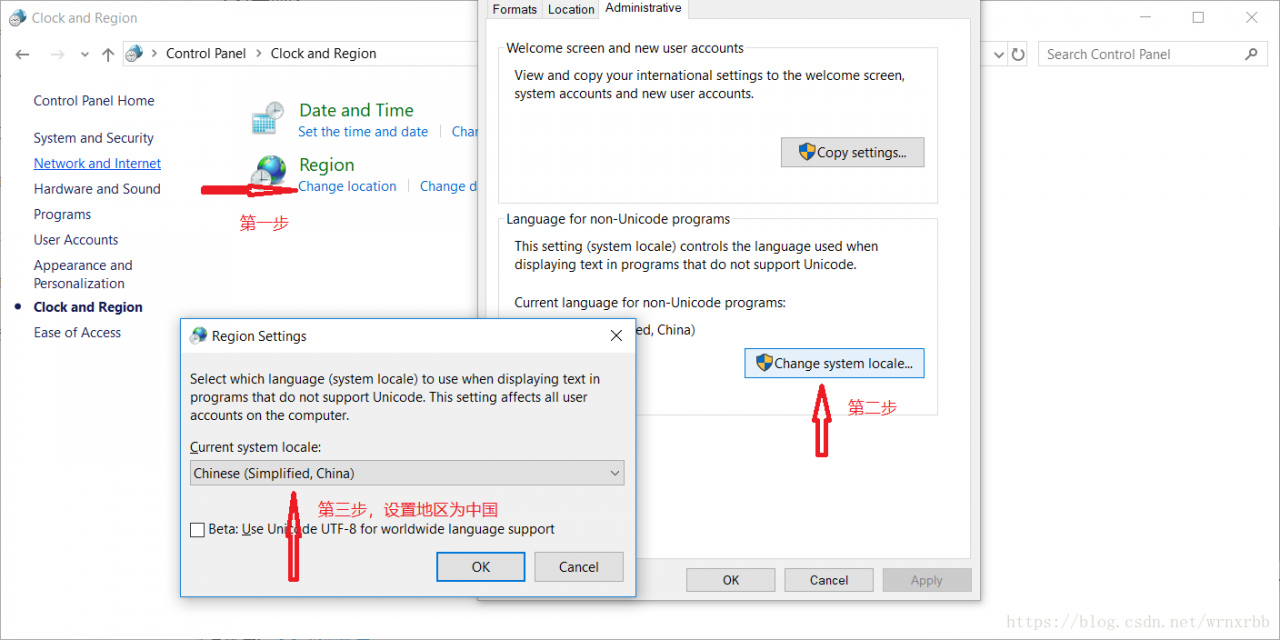
4. The restart takes effect.
What I make complaints about is what closely reasoned and well argued. First, I want to talk about the process of yield. I found that no one could simply let me know. When I was talking about Baidu, it was all the same, what parameters and what was passed. It was also the simplest and the easiest way to read the TM tutorial. I would like to ask if I have not considered the feelings of the readers.
Next is the topic
First of all, if you don’t have a preliminary understanding of yield, you can regard yield as “return”. This is intuitive. First of all, it is a return. What does the common return mean? It means to return a value in the program. After returning, the program will no longer run down. See it as a return, and then see it as a part of the generator (the function with yield is the real iterator). Well, if you don’t understand this, first consider yield as a return, and then look at the following program directly, you will understand all the meaning of yield:
def foo():
    print("starting...")
    while True:
        res = yield 4
        print("res:",res)
g = foo()
print(next(g))
print("*"*20)
print(next(g))
Just a few lines of code will let you understand what yield is
starting...
4
********************
res: None
4
I directly explain the code running order, which is equivalent to single step debugging of code
1. After the program starts to execute, because there is yield keyword in foo function, foo function will not really execute, but get a generator g (equivalent to an object) first
2. Until the next method is called, the foo function is formally executed. First, the print method in the foo function is executed, and then the while loop is entered
3. When the program encounters the yield keyword, think of yield as return. After a return of 4, the program stops and does not execute the assignment to res operation. At this time, the next (g) statement is executed, so the first two lines of output (the first is the result of print above while, and the second is the result of return) are the result of print (next (g)),
4. The program executes print (“*” * 20) and outputs 20*
5. Start to execute the following print (next (g)), This time is similar to the one above, but the difference is that this time starts from the place where the next program just stopped, that is, the assignment operation of res is to be executed. At this time, it should be noted that there is no value on the right side of the assignment operation (because the return just went out, and no parameter was passed to the left side of the assignment operation), so this time Res is assigned to none, so the next output is res:None ,
6. The program will continue to run in while, and it will encounter yield again. At this time, it will return 4, and then the program will stop. The output 4 of the print function is the return 4
Here you may understand the relationship and difference between yield and return. The function with yield is a generator, not a function. One function of this generator is the next function. Next is equivalent to the number generated in the “next step”. The place where the next starts this time is the place where the next stops last time. Therefore, when calling next, the generator It doesn’t start from the start of foo function. It just starts from the place where the last step stopped. After yield is met, return the number to be generated. This step ends.
****************************************************************************************************************************************
def foo():
    print("starting...")
    while True:
        res = yield 4
        print("res:",res)
g = foo()
print(next(g))
print("*"*20)
print(g.send(7))
Take another example of the send function of this generator. This example replaces the last line of the above example. The output result is as follows:
starting...
4
********************
res: 7
4
Let’s talk about the concept of the send function: at this time, you should pay attention to the purple word above, and why the value of res above is none, which becomes 7. Why? This is because send sends a parameter to res, because it is mentioned above that when return, 4 is not assigned to res, so you have to continue the assignment next time , we have to assign it to none. If we use send, when we start execution, we first assign 7 to res in the last execution (after return 4), and then perform the function of next. When we meet the next yield, the result of return is finished.
5. The program executes g. send (7), the program will continue to run down from the yield keyword line, and send will assign the value of 7 to the res variable
6. Because the send method contains the next () method, the program will continue to run down, execute the print method, and then enter the while loop again
7. When the program encounters the yield keyword again, yield will return the following value, and the program will pause again until the next method or send method is called again.
That’s the end. Let’s talk about why we use this generator because if we use list, it will take up more space, such as 0,1,2,3,4,5,6,… 1000
You might be like this:
for n in range(1000):
    a=n
At this time, range (1000) generates a list containing 1000 numbers by default, so it takes up a lot of memory.
At this time, you can use the yield combination generator just now to realize it, or you can use xrange (1000) to realize it
Yield Combination:
def foo(num):
    print("starting...")
    while num<10:
        num=num+1
        yield num
for n in foo(0):
    print(n)
Output:
starting...
1
2
3
4
5
6
7
8
9
10
* xrange(1000):
for n in xrange(1000):
    a=n
It should be noted that there is no xrange () in python3. In python3, range () is xrange (). You can check the type of range () in python3. It is a & lt; class’ range ‘& gt; instead of a list. After all, it needs to be optimized.
Thank you
If you feel helpful, your appreciation is my greatest support!

zz from: http://hepg.sdu.edu.cn/Service/tips/latex/latexfig.html#top & http://liqunsun.spaces.live.com/Blog/cns!285A08B51269F219!109.entry
Generally, latex only supports inserting EPS (encapsulated postscript) format graphics files directly, so we should try to get EPS format files before inserting pictures into latex documents.
all kinds of application software under UNIX can output the results in PS format, Most software can also output EPS format. If the software can only output PS format but not EPS format results, it can be converted to EPS format by ps2epsi command. Please refer to man ps2epsi’s instructions. If the image file format is bitmap graphics file, it can be converted to PS or EPS format file by display and convert tools of image magic package. See man page and man page for details
instructions
the output of windows software becomes PS / EPS file: please refer to the
“How to convert the output of software in Windows system into PS and EPS files”
Description in the column
Inserting pictures into latex documents is realized by using some latex graphics processing macro commands. Many macro commands support inserting EPS format graphics files into latex documents
(1) Using the macro command of includegraphics (graphicx package)
First of all, you need to add the following in the file description of latex document:
/usepackage{graphicx}
Then, it is quoted in the place where the image needs to be inserted:
/ includegraphics [height = height] {image file name} or / includegraphics [width = width] {image file name}
where “height” and “width” refer to the height and width of the image to be printed, and the unit must be given, which can be centimeter (CM) or inch (in), The image file name in the above command refers to the file name of the image file to be inserted. The image must be in EPS format
When inserting a picture with the macro command includegraphics of the graphicx package, you can also rotate the picture by:
/ includegraphics [height = height] [angle = rotation angle] {picture file name}
The inserted graphics are usually in EPS, PDF, JPG, PNG and other formats. Suppose the name is fig, and put it in the same directory of your tex document.
1. First add a sentence / usepackage {graphicx}
in the introduction area. 2. If you want to insert an inline graphic, you can directly use
/ includegraphics [width = 5in] {fig},
without adding a suffix.
This width is my most commonly used option, which can also be changed to other options.
3. If you want to insert floating graphics, use
/ begin {figure} [htbp]
/ centering / includgraphics [width = 3.5in] {fig}
/ caption {something} / label{ fig:1 }
/ end {figure}
4. For EPS graphics, the compilation process is latex, dvips, ps2pdf.
for PDF JPG PNG graphics, the compilation process is pdflatex
Use the include graphics macro command (graphics package) to:
It is troublesome to insert pictures with graphics package
(2) Using psfig macro command
First of all, you need to add the following in the file description of latex document:
/usepackage{psfig}
Then, it is quoted in the place where the picture needs to be inserted:
/ psfig {figure = picture file name, height = height} or / psfig {figure = picture file name, width = width}
where “height” and “width” refer to the height and width of the picture you want to print, and the unit bit must be given, which can be centimeter (CM) or inch (in), The image file name in the above command refers to the file name of the image file to be inserted. The image must be in EPS format
(3) use the epsfig macro command
The usage of epsfig macro command is exactly the same as that of psfig. The specific method is as follows:
first, add the following in the file description of latex document:
/usepackage{epsfig}
Then reference where you want to insert the image:
/ epsfig {figure = picture file name, height = height} or / epsfig {figure = picture file name, width = width}
The “height” and “width” refer to the height and width of the picture you want to print. The unit must be given, which can be centimeter (CM) or inch (in). The height and width can also be in the above format
The image file name in the above command refers to the file name of the image file to be inserted, and the image must be in EPS format
(4) Using EpsF macro command
The usage of EpsF macro command is as follows: first, add the following in the file description of latex document:
/usepackage{epsf}
Then, you can refer to:
/ epsfxsize = width / epsffile {image file name} or / epsfysize = height / epsffile {image file name} where you want to insert the image
The “height” and “width” refer to the height and width of the image to be printed. The unit must be given, which can be centimeter (CM) or inch (in). The height and width can also be given in the above format, so that the length width ratio of the original image can be changed. The image file name in the above command refers to the file name of the image file to be inserted, and the image must be in EPS format
(5) Latex? Picture control command, position control
Latex controls the position of the image by adding an exclamation point to ignore the “aesthetic” standard.
/ begin {figure} [! HTB]
/ usepackage {float}
/ begin {figure} [H]
insert it into the corresponding position of your code.
1, insert the side-by-side subgraph
/ usepackage {subfigure}
/ begin {figure} [H]
/ centering
/ subfigure [subfigurecaption] {
/ label{ Fig.sub .1}
/includegraphics[width=0.4/textwidth]{ figurename.eps }}
/subfigure[SubfigureCaption]{
/label{ Fig.sub .2}
/includegraphics[width=0.4/textwidth]{ figurename.eps }}
/caption{MainfigureCaption}
/label{ Fig.lable }
/ end {figure}
2, control the image position
if you don’t like latex to automatically arrange the image position, you can use the float package, and then
use / begin {figure} [H].
/ usepackage {float}
1, insert JPG image
in the command line environment, use the command:
ebb figure.jpg
Generating bounding box file figure.bb .
Use the following command:
/ includegraphics [width = 0.8/textwidth]{ figure.jpg }
PDF texify can be directly compiled into PDF file.
2, insert BMP image
there is no way to insert BMP image directly. The current method is to use
gimp to convert BMP into JPG, and then insert it according to the above method. When converting, do not use windows built-in painter, as the image quality is lost too much. With gimp or
fastone image viewer, the JPG quality is the highest, and the image quality is better.
3, insert JPG and EPS images at the same time
the insert command remains unchanged. When compiling, it uses latex and dvi2pdf, and the
images in both formats can be displayed.
Insert EPS picture
use / includegraphics [options] {file} command to insert EPS picture. The following is the simplest example:
/ documentclass {article}
/ usepackage {graphicx}% using the graphicx package
/ begin {document}
/ includegraphics{ file.eps }% insert the picture, insert it according to the original size of the picture
/ end {document}
note:
(1) EPS file and Tex file are placed in the same folder, which can be called only by the file name, without writing the path.
(2) Pdflatex cannot be used at compile time, an error will occur. Even if there are no mistakes, you can’t see the diagram. We should use latex compilation to generate DVI, and then dvi2ps, ps2pdf can see the figure.
Use [options] to specify the image size:
/ includegraphics [width = 3in]{ file.eps }
set the image width to 3 inches, and the image height will be automatically scaled.
/includegraphics[width=/testwidth]{ file.eps }
set the image width to the text width.
/includegraphics[width=0.8/textwidth]{ file.eps }
set the image width to 0.8 times the text width
/ includegraphics [width = / testwidth-2.0in]{ file.eps }
set the image width to be 2 inches less than the text width.
Use [options] to specify the image rotation angle:
/ includegraphics [angle = 270]{ file.eps }
rotate the image 270 degrees.
The two options are used at the same time, separated by commas:
/ includegraphics [width = / testwidth, angle = 270]{ file.eps }
A few useful articles on graph problems in latex
Graphics and Colour with LaTeX
Online guide to illustration and color use in latex
Figure’ing and picture’ing latex (PS format)
The method of inserting PS graph and xfig graph into latex
Using imported graphics in latex 2e (PS format)
The illustration in latex is discussed in detail, including basic concepts, file formats and their mutual conversion, related software, etc. in addition, how to replace the characters in PS format pictures with latex format characters is also discussed, so as to solve the problem that some application software can not use special characters such as Greek alphabet and complex mathematical formula expressions
Latex maths and graphics (PS format)
It is mainly about the method of inserting pictures and formulas into latex.
this paper introduces the method of inserting pictures and formulas into latex
About Visio to EPS
Many people are used to drawing with Visio (including me), but Visio can’t export EPS format, so they have to rely on third-party software. Save it as *. EMF format through Visio, and then open it with OpenOffice draw to export it to EPS format. When exporting, you need to select the open image, so that after exporting EPS, only the content of *. EMF image will be included, and there will be no large blank. But the EPS image exported by this method will be out of shape, for example, the straight line will often be intermittent, and the “computer” shape I added in Visio will also have inexplicable shadows. Or maybe I didn’t set it up.
There is another better solution, the EPS file exported is perfect. In other words, the Visio graphics are printed into PDF by acrobat printer, and then cut by gsview (gsview4.8). The specific process is as follows:
1 edit the image file and save it as PDF file
Install acrobat, print the edited picture as PDF file under Visio and word
2 to EPS file
Open PDF file in acobat and select Save as EPS file
3. Reduce EPS files
Open EPS file with gsview, select File — & gt; PS to EPS, select auto cut, and save it as another *. EPS file
1, subscript with underline a_ B
2, superscript use ^ e.g.: A ^ 2
3, superscript and subscript use together, a_ b^2
1. Solve function
① Numerical solution of single equation
syms x;
x0 = double(solve(x +2 – exp(x),x));
Find the solution of X + 2 = exp (x), and the result is shown in double
In use, you can also write x + 2 = = exp (x), note that ‘= =’
In addition, if there are multiple solutions, the function returns only one solution
② Solving the equation with signed variables
syms x a b c;
x0 = solve(a*x^2+b*x+c,x);
Two solutions can be obtained
③ Solving equations
syms x y z;
e1 = 2*x – y +z;
e2 = x + y – 6;
e3 = z^2 +2*y;
[x0,y0,z0] = solve(e1,e2,e3,x,y,z);
double([x0,y0,z0])
Can return multiple solutions, note that can not directly solve double conversion
2. Vpasolve function
Only one solution can be returned to solve the equation in a certain range
syms x;
double(vpasolve(x +2 – exp(x),x,[-2,2]))
The solution near a point can also be obtained
double(vpasolve(x +2 – exp(x),x,1))
The premise is that this’ nearby point ‘cannot deviate too much from the solution
To find out all the solutions, we can first draw a graph and find out the approximate interval or adjacent points of each solution
Dot multiplication: A / b
Cross product: a times b
Divide by: A / div B
Problem: the following problems occurred when the running project was opened in chrome
This problem occurs a lot when I visit the company network, GitHub and so on. I have a headache
Your connection is not private
an attacker may try to steal your information (such as password, communication content or credit card information) from x.x.x. Learn more
net:: err_ CERT_ INVALID
Send some web addresses, limited system information and some web content to Google to help us improve the security of chrome. Privacy policy
x.x.x.x usually uses encryption technology to protect your information. When Google Chrome tried to connect to x.x.x.x this time, the website sent back abnormal wrong credentials. This may be because an attacker is trying to impersonate x.x.x, or the Wi Fi login screen interrupted the connection. Please rest assured that your information is still secure, because Google Chrome has stopped connecting without any data exchange.
You can’t access x.x.x.x at this time because this site has sent messy credentials that Google Chrome can’t handle. Network errors and attacks are usually temporary, so this page may return to normal later.
The boy taught me a move, I feel very practical
Solution: in the current page with the keyboard input “this is a safe, not in the address bar input, directly on the keyboard on the line, the page will automatically refresh into the web page.
Reason: because chrome doesn’t trust these self signed SSL certificates, for the sake of security, it directly forbids access. This is a safe command, which means that you have understood and confirmed that this is an unsafe website. If you still want to visit it, you can visit it.
\centerline
Syntax: centerline {text}
This is the original command of Tex for centering short text.
Center environment
Grammar:
\begin{center}
First line\\
The second line\\
\end{center}
Center environment can realize the alignment of multiple lines.
In the center environment, if the “first line” is too long, it will wrap automatically, and the text of the wrap is still center aligned, so this is a very common way.
example
Here is a very practical example. When writing a paper, you need to write a title, and it is usually stipulated that the title above is in Chinese and the title below is in English
|
one two three four five six seven eight nine ten eleven twelve thirteen fourteen fifteen sixteen seventeen eighteen |
\documentclass[11pt,a4paper]{article} \usepackage{CJK} \usepackage{type1cm} \usepackage{times} \newcommand{\song}{\CJKfamily{song}} \newcommand{\xiaoer}{\fontsize{18pt}{18pt}\selectfont} \newcommand{\xiaosan}{\fontsize{15pt}{22pt}\selectfont} \Renewcommand {baselinestretch} {1.8}% double spacing \begin{document} \begin{CJK*}{GBK}{song} \begin{center} The shortest path algorithm: ~ classification system and research progress}} \ {Xiaoer shortest path algorithms: ~ taxonomy and advance in research}% Times New Roman, sophomore \end{center} \vspace{20pt} \Centerline {Xiaosan for Quad: Lu Feng}% can be used for shorter text \end{CJK*} \end{document} |
The results are as follows

CentOS 7.0 uses firewall as firewall by default
View firewall status
firewall-cmd --state
Stop firewall
systemctl stop firewalld.service
Disable firewall startup
systemctl disable firewalld.service
From: the closure of CentOS 6 and CentOS 7 firewalls
Sometimes we need to empty a line, especially when we are doing a beamer. However, it seems that latex can’t empty a whole line directly. Two consecutive “\ \” still only have the function of line feed
At present, the online version is “vSpace {*}”, which requires you to estimate the length of the space, which is very inconvenient
I found an easy way to do it
\\ \hspace*{\fill} \\
That is, line feed, fill with blank space, and then line feed, you can achieve the effect of leaving a whole line empty, this method does not need any adjustment of the environment, you can use it directly