Author Archives: Robins

On the error report after the command of ADB shell error:device not A solution of found

When debugging Android development and connecting mobile phones, it is clear that the development mode has been turned on and USB debugging is allowed. After connecting the mobile phone, the device still cannot be found, and an error is reported after inputting the ADB shell in the console error:device not found。 The methods on the Internet can be roughly divided into:
1. ADB kill server to kill the ADB process, and then use the ADB start server command to start it;
2. Detect port 5037( adb.exe Whether the default port is occupied or not adb.exe For processes that occupy port 5037, restart the ADB service:
2.1. ADB nodeamon server: check whether port 5037 is occupied;
2.1 2.2, netstat – ano | findstr “5037”: check which process occupies port 5037;
2.3, tasklist | findstr “21152”: check which program created this process (21152 is the PID of a process occupying port 5037);
2.4, taskkill/F/PID 21152: turn off the process;
2.5, ADB devices: display the current connected devices.
Another solution is provided here, by manually viewing the hardware ID and installing Google native Android debug driver;
1. Right click my computer – & gt; management – & gt; device management – & gt; Android phone. Here we can see the corresponding Android device driver.
2. Right click the attribute of the driver, select the hardware ID in the attribute (P) option under the details option, and record the information in the following value (V). For example, the value of a device is:

USB\VID_2A45&PID_0C02&REV_????&MI_01
USB\VID_2A45&PID_0C02&MI_01

Focus on 2a45 and 0c02.
3. Find the SDK directory of Android development and download (assuming you have downloaded it through the SDK manager) in the computer, and enter into the system of ⁃ extras ⁃ Google ⁃ USB_ In the driver folder, find Android_ winusb.inf This is a Google configuration file for Android. Found in file[ Google.NTx86 ](for 32-bit platform, 64 bit is the same as adding) in this line, you can see a lot of Android device driver information below, for example:

;Google Nexus One
%SingleAdbInterface%        = USB_Install, USB\VID_18D1&PID_0D02
%CompositeAdbInterface%     = USB_Install, USB\VID_18D1&PID_0D02&MI_01

Here, we only need to copy the driver information in the format of this file, and modify it with 2a45 and 0c02 obtained in 2, as follows:

;MEIZU metal
%SingleAdbInterface%        = USB_Install, USB\VID_2A45&PID_0C02
%CompositeAdbInterface%     = USB_Install, USB\VID_2A45&PID_0C02&MI_01

Save and close.
4. Uninstall the original driver and restart the computer. Make sure that the mobile phone has entered the developer mode and allows USB debugging. Select the connection mode to transfer files. Then right click computer – & gt; manage – & gt; device management – & gt; other devices again. You can see a question mark on the ADB interface option, indicating that the driver is not installed correctly. Select the ADB interface and right-click to select Update Driver Software – & gt; browse the computer to find the driver software. In browsing, select Android, the hardware device driver information file that we added before_ winusb.inf The folder of (d): – Android – SDK – Extras – Google – USB_ In this case, you only need to select a folder, not a file). Next, choose always install.
5. After successful installation, an Android phone option will appear in device management.

Error attaching to process

Use Jinfo command to check the error of remotemaven server (a process of idea)

Error attaching to process: sun.jvm.hotspot.runtime.VMVersionMismatchException: Supported versions are 25.101-b13. Target VM is 25.152-b28
sun.jvm.hotspot.debugger.DebuggerException: sun.jvm.hotspot.runtime.VMVersionMismatchException: Supported versions are 25.101-b13. Target VM is 25.152-b28
        at sun.jvm.hotspot.HotSpotAgent.setupVM(HotSpotAgent.java:435)
        at sun.jvm.hotspot.HotSpotAgent.go(HotSpotAgent.java:305)
        at sun.jvm.hotspot.HotSpotAgent.attach(HotSpotAgent.java:140)
        at sun.jvm.hotspot.tools.Tool.start(Tool.java:185)
        at sun.jvm.hotspot.tools.Tool.execute(Tool.java:118)
        at sun.jvm.hotspot.tools.JInfo.main(JInfo.java:138)
        at sun.reflect.NativeMethodAccessorImpl.invoke0(Native Method)
        at sun.reflect.NativeMethodAccessorImpl.invoke(NativeMethodAccessorImpl.java:62)
        at sun.reflect.DelegatingMethodAccessorImpl.invoke(DelegatingMethodAccessorImpl.java:43)
        at java.lang.reflect.Method.invoke(Method.java:498)
        at sun.tools.jinfo.JInfo.runTool(JInfo.java:108)
        at sun.tools.jinfo.JInfo.main(JInfo.java:76)
Caused by: sun.jvm.hotspot.runtime.VMVersionMismatchException: Supported versions are 25.101-b13. Target VM is 25.152-b28
        at sun.jvm.hotspot.runtime.VM.checkVMVersion(VM.java:227)
        at sun.jvm.hotspot.runtime.VM.<init>(VM.java:294)
        at sun.jvm.hotspot.runtime.VM.initialize(VM.java:370)
        at sun.jvm.hotspot.HotSpotAgent.setupVM(HotSpotAgent.java:431)
        ... 11 more

Solution:
the reason is that the JDK version does not match. Just change the JDK version of Maven in idea. The method is as follows

change the version here.

Error in dex2jar decompilation apk error.zip The solution of

The following error is reported in dex2jar decompilation APK, and the complete error is shown in the picture:

Detail Error Information in File .\GtsSettingsTestCases-classes- error.zip
Please report this file to  http://code.google.com/p/dex2jar/issues/entry  if possible.


Open error.zip The error contents are as follows: java.lang.RuntimeException : can not merge I and Z


Solution (transferred from: https://www.twblogs.net/a/5c95e18bbd9eee4a0d090cd5 ):

1. From https://github.com/pxb1988/dex2jar Download the source code of dex2jar: dex2jar-2.x.zip

2. Recompile: enter the dex2jar-2. X directory and execute the compile command:

gradlew.bat assemble

(the gradle environment variable needs to be configured. Compiling is easy to time out. You can succeed by trying several times. I tried three times.)

3. After compiling, the compressed package (dex-tools-2.1) will be generated under dex2jar-2. X/DEX tools/build/distributions- SNAPSHOT.tar ,dex-tools-2.1- SNAPSHOT.zip ), decompress a compressed package and recompile APK.

Attached is my own dex2jar:

dex-tools-2.1- SNAPSHOT.tar

dex-tools-2.1- SNAPSHOT.zip

Error creating bean with name ‘redissonclient’:

The contents of the error report are as follows:

 Error creating bean with name ‘redissonClient’: Bean instantiation via factory method failed; nested exception is org.springframework.beans .BeanInstantiationException: Failed to instantiate [ org.redisson.api .RedissonClient]: Factory method ‘create’ threw exception; nested exception is java.lang.NoSuchMethodError : io.netty.channel . nio.NioEventLoopGroup .<init>(ILjava/util/concurrent/ThreadFactory;)V


The version of reisson I use is 3.10.7

Finally, through debugging the source code, I found that the version of netty I used was too high. After several tests, I used netty 4.1.36.final

At present, redisson does not support netty 5. At the same time, version 3.10.7 of redisson does not support part of netty 4.0. X, so you need to pay attention when using redisson


After solving the previous problem, I have encountered a problem, that is, I clearly configured the redisson node address as the remote address, but the redisson node has to connect to my local address, that is 127.0.0.1, that is to say, the address of the redisson node connection is inconsistent with the address of the redis configured by me, as shown in the figure below

You can see that the first step is to grab the configuration from the remote server that I configured, and then connect directly to my local server. It’s conceivable that I can’t connect. Later, when debugging the source code, I suddenly thought whether there was a problem with the configuration of my redis cluster. After checking the process, I found that the processes of redis server are all there. Later, I suddenly thought that the processes of redis are all there, but the It’s not in the cluster state. After checking the configuration method of redis cluster, it’s found that in addition to the basic change of configuration file, you need to start the cluster in two steps

1. Start each node of redis

2. Create clusters through redis cli

And my problem is that I didn’t do step 2, and then I did step 2, and I tested again and finally connected,

There is another possibility for this error report, that is, redis.conf File bind configuration error, pro test, in redis.conf This problem will appear whether “bind” or “bind” binding address is 0.0.0.0 or 127.0.0.1. The solution is to set the value of “bind” to the real IP of the machine, that is, the intranet IP or the Internet IP, depending on your application. Of course, this is the setting needed to build a redis cluster. If it is a stand-alone redis, it is better to comment out the bind or set it to 0.0.0.0

When using redis cli to connect to redis cluster, use the following command:

Redis cli – C – H ﹣ any node IP – P ﹣ port number

For the construction of redis cluster, please refer to:

https://my.oschina.net/ruoli/blog/2252393

Error 1064 in MySQL password change

MySQL must know P203 to change the password

mysql> SET password for ben=password('123456');

Error will be reported during operation

ERROR 1064 (42000): You have an error inyour SQL syntax; check the manual that

corresponds to your MySQL server versionfor the right syntax to use near ‘passw

ord(‘123456′)’ at line 1

The reason is that after MySQL 5.7.6, the password property has been cancelled (select password is used)

(the “123” experiment informs that an error is reported), and the statement to modify the user’s password has changed


Correct statement:

mysql> alter user ben identified by'123456';

Query OK, 0 rows affected (0.15 sec)


reference material: https://www.zhihu.com/question/30481083

(maybe there are other solutions, just share the mistakes in learning and my solutions. If there are mistakes in the above statements, please criticize and correct them. Thank you.)

Error: RPC failed; HTTP 504 curl 22 the requested URL returned error: 504 gateway time out

The following error is reported when using git clone Code:

Cloning into ‘FanHeIOSV2’…

error: RPC failed; HTTP 504 curl 22 The requested URL returned error: 504 Gateway Time-out

fatal: The remote end hung up unexpectedly

The solution is to add — depath = 1:1

git clone –depth=1 https://git.oschina.net/xxxxxx.git  

Error C1083 error msb3075 in UE4 generated by vs2019 debug editor

Problem Description:
psallocator. H (40): fatal error C1083: TypeInfo. H: no such file or directory
error msb3075 shadercompileworker win64 development “- waitmutex – frommsbuild” has exited with code 5. Verify that you have sufficient permissions to run this command

Solutions:
1. Run as an administrator (possibly redundant steps)
2. Delete the code # include & lt; TypeInfo. H & gt;

Mybatis plus method querytotal execution error of SQL

Caused by: com.baomidou.mybatisplus . core.exceptions.MybatisPlusException : Error: Method queryTotal execution error of sql : 
 SELECT COUNT(1) FROM ( SELECT  id,third_ code,amount,target_ data,code,target_ id,target_ amount,refund_ time,refund_ res,channel,verify_ time,type,expired_ time,uid,cancel_ time,create_ time,merid,pay_ id,use_ expired_ time,status  FROM uni_ order 
 
 WHERE (code = ?AND uid IN () AND merid = ?AND channel = ?AND type = ?AND create_ time >= ?AND create_ time < ?AND status <> ?) ORDER BY id DESC ) TOTAL 
 

General SQL execution error

After reading the diary carefully, I found that the uid of SQL where condition did not pass the value

My mistake case:

The UIDs is not null, but the size is 0, so this condition is passed. But my UIDs has no value, so it is solved by adding the size judgment

Conclusion:

The condition in where may have no value, so an error will be reported: SQL execution error


Vs compilation error msb6006:“ cmd.exe ” exited with code 1.

Please note: http://blog.csdn.net/hust_ sheng/article/details/78827167

When this error occurs, the program will not crash, but the error window will display the above information~

There are a lot of blogs on the Internet to solve this kind of problem, but we can see that the reasons are different (incomplete files, insufficient administrator permissions, path containing Chinese, path containing spaces…) Because such problems are often not caused by one or even several certain reasons. Of course, we can’t rule out the consistent reasons for the compilation process of some fixed software, such as this blog

So in most cases, how can we determine the cause of the error in our own project?

look at the log information of the compilation process and the error prompt! I found that the reason for this error is that I didn’t install python

[Python error] memoryerror

Error report:
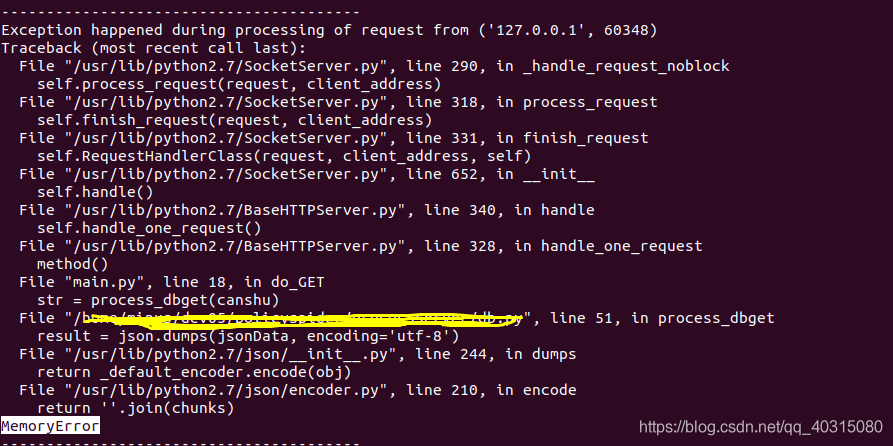
(the figure above shows the error report when the server code is running in the virtual machine)

Memory error: it involves reading, saving and writing. The memory is not enough

Solution:
check and install 64 bit python. The pandas and numpy in 64 bit Python are 64 bit, and the memory is larger.

If running in a virtual machine: set the memory size of the virtual machine (this method I use)

run again, and no more errors will be reported:

Error: nothing to do in centos7’s Yum installation

catalog

Caption:

Yum installation error description:

Solution, update Yum source:

Re install, problem solved:


Caption:

After installing centos7, sometimes Yum is not up-to-date. It’s better to update the yum source after installing the system. Since the yum source was not updated after installing the operating system, the following error occurred today.

Yum installation error description:


Solution, update Yum source:

yum -y update 


Re install, problem solved: