The problem is this:
processes some photos on the server, and sometimes you want to look directly at the images on the server. But the server is Ubuntu Server, with no graphical interface. If we use feH, or cv2.imshow(), the error will be reported as follows:
Feh ERROR: Can’t open X display. It is running, yeah?
Solutions:
It should be in the server side ~/.bashrc file
export DISPLAY=localhost=10.0
On the server side the /etc/ssh/ssh_config file should be set to :
Host *
ForwardX11 yes
Use the following parameters when sshing to the server.
Recently, a bug was added to the task list to be resolved in this sprint. The stack information of the bug is as follows:
Fatal Exception: java.lang.RuntimeException: An error occurred while executing doInBackground()
       at android.os.AsyncTask$3.done(AsyncTask.java:353)
       at java.util.concurrent.FutureTask.finishCompletion(FutureTask.java:383)
       at java.util.concurrent.FutureTask.setException(FutureTask.java:252)
       at java.util.concurrent.FutureTask.run(FutureTask.java:271)
       at java.util.concurrent.ThreadPoolExecutor.runWorker(ThreadPoolExecutor.java:1162)
       at java.util.concurrent.ThreadPoolExecutor$Worker.run(ThreadPoolExecutor.java:636)
       at java.lang.Thread.run(Thread.java:764)
Caused by java.lang.SecurityException: Caller no longer running, last stopped +25s437ms because: timed out while starting
       at android.os.Parcel.readException(Parcel.java:1942)
       at android.os.Parcel.readException(Parcel.java:1888)
       at android.app.job.IJobCallback$Stub$Proxy.dequeueWork(IJobCallback.java:191)
       at android.app.job.JobParameters.dequeueWork(JobParameters.java:196)
       at android.support.v4.app.JobIntentService$JobServiceEngineImpl.dequeueWork(JobIntentService.java:309)
       at android.support.v4.app.JobIntentService.dequeueWork(JobIntentService.java:627)
       at android.support.v4.app.JobIntentService$CommandProcessor.doInBackground(JobIntentService.java:384)
       at android.support.v4.app.JobIntentService$CommandProcessor.doInBackground(JobIntentService.java:377)
       at android.os.AsyncTask$2.call(AsyncTask.java:333)
       at java.util.concurrent.FutureTask.run(FutureTask.java:266)
       at java.util.concurrent.ThreadPoolExecutor.runWorker(ThreadPoolExecutor.java:1162)
       at java.util.concurrent.ThreadPoolExecutor$Worker.run(ThreadPoolExecutor.java:636)
       at java.lang.Thread.run(Thread.java:764)
According to the above bug information, it can be known that the system JobIntentService, AsyncTask doInBackground is called, while doInBackground calls dequeueWork. The following is the source code (source code of androidx 1.1.0) :
final class CommandProcessor extends AsyncTask<Void, Void, Void> {
    @Override
    protected Void doInBackground(Void... params) {
        GenericWorkItem work;

        if (DEBUG) Log.d(TAG, "Starting to dequeue work...");

        while ((work = dequeueWork()) != null) {
            if (DEBUG) Log.d(TAG, "Processing next work: " + work);
            onHandleWork(work.getIntent());
            if (DEBUG) Log.d(TAG, "Completing work: " + work);
            work.complete();
        }

        if (DEBUG) Log.d(TAG, "Done processing work!");

        return null;
    }
dequeueWork() source code is as follows, let’s focus on mJobImpl! = null part, will enter mjobimpl.dequeuework () part:
mJobImpl is actually a , CompatJobEngine, source code and is the implementation class JobServiceEngineImpl as follows:
	interface CompatJobEngine {
   		 IBinder compatGetBinder();
    	GenericWorkItem dequeueWork();
    }

	@RequiresApi(26)
	 static final class JobServiceEngineImpl extends JobServiceEngine
        implements JobIntentService.CompatJobEngine {
	 @Override
        public JobIntentService.GenericWorkItem dequeueWork() {
            JobWorkItem work;
            synchronized (mLock) {
                if (mParams == null) {
                    return null;
                }
                work = mParams.dequeueWork();
            }
            if (work != null) {
                work.getIntent().setExtrasClassLoader(mService.getClassLoader());
                return new WrapperWorkItem(work);
            } else {
                return null;
            }
        }
    }
As you can see from the bug information at the beginning of the article, it goes to mparams.dequeuework (); Binder, then enter the Binder mechanism, the source code is as follows, so we can conclude that there is a problem here, throwing an exception, but because this is part of the source code, it should not be our responsibility.
After query source, found that the problem appeared in the framework layer, and there are already online issue of the problem: https://github.com/evernote/android-job/issues/255
https://issuetracker.google.com/issues/63622293 online encounter this kind of problem a lot of a lot of people, but so far, I have checked the latest Google androidx library ("androidx.core:core-ktx:1.2.0-rc01") and still haven’t solved this problem. App . In this package, a new class SafeJobIntentService</code b> is inserted into the JobIntentService. The reason for this is that the dequeueWork() method is not public. We have to write in the same package to override its methods and fix bugs.
@RestrictTo({Scope.LIBRARY})
public abstract class SafeJobIntentService extends JobIntentService {
    public SafeJobIntentService() {
    }

    GenericWorkItem dequeueWork() {
        try {
            return super.dequeueWork();//1 Here we do a try/catch operation on this method
        } catch (SecurityException var2) {
            var2.printStackTrace();
            return null;
        }
    }

    public void onCreate() {
        super.onCreate();
        if (VERSION.SDK_INT >= 26) {
            this.mJobImpl = new SafeJobServiceEngineImpl(this);
        } else {
            this.mJobImpl = null;
        }
    }
}

@RequiresApi(26)
public class SafeJobServiceEngineImpl extends JobServiceEngine implements CompatJobEngine {
    static final String TAG = "JobServiceEngineImpl";
    static final boolean DEBUG = false;
    final JobIntentService mService;
    final Object mLock = new Object();
    JobParameters mParams;

    SafeJobServiceEngineImpl(JobIntentService service) {
        super(service);
        this.mService = service;
    }

    public IBinder compatGetBinder() {
        return this.getBinder();
    }

    public boolean onStartJob(JobParameters params) {
        this.mParams = params;
        this.mService.ensureProcessorRunningLocked(false);
        return true;
    }

    public boolean onStopJob(JobParameters params) {
        boolean result = this.mService.doStopCurrentWork();
        synchronized(this.mLock) {
            this.mParams = null;
            return result;
        }
    }

    public GenericWorkItem dequeueWork() {
        JobWorkItem work = null;
        synchronized(this.mLock) {
            if (this.mParams == null) {
                return null;
            }

            try {
                work = this.mParams.dequeueWork();
            } catch (SecurityException var5) {
                var5.printStackTrace();
            }
        }

        if (work != null) {
            work.getIntent().setExtrasClassLoader(this.mService.getClassLoader());
            return new SafeJobServiceEngineImpl.WrapperWorkItem(work);
        } else {
            return null;
        }
    }

    final class WrapperWorkItem implements GenericWorkItem {
        final JobWorkItem mJobWork;

        WrapperWorkItem(JobWorkItem jobWork) {
            this.mJobWork = jobWork;
        }

        public Intent getIntent() {
            return this.mJobWork.getIntent();
        }

        public void complete() {
            synchronized(SafeJobServiceEngineImpl.this.mLock) {
                if (SafeJobServiceEngineImpl.this.mParams != null) {
                    try {
                        SafeJobServiceEngineImpl.this.mParams.completeWork(this.mJobWork);
                    } catch (SecurityException  | IllegalArgumentException var4) {
                    // 2 Here we also perform a try/catch operation on the completeWork
                        var4.printStackTrace();
                    }
                }
            }
        }
    }
}
On the basis of the source code, the above code only handles Exception at 1 and 2</code b>. The rest of the code does not change, so we can compare the source code to see the comparison. If you have a three-party library in your project that has introduced this SafeJobIntentService class, but because you can't use this class of them, and you refer to such as implementation 'com.evernote:android-job:1.4.2' library, duplicate class found in the module. If this problem occurs, we can rename the class and follow the above code to deal with it. Hopefully Google will add a solution to this problem in future libraries.
JSON has three methods for parsing data
mount error(6): No such device or address
Refer to the mount.cifs(8) manual page (e.g. man mount.cifs)
Samba server Settings:
[root@test1 ~]#cat /etc/samba/smb.conf
Global Settings:
[global]
    workgroup = test
    server string = Samba Server Version %v
    #log files split per-machine:
    log file = /var/log/samba/log.%m
    #maximum size of 50KB per log file, then rotate:
    max log size = 50
    security = user
    passdb backend = tdbsam
    load printers = no
    cups options = raw
The home Settings
[homes]
    comment = Home Directories
    browseable = no
    writable = yes
    create mode = 0664
    directory =0755
Projects
    comment = smbuser's home
    path    = /share
    browseable = yes
    writable = yes
    write list = @users
3 . font – family: tahoma; mso – bidi – font – family: tahoma;从/etc/samba/smb.Load smb configuration file conf
rlimit_max: increase rlimit_max(1024) to the minimum window limit (16384)
Process section “[homes]”
Processing section “[project]”
Loaded service file OK.
Server role:ROLE_STANDALONE
View service definition dumps by enter
# global parameters
(Global)
    server string = Samba Server Version %v
    workgroup = TEST
    log file = /var/log/samba/log.%m
    max log size = 50
    load printers = No
    security = USER
    idmap config * : backend = tdb
    cups options = raw
(home)
    comment = Home Directories
    path = 0755
    browseable = No
    create mask = 0664
    read only = No
(project)
    comment = smbuser's home
    path = /share
    read only = No
    write list = @users
Client mount
[root@test2 ~]# mount -t cifs //2.2.1.2/user1/mnt-o username=user1,password=4321
Retrying with upper case share name
mount error(6): No such device or address
Refer to the mount.cifs(8) manual page (e.g. man mount.cifs)
Check found an error setting for the server:
Solution: Change directory = 0755 in the home directory to Directory Mode = 0755
[homes]
    comment = Home Directories
    browseable = no
    writable = yes
    create mode = 0664
    directory **mode** = 0755
Testparm didn’t detect a problem, so it took a long time. The key is carefulness, carefulness!
IO error and blade file deletion appeared synchronously
[root@mirrors tmp]# tail -f rsync_centos.log
|   Service Provided by                            |
|      neomirrors                                  |
|                                                  |
+==================================================+

 Note: This service is provided with a modified
 version of rsync. For detailed information, please
 visit: https://github.com/tuna/rsync

receiving incremental file list
IO error encountered -- skipping file deletion
Meanwhile another error still exists:
rsync: readlink_stat("7.7.1908/isos/x86_64/.CentOS-7-x86_64-Everything-1908.iso.RjFDl5" (in centos)) failed: Permission denied (13)
rsync error: some files/attrs were not transferred (see previous errors) (code 23) at main.c(1650) [generator=3.1.2]
Taking a closer look at the parameters of rsync, one of the options is:
Delete even if I/O errors occur
(Delete even if I/O error occurs)
centos6 install mysq5.6
Error message:Installing MySQL system table ……/bin/mysqld:Error loading shared library:libaio.so. 1:Unable to open shared object file:No such file or directory
Workaround:yum install- y libaio
This error occurred because more than 18 graphs and tables were placed in a row without any text in between.These solutions are available online:
1. Using macro package \usepackage[section]{placeins}
2. Start using \ ClearPage on each pageBut after the author used the above method, although the error is not reported, but the layout of the picture is still a bit messy.
In fact, this error is caused by the continuous placement of too many floating graphics.
The author to check the LaTex books (http://www.ctex.org/documents/latex/graphics/node2.html), 20 according to the book. Do not float the figure, remove the figure environment (that is, add pictures as non-floating graphics), the problem is solved.
where vspace{5mm} can be adjusted for image spacing.
Update: If you must use the Figure environment, you can combine \ ClearPage with! H parameters are used together, such as:
\begin{figure}[!h]
\centerline{\includegraphics[width=12cm]{fig17}}
\caption{Experimental results of the 17th image frame}\label{fig17}
\end{figure}

\clearpage

\begin{figure}[!h]
\centerline{\includegraphics[width=12cm]{fig18}}
\caption{Experimental results of the 18th image frame}\label{fig18}
\end{figure}
\ ClearPage where it was at the end of the previous page.
The solution
In order to avoid any detours seen later, the solution is posted directly. The rest of the content is just to record and restore the problem.
How to: Replace Android Platform Tools 29 with Android Platform Tools 28. Download the link at the end of the article.
Problem reproduction
Oddly enough, I went out for an experimental class, and when I came back Android Studio couldn’t compile the Flutter app. The output of the console part is as follows:
Exit code -1073740940 from C:\SDK\platform-tools\adb -s emulator-5554 shell -x logcat -v time -t l
Bash adb --version output:
Android Debug Bridge version 1.0.40
Version 29.0.1-5303910
Installed as C:\SDK\platform-tools\adb.exe
Since taicai did not see any problem, he thought to go to doctor to check the problem with flutter. The partial output is as follows:
[√] Flutter (Channel master, v1.7.2-pre.30, on Microsoft Windows [Version 10.0.17763.529], locale zh-CN)
[!]  Android toolchain - develop for Android devices (Android SDK version 29.0.1)
     × Android license status unknown.
     Try re-installing or updating your Android SDK Manager.
     See https://developer.android.com/studio/#downloads or visit https://flutterchina.club/using-ide/ to get more instructions.
[√] Android Studio (version 3.4)
[√] VS Code, 64-bit edition (version 1.34.0)
[!] Connected device
    ! No devices available
!   Doctor found issuses in 2 categories.
So the problem is probably the Android License, right?Fortunately, the solution is as follows: reinstall or upgrade SDK Manager
First, enter the bin directory of SDK tools, CD C:\SDK\tools\bin, and directly execute sdkmanager --update. I thought everything would be ok, but the output is as follows:
Exception in thread "main" java.lang.NoClassDefFoundError: javax/xml/bind/annotation/XmlSchema
Apparently the solution given by Doctor Flutter didn’t work, so I had to scan the Internet for a flutter. Solutions such as adb kill don’t work
In my anger, I reinstalled Android Studio. After docor, I got an extra line of output as follows:
Error retrieving device properties for ro.product.cpu.abi
However, there was still no solution for goose to search with this method, so she had to go out and look for over the wall (after all, Google stuff) and soon found the first issue of 26 May 2017. The dropdown is basically an unresolved problem. So I continued to find the issue of the second 23 Apr 2018. At the end of the page, I found the following comment, which was published two days ago, namely June June 2019, which was about the same time as my problem
This is a problem with platform tools 29. Temporary fix in my issue
According to the comment, it should be the problem of Platform Tools 29. He mentioned an issue later and got a solution after clicking on it.
Install the latest version of android studio beta on windows (platform tools 29 will be installed)
OK, so that’s the easy part, degrade Platform Tools
open the folder where the SDK is located and remove the platform-tools folder (make sure the adb related process is finished) unzip the platform-tools 28 and put it in and replace it with
(The SDK Manager for Android Studio also seems to be able to degrade directly, but I don’t know why this doesn’t work, so I recommend downloading a manual replacement.)
Here is the download address:
Toss about for a long time, finally clear the specific reason!
According to the exception prompt, vector is out of bounds, but it has not been located to which vector variable for a long time.
Write the class printf before and after the interrupt position, find the interrupted function, and print inside the function, only to find that the function doesn’t go in at all. It’s strange how you can’t go back in, no other thread, no other place to cause a crash. At this point, I should have thought to check the input of the function earlier. If the input is not correct, the function cannot enter. However, I have never encountered the situation that the input causes the function to not enter, so I did not think to check the input.
The input is a vector type, and the error is due to a problem with the access method.
Vector has a variety of access methods, which can be accessed directly in the way of array, such as VEC variable, VEC [0], or at(), vec.AT (0). There are differences between the two approaches. If veC happens to be empty, accessing the 0th element as an array will not be considered wrong, but the second access using the at method will result in the above error!!
Cffi installation problem
Environment: powerlinux6.5-64
installation:
1. Unzip cffi-1.11.5.tar.gz
2. Enter the cffi directory
   cd cffi-1.11.5
   python setup.py install
error message is as follows:
[root@localhost cffi-1.11.5]# /opt/python-powerlinux6-64/bin/python setup.py install
Package libffi was not found in the pkg-config search path.
Perhaps you should add the directory containing `libffi.pc'
to the PKG_CONFIG_PATH environment variable
No package 'libffi' found
'''
Package libffi was not found in the pkg-config search path.
Perhaps you should add the directory containing `libffi.pc'
to the PKG_CONFIG_PATH environment variable
No package 'libffi' found
Package libffi was not found in the pkg-config search path.
Perhaps you should add the directory containing `libffi.pc'
to the PKG_CONFIG_PATH environment variable
No package 'libffi' found
Package libffi was not found in the pkg-config search path.
Perhaps you should add the directory containing `libffi.pc'
to the PKG_CONFIG_PATH environment variable
No package 'libffi' found
Package libffi was not found in the pkg-config search path.
Perhaps you should add the directory containing `libffi.pc'
to the PKG_CONFIG_PATH environment variable
No package 'libffi' found
running install
running bdist_egg
running egg_info
writing requirements to cffi.egg-info/requires.txt
writing cffi.egg-info/PKG-INFO
writing top-level names to cffi.egg-info/top_level.txt
writing dependency_links to cffi.egg-info/dependency_links.txt
writing entry points to cffi.egg-info/entry_points.txt
reading manifest file 'cffi.egg-info/SOURCES.txt'
reading manifest template 'MANIFEST.in'
writing manifest file 'cffi.egg-info/SOURCES.txt
installing library code to build/bdist.linux-ppc64/egg
running install_lib
running build_py
running build_ext
building '_cffi_backend' extension
gcc -pthread -fno-strict-aliasing -g -O2 -DNDEBUG -g -fwrapv -O3 -Wall -Wstrict-prototypes -fPIC -DUSE__THREAD -DHAVE_SYNC_SYNCHRONIZE -I/usr/include/ffi -I/usr/includ
e/libffi -I/opt/python-powerlinux6-64/include/python2.7 -c c/_cffi_backend.c -o build/temp.linux-ppc64-2.7/c/_cffi_backend.oc/_cffi_backend.c:15:17: error: ffi.h: No such file or directory
In file included from c/_cffi_backend.c:92:
c/malloc_closure.h:81: error: expected specifier-qualifier-list before ‘ffi_closure’
c/malloc_closure.h: In function ‘more_core’:
c/malloc_closure.h:117: warning: division by zero
c/malloc_closure.h:149: error: ‘union mmaped_block’ has no member named ‘next’
c/malloc_closure.h: At top level:
As you can see from the tips:
Perhaps you should add the directory containing ‘libffi. PC’
to the PKG_CONFIG_PATH environment variable
Package libffi was not found in the pkg-config search path. Find the directory for libffi.pc,
#### libffi is not installed
Install libffi to compile and install.

[root@localhost cffi-1.11.5]# export PKG_CONFIG_PATH=/opt/python-powerlinux6-64/lib/pkgconfig/
In the case of binding the select tag to an array of *ngFor, the Error
Error trying to diff ‘2’. Only arrays and iterables are allowed is used. Need to change the bound array to item
in the array error demonstration
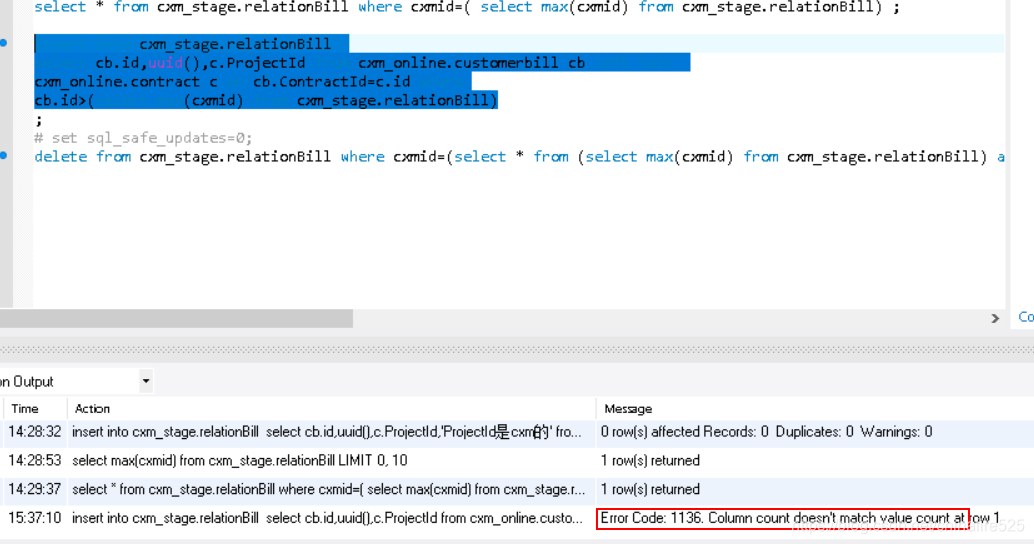
Running mysql script during development, mysql prompts Column count doesn’t match value count at row 1 error. After sticking, it is found that the number of columns in the SQL statement is inconsistent with the number of subsequent values. For example, insert into table names (field1,field2,field3) values(‘a’,’b’).
1. Modify the file type
Vi finddir.sh enter: set ff If fileformat= DOS, change to Unix: : set FF = Unix execute save command: : WQ 2. Delete hidden characters
Open your SHELL script file with the command VI-b, and you will. It is found that there is an extra ^M at the end of each line of the script because MS-DOS and Windows are return + line feed to represent line feed. Therefore, Vim is used in Linux to view the code written in Windows with VC. The “^M” symbol at the end of the line represents the character.
To eliminate “^M” in Vim with the substitution function, type the following substitution command line: 1) vi-b setup.sh2) on the command edit line
< That is: press ESC and shift: colon >
Note: the “M” character on the command line above is not “” and” M “, but is generated by “Ctrl V” and “Ctrl M”. After this substitution, the save is ready to be executed.