Author Archives: Robins

[Solved] Mybatis Error: Cause: org.apache.ibatis.builder.BuilderException: Error creating document instance.


Complete error reporting:

org.apache.ibatis.exceptions.PersistenceException: 
Error building SqlSession.
Cause: org.apache.ibatis.builder.BuilderException: Error creating document instance.  Cause: org.xml.sax.SAXParseException; lineNumber: 58; columnNumber: 17; 元素类型为 "configuration" 的内容必须匹配 "(properties?,settings?,typeAliases?,typeHandlers?,objectFactory?,objectWrapperFactory?,reflectorFactory?,plugins?,environments?,databaseIdProvider?,mappers?)"。

Solution:

When the above error occurs, it is obvious that the exception occurs when parsing the XML configuration file,
from org.xml.sax.saxparseexception; lineNumber: 30; columnNumber: 17; Content with element type “configuration” must match: (properties?, settings?, typealiases?, typehandlers?, objectfactory?, objectwrapperfactory?, plugins?, environments?, databaseidprovider?, mappers?) “。 It is obvious that the configuration files of mybatis are in order and the number is limited Indicates that there can be no but at most one, but in your own configuration:

Incrrect order:

Correct order:

Python: How to Solve mysqlclient Install Error in Mac

It’s finally solved after many hardships. Please refer to the notes of Niu Ren and record it

Install brew

First, install brew and Baidu. There are many tutorials

Install MySQL

#Install
brew install mysql

#Configure environment variables
echo'export PATH="/opt/homebrew/opt/mysql-client/bin:$PATH"' >> ~/.bash_profile

#Make environment variables take effect
source ~/.bash_profile

#Start mysql service through script
mysql.server start

#Start mysql and set to boot
brew services start mysql

#Initialization, set password
mysql_secure_installation

ya..... bin% mysql_secure_installation
Enter password:

Securing the MySQL server deployment.


VALIDATE PASSWORD PLUGIN can be used to test passwords //Password verification plug-in, in order to improve security, you need to verify the password
and improve security. It checks the strength of password // It checks the strength of password
and allows the users to set only those passwords which are
secure enough. Would you like to setup VALIDATE PASSWORD plugin? //Prompt to install the password verification plugin

Press y|Y for Yes, any other key for No: y

There are three levels of password validation policy: //Three levels of password validation policy

LOW Length >= 8 //The minimum length is greater than or equal to 8 characters
MEDIUM Length >= 8, numeric, mixed case, and special characters //Numbers, letters, and special characters are mixed, the specific ones should be at least 1 number, 1 letter, 1 special character, and the length should not exceed 32 characters
STRONG Length >= 8, numeric, mixed case, special characters and dictionary file // The most stringent, plus, the dictionary file

Please enter 0 = LOW, 1 = MEDIUM and 2 = STRONG: 2 //Here I choose 2 MEDIUM
Using existing password for root.

Estimated strength of the password: 50 //Here is also the rating of password strength
Change the password for root ?((Press y|Y for Yes, any other key for No): y

New password: //Password

Re-enter new password:

Estimated strength of the password: 50
Do you wish to continue with the password provided? (Press y|Y for Yes, any other key for No): y //Prompt to use the password you just entered?
 ... Failed! Error: Your password does not satisfy the current policy requirements

New password: //Password

Re-enter new password:

Estimated strength of the password: 100
Do you wish to continue with the password provided?(Press y|Y for Yes, any other key for No): y
By default, a MySQL installation has an anonymous user, //By default, MySQL has an anonymous user,
allowing anyone to log into MySQL without having to have //This anonymous user does not have to be created for them by a user. An anonymous user allows anyone to log into MySQL,
a user account created for them. This is intended only for //This is just to facilitate test use
testing, and to make the installation go a bit smoother.
You should remove them before moving into a production //When using in a formal environment, it is recommended that you remove them
environment.

Remove anonymous users? (Press y|Y for Yes, any other key for No): y //Prompt to remove anonymous users
Success.

Normally, root should only be allowed to connect from //Under normal circumstances, root users are only allowed to log in using "localhost",
'localhost'. This ensures that someone cannot guess at // to ensure that someone cannot guess at
the root password from the network.

Disallow root login remotely? (Press y|Y for Yes, any other key for No): n //

 ... skipping.
By default, MySQL comes with a database named'test' that //By default, there is a test library in the MySQL database that can be accessed by any user.
anyone can access. This is also intended only for testing, //This is also intended only for testing
and should be removed before moving into a production // in a formal environment, should be removed
environment.

Remove test database and access to it?(Press y|Y for Yes, any other key for No) : y
 - Dropping test database...
Success.

 - Removing privileges on test database...
Success.

Reloading the privilege tables will ensure that all changes                       //Refresh the permission table to ensure that all modifications can take effect immediately
made so far will take effect immediately.

Reload privilege tables now?(Press y|Y for Yes, any other key for No) : y
Success.

All done! 

Install mysql-connector-c

brew install mysql-connector-c

Installing Xcode-

xcode-select --install

Install OpenSSL

brew install openssl

After installation, the terminal will display the method of configuring environment variables

If you need to have openssl@3 first in your PATH, run:
  echo 'export PATH="/opt/homebrew/opt/openssl@3/bin:$PATH"' >> ~/.zshrc

For compilers to find openssl@3 you may need to set:
  export LDFLAGS="-L/opt/homebrew/opt/openssl@3/lib"
  export CPPFLAGS="-I/opt/homebrew/opt/openssl@3/include"

Unlink MySQL and the linked MySQL connector mysql-connector-c

brew unlink mysql
brew link --overwrite mysql-connector-c

As shown in the figure, mysql-connector-c has a warning
warning: MySQL client is keg only and must be linked with -- force.
execute
brew link -- overwrite mysql-connector-c -- force
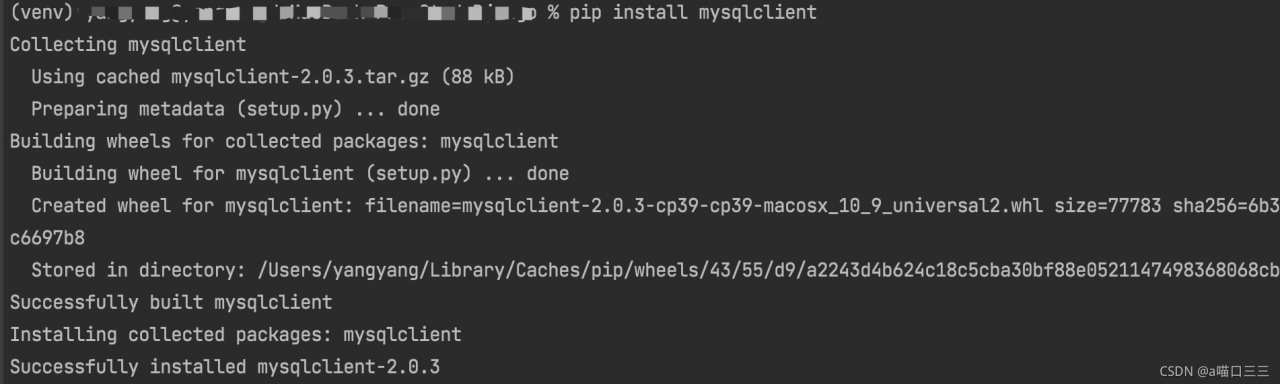
Install mysqlclient

Using PIP install mysqlclient will not cause any errors

Connect MySQL again

Do the opposite of unlinking MySQL and the linked MySQL connector mysql-connector-c:

brew unlink mysql-connector-c
brew link --overwrite mysql --force

[Solved] Mybatis integrates PageHelper and uses sqlserver paging error

The environment uses mybatis plus, the paging plug-in: PageHelper 5.2.0, and the database uses sqlserver2012 or above

In fact, the paging plug-in is ultimately handled by the mybatis interceptor, so it is equivalent to the mybatis environment.

Using paging

 PageHelper.startPage(1,10); // Pagination
  orderMapper.list(); // Follow the execution

Then an error will be reported

SQL: SELECT  id,product_name,xxxx,xxxxx  FROM product_xxxx  OFFSET ?ROWS FETCH NEXT ?ROWS ONLY
### Cause: com.microsoft.sqlserver.jdbc.SQLServerException: “@P0”There is a grammatical error nearby.
; uncategorized SQLException; SQL state [S0001]; error code [102]; There is a syntax error near "@P0". ; nested exception is com.microsoft.sqlserver.jdbc.SQLServerException: There is a syntax error near "@P0".

Finally, after checking, it is found that the paging syntax offset and fetch used by PageHelper are sqlserver’s support for sorting.

Therefore, if you want to use this plug-in to page, you need to add sorting.

PageHelper.startPage(1,10,"xxxx sorted table field name, not attribute name");
orderMapper.list(); // Follow the execution

Or use the default sort field

PageHelper.startPage(1,10,"CURRENT_TIMESTAMP");
orderMapper.list(); //Follow up

[Solved] @webservice Error: org.apache.cxf.common.i18n.UncheckedException: No operation was found with

1. Phenomenon

Integrating the web service of Spring + CXF, the WSDL is successfully published, but an error is reported when calling
org.apache.cxf.common.i18n.uncheckedexception: no operation was found with

2. Solution 1

: add targetNamespace in the service interface

package com.gblfy.service;

import javax.jws.WebMethod;
import javax.jws.WebParam;
import javax.jws.WebService;

@WebService(targetNamespace = "http://impl.service.gblfy.com/")
public interface IUserService {

    @WebMethod
    public String getCxf(@WebParam(name = "reqXml") String reqXml);
}

Implementation class

package com.gblfy.service.impl;

import com.gblfy.service.IUserService;

import javax.jws.WebService;

@WebService
public class UserServiceImpl implements IUserService {

    @Override
    public String getCxf(String reqXml) {

        System.out.println("Message received:" + reqXml);
        return "OK";
    }
}

client

/**
     * Single/multi-parameter calling tool class (Object type)
     *
     * @param cxfUrl url address
     * @param method call method name
     * @param reqXml send message body
     * @return res return result
     * @throws Exception If there is an exception, output the exception on the console and throw the exception
     */
    public static String cxfClientParam(String cxfUrl, String method, Object... reqXml) throws Exception {
        String res = null;
        // Create a dynamic client
        JaxWsDynamicClientFactory dcf = JaxWsDynamicClientFactory.newInstance();
        Client client = dcf.createClient(cxfUrl);

        // If you need a password, you need to add a user name and password
        // client.getOutInterceptors().add(new ClientLoginInterceptor(USER_NAME, PASS_WORD));
        Object[] objects = new Object[0];
        try {
            // Basic format: invoke("method name", parameter 1, parameter 2, parameter 3....);
            objects = client.invoke(method, reqXml);
            res = objects[0].toString();
            System.out.println("Return data:" + res);
        } catch (java.lang.Exception e) {
            e.printStackTrace();
            throw e;
        }
        return res;
    }
3. Solution 2

Use QName and add the address of the service interface

package com.gblfy.service.client;

import org.apache.cxf.endpoint.Client;
import org.apache.cxf.jaxws.endpoint.dynamic.JaxWsDynamicClientFactory;
import org.springframework.stereotype.Component;

import javax.xml.namespace.QName;

/**
 * cxf client call (packaged inside the enterprise)
  *
  * @author gblfy
  * @date 2021-09-17
  */
@Component
public class CxfClient {
     public static void main(String[] args) throws Exception {
         String cxfUrl = "http://127.0.0.1:8080/spring_cxf_war/webservice/userWS?wsdl";
         String method = "getCxf";
         String reqXml = "cxf request message";

         //Call the service
         CxfClient.cxfClientParam(cxfUrl, method, reqXml);
     }

     /**
      * Single/multi-parameter calling tool class (Object type)
      *
      * @param cxfUrl url address
      * @param method call method name
      * @param reqXml send message body
      * @return res return result
      * @throws Exception If there is an exception, output the exception on the console and throw the exception
     */
    public static String cxfClientParam(String cxfUrl, String method, String reqXml) throws Exception {
        String res = null;
        // Create a dynamic client
         JaxWsDynamicClientFactory dcf = JaxWsDynamicClientFactory.newInstance();
         Client client = dcf.createClient(cxfUrl);

         // If you need a password, you need to add a user name and password
         // client.getOutInterceptors().add(new ClientLoginInterceptor(USER_NAME, PASS_WORD));
         Object[] objects = new Object[0];
         try {
             // Basic format: invoke("method name", parameter 1, parameter 2, parameter 3....);
             QName qName = new QName("http://impl.service.gblfy.com/",method);
             objects = client.invoke(qName, reqXml);
             res = objects[0].toString();
             System.out.println("Return data:" + res);
        } catch (Exception e) {
            e.printStackTrace();
            throw e;
        }
        return res;
    }
}

[Solved] Vue Compile Error: JavaScript heap out of memory

Vue element UI project

The default size limit of V8 engine for memory use is 1.4g. You can set the limit through the node.js command to solve this problem. Modify the contents in the package.json file as follows.

"serve": "npx --max_old_space_size=4096 vue-cli-service serve",
"build": "npx --max_old_space_size=4096 vue-cli-service build --modern"

General Vue items

Vue didn’t put  package.json   inside  scripts  The node command of the script command of the field is hidden. We directly write the option parameters provided in V8 above to scripts  Field  node  After the command, it’s OK. An example is as follows

"build": "node --max_old_space_size=4096 build/build.js"

VUE Error: Mixed spaces and tabs [How to Solve]

Error reporting reason:

Mixed spaces and tabs.

Eslint is used in the development process to standardize the code style. Eslint loader is used in webpack configuration. Eslint is a syntax checking tool. The disadvantage is that it is too strict with the written code. Most code conventions require the use of spaces or tabs for indentation. Therefore, if a line of code is mixed with tab indentation and space indentation at the same time, it is usually wrong. You need to delete the spaces where the error is reported before compiling.

Solution:

Add rules under eslintconfig in package.json

"rules": {
		"no-console": "off",
		"no-debugger": "off",
		"no-mixed-spaces-and-tabs": "off"
	}

Spring-boot-maven-plugin Error [How to Solve]

1. After using idea to create a spring project, it is found that the spring boot Maven plugin in pom.xml reports an error.

2. Compared with the springboot project created on the official website, it is found that < version> 2.4.12

3. Add the corresponding version to idea

Conclusion: the problem that is not a problem is the most people’s mentality

[Solved] Rocketmq remote connection error: sendDefaultimpl call timeout

error message

Startorg.apache.rocketmq.remoting.exception.RemotingTooMuchRequestException: sendDefaultImpl call timeout
	at org.apache.rocketmq.client.impl.producer.DefaultMQProducerImpl.sendDefaultImpl(DefaultMQProducerImpl.java:612)
	at org.apache.rocketmq.client.impl.producer.DefaultMQProducerImpl.send(DefaultMQProducerImpl.java:1253)
	at org.apache.rocketmq.client.impl.producer.DefaultMQProducerImpl.send(DefaultMQProducerImpl.java:1203)
	at org.apache.rocketmq.client.producer.DefaultMQProducer.send(DefaultMQProducer.java:214)
	at com.cmit.fabric.java.rocketmq.RocketMQTest.producer.ProducerTest.producerStart(ProducerTest.java:39)
	at com.cmit.fabric.java.rocketmq.RocketMQTest.producer.ProducerTest.main(ProducerTest.java:27)

Solution:

Add in conf/break.conf

	namesrvAddr = Internet access address: 9876
brokerIP1=Internet access address

Start command change

Start namesrv
sh bin/mqnamesrv -n Internet access address: 9876
Start the broker
sh bin/mqbroker -n Internet access address:9876 -c conf/broker.conf autoCreateTopicEnable=true