Vue reports an error using ‘NPM run dev’
Solution:
execute NPM install webpack-dev-server -D
If the change command fails, install webpack globally first
execute NPM install webpack-cli -g
Vue reports an error using ‘NPM run dev’
Solution:
execute NPM install webpack-dev-server -D
If the change command fails, install webpack globally first
execute NPM install webpack-cli -g
Problem overview
Today, when learning the vector container, I found that clion threw such an error, as shown in the following figure
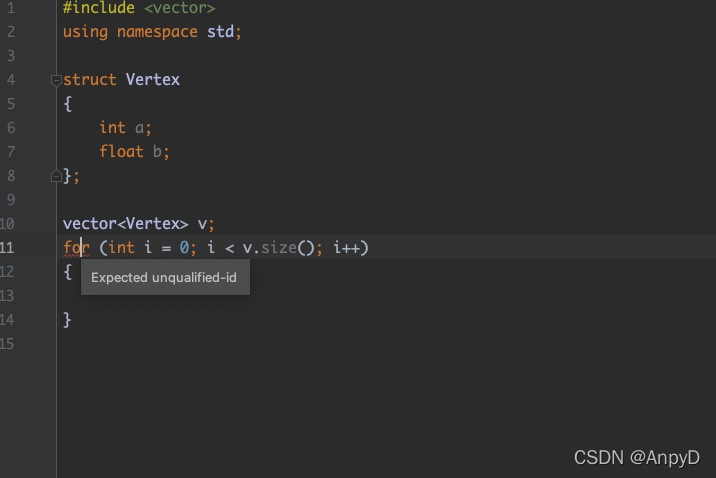
this problem still exists after compiling with clang
~/Documents/Clion_Project/Learning/L11.cpp:12:1: error: expected unqualified-id
for (int i = 0; i < v.size(); i++)
^
1 error generated.
reason:
The main function is not written
Solution:
#include <vector>
using namespace std;

int main()
{
    struct Vertex
    {
        int a;
        float b;
    };

    vector<Vertex> v;
    for (int i = 0; i < v.size(); i++)
    {

    }
}
Error Messages: cv2.drawContours(thresh_Contours, cnts, -1, (0, 0, 255), 3)
cv2.error: OpenCV(4.5.5) D:\a\opencv-python\opencv-python\opencv\modules\imgproc\src\drawing.cpp:2502: error: (-215:Assertion failed) npoints > 0 in function ‘cv::drawContours’
Reason: Different Opencv versions cause errors
cnts = cv2.findContours(thresh.copy(), cv2.RETR_EXTERNAL,
                        cv2.CHAIN_APPROX_SIMPLE)[1]
cv2.drawContours(thresh_Contours, cnts, -1, (0, 0, 255), 3)
Correction method: change “1” to “0”
cnts = cv2.findContours(thresh.copy(), cv2.RETR_EXTERNAL,
                        cv2.CHAIN_APPROX_SIMPLE)[0]
cv2.drawContours(thresh_Contours, cnts, -1, (0, 0, 255), 3)
idea compilation failed, reporting java: Compilation failed: internal java compiler error
Check if the local jdk version is exactly the same
Reason for error: The database version does not match, perhaps the files in the migration folder have changed but the database version is still the same.
Solution:
Delete the migration folder and delete the alembic_version table from the database.
Re-initialize (init, migrate, upgrade) to retain the original data
Error message:
2022-02-08 14:17:32.022  INFO 1816 --- [nio-8080-exec-3] com. alibaba. druid. pool. DruidDataSource   : {dataSource-1} inited
2022-02-08 14:17:32.110 ERROR 1816 --- [eate-1764881818] com. alibaba. druid. pool. DruidDataSource   : create connection SQLException, url: jdbc: mysql://127.0.0.1:3306/itqs?allowMultiQueries=true , errorCode 1045, state 28000
As shown below:

Reason: application The MySQL database user name or password in the properties file is incorrect.
Solution: change to the correct user name or password.
1. Explain
After configured $mail->Username,$mail->password, the error is reported as follows:
2021-09-01 12:22:37 SMTP ERROR: Failed to connect to server: (0)
SMTP connect() failed. https://github.com/PHPMailer/PHPMailer/wiki/Troubleshooting
Error
2. Solution
1. Ignore SSL authentication (this is my reason)
Add the following code after code: $mail = new PHPMailer();
// Instantiating the PHPMailer core class
$mail = new PHPMailer();

$mail->SMTPOptions = array(
    'ssl' => array(
        'verify_peer' => false,
        'verify_peer_name' => false,
        'allow_self_signed' => true
    )
);

...
2. Set the port to bit 25, do not use SSL, 465 (other possible reasons)
Change
// Set up ssl encryption for login authentication
$mail->SMTPSecure = 'ssl';
// set the remote server port number for ssl connection to smtp server
$mail->Port = 465;
to
$mail->Port = 25;Error when using meme theme:
Error: Error building site: TOCSS: failed to transform "en/styles/main-rendered.scss" (text/x-scss): SCSS processing failed: file "stdin", line 223, col 17: Invalid CSS after "$fofPoster: url(": expected expression (e.g. 1px, bold), was "<no value>);"
Solution:
① install the extended version Hugo. That is, execute with extended
② in the name
rm config.toml && cp themes/meme/config-examples/en/config.toml config.toml ```
1. Error reporting:
The error of Android C + + OpenSSL link is as follows:
I:/webrtc/android/openssl-1.1.1k/output-armeabi-v7a/lib/libcrypto.a(armcap.o):armcap.c:function OPENSSL_cpuid_setup: error: undefined reference to 'sigfillset'

I:/webrtc/android/openssl-1.1.1k/output-armeabi-v7a/lib/libcrypto.a(armcap.o):armcap.c:function OPENSSL_cpuid_setup: error: undefined reference to 'sigdelset'

I:/webrtc/android/openssl-1.1.1k/output-armeabi-v7a/lib/libcrypto.a(armcap.o):armcap.c:function OPENSSL_cpuid_setup: error: undefined reference to 'sigdelset'

I:/webrtc/android/openssl-1.1.1k/output-armeabi-v7a/lib/libcrypto.a(armcap.o):armcap.c:function OPENSSL_cpuid_setup: error: undefined reference to 'sigdelset'

I:/webrtc/android/openssl-1.1.1k/output-armeabi-v7a/lib/libcrypto.a(armcap.o):armcap.c:function OPENSSL_cpuid_setup: error: undefined reference to 'sigdelset'

I:/webrtc/android/openssl-1.1.1k/output-armeabi-v7a/lib/libcrypto.a(ui_openssl.o):ui_openssl.c:function open_console: error: undefined reference to 'tcgetattr'

I:/webrtc/android/openssl-1.1.1k/output-armeabi-v7a/lib/libcrypto.a(ui_openssl.o):ui_openssl.c:function read_string_inner: error: undefined reference to 'signal'

I:/webrtc/android/openssl-1.1.1k/output-armeabi-v7a/lib/libcrypto.a(ui_openssl.o):ui_openssl.c:function read_string_inner: error: undefined reference to 'tcsetattr'

I:/webrtc/android/openssl-1.1.1k/output-armeabi-v7a/lib/libcrypto.a(ui_openssl.o):ui_openssl.c:function read_string_inner: error: undefined reference to 'tcsetattr'

clang++: error: linker command failed with exit code 1 (use -v to see invocation)
2. Reason:
Sigdelset, sigfillset and signal cannot be found in the SDK of Android
3. Solution:
Modify the minSdkVersion of build.grandle to a version number after 21:
apply plugin: 'com.android.application'
def LIBWEBRTC_HOME_PATH = "I:/webrtc/android/webrtc_m84_20201001/webrtc_android/src/"
//def LIBWEBRTC_HOME_PATH = "I:/webrtc/android/androidnativeapi/app/webrtc/"
android {
    compileSdkVersion 28
    defaultConfig {
        applicationId "org.webrtc.examples.androidnativeapi"
        minSdkVersion 21
        targetSdkVersion 28
        versionCode 1
        versionName "1.0"
        testInstrumentationRunner "android.support.test.runner.AndroidJUnitRunner"
        externalNativeBuild {
            cmake {
                arguments "-DLIBWEBRTC_HOME_PATH=" + LIBWEBRTC_HOME_PATH,
                        "-DANDROID_STL=c++_static"
            }
        }
        ndk {
            abiFilters  "armeabi-v7a"
        }
    }
    buildTypes {
        release {
            minifyEnabled false
            proguardFiles getDefaultProguardFile('proguard-android.txt'), 'proguard-rules.pro'
        }
    }
    externalNativeBuild {
        cmake {
            path "src/main/cpp/CMakeLists.txt"
        }
    }
    compileOptions {
        sourceCompatibility JavaVersion.VERSION_1_8
        targetCompatibility JavaVersion.VERSION_1_8
    }
    sourceSets {
        main {
            // 1. configure the root directory libs to load third-party so libraries, (it is best not to create jniLibs, in the many open source libraries may cause conflicts, not yet found)
            // 2. automatically copy the so libraries in the libs directory to the specified directory when running
            // 3. If you don't need to recompile the so you created, you can copy the so generated by (app/build/intermediates/transforms) to this directory
            jniLibs.srcDirs = ['libs']
            // If it is a single folder, you can directly configure it as follows
            // jniLibs.srcDir 'libs'
        }
    }
    buildToolsVersion '28.0.2'//ADD
}
repositories {
    flatDir{
        dirs'libs'
    }
}

dependencies {
    implementation fileTree(dir: "libs", include: ["*.aar"])

    //implementation fileTree(include: ['*.jar'], dir: 'libs')
    implementation 'com.android.support:appcompat-v7:28.0.0-rc02'
    implementation 'com.android.support.constraint:constraint-layout:1.1.3'
    testImplementation 'junit:junit:4.12'
    androidTestImplementation 'com.android.support.test:runner:1.0.2'
    androidTestImplementation 'com.android.support.test.espresso:espresso-core:3.0.2'
    //implementation(name: 'libwebrtc', ext: 'aar')
    //implementation 'org.webrtc:google-webrtc:1.0.+'
}Problems encountered
fatal error: dynlink_nvcuvid.h: No such file or directory #include <dynlink_nvcuvid.h>
Solution
Add: -dbuild_opencv_cudacodec=OFF
mkdir build
cd build
cmake -D CMAKE_BUILD_TYPE=RELEASE -D CMAKE_INSTALL_PREFIX=/usr/local -D BUILD_TIFF=ON -DBUILD_opencv_cudacodec=OFF ..

sudo make -j12
sudo make install
Problems encountered
[ WARN:0] cvCreateFileCaptureWithPreference: backend FFMPEG doesn't support legacy API anymore.
Solution
install opencv3.4.0
It must be 3.4.0, others 3.4 X is wrong
3.4.0 download address https://codeload.github.com/opencv/opencv/tar.gz/refs/tags/3.4.0
Then install the extension package of OpenCV 3.4.0, download address, https://codeload.github.com/opencv/opencv_contrib/tar.gz/refs/tags/3.4.0
Preparation
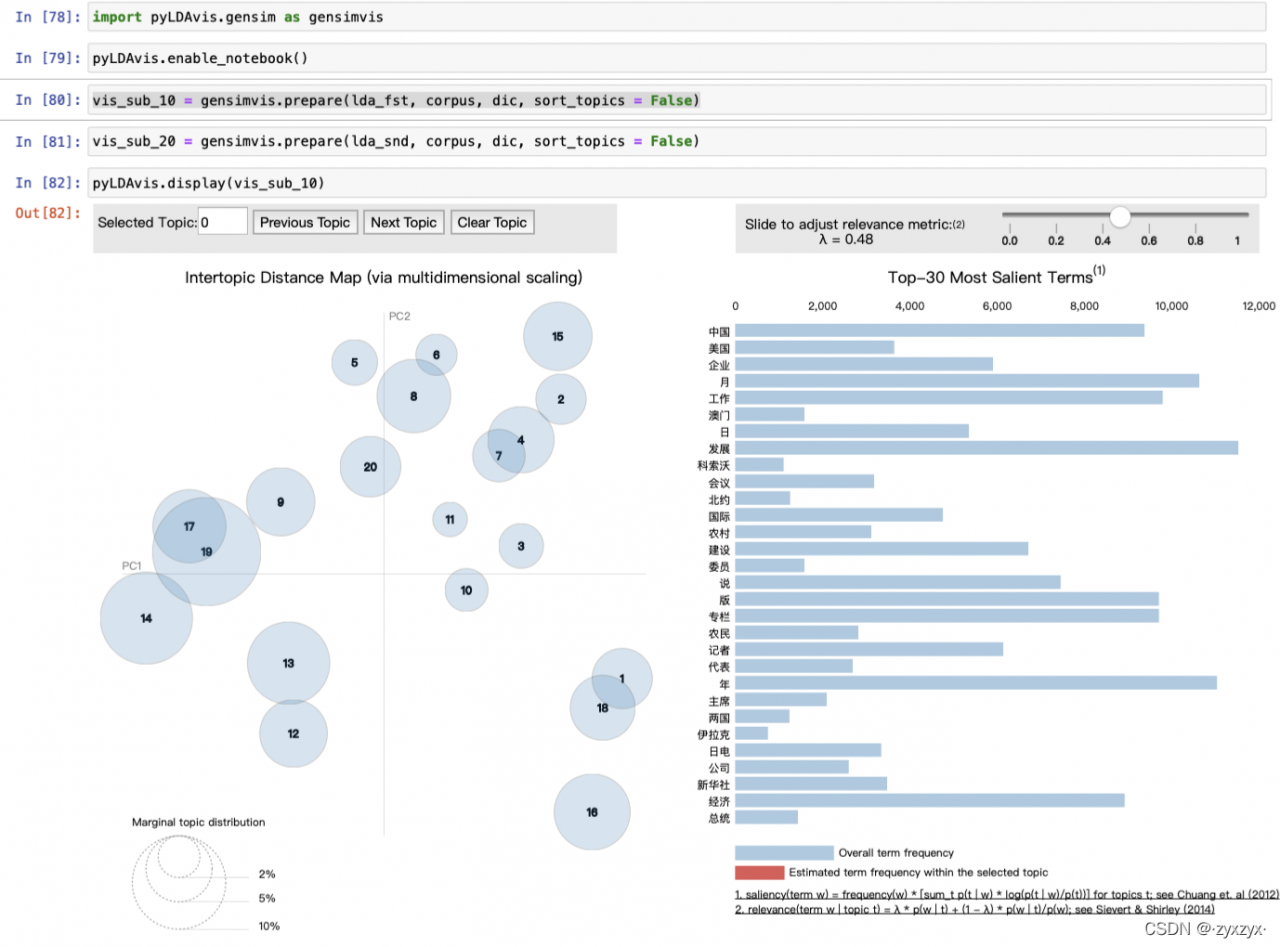
First, make sure you have the pyldavis and gensim libraries installed.
pip install gensim
pip install pyldavis
Code change
Secondly, if the error not attribute is because the version of pyldavis is different, the new version needs to be changed as follows: change all pyLDAvis.gensim to gensimvis。
import pyLDAvis.gensim as gensimvis
pyLDAvis.enable_notebook()
vis_sub_10 = gensimvis.prepare(lda_fst, corpus, dic, sort_topics = False)
vis_sub_20 = gensimvis.prepare(lda_snd, corpus, dic, sort_topics = False)
pyLDAvis.display(vis_sub_10)
Success! The effect is shown in the following figure.
Or you can install a lower version of pyldavis
pip install pyLDAvis==2.1.2
Codes:
import pyLDAvis.gensim
pyLDAvis.enable_notebook()
vis_sub_10 = pyLDAvis.gensimda_fst, corpus, dic, sort_topics = False)
vis_sub_20 = pyLDAvis.gensim.prepare(lda_snd, corpus, dic, sort_topics = False)
pyLDAvis.display(vis_sub_10)。
Cause: Because the /etc/sudoers file was previously edited with a problem, the default Ubuntu system could not use sudo to raise power after saving, and could not use root privileges causing a big problem; the default Ubuntu system root was not allowed to log in, and the root login password had not been set before; sadly, it could not be modified by directly logging into the root account.
The problem is in /etc/sudoers: syntax error near line 32 of the sudoers file.
Solution.
1. open two shell windows with the normal user “ubuntu”.
2, in the first ssh session execute “echo $$” and write down the PID
3, in the second ssh session, execute “pkttyagent –process PID”.
4. Execute “pkexec visudo” in the first ssh session and then enter the password in the second ssh session. This will give you access to the /etc/sudoers file, then you will know the error line and modify the data.
5. Use the nano editor for editing by default.
1、Execute "Ctrl+O" #Save
2, after the implementation of "Ctrl + O", the output will be "File Name to Write sudoers.tmp", in tmp after the implementation of the carriage return *
3、Execute "Ctrl+X "* #Exit
At this time, when you open the shell link, you will not report an error when using sudo and Su rights raising behavior;