Category Archives: Error

[Solved] Error–dubbo Connect zk Error: zookeeper not connected

Error Message:

Error creating bean with name 'dubboBootstrapApplicationListener': Initialization of bean failed; nested exception is java.lang.IllegalStateException: zookeeper not connected


Problem:
The project starts with the following error.
IllegalStateException: zookeeper not connected

Reason:
First of all, the default connection timeout for dubbo registration is 5 seconds.
And the zookeeper server I connected to was a little slow to access, which caused the connection to time out.

Solution:
Adjust the default registration time for dubbo to 200 seconds
The default registration timeout is 5 seconds
All others are 1 second
So I increased the timeout for other service calls as well.
If you only need to modify the registration timeout, just add or modify registry.

dubbo:
  registry:
    timeout: 200000
  service:
    timeout: 200000
  consumer: 
    timeout: 200000
  provider:
    timeout: 200000

[Solved] error: password authentication failed for user “postgres”

password authentication failed for user “postgres” with docker

Steps:

    1. 1. run the instruction to create a docker container.

docker run --rm --name test-postgres -p 5432:5432 -e POSTGRES_PASSWORD=pw -d postgres

    1. 2. run the following command in node code to connect to the database:
import pg from 'pg'
const { Pool } = pg
pool = new Pool({
   database: 'postgres',
   user: 'postgres',
   password: 'pw',
   port: 5432
})

The following error is thrown:
error: password authentication failed for user “postgres”


Cause analysis

Because Postgres has been installed locally, Postgres is automatically started when the system is started by default. When connecting to the database, the locally installed Postgres service is preferentially connected, so the connection fails.


Solution:

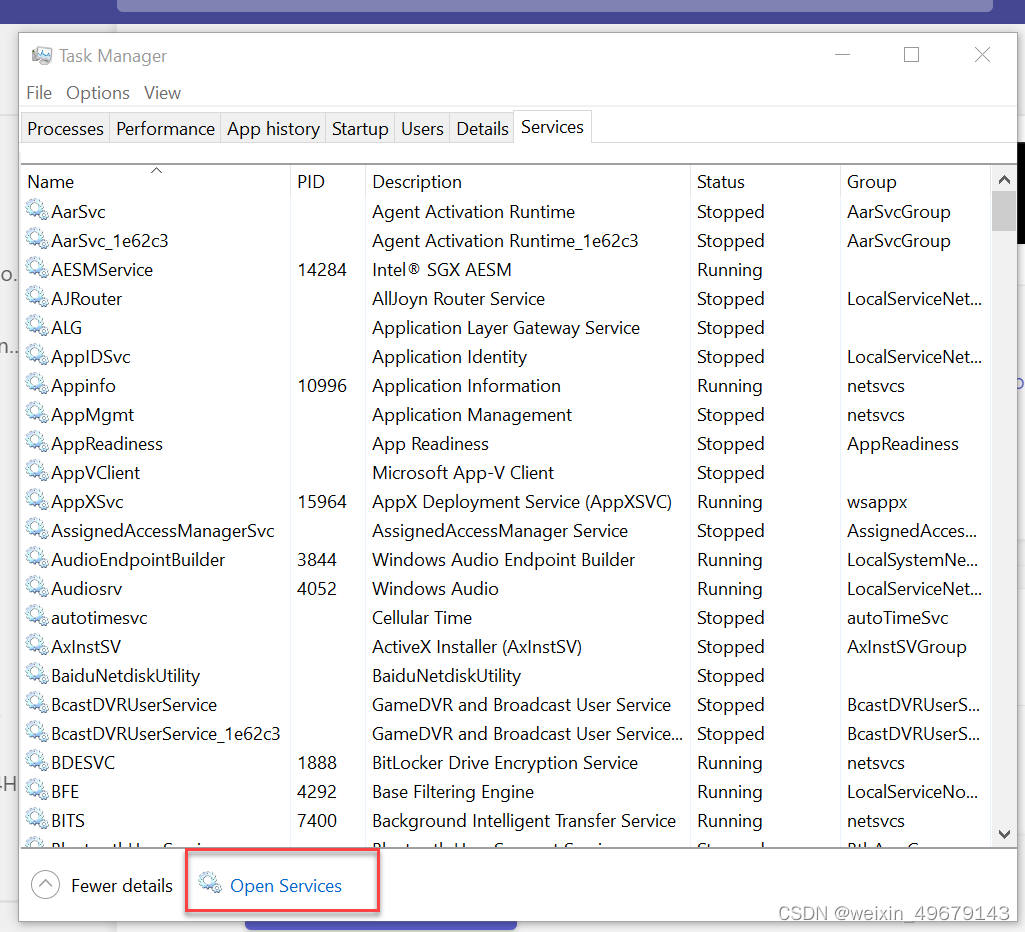
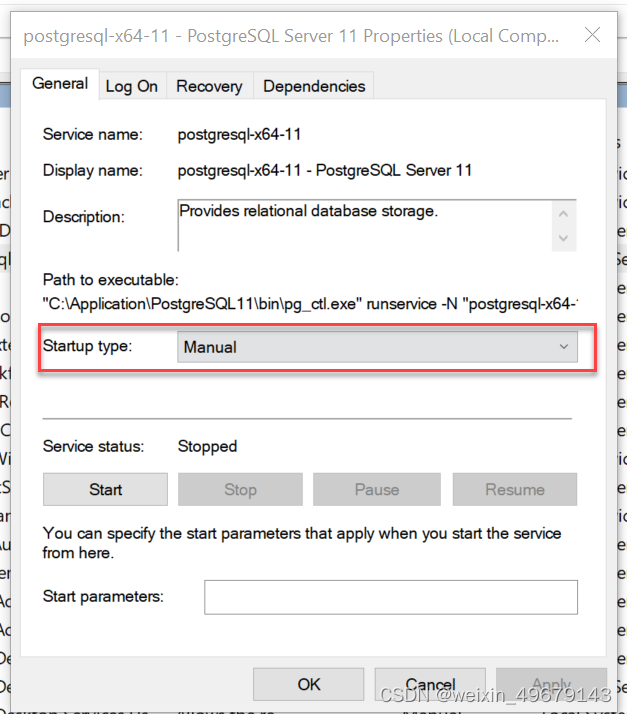
Open Window Task Manager, under Services you will see a postgres service running. Right-click to turn off the postgres service, open the Service window and double-click on the postgres service to set the Startup Type to Manual.
then


Other troubleshooting methods

Open the Terminal of the container

  1. Enter the following two commands to see if there is a problem with local host permissions.
    cd var/lib/postgresql/data
    cat pg_hba.conf
  2. To see if the default user is postgres.
    psql -U postgres -x -c "select * from current_user;"
  3. Check the password expiration date. rolvaliduntil no value means no expiration date.
    psql -h 127.0.0.1 -U postgres -d postgres
    SELECT * FROM pg_roles WHERE rolname='postgres';
  4. Try clearing docker’s columns and containers, and restarting docker

[Solved] catkin_make Error: Invoking “make -j12 -l12“ failed

While studying the official ROS tutorial Writing a Simple Publisher and Subscriber (C++), the following error occurred when running catkin_make:

Base path: /home/free/catkin_ws
Source space: /home/free/catkin_ws/src
Build space: /home/free/catkin_ws/build
Devel space: /home/free/catkin_ws/devel
Install space: /home/free/catkin_ws/install
####
#### Running command: "make cmake_check_build_system" in "/home/free/catkin_ws/build"
####
####
#### Running command: "make -j12 -l12" in "/home/free/catkin_ws/build"
####
[  0%] Built target std_msgs_generate_messages_lisp
[  0%] Built target std_msgs_generate_messages_nodejs
[  0%] Built target std_msgs_generate_messages_cpp
[  0%] Built target std_msgs_generate_messages_py
[  0%] Built target std_msgs_generate_messages_eus
[  0%] Built target _beginner_tutorials_generate_messages_check_deps_Num
[  0%] Built target _beginner_tutorials_generate_messages_check_deps_AddTwoInts
[ 58%] Built target beginner_tutorials_generate_messages_py
[ 64%] Built target beginner_tutorials_generate_messages_eus
[ 58%] Built target beginner_tutorials_generate_messages_lisp
[ 58%] Built target beginner_tutorials_generate_messages_cpp
[ 76%] Built target beginner_tutorials_generate_messages_nodejs
[ 76%] Built target beginner_tutorials_generate_messages
[ 82%] Linking CXX executable /home/free/catkin_ws/devel/lib/beginner_tutorials/talker
[ 88%] Linking CXX executable /home/free/catkin_ws/devel/lib/beginner_tutorials/listener
/usr/bin/ld: CMakeFiles/listener.dir/src/listener.cpp.o: relocation R_X86_64_32 against `.rodata' can not be used when making a PIE object; recompile with -fPIC
/usr/bin/ld: Final link failure: output non-representable links
collect2: error: ld returned 1 exit status
beginner_tutorials/CMakeFiles/listener.dir/build.make:112: recipe for target '/home/free/catkin_ws/devel/lib/beginner_tutorials/listener' failed
make[2]: *** [/home/free/catkin_ws/devel/lib/beginner_tutorials/listener] Error 1
CMakeFiles/Makefile2:1344: recipe for target 'beginner_tutorials/CMakeFiles/listener.dir/all' failed
make[1]: *** [beginner_tutorials/CMakeFiles/listener.dir/all] Error 2
make[1]: *** Waiting for unfinished tasks....
/usr/bin/ld: CMakeFiles/talker.dir/src/talker.cpp.o: relocation R_X86_64_32 against `.rodata' can not be used when making a PIE object; recompile with -fPIC
/usr/bin/ld: Final link failure: output non-representable links
collect2: error: ld returned 1 exit status
beginner_tutorials/CMakeFiles/talker.dir/build.make:112: recipe for target '/home/free/catkin_ws/devel/lib/beginner_tutorials/talker' failed
make[2]: *** [/home/free/catkin_ws/devel/lib/beginner_tutorials/talker] Error 1
CMakeFiles/Makefile2:1381: recipe for target 'beginner_tutorials/CMakeFiles/talker.dir/all' failed
make[1]: *** [beginner_tutorials/CMakeFiles/talker.dir/all] Error 2
Makefile:140: recipe for target 'all' failed
make: *** [all] Error 2
Invoking "make -j12 -l12" failed

After looking for the reason for a long time, I finally found that the final error was due to the wrong version of GCC and G + +. After changing GCC and g++ 5.5.0, I successfully compiled

Process for installing GCC and g++ version 5.5.0:

sudo add-apt-repository ppa:ubuntu-toolchain-r/test 
sudo apt-get update 
sudo apt-get install gcc-5
sudo apt-get install g++-5

Change GCC and g++ versions

cd /usr/bin 
sudo rm gcc 
sudo ln -s gcc-5 gcc 
sudo rm g++ 
sudo ln -s g++-5 g++

Finally, check whether the modification is successful

gcc --version
g++ --version

Recompile:

catkin_make clean   #Clear the front compile
catkin_make 

[Solved] failed (13: Permission denied) while reading upstream

Error Messages:

/usr/local/nginx/logs/error.log
2022/08/11 09:36:47 [crit] 2821940#0: *6263 open() "/usr/local/nginx/proxy_temp/2/29/0000000292" failed 
(13: Permission denied) while reading upstream, client: 15.60.178.88, server: demo.jichu.com, 
request: "GET /static/css/bootstrap.min.css.map HTTP/1.1", 
upstream: "http://15.60.178.88:3001/static/css/bootstrap.min.css.map", host: "demo.jichu.com"
2022/08/11 09:36:49 [crit] 2821940#0: *6261 open() "/usr/local/nginx/proxy_temp/3/29/0000000293" failed (
13: Permission denied) while reading upstream, client: 15.60.178.88, server: demo.jichu.com, 
request: "GET /class/studChoiceConfig?v=463&_=1660181808733 HTTP/1.1", 
upstream: "http://15.60.178.88:3001/class/stu?v=463&_=1660181808733", host: "demo.jichu.com", 
referrer: "http://demo.jichu.com/class/class"


Solution:
vi /usr/local/nginx/conf/nginx.conf
#use nobody;
Modify to
use root;
Restart nginx

How to Configure OpenFPGA Environment (Probable Errors & Their Solutions)

Openfpga environment configuration and problem-solving


Environment configuration process

git clone https://github.com/LNIS-Projects/OpenFPGA.git​

cd OpenFPGA/.github/workflows​
# Add ‘sudo’ before apt-get in script: install_depencies_build.sh​
source install_depencies_build.sh  # (install all depencies)​

# back to OpenFPGA
python3 –m pip install –r requirements.txt​
make all​

# During make, watch the error messages and see which package is missing, repeatly using  ‘sudo apt install XXX’ to install them like:​
Tcl.h:   sudo apt install tcl-dev​
readline:   sudo apt install readline-dev​

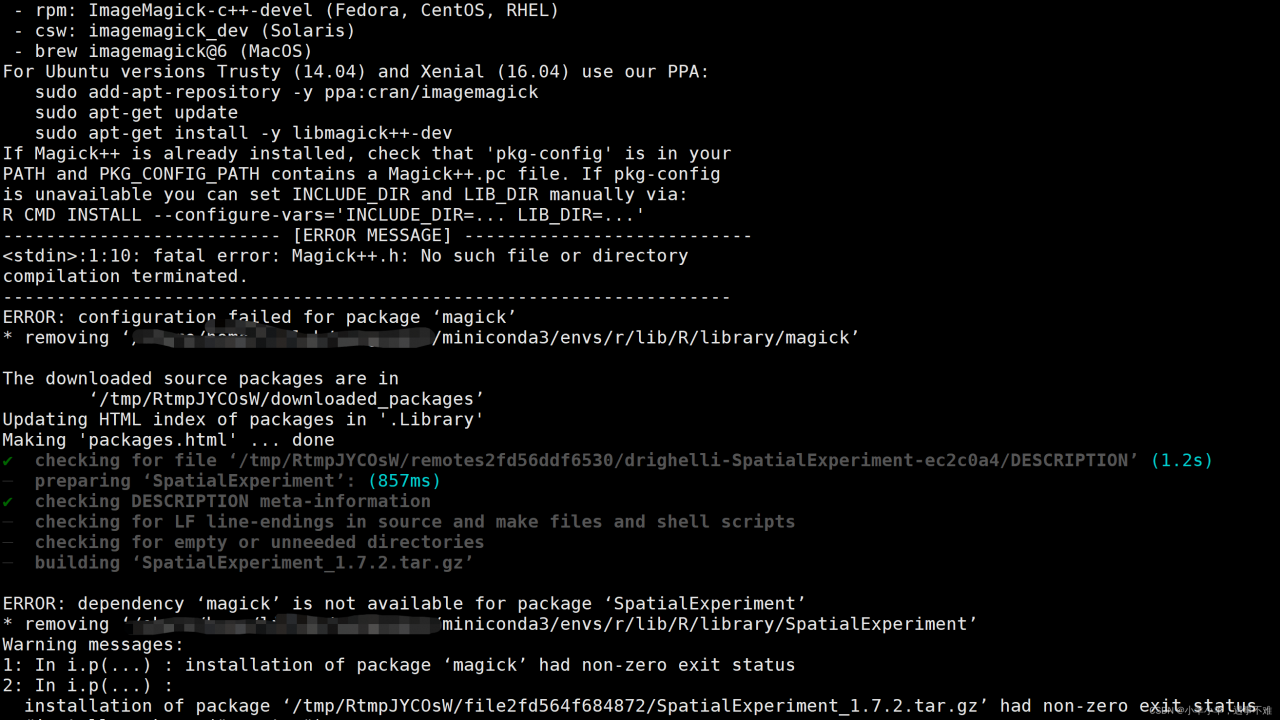
How to Solve the Errors:

Compilation error

SIGSTKSZ Error

  • Cause: Guess it is a C compilation tool chain version problem caused by different source change
  • Solution: Update the version of catch.hpp and replace


1. Download

wget -O ~/Downloads/catch.hpp https://github.com/catchorg/Catch2/releases/download/v2.13.9/catch.hpp

2. Replace the file

cd {OpenFPGA_File_location}/libs/EXTERNAL/libcatch/
mv catch.hpp catch.bak.hpp
mv ~/Downloads/catch.hpp ./

FATAL ERROR issues about TBB

  • Cause: system problem missing header file tbb_stddef.h
  • Solution:
wget -O ~/Downloads/tbb_stddef.h https://raw.githubusercontent.com/wjakob/tbb/9e219e24fe223b299783200f217e9d27790a87b0/include/tbb/tbb_stddef.h
sudo mv ~/Downloads/tbb_stddef.h /usr/include/tbb

Missing header file task_scheduler_init.h

wget -O ~/Downloads/task_scheduler_init.h https://raw.githubusercontent.com/wjakob/tbb/raw/master/include/tbb/task_scheduler_init.h
sudo mv ~/Downloads/task_scheduler_init.h /usr/include/tbb

Dependency not found

  • Uniform problem: Error or not running when running install_dependencies_build.sh or when pip install
  • Solution: rerun both steps and install separately if there is still a problem
Note
# Missing ffi.h
sudo apt install libffi-dev
# Missing tcl.h
sudo apt install tk tcl tk-dev tcl-dev
# Missing readline
sudo apt install readline-dev libreadline6-dev

run-task error

Check the log. The most observed problem is that envYAML package is not installed

pip3 install envyaml

ModuleNotFoundError ‘prettytable’

When running run_vtr_task.py, it prompts: ModuleNotFoundError: No module named ‘prettytable’
processing:

# update pip
python -m pip install --upgrade pip
# install PrettyTable package
pip install PrettyTable

Script unsatisfiable

  • ctags, qt5-default are not available candidates (no installation candidate)
  • Solution: In most usage scenarios, these two packages are not important, edit the install_dependencies_build.sh file and delete the lines ctags and qt5-default

Network environment problems

include:

  1. Connection refused Connection refused
  2. 443 SSL could not be established
  3. Clone failed Clone failed

Solution:

  1. Modify hosts
  2. Open accelerator/VPN
  3. Use personal hotspot for mobile traffic

Runtime problems

Permission Denied | Can not find directory…

Problem Analysis: The command is incorrectly run with the root user when git clone or install dependencies, resulting in the personal user not having any modification rights.
Solution: In the root directory of OpenFPGA

sudo chown -hR {user name}:{user group, usually same as user name} . /
# Change all file owners to individual users

In the yosys shell, when the show command views the circuit diagram, it prompts an error

Problem: lack of dot matrix graphic display tool
solution: try running sudo apt-get install xdot
System Startup and Display: [drm:drm_edid_block_valid] *ERROR* EDID checksum is invalid

envirenment:

CentOS7

question:

On startup, the system scrolls the console with messages similar to the following:

[drm:drm_edid_block_valid] *ERROR* EDID checksum is invalid, remainder is 128
Raw EDID:
    ff ff ff ff ff ff ff ff ff ff ff ff ff ff ff ff
    ff ff ff ff ff ff ff ff ff ff ff ff ff ff ff ff
    ff ff ff ff ff ff ff ff ff ff ff ff ff ff ff ff
    ff ff ff ff ff ff ff ff ff ff ff ff ff ff ff ff
    ff ff ff ff ff ff ff ff ff ff ff ff ff ff ff ff
    ff ff ff ff ff ff ff ff ff ff ff ff ff ff ff ff
    ff ff ff ff ff ff ff ff ff ff ff ff ff ff ff ff
    ff ff ff ff ff ff ff ff ff ff ff ff ff ff ff ff
i915 0000:00:02.0: HDMI-A-2: Ignoring invalid EDID block 59.


Approach:

Edit the file /boot/grub/grub.conf: add nomodeset to the end of the line starting with “kernel”.

kernel /vmlinuz-2.6.32-279.22.1.el6.x86_64 ro root=/dev/mapper/vg_rhel6-rootfs rd_NO_LUKS crashkernel=auto rhgb quiet <strong>nomodeset</strong>


reason:

Video mode settings have been moved to the kernel. This means that programming of hardware specific clock rates and video card registers happens in the kernel, not in X Windows System startup. On some cards this doesn’t work properly. Adding the nomodeset parameter instructs the kernel to use the BIOS video mode during boot and to load the video driver when the X Windows System starts.

Diagnostic steps:

View /var/log/dmesg log information.

K8S Master Initialize Error: [ERROR CRI]: container runtime is not running: output: E0812

[root@master1 ~]# kubeadm init   --kubernetes-version 1.24.3   --apiserver-advertise-address=0.0.0.0   --service-cidr=10.96.0.0/16   --pod-network-cidr=10.250.0.0/16   --image-repository k8s.gcr.io 
[init] Using Kubernetes version: v1.24.3
[preflight] Running pre-flight checks
error execution phase preflight: [preflight] Some fatal errors occurred:
        [ERROR CRI]: container runtime is not running: output: E0812 15:41:43.145278   29697 remote_runtime.go:925] "Status from runtime service failed" err="rpc error: code = Unimplemented desc = unknown service runtime.v1alpha2.RuntimeService"
time="2022-08-12T15:41:43+08:00" level=fatal msg="getting status of runtime: rpc error: code = Unimplemented desc = unknown service runtime.v1alpha2.RuntimeService"
, error: exit status 1
[preflight] If you know what you are doing, you can make a check non-fatal with `--ignore-preflight-errors=...`
To see the stack trace of this error execute with --v=5 or higher
# Solution
[root@master1 ~]# rm -rf /etc/containerd/config.toml
[root@master1 ~]# systemctl restart containerd

[Solved] HALCON error #5190: Invalid window parameter

There are two types of window operations in Halcon:

1. dev_open_window opens the entity’s form and displays the image

2. open_window opens a virtual form, which is actually an image into the cache

  1. * See the official routine advanced_visualization_settings.hdev
  2. dev_close_window()
  3.  dev_open_window ( 0, 0, 512, 512, ‘black’, WindowHandle)
  4.  set_window_param (WindowHandle, ‘graphics_stack’, ‘true’) //default value: ‘false’
  5.  set_window_param(WindowHandle, ‘flush’, ‘false’) //default value: ‘true’

In my C++ project, I encountered this problem. When the SetWindowParam function is executed, an exception is always reported:

HALCON error #5190: Invalid window parameter

The solution is as follows:
The SetWindowParam function needs to rely on the dynamic library file hcanvas.dll, and copy the library from
C:\Program Files\MVTec\HALCON-xxx\bin\x64-win64
to your own project path.

[Solved] Error: ENOSPC: System limit for number of file watchers rea

describe:

Apache Superset is an open source data visualization platform.

To reproduce:

kali@kali:~/Desktop/superset$ sudo docker-compose up

The error is reported during the startup process of superset with docker as follows

Error from chokidar (/app/superset-frontend/images/viz_thumbnails): Error: ENOSPC: System limit for number of file watchers reached, watch

** **

Solution:

kali@kali:~/Desktop/superset$ echo fs.inotify.max_user_watches=524288 | sudo tee -a /etc/sysctl.conf && sudo sysctl -p 
​[
 sudo] password for kali: 
​fs.inotify.max_user_watches
 =524288 
​fs.inotify.max_user_watches
 = 524288 
​kali
 @kali:~/Desktop/superset$

Re-docker run superset, green shows no errors

Problem reference:

https://github.com/gatsbyjs/gatsby/issues/11406

[Solved] Springboot Reflection calls ServiceImpl Error: java.lang.NullPointerException, mapper is null

Springboot uses reflection to call serviceimpl and reports an error: java.lang.nullpointerexception

Because the mapper of ServiceImpl is null, the following is the original implementation code:

           // package name and class name
           Class classzz = Class.forName("com.XXX.XXX.service.impl.SenDataServiceImpl");

           // Get the constructor object
           Constructor constructor = null;
           try {
               constructor = classzz.getConstructor();
           } catch (NoSuchMethodException e) {
               e.printStackTrace();
           }
           // Create an object using the constructor object
           Object o = constructor.newInstance();
           // Pass the method to be executed Pass the parameter type, if not, you can leave it out
           Method method = classzz.getMethod("method name", long.class,String.class,String.class );
// invoke method, and pass parameters, if there are no parameters, you can leave them out
           Object obj =method.invoke(o,  5,
                  "param1",
                   "param2");

In the post query mode, you need to ContextLoader.getCurrentWebApplicationContext() firstly, but you haven’t gone to invoke, so the ContextLoader.getCurrentWebApplicationContext() is null.

The final solution is as follows:

1. Create a new class SpringBootBeanUtil

package com.smart.hyd.common.utils.reflect;

import org.springframework.beans.BeansException;
import org.springframework.context.ApplicationContext;
import org.springframework.context.ApplicationContextAware;
import org.springframework.stereotype.Component;

/**
 * SpringBoot Common class to get the bean tool class in the Spring container
 */
@Component
public class SpringBootBeanUtil implements ApplicationContextAware {

    private static ApplicationContext applicationContext;

    public void setApplicationContext(ApplicationContext applicationContext) throws BeansException {
        if (SpringBootBeanUtil.applicationContext == null) {
            SpringBootBeanUtil.applicationContext = applicationContext;
        }
        System.out.println("========ApplicationContext========");
//        System.out.println("========In the general class you can get the applicationContext object by calling SpringBootBeanUtil.getApplicationContext()========");
        System.out.println("========applicationContext="+ SpringBootBeanUtil.applicationContext +"========");
    }

    /**
     * get applicationContext
     * @return
     */
    public static ApplicationContext getApplicationContext() {
        return applicationContext;
    }

    /**
     * Get Bean by name.
     * @param name
     * @return
     */
    public static Object getBean(String name) {
        return getApplicationContext().getBean(name);
    }

    /**
     * Get Bean by class.
     * @param clazz
     * @return
     */
    public static <T> T getBean(Class<T> clazz) {
        return getApplicationContext().getBean(clazz);
    }

    /**
     * Return the specified bean by name, and Clazz
     * @param name
     * @param clazz
     * @return
     */
    public static <T> T getBean(String name, Class<T> clazz) {
        return getApplicationContext().getBean(name, clazz);
    }

}

2. Call SpringBootBeanUtil.getApplicationContext(). When invoking, the first parameter is applicationContext.getBean(ServiceImplType). Refer to the following code for specific implementation.

try {
               //Retrieve the created object from the ApplicationContext
               // Do not create the serviceimpi object directly by reflection, because the object created by reflection cannot instantiate the dao interface
               ApplicationContext applicationContext = SpringBootBeanUtil.getApplicationContext();
               //reflection creates the serviceimpi entity object, and the entity class
               Class<? > ServiceImplType = Class.forName("com.XXX.XXX.service.impl.SenDataServiceImpl");
              // Class<? > entityType = Class.forName("com.XXX.XXX.service.impl.SenDataServiceImpl");
               //reflection set method parameters.
               Method method = ServiceImplType.getDeclaredMethod("methodName",long.class,String.class,String.class );
               // get the instantiated bean in the ApplicationContext according to class
               method.invoke(applicationContext.getBean(ServiceImplType), 5,
                           "param1",
                           "param2");

           } catch (ClassNotFoundException | IllegalAccessException | InvocationTargetException | NoSuchMethodException e) {
               e.printStackTrace();
               LOGGER.error("\n onMessage Receive Processing Message Failed - {}", "methodName");
           }

This solves the problem that the reflection calls ServiceImpland the mapper reports an error when it is null.

[Solved] SyntaxError: Unexpected end of JSON input

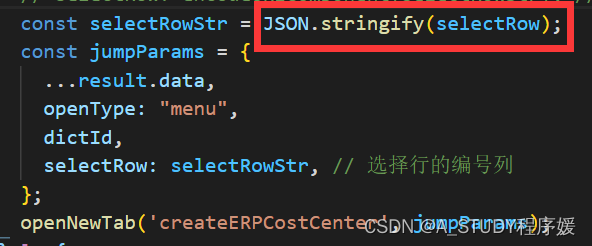
Note: When doing a project, I encountered the need to transfer a line of data objects to another page, using JSON.stringify => JSON.parse and then transferring it by url:

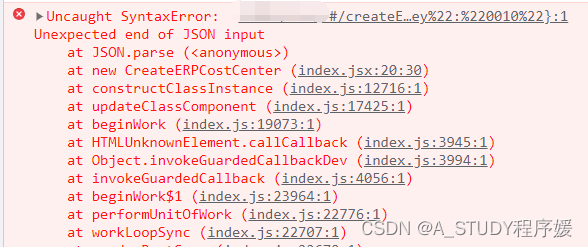
Then the error is reported as follows:

Later, after reviewing the relevant information, we found that we need to add a coding and decoding process, as follows:

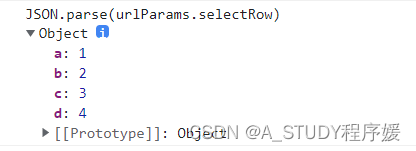
After printing, the object appears:

Cause analysis:

Reason: If an address is encountered in the parameters of the object or the elements of the array, and the address includes ? and & these special symbols, the object/array must first be converted to a string by JSON.stringify and then encoded by encodeURIComponent, when received, first decoded by decodeURIComponent and then converted to JSON format object/array by JSON.parse