Author Archives: Robins

Conversion of two data types in Java

how data types in Java are converted

data type casting is the process of changing a value from one type to another. For example, String data 456 can be converted to a numeric type, and any type of data can be converted to String.

if you convert from a low-precision data type to a high-precision data type, you will never overflow and will always succeed. However, the conversion of high-precision data type to low-precision data type will inevitably result in information loss and possibly failure.

data type conversion can be done in two ways, implicit and explicit.

implicit cast:

the first type is implicit conversion, which is the conversion from a low-level type to a high-level type without any operation, the system will perform automatically. This type conversion is called implicit conversion. The following basic data types involve data conversions, which do not include logical types or character types. These types are classified in order of accuracy from low to high:
byte< short< int< long< float< Double
example:
int x = 100;
float y = x; The output y value is 100.0

implicit casting requires certain rules to resolve when to convert one type of data to another.
the general rule of implicit type conversion below:

shows type conversion:

the second type is display type conversion, also known as display type conversion to cast. Display type conversion must be used when assigning the value of a high-precision variable to a low-precision variable.
syntax :

may cause accuracy to disappear when performing display type conversions

( type name) value to be converted

example:
int a = (int)45.23;
int a = (int)45.23;
long b = (long)45.6f;
int c = (int) ‘d’;
output result a=45;
b = 45;
c = 100; Note: when assigning integers to a byte short int long type of variable, the values of these types must not be exceeded, or you must enter a cast. For example:
byte a = (byte)129;

reference: what are the two types of data conversion in Java?

How to convert a Java string into a number (stringtonumber)

public class StringToNumber {
    public static void main(String[] args) {
        String str = "123";

        Integer num1 = new Integer(str);

        int num2 = Integer.parseInt(str);

        Integer num3 = Integer.valueOf(str);

        System.out.println(num1+"\t"+num2+"\t"+num3);

    }
}

if it’s a single character or a string you have to cut it and convert it to char and then convert it to char otherwise it will be null pointer exception

like above

String a = "ABC";

//将String对象中的每一个下标位的对象保存在数组中

char[] b = a.toCharArray();

//转换成响应的ASCLL

for (char c : b) {

System.out.println(Integer.valueOf(c));

}

principle analysis:

Interger class constructor

directly into the source code, look at this constructor:

 
  1. public Integer(String s) throws NumberFormatException {

  2. this.value = parseInt(s, 10);

  3. }

What is

this this.value?Continue tracing source:

 private final int value;

from this, we can find a characteristic of the packaging class:

inside the wrapper, the corresponding primitive data type of the wrapper class is treated as a private attribute, and the value of the primitive data type is wrapped externally into an object of the corresponding wrapper class.

in the constructor of an Integer, we find that the parseInt (String s) method is called, and we continue our tracing, which leads us to the second method demonstrated at the beginning of this article:

parseInt (String s) method

 
  1. public static int parseInt(String s) throws NumberFormatException {

  2. return parseInt(s,10);

  3. }

  4. // a: the first method of encapsulation,

  5. // a:

  6. public static int parseInt(String s, int radix)throws NumberFormatException

valueOf (String s) method

 
  1. public static Integer valueOf(String s) throws NumberFormatException {

  2. return Integer.valueOf(parseInt(s, 10));

  3. }

The last method,

, actually calls the parseInt() method (the second)

Abstract method and static method of java interface

introduction

before JDK1.8, interface did not provide any concrete implementation. It was described in JAVA programming ideas as follows: “interface is a keyword that produces a completely abstract class. It does not provide any concrete implementation at all. It allows the author to determine the method name, argument list, and return type, but does not have any method body. The interface provides the form, not any concrete implementation.

but this limitation is broken in JDK1.8, where interfaces allow you to define default methods and static methods.

code example

defines an IHello interface

public interface IHello {
	//抽象方法
	void sayHi();
	//静态方法
	static void sayHello() {
		System.out.println("static method : say Hello!");
	}
	//默认方法
	default void sayByebye() {
		System.out.println("default method : say bye!");
	}

}

defines an IHello interface implementation class

public class HelloImpl implements IHello {
	//实现抽象方法
	@Override
	public void sayHi() {
		
		System.out.println("normal method:say hi");
		
	}
}

The

method call

public class App 
{
	public static void main(String[] args)
    {
    	HelloImpl helloImpl = new HelloImpl();
    	//对于abstract抽象方法通过实例对象来调用
    	helloImpl.sayHi();
    	//default 方法只能通过实例对象来调用
    	helloImpl.sayByebye();
    	//静态方法通过 接口名.方法名()来调用
    	IHello.sayHello();
    	
    	//接口是不允许new的,如果使用new后面必须跟上一对花括号用于实现抽象方法,这种方式被称为匿名实现类,匿名实现类是一种没有名称的实现类
    	//匿名实现类的好处:不用再单独声明一个类 缺点:由于没有名称。不能重复使用,只能使用一次
    	new IHello() {			
			@Override
			public void sayHi() {
				System.out.println("normal method;say hi 新定义");			
			}
		}.sayHi();
    }
}

normal method: say hi
default method: say bye!> static method: say Hello!
normal method: say hi new definition

Python: How to get the size of the picture (byte/kb/mb)

local image

from urllib import request
from PIL import Image
import os
import numpy as np
import requests,io

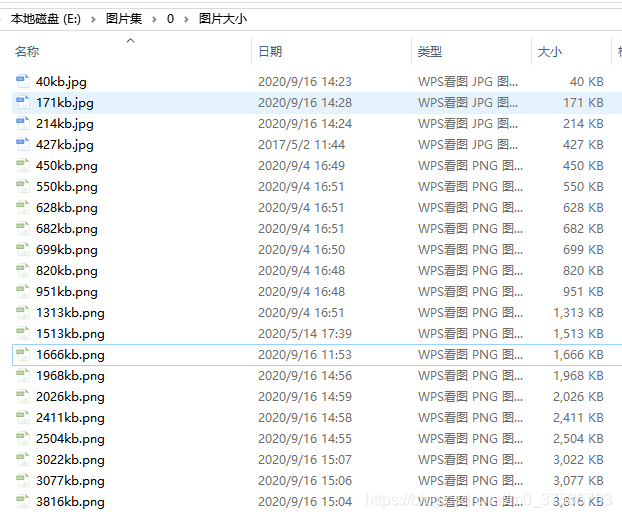
dirpath = r"E:\图片集\0\图片大小"
filenames = os.listdir(dirpath)

for filename in filenames[:]:
    portion = os.path.splitext(filename)  # 将文件名和缀名分成俩部分
    filepath = os.path.join(dirpath, filename)

    with open(filepath, "rb") as f:
        size = len(f.read())
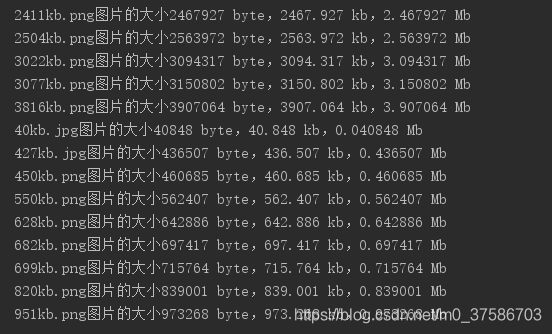
        print("{}图片的大小{} byte,{} kb,{} Mb".format(filename,size, size/1e3, size/1e6))

results:

image url </ strong> </ p>

import requests,io

urls = ['http://******/image/0826/2411kb.png',
        'http://******/image/0826/2026kb.png',
        'http://******/image/0826/1968kb.png']
for url in urls:
    image = requests.get(url).content
    image_b = io.BytesIO(image).read()
    size = len(image_b)
    print("{}的大小{} byte,{} kb,{} Mb".format(url,size, size/1e3, size/1e6))

results:

Note: as can be seen from the above screenshot, byte/ KB /Mb values obtained from both the local image fetch size and url fetch size are larger than those seen on the computer. I don’t know why, but if anyone knows, please help to solve </p b>

Parallel processing in Python (Pool.map(), Pool.starmap(), Pool.apply ())

1. Parallel processing

parallel processing is a mode of operation in which tasks are run simultaneously in multiple processors on the same computer. The purpose of this mode of work is to reduce the total task processing time, but there is an additional overhead associated with communicating between processes, so for small tasks, the total task time increases rather than decreases.

in the Python language, the multiprocessing module runs a separate parallel process by using child processes instead of threads. It allows you to take advantage of multiple processors on your machine (Windows and Unix), that is, multiple processes can run

in memory completely independently

2. How many parallel processing can your device do at most

the maximum number of processes that can be run at one time is limited by the number of processors in the computer. You can use the cpu_count() function in the multiprocessing module to display

import multiprocessing as mp

print("Number of processers: ", mp.cpu_count())

like my computer only has four:

3. Execute synchronously and asynchronously </h3 b> In

parallel processing, there are two types of execution: synchronous and asynchronous

synchronous execution means that each process completes in the order in which it was started. This is done by locking the main program until the corresponding process has finished executing.

asynchronous execution , in other words, the execution of a process does not involve locking, and as a result, the order in which the process results are returned may be confusing, but in general, asynchronous execution completes faster.

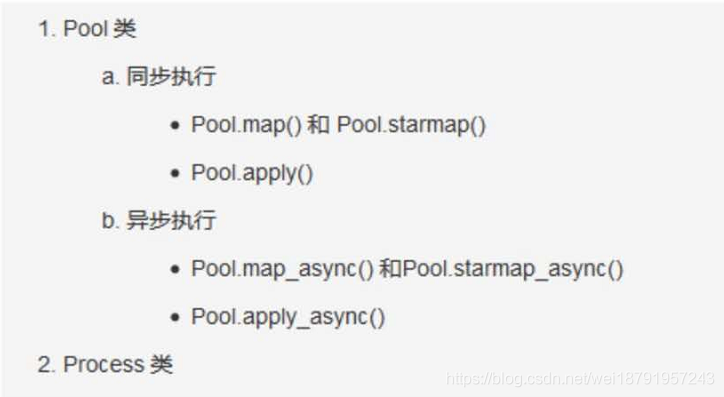
There are two objects in the

multiprocessing module to implement parallel function execution: Pool class and Process class

</ strong>
</ p>

4. Practical problem solving example: calculate the number of elements </h3 b> within a given numerical range in each row

given a two-dimensional matrix (or list and multidimensional list), calculate the number of elements

within a given numerical range in each row

import numpy as np
from time import time

# RandomState()是一个伪随机数生成器
np.random.RandomState(100)
# 0, 10 : 生成0到10的随机整数
# size=[200000, 5]  即生成200000行,一列的 ndarray(二维矩阵的形式,每个里面5个元素)
arr = np.random.randint(0, 10, size=[200000, 5])
data = arr.tolist()  # 将numpy.ndarray 转化为list
# 因为是随机的,所以每次的数字不确定
data = data[:5]
print("数据为:", data)

"""
运行结果:
数据为: [[5, 6, 7, 0, 9], [4, 0, 6, 7, 4], [7, 3, 8, 3, 9], [2, 1, 9, 3, 2], [0, 0, 9, 5, 2]]


"""

4.1 </ strong> don’t use parallel processing reference code </ strong> </ p>
The

function howmany_within_range() is repeated to check howmany diseases the number in the range has returned a count

"""不使用并行处理"""

def howmany_within_range(row, minimum, maximum):
    count = 0
    for n in row:
        if minimum <= n <= maximum:
            count += 1
    return count


result = []
for row in data:
    result.append(howmany_within_range(row, minimum=4, maximum=8))
print("给定数值范围中的元素个数:", result[:10])
"""
注意:以下只是参考输出,因为输入序列是随机的,每次输出结果并不固定
运行结果:
给定数值范围中的元素 [3, 2, 3, 4, 2, 3, 3, 2, 2, 2]
"""

4.2 parallelize the function

The usual way to parallelize code is to take a specific function that can be run multiple times, put it on a different processor, and run it. To do this, you need to use the Pool class to initialize the number of n processors, and then pass the function you want to run and run to the parallel method in the Pool class.

The apply(), map() and starmap() methods are provided in the Pool() to run the passed functions in parallel.

What’s the difference between

apply() and map()?

apply() and map() both take the function to be parallelized as the main parameter, but the difference is that apply() takes the args parameter, which passes each parameter to the function to be parallelized, while map takes only one iterator as the parameter.

Therefore, it is better to use map() for simple, iterative operations for parallel processing, and for faster completion of work

2 Pool. The apply () for parallel processing </ strong> </ p>

if __name__ == '__main__':

    # 1.初始化 multiprocessing.Pool()
    pool = mp.Pool(mp.cpu_count())

    # 2.使用apply(), 将函数howmany_within_range作为主参传进去
    results = [pool.apply(howmany_within_range, args=(row, 4, 8)) for row in data]

    # 3. 不要忘记关闭进程
    pool.close()

    print(results[:10])

note: </ strong> use if __name__ = = “__main__ ‘: put your code in the following to perform, or complains </ p>

The freeze_support “()” line can be omitted if The program
is not going to be frozen to produce an executable. </ p>

if we print outside of this program, we’ll see that it’s going to run in parallel, so we’ll print outside of this program </p b> multiple times

4.2.2 Parallelizing using the Pool. The map () </ strong> </ p>

pool.map () takes only one iterator argument. A simple change to howmany_within_range() is to howmany_within_range_rowonly(), which sets the minimum and maximum to fixed values, that is, . Accepting only the row data list iterator as input is not the best approach, but it clearly shows how it differs from apply()

import multiprocessing as mp
    
    def howmany_within_range_rowonly(row, minimum=4, maximum=8):
        count = 0
        for n in row:
            if minimum <= n <= maximum:
                count += 1
        return count
    
    pool = mp.Pool(mp.cpu_count())
    results = pool.map(howmany_within_range_rowonly,[row for row in data])
    pool.close()
    print(results[:10])

holdings using the Pool. The starmap to parallelize () </ strong> </ p>

, like pool.map (), pool.starmap () takes only one iterator argument, but in starmap() each element in the iterator is also an iterator. This internal iterator allows you to pass arguments to the parallelized function and unwrap them sequentially at execution time, as long as they are passed and unwrapped in the same order

actually, pool. starmap() is like a pool. map() version

that takes arguments

    import multiprocessing as mp

    pool = mp.Pool(mp.cpu_count())
    results = pool.starmap(howmany_within_range, [(row, 4, 8) for row in data])
    pool.close()
    print(results[:10])

5. Asynchronous parallel processing </h3 b>

and synchronous parallel processing peer asynchronous parallel processing functions apply_async(), map_async(), and starmap_async() allow parallel execution of processes asynchronously, that is, the next process can be started as soon as the previous one completes, regardless of the order in which it was started. Therefore, there is no guarantee that the result will be in the same order as the input

6. The use of the Pool. Apply_async to parallelize () </ strong> </ p>

keep updating

</ p>

ModuleNotFoundError: No module named ‘tensorflow.python’ And the pits encountered after installation

error
ModuleNotFoundError: No module named 'tensorflow.python'

after we installed tensorflow, we thought we had debuggable the environment and PIP install tensorflow, if

is entered in CMD

import tensorflow

(normally installed the GPU version tensorflow) :

but may be submitted to the above error, on the Internet a lot according to the results there is no use, 😂 is outrageous.
reason (personal summary) : the computer installed multiple python environment, not only the environment, but also anconda, etc., constitute the virtual environment, so you will encounter various problems when using the command conda to assemble the tensflow environment.
the solution: delete other environment, if you remove after the computer did not have the python environment, then reinstall it again, because I have more than one person has them around, “reshipment can solve the problem of ninety-nine percent”, but if pycharm with few words, I do not recommend to assemble anconda, unloading directly, in python’s official website to download the new version of python. After that, tensorFlow is assembled in the whole large Python environment; With the PIP command, there is little problem with reloading.

after installed, we can run the minist a piece of code: </ p>

from tensorflow.examples.tutorials.mnist import input_data

#加载数据集,参数为下载的路径,如果该路径下没有数据集的话,则会从网上自动下载。
#read_data_sets函数
mnist = input_data.read_data_sets("E:\\桌面\\datatest")
# 打印训练数据大小
print("Training data size:", mnist.train.num_examples)
# 打印验证集大小
print("Validating data size:", mnist.validation.num_examples)
# 打印测试集大小
print("Testing data size:", mnist.test.num_examples)
# 打印训练样例
print("Example training data", mnist.train.images[0])
# 打印训练样例的标签
print("Example training data label:", mnist.train.labels[0])

When

, ninety-nine percent of the time will error and remind:

ModuleNotFoundError: No module named 'tensorflow.tutorials'

We first enter the installation environment of tensorflow, and we can find the installation path

through python’s path method

import tensorflow as tf
print(tf.__path__)

after entering python environment, type the command and get the path, and then find the path of files
(about) the new version of the tensflow

enter the examples of the first file,
there should be no my red line mark.
portal
go here to download, then copy in the directory, if it is the old version, find the examples file, the effect is the same, after found on the Internet part of the introduction code may also have problems. Note that we must refer to pylab with

from matplotlib import pylab

so, when you’re done, you can run the following code.
1.

from tensorflow.examples.tutorials.mnist import input_data
mnist = input_data.read_data_sets("MNIST_data", one_hot=True)
print ( ' 输入数据:', mnist.train.images)
print ( ' 输入数据打shape :', mnist.train.images.shape)
from matplotlib import pylab
im = mnist.train.images[1]
im = im.reshape(-1 ,28)
pylab.imshow(im)
pylab.show()
  • note that our read_data_sets should never be interrupted when downloading data. If they are interrupted, they will report an error if they continue executing later. At this time, either change the path to download again, or find the original download path, delete it and run again.

TypeError: Decimal type object is not a JSON serialization solution

The data type calculated when python connects to a database using select sum(a) from b is Decimal. But this format doesn’t fit the json format, so we can cast the data we get. Convert to an integer, and you’ll be able to fit the JSON format.

@app.route('/c1')
def get_cl_data():
    data = utils.get_conn()
    # data = json.dumps({"confirm": data[0], "suspect": data[1], "heal": data[2], "dead": data[3]})
    # print(data)
    return jsonify({"confirm": int(data[0]), "suspect": int(data[1]), "heal": int(data[2]), "dead": int(data[3])})

</ div>

Python exports the gitlab project

Python export gitlab project

  1. install python-gitlab module
    pip install python-gitlab
    python3 
    pip3 install python-gitlab
    
  2. gitlab application API access token
    path User Settings -> Access Tokens
  3. configure pythongitlab.cfg and place

    in the same directory

    [global]
     default = username
     ssh_verify = False
     timeout = 8
    
     [username]
     url = https://gitlab.com
     private_token = xxxxxxxxxxxx


    对于API v4使用url https://gitlab.com,如果您使用API v3使用url
    https://gitlab.example.com

    </引用>

      <>


import gitlab
gl = gitlab.Gitlab.from_config('username', ['python-gitlab.cfg'])
projects = gl.projects.list()
print(projects)
  • or use the following code to get the group project
    import gitlab
    class GitlabAPI(object):
    	
        def __init__(self, *args, **kwargs):
            self.gl = gitlab.Gitlab('https://gitlab.com', private_token='xxxxxxxxxxxxx', api_version='4')
    
        # 可行 先获取所有group ID, 然后根据group ID 获取项目地址
        def get_all_group(self):
            return self.gl.groups.list(all=True)
        def get_group_by_id(self, groupID):
            group = self.gl.groups.get(groupID)
            projects = group.projects.list(all=True)
            result_list = []
            for project in projects:
                result_list.append(project.http_url_to_repo)
            return result_list
    
    	
    apiObject = GitlabAPI()
    groupProjects = apiObject.get_group_by_id(填写获取到的groupID)
    print(groupProjects)
    

Django Issues: TypeError: “Settings” object is irreversible

Exception in thread django-main-thread:
Traceback (most recent call last):
  File "D:\Python37\lib\threading.py", line 926, in _bootstrap_inner
    self.run()
  File "D:\Python37\lib\threading.py", line 870, in run
    self._target(*self._args, **self._kwargs)
  File "D:\PyCharm\py_place\djangoSimpleproProject1\venv\lib\site-packages\django\utils\autoreload.py", line 53, in wrapper
    fn(*args, **kwargs)
  File "D:\PyCharm\py_place\djangoSimpleproProject1\venv\lib\site-packages\django\core\management\commands\runserver.py", line 138, in inner_run
    handler = self.get_handler(*args, **options)
  File "D:\PyCharm\py_place\djangoSimpleproProject1\venv\lib\site-packages\django\contrib\staticfiles\management\commands\runserver.py", line 27, in get_handler
    handler = super().get_handler(*args, **options)
  File "D:\PyCharm\py_place\djangoSimpleproProject1\venv\lib\site-packages\django\core\management\commands\runserver.py", line 65, in get_handler
    return get_internal_wsgi_application()
  File "D:\PyCharm\py_place\djangoSimpleproProject1\venv\lib\site-packages\django\core\servers\basehttp.py", line 45, in get_internal_wsgi_application
    return import_string(app_path)
  File "D:\PyCharm\py_place\djangoSimpleproProject1\venv\lib\site-packages\django\utils\module_loading.py", line 17, in import_string
    module = import_module(module_path)
  File "D:\Python37\lib\importlib\__init__.py", line 127, in import_module
    return _bootstrap._gcd_import(name[level:], package, level)
  File "<frozen importlib._bootstrap>", line 1006, in _gcd_import
  File "<frozen importlib._bootstrap>", line 983, in _find_and_load
  File "<frozen importlib._bootstrap>", line 967, in _find_and_load_unlocked
  File "<frozen importlib._bootstrap>", line 677, in _load_unlocked
  File "<frozen importlib._bootstrap_external>", line 728, in exec_module
  File "<frozen importlib._bootstrap>", line 219, in _call_with_frames_removed
  File "D:\PyCharm\py_place\djangoSimpleproProject1\djangoSimpleproProject1\wsgi.py", line 16, in <module>
    application = get_wsgi_application()
  File "D:\PyCharm\py_place\djangoSimpleproProject1\venv\lib\site-packages\django\core\wsgi.py", line 13, in get_wsgi_application
    return WSGIHandler()
  File "D:\PyCharm\py_place\djangoSimpleproProject1\venv\lib\site-packages\django\core\handlers\wsgi.py", line 127, in __init__
    self.load_middleware()
  File "D:\PyCharm\py_place\djangoSimpleproProject1\venv\lib\site-packages\django\core\handlers\base.py", line 39, in load_middleware
    for middleware_path in reversed(settings.MIDDLEWARE):
TypeError: 'set' object is not reversible

focus:

TypeError: 'set' object is not reversible

solution:
in setting. Py, change {} of
to []……
problem is, I haven’t changed
and I’m confused, I’ve seen a lot of big guys’ methods, it’s really just this emmmmmmmmmm
and I can’t figure out

Conscience installation: How To install Pyinstaller offline on Windows

could not install the Pyinstaller package online, so I downloaded the Pyinstaller offline package.

need to rely on package, download links: https://download.csdn.net/download/ryanji/12881427: </ p>

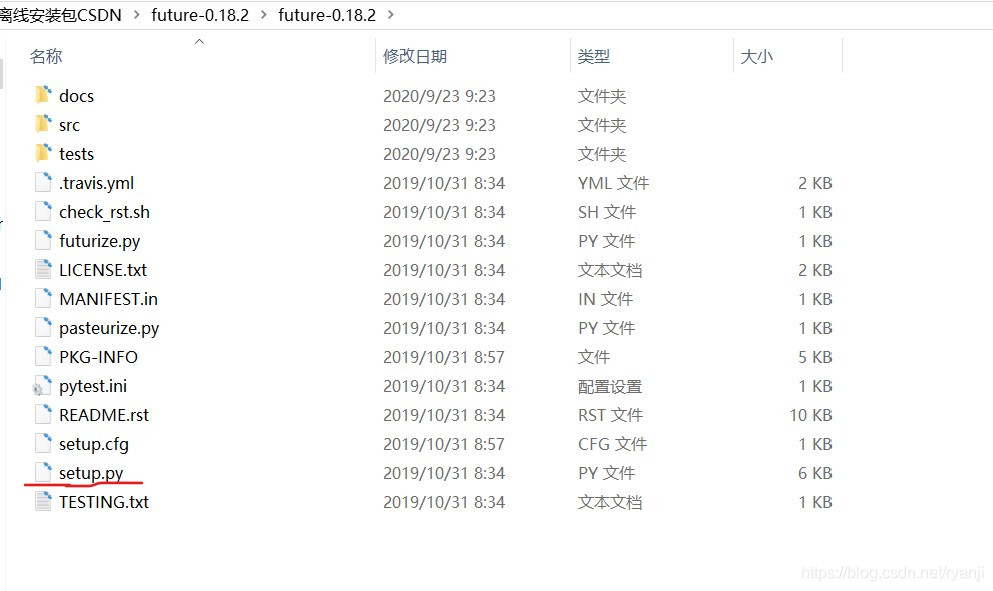
  1. pywin32_ctypes
  2. pefile
  3. future
  4. altgraph

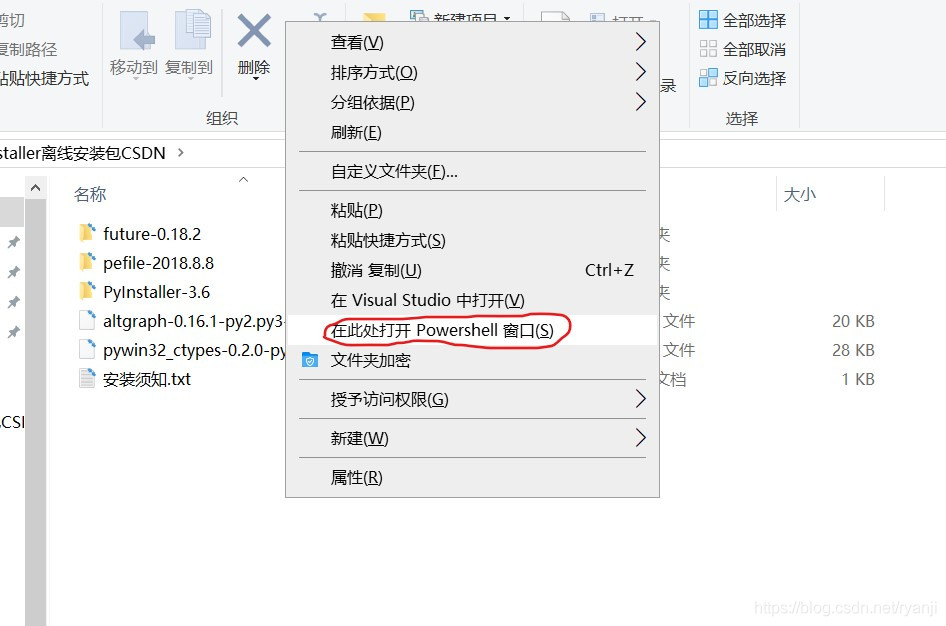
installation order is as follows:

  1. altgraph
  2. pywin32_ctypes
  3. future
  4. pefile
  5. pyinstaller

</ p>

Python + Requests +Excel+Jenkins interface automation

python+requests+Excel+Jenkins interface automation

summary most people do interface automation process, found that basically is: python + requests do interface requests; Excel is used to store use cases; HTMLTestRunner generates test reports; Jenkins completes scheduled tasks.

actually takes only a fraction of the time to complete this process, with most of the time wasted in setting up the environment and writing use cases. Here I’m going to write down some of the problems.

interface request
(1) configuration request method: get and post method simple packaging, header parameter setting

# _*_coding:utf-8 _*
import requests

#get请求
def get(url,querystring):
    headers = requestHeader()
    response = requests.request("GET", url, headers=headers, params=querystring)
    # print response.url
    return response

#post请求
def post(url,payload,querystring):
    headers = requestHeader()
    response = requests.request("POST", url, data=payload, headers=headers, params=querystring)
    # print response.url
    return response

#设置请求的header
def requestHeader():
    headers = {
    'Content-Type': "application/json",
    'Cache-Control': "no-cache"
    }
    return headers

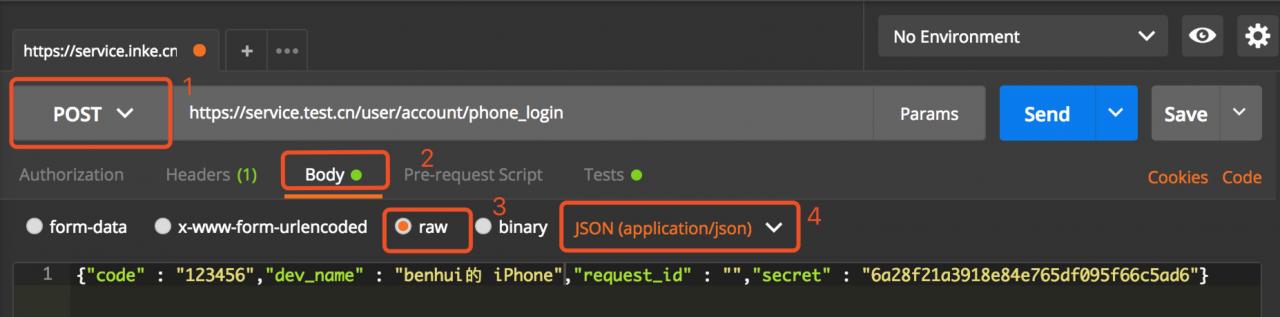
(2) for the body of a post request, we used a “dict” in text at the beginning, but it always returned “error”. After that, postman used to debug and directly copied the body reference that had been converted into json to make the request, and it worked.

WechatIMG12.jpeg

can be used to convert some problematic bodies in this way.

Another way to convert

(3) body to json: through ast module for conversion (recommended)

import ast
caseParams      =   ast.literal_eval(caseParams)

(4) get use case Excel

through openpyxl module

#用例名
caseName    =   caseFile.getCellVaule(ws,rowIndex,1)
#url
caseUrl     =   caseFile.getCellVaule(ws,rowIndex,3)
#请求方式
caseMethod  =   caseFile.getCellVaule(ws,rowIndex,4)
#参数
caseParams  =   caseFile.getCellVaule(ws,rowIndex,5)

note: in the process of obtaining the use case information, some parameters need to be fault-tolerant
A: whether there are parameters, if there are no parameters, need to pass null;
B: get parameter and post body need to be handled separately:
get parameter is ‘& Param ‘in the form of clear text spliced in the URL;

#将请求参数转换为json格式
caseParams  =   ast.literal_eval(caseParams)
keys        =   dict(caseParams).keys()
values      =   dict(caseParams).values()
for x in xrange(0,len(keys)):
  tempQuery[keys[x]] = values[x]

, the body of the post needs to be put in dict;

caseParams      =   ast.literal_eval(caseParams)

(5) split the required parameters and write the result to the file

#请求返回的内容,转换为json格式
text            =   json.loads(response.text)
                caseFile.setCellValue(ws,rowIndex,6,response.text)

#URL请求耗时
spendTime       =   response.elapsed.total_seconds()
                caseFile.setCellValue(ws,rowIndex,7,spendTime)

#请求结果状态
statue          =   response.status_code
                caseFile.setCellValue(ws,rowIndex,8,statue)
self.assertEqual(statue, 200)

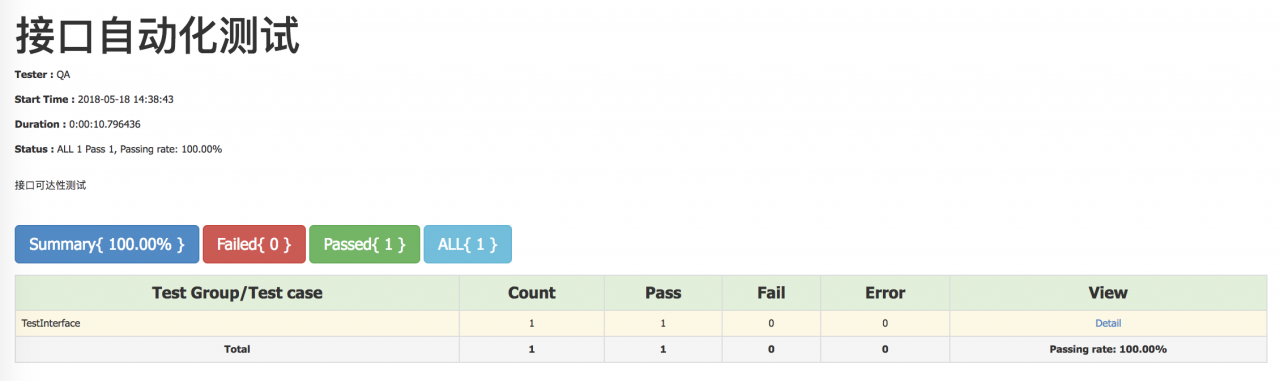
(6) writes the result of the request to an HTML file and displays

WechatIMG13.jpeg

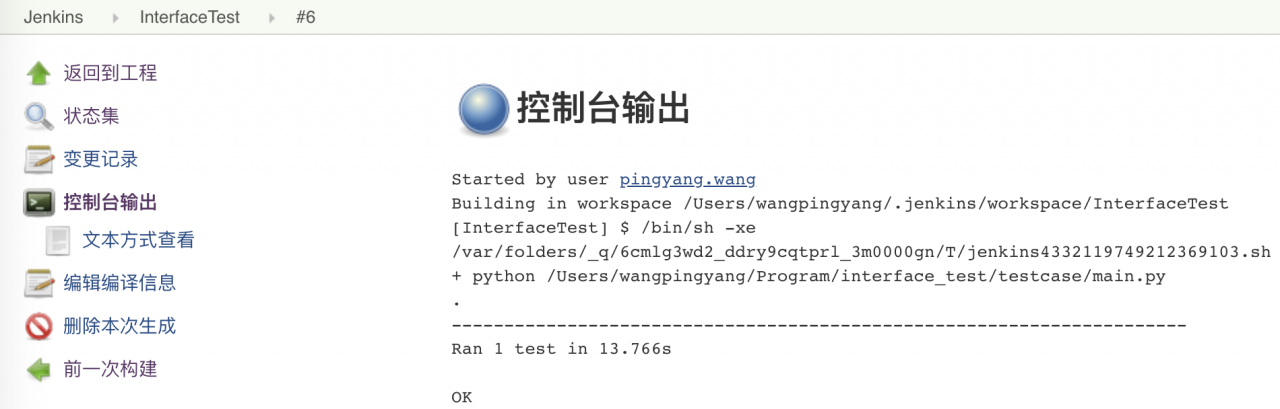
(7) is configured to Jenkins to periodically execute the accessibility of the view interface

learning Python address: https://ke.qq.com/course/2707042?flowToken=1025648

if there are any problems you for learning Python, learning methods, learning course, how to learn efficiently, can be consulting me at any time, or the lack of system study materials, I do this year longer, they think is experienced, can help everyone puts forward constructive Suggestions, this is my Python communication qun: 785128166, if you have any question can be consulting me at any time.