Author Archives: Robins

[Solved] stm32 Failed to Download: Error: Flash Download failed – “Cortex-M3”

Error:

Error:Flash Download failed – “Cortex-M3”


Solution:

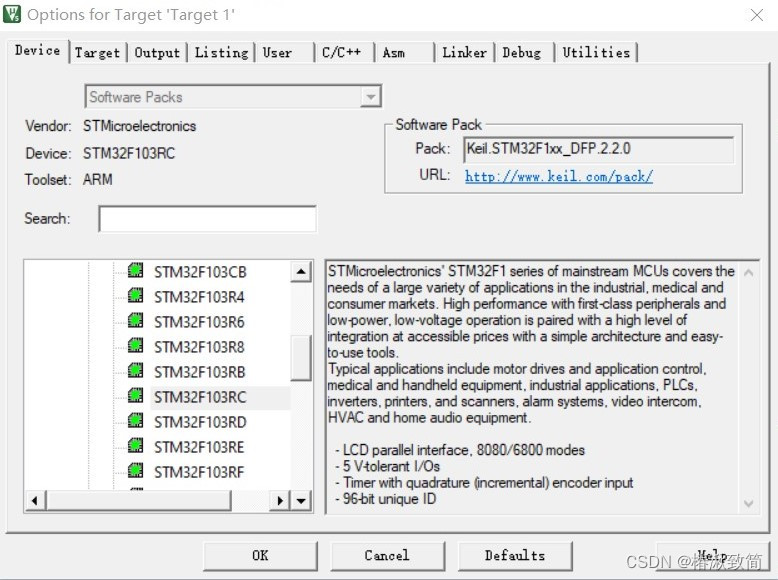
1. The correct device is not selected

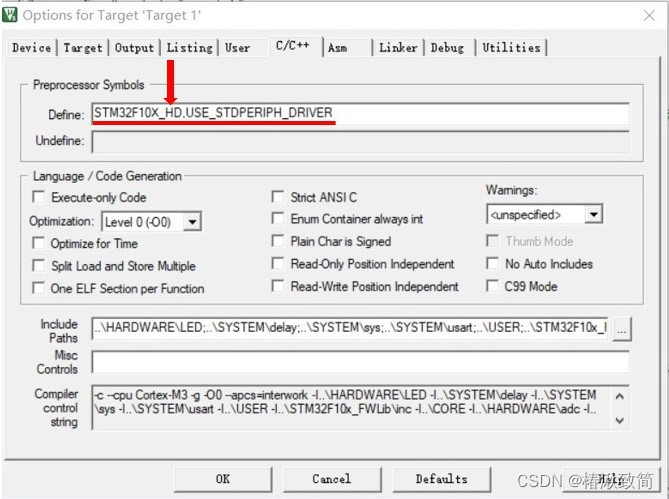
2. The boot file does not correspond to the memory size

In C/C++

Large capacity chip corresponds to STM32F10X_HD,USE_STDPERIPH_DRIVER

Medium capacity corresponds to STM32F10X_MD,USE_STDPERIPH_DRIVER

Small capacity corresponds to STM32F10X_LD,USE_STDPERIPH_DRIVER

After modifying the letters, it is also necessary to confirm that there is a startup file with corresponding capacity in the project CORE file

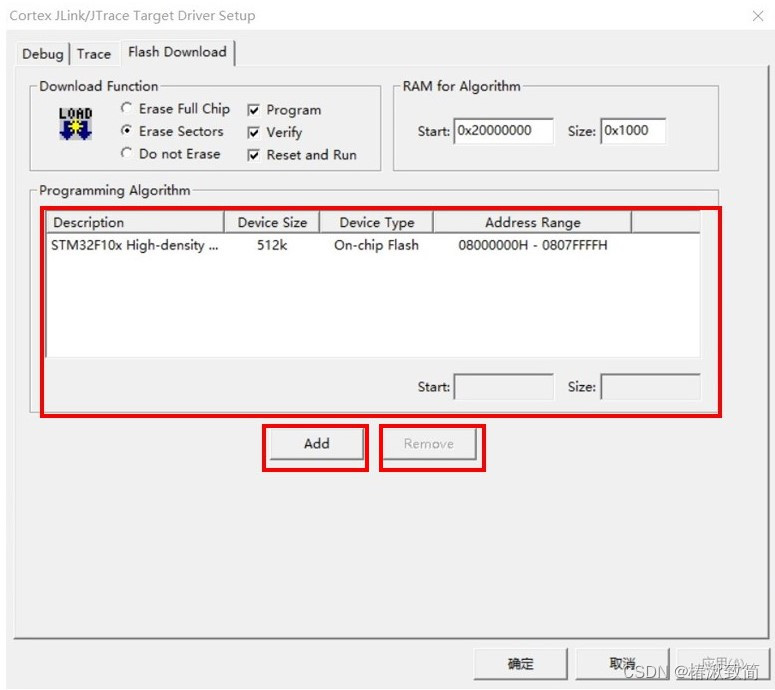
3. Another place to set memory

Flash Dowmload in Debug Settings

Add correct Flash capacity through ADD/Remove

[Solved] Android-android studio apk Install Error: INSTALL_PARSE_FAILED_MANIFEST_MALFORMED

I simply wrote a program today and found that it could not run all the time, prompting that the installation failed on the physical device

INSTALL_PARSE_FAILED_MANIFEST_MALFORMED
Installation failed due to: ‘null’

After checking on the Internet, most of the brothers said that it was a problem with the test mark, so just add it

android:testOnly="false"

But there are still problems after trying

Another brother said that this problem is related to the manifest file. It may be that there is a problem with the configuration of the manifest file. Therefore, I checked it from here. However, I was also very curious about how a hello world program has a configuration problem. I didn’t see any exceptions in the xml. I went to the apk generation directory to directly try to install it:

adb install -r -d a.apk

here I saw the error messages:

adb: failed to install app-debug.apk: Failure [INSTALL_PARSE_FAILED_MANIFEST_MALFORMED: Failed parse during installPackageLI: /data/app/vmdl631790294.tmp/base.apk (at Binary XML file line #20): com.leonard.goot.MainActivity: Targeting S+ (version 31 and above) requires that an explicit value for android:exported be defined when intent filters are present]

Find the problem, because the activity does not have the export property caused by the modification can be installed after debugging, Done!

error: \*1035 connect() failed (111: Connection refused) while connecting to upstream, client…..

error:1035 connect() failed (111: Connection refused) while connecting to upstream, client: …217, server: .com, request: “POST /api/userLogin HTTP/1.1”, upstream: “http://.1:8443/userLogin”, host: “*.com”

1. Cause

The deployment of the project is on Tencent cloud server, http upgraded to https, using Tencent ssl certificate, Ali’s domain name, during the nginx.conf configuration process, there is a front-end to back-end send request failure problem. The following error occurs.

The nginx.conf configuration is as follows:

server{
	#SSL The default access port number is 443
    listen 443 ssl;
    server_name domain;
    default_type text/html;
    ssl_certificate certificate file path (.crt/.pem);
    ssl_certificate_key private key file path (.key);
    ssl_session_timeout 5m;
    # Please configure according to the following protocols
    ssl_protocols TLSv1.2 TLSv1.3;
    s#Please configure the encryption suite according to the following suite configuration, written following the openssl standard.
     ssl_ciphers ECDHE-RSA-AES128-GCM-SHA256:HIGH:!aNULL:!MD5:!RC4:!DHE;
    ssl_prefer_server_ciphers on;

    location/{
        root /usr/share/nginx/html/dist/;
        try_files $uri $uri/ /index.html;
        index index.html;
    }

    location /api/ {
        default_type application/json;
        proxy_pass http://localhost:8443/;
    }
}

2. Solutions

Add a clause to the nginx.conf configuration: proxy_set_header Host $http_host;

server{
	#SSL The default access port number is 443
    listen 443 ssl;
    server_name domain;
    default_type text/html;
    ssl_certificate certificate file path (.crt/.pem);
    ssl_certificate_key private key file path (.key);
    ssl_session_timeout 5m;
    # Please configure according to the following protocols
    ssl_protocols TLSv1.2 TLSv1.3;
    s#Please configure the encryption suite according to the following suite configuration, written following the openssl standard.
     ssl_ciphers ECDHE-RSA-AES128-GCM-SHA256:HIGH:!aNULL:!MD5:!RC4:!DHE;
    ssl_prefer_server_ciphers on;

    location/{
        root /usr/share/nginx/html/dist/;
        try_files $uri $uri/ /index.html;
        index index.html;
    }

    location /api/ {
    	# nginx reverse proxy rewrites the host field attribute in the request header
        proxy_set_header Host $http_host;
        default_type application/json;
        proxy_pass http://localhost:8443/;
    }
}

Vscode Tensorboard Error: We failed to start a TensorBoard session due to the following error: Command fa

When vscode opens the tensorboard, an error is reported:We failed to start a TensorBoard session due to the following error: Command failed: conda activate python && echo ‘e8b39361-0157-4923-80e1-22d70d46dee6’ && python /home/zhangyulan/.vscode-server/extensions/ms-python.python-2022.14.0/pythonFiles/printEnvVariables. py CommandNotFoundError: Your shell has not been properly configured to use ‘conda activate’. To initialize your shell, run $ conda init < SHELL_NAME> Currently supported shells are: – bash – fish – tcsh – xonsh – zsh – powershell See ‘conda init –help’ for more information and options. IMPORTANT: You may need to close and restart your shell after running ‘conda init’.

The main reason for the above problems is the version update.

Solution:

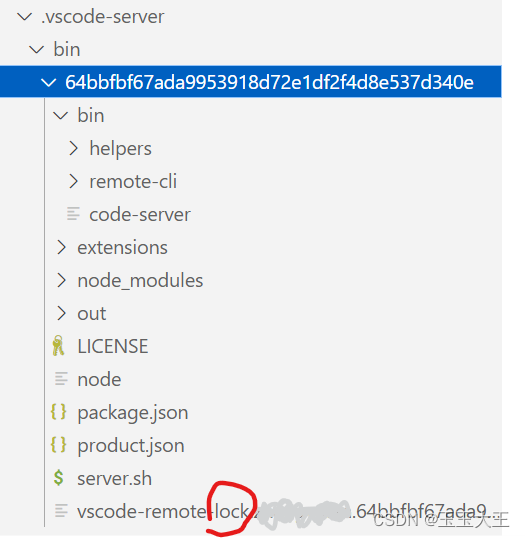
1. Make sure that in the .vscode-server/bin directory, delete the lock file xxxx-lock xxx, or not if it is not there. The file is shown in the following figure.

2. Return the python and balance extensions of vscode to 2022.14.0 and 2022.9.10, respectively, which are the versions one month ago. But I can’t go back to the version one month ago, just go back to the version one year ago

[Solve] Yinhe Qilin V10 System Error: Failed to download metadata for repo ‘ks10-adv-os‘

In the use of Yinhe Kirin system will be installed from time to time, yum command is the most convenient and fast command, but in the process of using the Failed to download metadata for repo ‘ks10-adv-os’ such an error how to solve it?

After several attempts, I finally succeeded in solving it, and the following is the specific solution.
Enter the yum source file directory
cd /etc/yum.repos.d
Back up the yum source files
cp kylin_aarch64.repo kylin_aarch64.repo.bak

Modify the contents of the source file
Enter the command: vim kylin_aarch64.repo
Delete the original code and copy the following code over

[ks10-adv-os]
name = Kylin Linux Advanced Server 10 - Os
baseurl = http://archive2.kylinos.cn/rpm/kylin/production/KY-KY10-GFB-aarch64/custom/kylin-server/KY10-GFB-aarch64/
#baseurl = http://update.cs2c.com.cn:8080/NS/V10/V10SP1/os/adv/lic/base/$basearch/
gpgcheck = 0
enabled = 1

[ks10-adv-updates]
name = Kylin Linux Advanced Server 10 - Updates
baseurl = http://update.cs2c.com.cn:8080/NS/V10/V10SP1/os/adv/lic/updates/$basearch/
gpgcheck = 0
enabled = 0

[ks10-adv-addons]
name = Kylin Linux Advanced Server 10 - Addons
baseurl = http://update.cs2c.com.cn:8080/NS/V10/V10SP1/os/adv/lic/addons/$basearch/
gpgcheck = 0
enabled = 0

Use the download command:
reposync -v –installroot /opt/aarch64/
After completion, you can see that the yum install program name can be downloaded normally, no error will be reported

[Solved] failed to set bridge addr: “cni0“ already has an IP address different from xxxx

failed to set bridge addr: “cni0“ already has an IP address different from xxxx

Recently, when debugging Kubernetes to add or delete a node, and then deploying Pod on this node, a network card address error exception occurred. The troubleshooting solution for this exception is as follows:

Error:

(combined from similar events): Failed to create pod sandbox: rpc error: code = Unknown desc = failed to setup network for sandbox “745720ffb20646054a167560299b19bb9ae046fe6c677b5d26312b89a26554e1”: failed to set bridge addr: “cni0” already has an IP address different from 172.20.2.1/24


Solution:

  1. Delete the node without restarting the node server, restart the node server (in this case, it is usually caused by the server cache, restart the server on it)
  2. After restarting the server or not, delete the wrong NIC on the node and wait for the system to rebuild automatically, the operation process is as follows.
sudo ifconfig cni0 down    
sudo ip link delete cni0

[Solved] Non-fatal Exception: java.lang.UnsatisfiedLinkError: dlopen failed: library “libmmkv.so“ not found

Project scenario:

The mmkv version 1.0.23 used in the project is too old, and 1.0.23 also introduces libc++_shared.so which is about 249K + libmmkv.so which is about 40K.

Checking github, I found that the latest version has reached 1.2.14 and the aar package has been optimized, so I have a need to upgrade.


Problem description

In the project, we upgraded mmkv version 1.0.23 to 1.2.14. After solving a lot of compilation errors (inconsistent kotlin versions, gradle upgrade required, etc.), we thought everything was all right, but we didn’t expect to report the startup

Non-fatal Exception: java.lang.UnsatisfiedLinkError: dlopen failed: library “libmmkv.so” not found

I searched various posts on the Internet – no answer. Later, someone in github issue raised similar questions: dlopen failed: library “libmmkv. so” not found · Issue # 958 · Tencent/MMKV · GitHub

Inspired, we developed the source code GitHub – Tencent/MMKV: An efficient, small mobile key value storage framework by WeChat Works on Android, iOS, macOS, Windows, and POSIX. Clone down and study.


Cause analysis:

After compiling the mmkv module with the source code clone, it is found that only the following four cpu architecture sos will be generated in the compilation log

armeabi-v7a, arm64-v8a, x86,  x86_64

No armeabi generated

My own project only supports armeabi

Therefore, the reason is obviously related to the CPU architecture settings of your project.

Why didn’t you compile so to generate armeabi?

The ndk17 does not support armeabi at first. The ndk version needs to be changed to 16 and below and the gradle plug-in needs to be downgraded to 4.1.3 and below. However, the gradle in the project has been upgraded to 7. x


Solution:

Method 1: The app’s build.gradle checks for ndk abiFilters under android-buildTypes

ndk {
    abiFilters "armeabi"
}

Modify to

ndk {
          abiFilters "armeabi-v7a"

}

Armeabi-v7a is backward compatible with armeabi

Method 2: If the project has only armeabi architecture and cannot upgrade to v7a, you can find the armeabi-v7a so through the aar package that mmkv maven depends on, put the so into the project armeabi directory, and the abiFilters can still be “armeabi”.

[Solved] failed to connect to server, reason: Unable to establish connection

Prerequisites: Precautions for installing in Windows:

Note:

    1. You need to install the server side, start taosd.exe, and wait for the
10/12 10:45:10.026000 00022304 DND TDengine initialized successfully
10/12 10:46:10.463000 00022216 MND succeed to send telemetry report

Then keep taosd.exe opened. Use the taos command of the taos shell to check whether it is started. If it succeeds, a prompt appears:

Server is Community Edition.

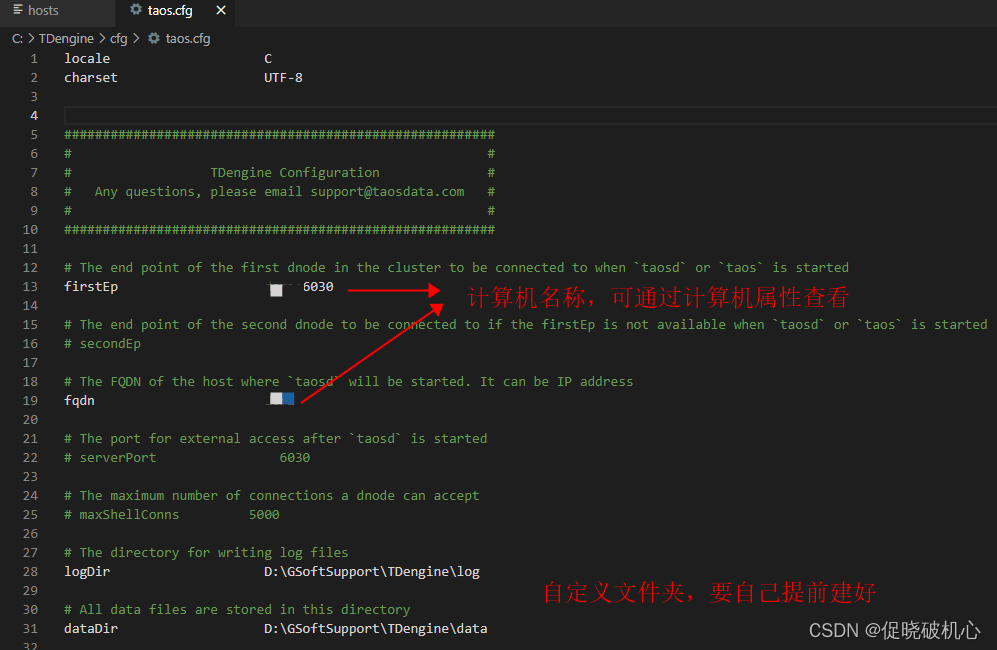
2. Check whether the configuration is modified successfully

taos.cfg

hosts

    Add a line of ipv4 address computer name at the end of the file, eg:
192.168.1.32 nodes1

Node Memory Overflow: FATAL ERROR: Reached heap limit Allocation failed – JavaScript heap out of memory

The first time the npm run serve ran, there was no error. After the change file was saved, it was automatically repackaged and an error was reported: FATAL ERROR: Retrieved heap limit Allocation failed – JavaScript heap out of memory, as shown in the following figure:


Problem: Too many resources were referenced, Causing node memory overflow

Solution:
1. Global installnpm install - g increase memory-limit
2. Execute increase-memory-limit
3. Run the project npm run serve

If it appears after running:
“node –max-old-space-size=10240″‘ is not an internal or external command, nor is it an executable program or program file

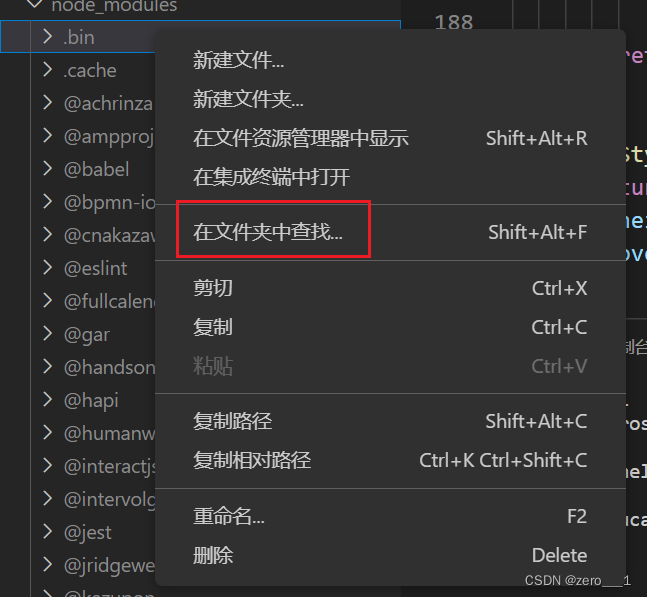
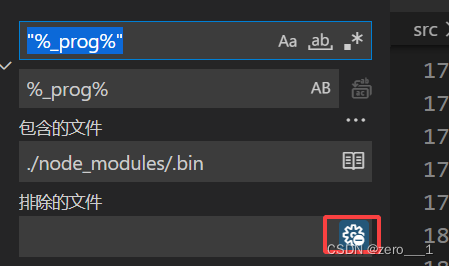
Search for “%_prog%” in the .bin file in the node_modules directory and replace it all with %_prog%

If no file is found, click the ignored file button

to replace it and run: npm run serve

It will be OK!

Centos8 Could not restart the Network: Failed to restart network.service: Unit network.service not found

Error:

[root@centos8 ~]# service network  status
Redirecting to /bin/systemctl status network.service
Unit network.service could not be found.

[root@centos8 ~]# systemctl status network.service
Unit network.service could not be found.

[root@centos8 ~]# systemctl status network
Unit network.service could not be found.

[root@centos8 ~]# systemctl restart network
Failed to restart network.service: Unit network.service not found.

After installing Centos8, configure the static IP address. If you want to restart the network, the previous commands on Centos7 are hard to use

Error reported as above

After checking the data, it is found that the original network has been replaced by Centos8. The new version is called NetworkManager

This tool is amazing and easy to use. especially those related to wifi,

So you can restart with this command: systemctl restart NetworkManager

[root@centos8 ~]# systemctl status  NetworkManager
● NetworkManager.service - Network Manager
   Loaded: loaded (/usr/lib/systemd/system/NetworkManager.service; enabled; vendor preset: enabled)
   Active: active (running) since Tue 2019-10-15 22:20:43 CST; 9min ago
     Docs: man:NetworkManager(8)
 Main PID: 7299 (NetworkManager)
    Tasks: 3 (limit: 11357)
   Memory: 6.8M
   CGroup: /system.slice/NetworkManager.service
           └─7299 /usr/sbin/NetworkManager --no-daemon


[Solved] ssl_client_socket_impl.cc handshake failed (Same Codes in Different Environments)

First of all, the same script environment (the same code, the same plug-in version) has no problem running on my native environment, windoiws11.

However! Report an error ssl_client_socket_impl.cc  handshake failed~ QaQ in the newly installed Windows 10 environment.

[19852:2032:0912/202419:ERROR:ssl_client_socket_impl.cc(983)] handshake failed;
 returned -1, SSL error code 1, net_error -100

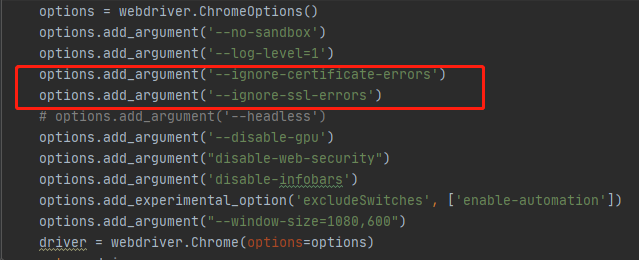
I have added these two conditions, but the loop still reports an error and the script stops directly

options.add_argument('--ignore-certificate-errors')
options.add_argument('--ignore-ssl-errors')

There is no difference between the chromedriver version and the Chrome version.

I can’t find any other reason

ArcGIS API for JavaScript version 4. X updated and the project startup error: Module parse failed: Unexpected token(… …


Question:

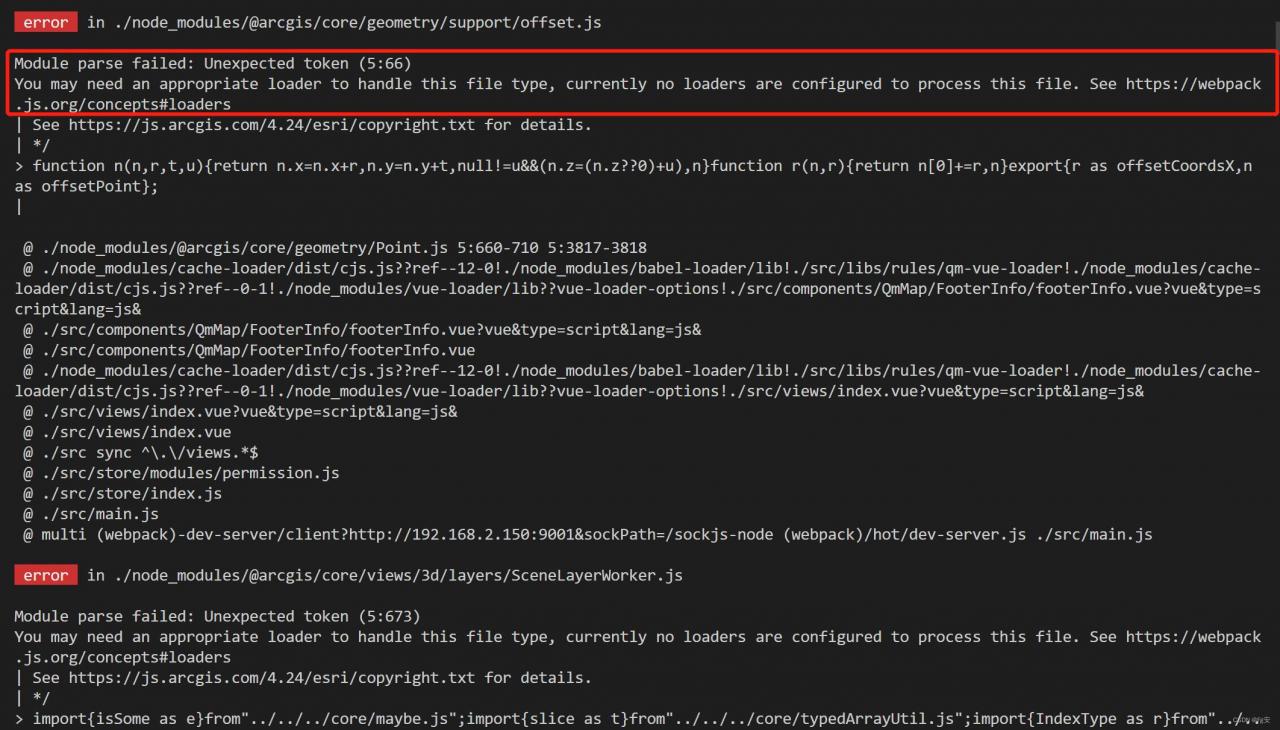
When using the project created by vue and webpack, after the ArcGIS API for JavaScript 4. X is upgraded from a lower version to a higher version, problems occur in building the project:

Module parse failed: Unexpected token. You may need an appropriate loader to handle this file type…

error  in ./node_modules/@arcgis/core/views/3d/layers/SceneLayerWorker.js
Module parse failed: Unexpected token (5:673)
You may need an appropriate loader to handle this file type, currently no loaders are configured to process this file. See https://webpack.js.org/concepts#loaders
| See https://js.arcgis.com/4.24/esri/copyright.txt for details.
| */
Reason:

The new version of the ArcGIS API references the new version of ES2020 optional chaining and nullish coalescing, resulting in parsing errors in the old version of Webpack, so you need to install the appropriate dependencies or upgrade the framework.

Solution:

1. Download Dependencies

Download the corresponding dependencies through the command

npm install -D @babel/core @babel/plugin-proposal-nullish-coalescing-operator @babel/plugin-proposal-optional-chaining babel-loader

Or add the following codes in package.json, and then initialize npm install

 "@babel/core": "^7.18.9",
 "@babel/plugin-proposal-nullish-coalescing-operator": "^7.18.6",
 "@babel/plugin-proposal-optional-chaining": "^7.18.9",
 "babel-loader": "^8.2.5",

2. Add Configuration

Find the webpack.config.js file and add the following codes below

   module: {
     rules: [
       {
         test: /\.m?js$/,
         exclude: {
           and: [/node_modules/],
           not: [/@arcgis[\\/]core/]
         },
         use: {
           loader: "babel-loader",
           options: {
             plugins: [
               ["@babel/plugin-proposal-nullish-coalescing-operator", { loose: true }],
               ["@babel/plugin-proposal-optional-chaining", { loose: true }]
             ]
           }
         }
       }
     ]
   }

Note: If your project is using the vue1 framework, i.e. you can’t find the webpack.config.js file, then you need to configure the configureWebpack configuration item in the vue.config.js file.

3. Restart the project