Category Archives: How to Fix

Dca1000 reports an error and the SPI port cannot be connected

Dca1000 reports an error and the SPI port cannot be connected

Article catalog

Dca1000 reports an error and the SPI port cannot be connected. Problem Description: problem cause: solution:

Problem Description:

When using dca1000evm board and mmwave Studio software to measure AWR/IWR board data, SPI cannot be connected

Cause of problem:

The possible causes are problems with the 60 pin HD cable of the dca1000evm, or problems with the SPI pin of the FPGA on the board

resolvent:

    replace the 60 pin HD cable. At present, TI company not only provides additional 60 pin HD cable. Therefore, it is necessary to re purchase the board or find other 60 pin HD connection lines to replace it. At present, it is known that the 60 pin HD connection line of mmwave Devpack can be used with the 60 pin HD connection line of dca1000evm to replace the FPGA chip on the board, or check whether there is faulty soldering and additional connection at the pin (metal wire may be attached to the pin)

Solutions to errors in virtual machine running in Android studio

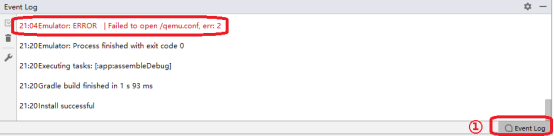
When starting the virtual machine in Android studio, there may be an error message in the “event log” of the main interface. At this time, the virtual machine can still run.

1. Solution to failed to open/qemu.conf

“Emulator: error | failed to open/qemu.conf, err: 2” (Figure 1 ②) is displayed in “event log” (Figure 1 ①), and the error message is “failed to open qemu.conf file”.

1.1 qemu.conf file

QEMU is a set of simulation software that can simulate another set of operating system in Windows operating system. Because it can simulate a virtual CPU in the system, and then hand over the operating system to be simulated to the virtual CPU for processing, it can achieve the purpose of executing two operating systems on the same platform at the same time.

Qemu.conf is the configuration file of Android studio virtual machine. When the virtual machine starts, you need to read the information of the configuration file. By default, the configuration file is in the root directory of drive C.

1.2 solutions

Create qemu.conf file in the root directory of drive C. First, open “this computer” on the desktop, click “view” in the toolbar (Figure 2 ①), and then select “file extension” (Figure 2 ②). The purpose of this operation is to display the file extension so that the file extension is changed to “conf”.


Figure 2 shows the file extension

Then, create a new text file in the root directory of drive C and rename it “QEMU. Conf”, as shown in Figure 3.

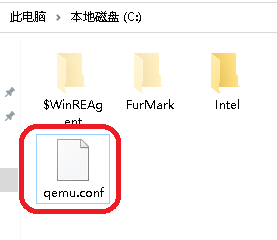
Figure 3 qemu.conf file

Run the simulator again at this time, and the above error prompt will not appear again.

2. Solution to unexpected system image feature string

When the simulator is running, “emulator: warning | unexpected system image feature string. Emulator may not function correctly.please try updating the emulator” is displayed in “event log”. The prompt means “unexpected system image feature string. The virtual machine may not work properly. Please update the virtual machine.”


Figure 4 warning message

For such error messages, you can lower the API level of the virtual machine. For example, if the API level of the current virtual machine is 30 and the above warning information will be displayed, delete the virtual machine and create a virtual machine with API level 29, as shown in Figure 5.


Figure 5 virtual machine API level  


net start mysql System error 2 has occurred. The system cannot find the file specified.

https://www.jianshu.com/p/6d8ed7c36e6f
368160;-net start mysql29616;- 38169;- 35823s;

error 2 has occurred.  The system cannot find the file specified.

Solution:
run as an administrator and enter the installation path of CD + MySQL bin directory on the command line

C:\WINDOWS\system32>cd C:\softerwaresetting\mySQL\mysql-8.0.11-winx64\bin

C:\softerwaresetting\mySQL\mysql-8.0.11-winx64\bin>mysqld --remove
Service successfully removed.

C:\softerwaresetting\mySQL\mysql-8.0.11-winx64\bin>mysqld --install
Service successfully installed.

C:\softerwaresetting\mySQL\mysql-8.0.11-winx64\bin>net start mysql
The MySQL service is starting.
The MySQL service was started successfully.

Error in v-on handler (Promise/async): “[object Object]“

Put the request processing in main.js:

axios.interceptors.response.use(
  response => {
    if (response.data.code != 0) {
      return Promise.reject(response);
    }
    return response.data
  }
)

It is found that when the code returned by the back end is not zero, that is, when return promise.rehect (response) is executed, although the code runs normally, the console will report an error:

vue.runtime.esm.js?2b0e:619 [Vue warn]: Error in v-on handler (Promise/async): "[object Object]"

found in

---> <Login> at src/views/Login.vue
       <App> at src/App.vue
         <Root>

Find the problem on the Internet and find that the exception of promise.rehect (response) needs to be captured, but most of them are captured in the component. Isn’t it meaningless to put the judgment in the main file, so you can put the capture processing in the main file, as follows:


axios.interceptors.response.use(
  response => {
    if (response.data.code != 0) {
      Message({content: response.data.message});
      return Promise.reject(response).catch(()=>{});
    }
    return response.data
  },
 )

That is, add . Catch (() = & gt; {}) directly after promise. Rehect (response) , which is currently valid for personal testing.

dpkg-deb: error: paste subprocess was killed by signal (Broken pipe)

1. Problem description

The following error occurred while attempting to install CUDA 10.2 on Ubuntu 18.04

dpkg-deb: error: paste subprocess was killed by signal (Broken pipe)
Errors were encountered while processing:
 /var/cache/apt/archives/nvidia-cuda-dev_9.1.85-3ubuntu1_amd64.deb
E: Sub-process /usr/bin/dpkg returned an error code (1)

2. Problem solving

1. Open the terminal and input sudo dpkg - I -- force overwrite XXX

 sudo dpkg -i --force-overwrite /var/cache/apt/archives/nvidia-cuda-dev_9.1.85-3ubuntu1_amd64.deb

2. Repair the damaged package

sudo apt-get -f install

3. Sprinkle flowers after completion

Unity Error:InvalidCastException: Cannot cast from source type to destination type.

Error:
when I use system.data.dll to parse excel table; Encountered this error:

wrong positioning:
this is an excel problem; The error is reported in: excel reader. Asdataset() is due to the problem of Excel format;

Solution:
you can solve this problem by setting the cell format as text in Excel table;

Reference website:
Yusong Momo cross platform analysis Excel

AttributeError: ‘NoneType‘ object has no attribute ‘shape‘

When training poly-yolo, the environment is debugged, but this bug will appear in the training. Generally, the picture path is not set or set incorrectly.

solve:

In the simulator_ Absolute path is added in front of each line of image in dataset/simulator-train.txt file, such as:

/home/arl/lc/poly-yolo-master/simulator_ dataset/imgs/img_ r_ 12.png

The validation set is the same as above

Error: timeout of 5000ms exceeded error is always reported during post request

The error: timeout of 5000ms exceeded error is always reported in the post request, but there is no problem with the get request. The front-end uses the Vue element admin framework.

terms of settlement:

//Use before for mock data and after for back-end interface. Otherwise, it will request a failure message with a timeout of 5000ms or delete it directly


ERROR: Could not find a version that satisfies the requirement tensorfolw==1.14

ERROR: Could not find a version that satisfies the requirement tensorfolw==1.14

After configuring the Linux environment, an error “error: could not find a version that satisfies the requirement tensorflow = = 1.14” appears when installing tensorflow

Error

Check the reason. It is found that the installed version of acaconda is too high, so the matching version of tensorflow cannot be found
the original version of Anaconda was Anaconda 3-5.3.0

terms of settlement

Reduce Anaconda version 3-5.3.0 to Anaconda version 3-5.2.0 to install tensorflow = = 1.14.0 .

installation command

wget https://repo.anaconda.com/archive/Anaconda3-5.2.0-Linux-x86_64.sh

If it is shown in the figure below, anaconda3-5.2.0 is successfully installed

Install tensorfolw = = 1.14.0