Tag Archives: windows

Detailed steps for installing Visual Studio 2010 + Intel parallel studio Xe 2013 and configuring mpich2

Pre-installation Instructions
Before installation, it is necessary to determine whether your VS and IVF version matches, as shown in the figure below. Also, the MPICH version is very important, this article USES the 32-bit, if the installation of 64-bit cannot be configured, it will be mentioned later.

Install Visual Studio 2010

    download Visual studio 2010 unzip and double-click setup.exe “Next” until finished, select exit;

Install Intel Parallel Studio XE 2013

    close VS(otherwise cannot load ivf template) unzip w_fcompxe_novsshell_2013.2.149.zip double-click the installation file, open it, select license configuration, and select lic under the installation file; When it comes to Options, look at the Installation Summary list for instructions added to VS, which is the part with the red coil. If so, it means that after IVF you will be able to use Fortran in VS.
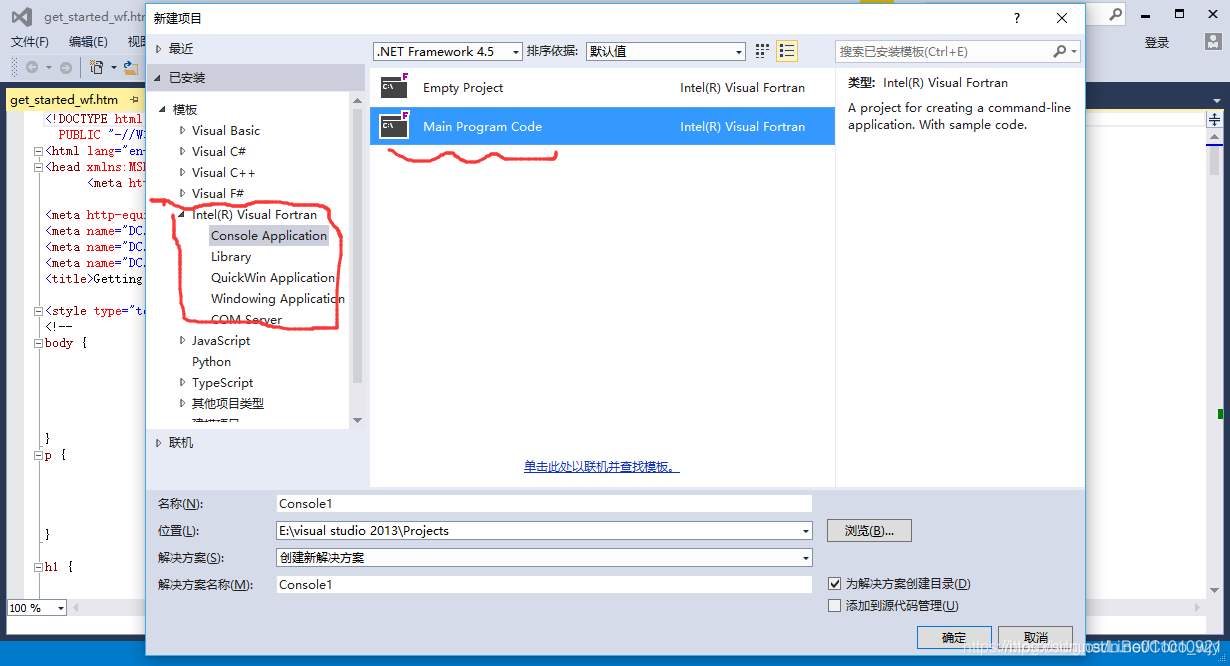
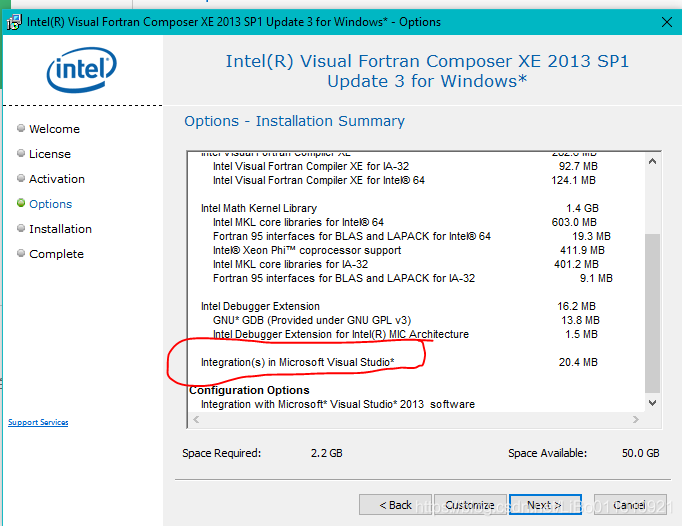
    starts the installation to check whether the FORTRAN module has been successfully added, as shown in the figure below

Install and configure MPICH2

    double-click and install mpich2-1.4.1p1-win-ia32.msi(the installation file provided in the network disk linked in this paper requires mpich of version 32, and the hosts of “Get setting” of the 64-bit version cannot be changed to green when wmpiconfig. Exe is used); After installation, strictly follow the configuration file (win7_vS2010_mpich2.pdf) given;

Installing PyQt4 in Windows + Python 3.6

As the title suggests, this article only applies to Python3.6 in Windows, and note that PyQt4, not PyQt5, will be installed. This is important because if you’ve ever used Python’s third party drawing libraries, Matplotlib and Seaborn, you’ve noticed that they both rely on PyQt4 (whatever PyQt5 does, it’s PyQt4, not PyQt5. If you have PyQt5 installed but don’t have PyQt4, you still can’t use them). In general, if you are using Anaconda3 as the Python interpreter, the Python version that contains PyQt4 can be viewed using conda list (the Python3.6 version comes with me). If, by some accident, PyQt4 is accidentally uninstalled, you use one of the two libraries mentioned above and it is “No module named PyQt4”, or “Pyqt4.gui, Pyqt4.core”, etc. There are several common ways to solve such problems online:
(1) Download The Windows Installers version of PyQt4 directly from the official website, namely the EXE file, and install it directly. Unfortunately, it looks like the official site has been revamped and I can’t find a ready version of Windows x 32 or x 64 for Python3.6 anyway.
(2) now the official website published the version of window after downloading is an uncompressed version, but not directly can be used, and need to re-make installation, more troublesome.
(3) a commonly used PIP or conda automatic installation does not reveal the existence of readily available resources for the Windows platform.
A very simple and efficient way to do this is to download it directly. WHL, which is available here (http://www.lfd.uci.edu/~gohlke/pythonlibs/#pyqt4), is a convenient way to choose between different Python versions, Windows 64bit or 32bit. After downloading, you can put the file into the Python installation directory, and then enter the CD into the directory under CMD or anaconda prompt. Enter the command, such as: PIP install pyqt4-4.11.4-cp36-cp36m-win_amd64. WHL , and wait for the completion of the installation. At this point, import seaborn as SNS or import matplotlib.pyplot as PLT can be executed normally.

How to Perfectly Uninstall ZoneAlarm Free Firewall

ZoneAlarm Free Firewall includes most of the common functions available in modern internet security programs. However, sometimes for some reason, the program may not meet your expectation and you just need to remove ZoneAlarm Free Firewall.
When you want to uninstall ZoneAlarm Free Firewall, the most common used tool which pops up in your mind comes to the Add/ Remove programs on Control Panel. But you should keep in mind that by this method, you can’t completely delete all the useless registry entries, related files and traces left by previously removed program. 
Rogueware infection?Click here.
What’s the harm for a failed ZoneAlarm Free Firewall removal?
1. The leftover of ZoneAlarm Free Firewall will take up valuable disk space and slow down your PC.
2. Mass traces left over by an incomplete ZoneAlarm Free Firewall removal can stuff Windows registry.
3. A failed uninstall by manual or other unsure uninstall tool may cause blue screen or system crash.
In this case, you may be trapped in various troubles from then on, such as computer freezing, runtime errors, system looping and so on.
So what is the best and safest way to uninstall ZoneAlarm Free Firewall?You can get multiple solutions by searching on the Internet; there are various tutorials, instructions and the introduction of all kinds of uninstallers and so on. However, sometimes, they don’t really work as they claim.
Among so many uninstallers, there is an uninstall tool is highly recommended by many computer experts and common PC users. Why can it stand out in a large group of uninstallers advertised on the internet?To clear it out, please have a look atthe benefits uninstall tool provides:
1. Much faster and more reliable than standard Windows Add/Remove programs.
2. Easily remove any stubborn programs that Windows Add/Remove Program can’t remove.
3. Completely remove ZoneAlarm Free Firewall and any other unwanted programs.
4. Forcibly uninstall applications that are even corrupted, and half-installed/uninstalled.
5. Clear registry entries and drivers that the programs leave over.
6. Show detailed information of a certain program installed in your computer.
7. Easy tpo use and effective with its unique features.
8. Is it amazing?Can’t wait to have a try? And do you want to completely uninstall ZoneAlarm Free Firewall immediately?
Download this uninstall tool here at to help you fully remove ZoneAlarm Free Firewall with great success and make sure all the now-defunct Registry entries and related files are eliminated automatically with a few clicks. Aside from this software, it can also completely remove other programs like Authentium, Norton, Trend Micro antivirus, Internet Explorer, Microsoft Office, and similar programs. Clickhere for video guide.

Installing Theano :Windows Installation Instructions

 Theano
 
Windows Installation Instructions
Warning
If you want to install the bleeding-edge or development version of Theano from GitHub, please make sure you are reading the latest version of this page.
Requirements
Note
We only support the installation of the requirements through conda.

Python == 2.7* or ( >= 3.4 and < 3.6 )
The conda distribution is highly recommended. Python 2.4 was supported up to and including the release 0.6. Python 2.6 was supported up to and including the release 0.8.2. Python 3.3 was supported up to and including release 0.9.
NumPy >= 1.9.1 <= 1.12
Earlier versions could work, but we don’t test it.
SciPy >= 0.14 < 0.17.1
Only currently required for sparse matrix and special functions support, but highly recommended. SciPy >=0.8 could work, but earlier versions have known bugs with sparse matrices.
BLAS installation (with Level 3 functionality)
Recommended: MKL, which is free through Conda with mkl-service package. Alternatively, we suggest to install OpenBLAS, with the development headers (-dev-devel, depending on your Linux distribution).

Optional requirements

GCC compiler with g++ (version >= 4.2.*), and Python development files
Highly recommended.  Theano can fall back on a NumPy-based Python execution model, but a C compiler allows for vastly faster execution.
nose >= 1.3.0
Recommended, to run Theano’s test-suite.
Sphinx >= 0.5.1, pygments
For building the documentation.  LaTeX and dvipng are also necessary for math to show up as images.
pydot-ng
To handle large picture for gif/images.
NVIDIA CUDA drivers and SDK
Highly recommended Required for GPU code generation/execution on NVIDIA gpus. See instruction below.
libgpuarray
Required for GPU/CPU code generation on CUDA and OpenCL devices (see: GpuArray Backend).
pycuda and skcuda
Required for some extra operations on the GPU like fft and solvers. We use them to wrap cufft and cusolver. Quick install pip install pycuda scikit-cuda. For cuda 8, the dev version of skcuda (will be released as 0.5.2) is needed for cusolver: pip install pycuda; pip install git+https://github.com/lebedov/scikit-cuda.git#egg=scikit-cuda.
warp-ctc
Required for Theano CTC implementation. It is faster then using an equivalent graph of Theano ops.

Requirements installation through Conda (recommended)
Install Miniconda
Follow this link to install Miniconda.
Note
If you want fast compiled code (recommended), make sure you have g++ installed.
Install requirements and optional packages

conda install numpy scipy mkl-service libpython <m2w64-toolchain> <nose> <sphinx> <pydot-ng> <git>

Note
Arguments between <…> are optional. m2w64-toolchain package provides a fully-compatible version of GCC and is then highly recommended. git package installs git source control through conda, which is required for the development versions of Theano and libgpuarray
Package parameterized is also optional but may be required for unit testing. It is available via pip.

pip install parameterized

Install and configure the GPU drivers (recommended)
Warning
OpenCL support is still minimal for now.
Install CUDA drivers
Follow this link to install the CUDA driver and the CUDA Toolkit.
You must reboot the computer after the driver installation.
Installation
Stable Installation
With conda
If you use conda, you can directly install both theano and pygpu. Libgpuarray will be automatically installed as a dependency of pygpu.

conda install theano pygpu

Warning
Latest conda packages for theano (>= 0.9) and pygpu (>= 0.6*) currently don’t support Python 3.4 branch.
With pip
If you use pip, you have to install Theano and libgpuarray separately.
theano
Install the latest stable version of Theano with:

<sudo> pip install <--user> Theano[test, doc]

Any argument between <…> is optional. Use sudo for a root installation. Use user for a user installation without admin rights. It will install Theano in your local site-packages. [test] will install the requirements for testing. [doc] will install the requirements in order to generate the documentation.
If you encountered any trouble, head to the Troubleshooting page.
The latest stable version of Theano is 0.9.0 (tagged with rel-0.9.0).
libgpuarray
For the stable version of Theano you need a specific version of libgpuarray, that has been tagged v0.6.9. Download it with:

git clone https://github.com/Theano/libgpuarray.git
cd libgpuarray
git checkout tags/v0.6.5 -b v0.6.9

and then follow the Step-by-step instructions.
Bleeding-Edge Installation (recommended)
Install the latest, bleeding-edge, development version of Theano with:

<sudo> pip install <--user> <--no-deps> git+https://github.com/Theano/Theano.git#egg=Theano

Any argument between <…> is optional. Use sudo for a root installation. Use user for a user installation without admin rights. It will install Theano in your local site-packages. Use no-deps when you don’t want the dependencies of Theano to be installed through pip. This is important when they have already been installed as system packages.
If you encountered any trouble, head to the Troubleshooting page.
libgpuarray
Install the latest, development version of libgpuarray following the Step-by-step instructions.
Note
Currently, you need libgpuarray version 0.7.1 that is not in conda default channel. But you can install it with our own channel mila-udem (that support only Python 2.7 and 3.5):

conda install -c mila-udem pygpu

Developer Installation
Install the developer version of Theano with:

git clone git://github.com/Theano/Theano.git
cd Theano
<sudo> pip install <--user> <--no-deps> -e .

Any argument between <…> is optional. Use sudo for a root installation. Use user for a user installation without admin rights. It will install Theano in your local site-packages. Use no-deps when you don’t want the dependencies of Theano to be installed through pip. This is important when they have already been installed as system packages. -e makes your installation editable, i.e., it links it to your source directory.
If you encountered any trouble, head to the Troubleshooting page.
libgpuarray
See instructions for bleeding-edge installation about libgpuarray.
Instructions for other Python distributions (not recommended)
If you plan to use Theano with other Python distributions, these are generic guidelines to get a working environment:

Look for the mandatory requirements in the package manager’s repositories of your distribution. Many distributions come with pip package manager which use PyPI repository. The required modules are Python (of course), NumPy, SciPy and a BLAS implementation (MKL or OpenBLAS). Use the versions recommended at the top of this documentation. If the package manager provide a GCC compiler with the recommended version (see at top), install it. If not, you could use the build TDM GCC which is provided for both 32- and 64-bit platforms. A few caveats to watch for during installation:

    Install to a directory without spaces (we have placed it in C:\SciSoft\TDM-GCC-64)If you don’t want to clutter your system PATH un-check add to path option. Enable OpenMP support by checking the option openmp support option.

Install CUDA with the same instructions as above. Install the latest, development version of libgpuarray following the Step-by-step instructions.

Box mount Cody_ How to listen to Pandora in Cody

Box mount Cody

Sometimes you just want to fire up Pandora on your stereo, without having to plug in your phone or enable Bluetooth. If you’re a Kodi user, You’ve probably wondered if there’s a Pandora addon for your home theater PC.
Sometimes, you just want to launch Pandora on stereo without having to plug in your phone or enable Bluetooth. If you are a Kodi user, you may want to know if your home theater PC has a Pandora add-on.
Sadly, there isn’t one in the official Repository. But that doesn’t mean you can’t use Pandora in Kodi: based on what is important and based on what is important. It just means you need to do some digging. An addon named Pandoki does the job admirably. Here’s how to set it up.
Unfortunately, none of the official repositories exist. But that doesn’t mean you can’t use Pandora in Kodi: it just means you need to do some digging. An add-on called Pandoki does this job nicely. The setup is as follows.
How to Install Pandoki in Kodi
First, head to this Thread on the Official Kodi Forum and download the “Repo Download”, so you can get Automatic Updates later. Next, Open Kodi and Head to Settings > Addons, and make sure that “Unknown Sources” is enabled.
First, visit the topic at the official Kodi forum and download a “buyback download” so that it can be automatically updated later. Next, open Kodi and go to Settings & GT; “Add-ons” and make sure unknown Sources are enabled.

With that done, we can head to Addons on the home screen, then select “Install from zip file.”
Once this is done, we can go to the plug-in on the home screen and select install from zip file.

Browse your hard drive until you find the ZIP file you downloaded earlier, then select it.
Browse the hard drive until you find the ZIP file you downloaded earlier, then select it.

Wait for the Repository to install, then head to “install from repository.”
Wait for the repository to install, then go to “Install from the repository.” ”

The plugin you’re looking for is in The “gominoa” repository, which you just installed. You’ll find it under “Music addons.”
The plug-in you are looking for is located in the ‘Gominoa’ repository that you just installed. You can find it under The Music Plugin.

Install that add-on and we’re just about ready to get started. You’ll first need to open the add-on’s Settings to enter your Pandora username and password.
With the add-on installed, we are ready to begin. First, you need to open the plug-in’s Settings to enter your Pandora user name and password.

If you’re a Pandora One subscriber, make sure you also toggle that option.
If you are a Pandora One subscriber, be sure to switch this option as well.
How to Use Pandoki in Kodi
Open up Pandoki and you will see all of your Pandora stations.
Open Pandoki and you’ll see all the Pandora stations.

Select a station and playback will begin.
Select a station and play it.

Everything takes place within Kodi’s default interface, meaning navigation is easy. If you want to hear a song again, you can: just head back to that song and select it.
Everything is done in Kodi’s default interface, which means navigation is very easy. If you want to listen to a song again, you can: just go back to that song and select it.
And that’s about it! There are a few things you can configure in the add-on’s Settings, including what order your channels show up in and how many songs show up in a given playlist, but for the most part this is very straightforward. Enjoy listening to your radio on your stereo.
That’s it! You can configure several things in the plug-in’s Settings, including the order in which channels are displayed and the number of songs displayed in a given playlist, but in most cases, this is very simple. Appreciate the stereo.

Translated from: https://www.howtogeek.com/286995/how-to-listen-to-pandora-in-kodi/

Box mount Cody

Python packaged *. Exe is running os.popen (cmd)/ subprocess.Popen *. Exe crashes with invalid [winerror 6] handle

Summary of the problem: last week I used Python3.8.5 to write an upgrade script for a software running on Windows 7, and by printing and exception catching found that the script crashed when the script was executed to os.popen(CMD), the exception was [WinError 6] handle invalid

Part of the test code:

logging.info('__Start__')
logging.info('os.system1')
logging.info('os.popen1')
try:
    logging.info(os.popen('c:'))
    logging.info('os.popen2')
except Exception as a:
    logging.info(a)
    logging.info('os.popen3')
logging.info('os.popen4')

Effect :

After testing, it was found that the program and script could run normally on Win10, and the script was executed separately on Win7 without any problem, and the script was called with the program on Win7, even if the script was executed OS.popen (‘ c: ‘) would crash.

Because os.popen is actually the encapsulation of subprocess.Popen, so the title also carries subprocess.Popen
solution: to implement a function myPopen, or use subproce. popen0 will be 1 stdin = Subprocess. DEVNULL to modify, the code is as follows:

def myPopen(cmd):
    proc = subprocess.Popen(cmd,
                            shell=True,
                            stdout=subprocess.PIPE,
                            stdin=subprocess.DEVNULL)
    return proc.stdout.read().decode()

Python running as Windows Service: OSError: [WinError 6] The handle is invalid
Popen(

How to open dump in Windows

Run regedd.exe and find “HKEY_LOCAL_MACHINE\SOFTWARE\Microsoft\Windows\Windows Error Reporting\LocalDumps”. If the key does not exist, do the following:
1) create a new LocalDumps key
2) create a subkey with the same name as your Windows store application process, such as myapp.exe
3) in the subkey create a folder called DumpFolder, of type REG_EXPAND_SZ, set it to the directory where you want to generate dump (make sure it exists), say C:\Dumps
4) in the same subkey create a subkey called DumpCount, Value of type REG_DWORD, set its value to 5 (maximum number of dumps generated)
5) in the same subkey create a value called DumpType, of type REG_DWORD, set its value to 2 (full dump)
Here is a registration script saved as a file with the suffix name REg

Windows Registry Editor Version 5.00

[HKEY_LOCAL_MACHINE\SOFTWARE\Microsoft\Windows\Windows Error Reporting\LocalDumps]
"DumpCount"=hex(b):0a,00,00,00,00,00,00,00
"DumpType"=hex(b):02,00,00,00,00,00,00,00
"DumpFolder"=hex(2):43,00,3a,00,5c,00,4c,00,6f,00,63,00,61,00,6c,00,44,00,75,\
  00,6d,00,70,00,73,00,00,00

When nodejs is installed: the error code is 2503

When installing Nodejs under Windows, you always report an error:

The installer has encountered an unexpected error installing this package. This may indicate a problem with this package. The error code is 2503.

There are three ways to try it:

    “Run as administrator” obtains administrator authority to Run the installation file. In Linux, you can prefix the command line with sudo. Open the “Start” menu in the lower left corner of the computer and type CMD in the search bar of the popup menu bar.
    in the top list, right-click [CMD] and select [run as administrator];
    enter the command line interface, find the directory of the program to be installed, and copy the path in the address bar;
    , for example, want to install the node-v6.9.1-x64.msi file under D disk;
    type D:\node-v6.9.1-x64.msi on the CMD command line;
    (be sure to have the full address, including the name of the installer); Right-click on the package and select the properties option.
    enter the properties dialog box, click the “security” option at the top, then select the current computer user, and click the lower right corner;
    enter the edit bar, check [full control] at the permissions below, and then click ok to install.

Author: leedaning
this address: http://blog.csdn.net/leedaning/article/details/53138664

Http Error 12057 (Bug Fix Note)

A Bug has been reported in the product that only occurs for a specific platform, Windows Server 2003 Standard Edition.
Check the Trace Log and find that the wrapper class of Wininet call returns Error 12057, with the specific Error contents as follows:

ERROR_WINHTTP_SECURE_CERT_REV_FAILED

12057

Indicates that revocation cannot be checked because the revocation server was offline (equivalent to CRYPT_E_REVOCATION_OFFLINE).
Open the
IE-> Tools-> Internet Options-> Advanced Tab-> Security Options – & gt;” Check for server certificate revocation(Requires Restart) “

This option is currently selected. Remove this option and the Bug symptoms disappear. Only IE with Windows Server 2003 Standard Edition is checked by default, and Error 12057 (Microsoft’s Bug?) does not occur when this option is checked on other platforms. or with other options?) . Decided to code the problem.
The code to solve this problem is quite simple. Add the following code after HttpOpenRequest to set the current Http connection options to cancel this check
DWORD dwFlags = 0;

DWORD dwError = 0;

DWORD dwBuffLen = sizeof(dwFlags);
InternetQueryOption(m_hRequest, INTERNET_OPTION_SECURITY_FLAGS,

(LPVOID)& dwFlags, & dwBuffLen);

dwFlags |= SECURITY_FLAG_IGNORE_REVOCATION;

InternetSetOption(m_hRequest, INTERNET_OPTION_SECURITY_FLAGS, (LPVOID)& dwFlags, sizeof(dwFlags)) ;

Another installation will pop up when Windows installs the application inprogress.you must complete that installation before continu

I installed node and Mongodb in Windows7 at the same time. Another installation inprogress. You must complete that installation before continu.  
Article type wants to change to translate, but I do not know how to say with this website, here to consult to everybody great god!
The original: https://support.techsmith.com/hc/en-us/articles/203730938-Snagit-Windows-Error-1500-1618-Another-installation-is-in-progress-You-must-complete-that-installation-before-before-proceeding-with-this-inst all
Snagit (Windows) : Errors 1500, 1618: Another installation is in progress. You must complete the installation before you can proceed with the installation
Last Update:
June 13, 2019 18:27
 
The problem
While installing the software, I received an error message indicating that another installation was in progress.
solution
Restart the computer, and then try to install Snagit again. If you still receive an error, do the following:
Windows 10 or Windows 8

    press CTRL + ALT + DEL and open task manager. Click on the bottom left corner for more details. On the Processes TAB, click to select Windows Installer under Background Processes. Click the end task button. Install Snagit again.

Windows 7

    press CTRL + ALT + DEL and open task manager. On the Processes TAB, right-click msiexec.exe, and then select End Process to install Snagit again.

Error 711: Cannot load Remote Access Service Connection Manager.

When you try to create a new network Connection, you may receive the following Error message:
Error 711: Cannot load Remote Access Service Connection Manager.
The Routing and Remote Access service terminated with service-specific error 711 (0x2C7)
Incoming Connections depend on the Routing and Remote Access service which was unable to start.For more information, check the system event log.
The first method:
 
Please take a look at your following services:
Service name: EventLog Display name: Windows Event Log Boot type: Auto
Service Name :TapiSrv Display name: Telephony Startup Type: Manual
Secure Socket Tunneling Protocol Service Startup Type: Manual
Service name :Netman Display name: Network Connections Startup Type: Manual
Service Name: NSI Display name: Network Store Inte*** CE Service Startup Type: Automatic
Service name :RasMan Display name: Remote Access Connection Manager Startup Type: Manual

error :711 friends, I think your service Settings should be on the first service I listed
First service description: This service manages events and event logs. It supports logging events, querying events, subscribing to events, archiving event logs, and managing event metadata. It displays events in BOTH XML and plain text formats. Stopping the service may compromise the security and reliability of the system.
Disabling the first Service will cause the SstpSvc to display the name: Secure Socket Tunneling Protocol Service which stops automatically after startup
And the service name :RasMan shows the name: Remote Access Connection Manager and the service needs to rely on it,


the second method:

this problem is easy to solve! At the command line run as administrator. Type Netsh WinSock Reset Enter and restart


the third method:

find C:/Windows/System32/LogFiles/WMI this folder, as long as this folder administrator title and then restart! Use rubik’s cube in the system Settings right menu management inside the new “access to administrator rights” function, and then you can click the right mouse button on the folder above, the administrator to obtain the ownership can be solved.
 

the fourth way :(this method did not try, it must work, but do not want to shut down every time to execute, feel like trying to steal the bell.

see by the members asked — — — — — — — the C:/Windows/System32/LogFiles/WMI right to this folder.
after restart, can be normal broadband connection. Then restart is such a problem, had to go to get the administrator rights of that file again, so after the restart can be on
The old restart is really very annoying, tell you a soil method, although soil, but it is really convenient, do not have to always take permission, restart. It’s the same thing, just write a script and have it run automatically when it’s turned off. Method is as follows:
1, to save the code below. Bat format (name myself to marry a good, I set it to 711. The bat) where is not easy to remove, code for @ ECHO OFF
takeown/f “C:/Windows/System32/LogFiles/WMI” y/r/d & amp; & icacls “C:/Windows/System32/LogFiles/WMI” /grant administrators:F /t
Encourage people to do it themselves, to enrich their food and clothing. The lazy ones or the ones that won’t save can be downloaded for a few bucks and the attachments below are already written

2, click “start” and “run”, in the run command box input “gpedit.msc”, open the group policy window pane on the left side of the console tree, in turn, a “computer configuration” “Windows Settings” “script startup/shutdown” node as shown in figure, double-click the details pane on the right side of the “shutdown” project, in the “shutdown properties” dialog box, click on the “add” button, will 711. Add bat for the new computer shutdown scripts set up complete, exit the group policy window, restart the computer
 
 
Fifth:
After the completion of the installation of Windows7, found that the dial-up connection can not be set up, either 711 error, 1068 dependent service can not start, or 691 error, and so on, it can be said that the error messages are varied!
There is no way, had to install back to WindowsXP, and then search the Internet for reasons, only to find that there are many friends appear the same error, after the search and analysis of the online information, as well as download ready to use the software, again installed back to Windows7.
Try to use the information on the Internet to solve the problem, make late at night, found still wrong, unable to restart to see first, no sleep, ready to install WindowsXp again the next day, a restart, surprise, to be able to connect to the Internet, web pages can be opened normally, success!
It’s two o ‘clock in the night. I’m going to bed

through several hours of groping, successfully dial-up Internet!
now put possible solutions, write out to share, may not be able to solve all the friends of the problem, but can try!
1,
install Windows7, then open control panel open network and Internet open view network status and tasks, select set up new connection or network, according to your network type set up the connection, set up the same method as WindowsXp.
 

“computer — management — services and applications — services”, go to the “Remote Access Connection Manager”, and check whether the “boot type” is “automatic”, if not, change to “automatic”. Similarly, find “Internet Connection Sharing (ICS)” and set it to “Auto.” Download ratio
Three,

find “c:/Windows/system32/logfiles” this folder and open.
Select and right-click the “WMI” folder. Select Get Administrator Privileges.

restart the computer!

5,
click on the lower right corner “”,

click the “broadband connection” and “” buttons. Icon “” becomes” “, OK!
open the network and share center, use the netcom broadband conversion tool to convert the user name, copy and paste, enter the password is ok. It’s ok to change the computer name. Right – click computer. Click properties. Click on advanced System Settings. Click computer name again. Click Change. Reset the top computer name in English or letters. Restart your computer. Log in and reconnect.


above five (except for the fourth) can not completely solve the “711 problem”, not necessarily which restart after the error.

here to do a survey, after all, recently there are many friends with this problem, everyone say
Because of what reason does oneself appear this problem?Is this the new system?Or after changing something?)
Is there a radical solution??(except for reinstall and system restore)
Hope to be able to solve this problem thoroughly through this post for the friends who are worried about this problem!

Ubuntu (16.04) creates a Windows boot U disk, using woeusb instead of DD

Ubuntu (16.04) creates Windows boot usb drives, using WOeUSB instead of DD
Dd creation often doesn’t start, I heard that you have to convert isohybrid to get to the USB flash drive. (Also, for Linux clones, if you already have a Linux system, install a Squashfs-Tools, just copy the root unsquashfs from the CD to a partition, and change the password to Chroot.)
Then we have to use another tool: WoeUSB
Installation:

sudo add-apt-repository ppa:nilarimogard/webupd8
sudo apt update 
sudo apt install woeusb

graphical interface use is not talked about, talked about the command line:

sudo woeusb --device </path/to/windows.iso> <device>
for example
sudo woeusb --device /home/windows.iso /dev/sdc

Update: if you get an error like this: “Error: Partition(s) on /dev/sdb are being used” when WinUSB/WoeUSB tries to format the USB stick from the command line, or “Error 256” in the beginning of the process when using the GUI, you must unmount the partitions. Firstly, to get a list of partitions, run the following command (“mount” also works):

df -aTh

This should list all the partitions mounted on your system. If you got here, you should already know the USB device drive, e.g. /dev/sdc, so you need to look for the partitions (it could also only be one) on this drive, like /dev/sdc1, /dev/sdc2, etc. Then, unmount them like this (example):

sudo umount /dev/sdc1
sudo umount /dev/sdc2
(etc)