Tag Archives: Operation and maintenance

[Solved] Linux WebService Startup Error: BindException: Cannot assign requested address

Linux deploys the WebService service and starts the error bindexception: cannot assign requested address

code

Question

The windows local test is normal. When it is deployed to the Linux server, an error is reported when it is started: BindException: Cannot assign requested address

Cause of problem

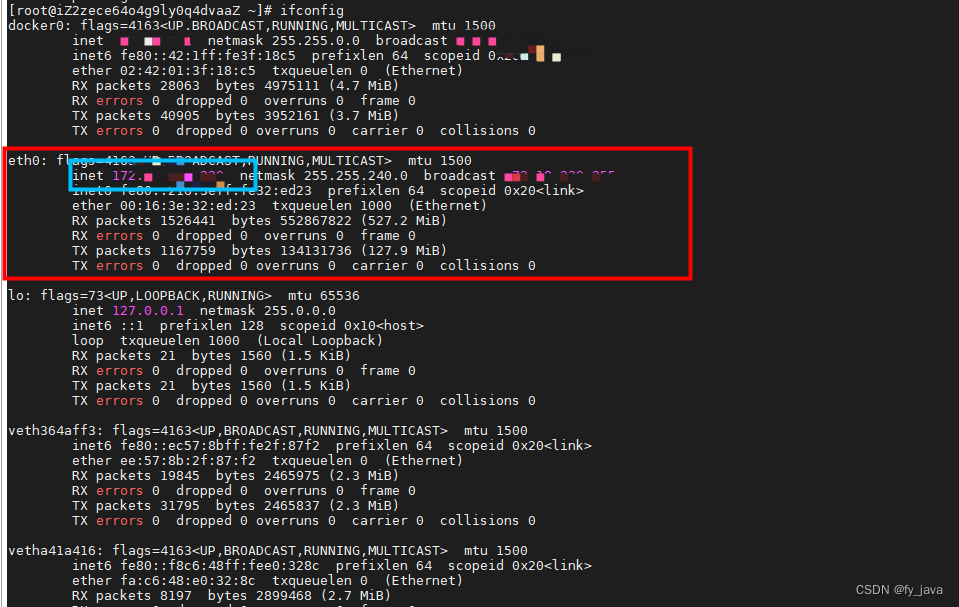
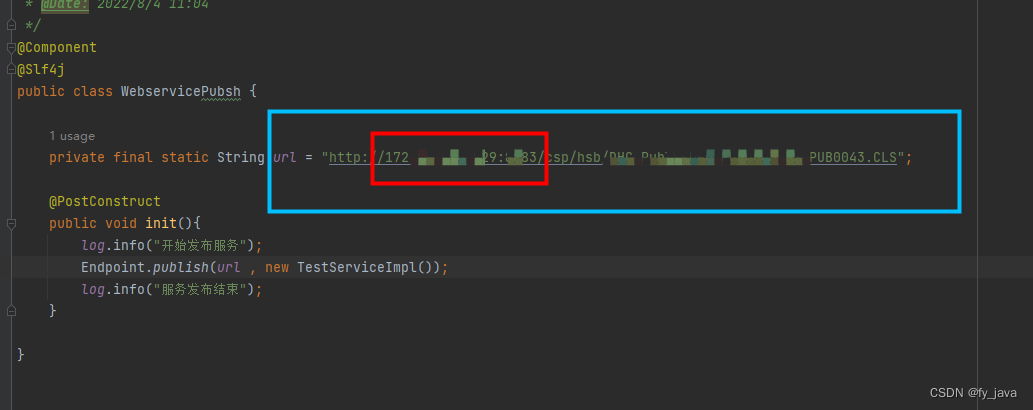
There is a problem with the IP in the URL. If Alibaba cloud and other cloud servers are used, you need to check the address of the network card eth0, and then change the IP in the URL to the IP of eth0

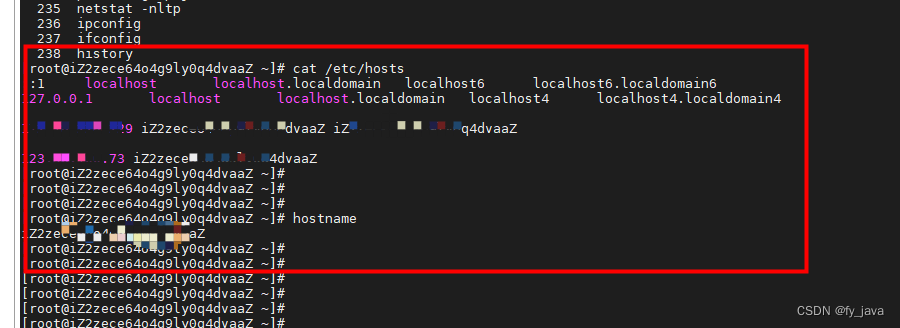
if not, check whether the IP of eth0 is configured or not in /etc/hosts. If not, add: IP + hostname
if you do not know the hostname, you can use the hostname command to check. If not, vim /etc/hosts, and then insert the data: IP hostname. Note that there is a space in the middle

Finally, when accessing WebService, the service can be accessed through public IP

[Solved] Log Error: kernel: blk_update_request: I/O error, dev fd0, sector 0

Environment: Center OS 7.6 virtual machine

Log error: kernel: BLK_ update_ request: I/O error, dev fd0, sector 0

Query the error information and find that there may be no floppy disk, and the floppy disk drive is loaded when the system is started.

Verification: lsmod | grep float

Step 1: (Not Work)

Try creating nofloppy.conf in the /etc/modprobe.d/ directory to disable the floppy module from loading on boot

vim /etc/modprobe.d/blacklist.conf

#Add command line
blacklist floppy

Or

echo "blacklist floppy" | tee /etc/modprobe.d/blacklist-floppy.conf

reboot

Step 2: The use of blacklist does not disable the way, and finally choose to add the following code in grub to boot disable

vim /boot/grub2/grub.cfg
 
#Add code
modprobe.blacklist=floppy
#Disable floppy drive
 
reboot

After rebooting and checking the logs, no errors were reported.

[Solved] fatal error: openssl/hmac.h: No such file or directory

Background

Error in compiling MSOffice encryption binary file on Debian 10 server

GitHub address: https://github.com/herumi/msoffice

report errors:

root@e0fef8daa858:/var/www/msoffice# make -j RELEASE=1
/usr/bin/make -C src
make[1]: Entering directory '/var/www/msoffice/src'
g++ -c msoffice-crypt.cpp -o release/msoffice-crypt.o -g -D_FILE_OFFSET_BITS=64 -msse2 -fno-operator-names -Wall -Wextra -Wformat=2 -Wcast-qual -Wcast-align -Wwrite-strings -Wfloat-equal -Wpointer-arith  -Ofast -fomit-frame-pointer -DNDEBUG -march=native -msse4 -I/var/www/msoffice/include -I/var/www/msoffice/../cybozulib/include -I/var/www/msoffice/../mie/include
g++ -c attack.cpp -o release/attack.o -g -D_FILE_OFFSET_BITS=64 -msse2 -fno-operator-names -Wall -Wextra -Wformat=2 -Wcast-qual -Wcast-align -Wwrite-strings -Wfloat-equal -Wpointer-arith  -Ofast -fomit-frame-pointer -DNDEBUG -march=native -msse4 -I/var/www/msoffice/include -I/var/www/msoffice/../cybozulib/include -I/var/www/msoffice/../mie/include
In file included from /var/www/msoffice/include/decode.hpp:14,
                 from msoffice-crypt.cpp:16:
/var/www/msoffice/../cybozulib/include/cybozu/crypto.hpp:30:10: fatal error: openssl/hmac.h: No such file or directory
   30 | #include <openssl/hmac.h>
      |          ^~~~~~~~~~~~~~~~
compilation terminated.
make[1]: *** [../common.mk:57: release/msoffice-crypt.o] Error 1
make[1]: *** Waiting for unfinished jobs....
In file included from /var/www/msoffice/include/attack.hpp:14,
                 from attack.cpp:14:
/var/www/msoffice/../cybozulib/include/cybozu/crypto.hpp:30:10: fatal error: openssl/hmac.h: No such file or directory
   30 | #include <openssl/hmac.h>
      |          ^~~~~~~~~~~~~~~~
compilation terminated.
make[1]: *** [../common.mk:57: release/attack.o] Error 1
make[1]: Leaving directory '/var/www/msoffice/src'
make: *** [Makefile:7: all] Error 2

Solution:

To solve this problem, you need to install the OpenSSL development package, execute the following command to install it, and then recompile it

apt update && apt install libssl-dev

If it is CentOS, you can execute the following command to solve the problem

yum install openssl-dev -y

[Solved] hadoop-2.7.1 Error: Error Cannot find configuration directory etchadoop

Since the configuration is hadoop-2.7.1, it will be found later during startup

The terminal executes./start yarn sh
starting yarn daemons
Error: Cannot find configuration directory: /etc/hadoop

This is the reason why the directory cannot be found. You can find the solution by reading the corresponding shell script~

Solution:

Configures the directory where a Hadoop configuration file is located in hadoop-env.sh (codes as below):

export HADOOP_CONF_DIR=/opt/hadoop-2.7.1/etc/hadoop/

Execute command

source  hadoop-env.sh

[Solved] MySQL Startup Error: Job for mysqld.service failed because the control process exited with error code

Question

An error is reported when starting MySQL service, as shown below:

[root@node2 hadoop]# systemctl start mysqld.service
Job for mysqld.service failed because the control process exited with error code.
See "systemctl status mysqld.service" and "journalctl -xe" for details.

or

[root@node2 hadoop]# systemctl start mysqld.service
Job for mysqld.service failed because the control process exited with error code.
See "systemctl status mysqld.service" and "journalctl -xe" for details.

Solution

This is because the /var/lib/MySQL directory has insufficient permissions

[root@node2 hadoop]# cd /var/lib/mysql
[root@node2 mysql]# ll
all 167348
-rw-r-----. 1 root  root        56 6月  19 20:00  auto.cnf
-rw-r-----. 1 mysql mysql        0 6月  19 20:01  binlog.index
-rw-------. 1 root  root      1676 6月  19 20:00  ca-key.pem
-rw-r--r--. 1 root  root      1112 6月  19 20:00  ca.pem
-rw-r--r--. 1 root  root      1112 6月  19 20:00  client-cert.pem
-rw-------. 1 root  root      1676 6月  19 20:00  client-key.pem
-rw-r-----. 1 root  root    196608 6月  19 20:00 '#ib_16384_0.dblwr'
-rw-r-----. 1 root  root   8585216 6月  19 20:00 '#ib_16384_1.dblwr'
-rw-r-----. 1 root  root      3595 6月  19 20:00  ib_buffer_pool
-rw-r-----. 1 root  root  12582912 6月  19 20:00  ibdata1
-rw-r-----. 1 root  root  50331648 6月  19 20:00  ib_logfile0
-rw-r-----. 1 root  root  50331648 6月  19 20:00  ib_logfile1
drwxr-x---. 2 root  root         6 6月  19 20:00 '#innodb_temp'
drwxr-x---. 2 root  root         6 6月  19 20:00  mysql
-rw-r-----. 1 root  root  15728640 6月  19 20:00  mysql.ibd
drwxr-x---. 2 root  root      8192 6月  19 20:00  performance_schema
-rw-------. 1 root  root      1676 6月  19 20:00  private_key.pem
-rw-r--r--. 1 root  root       452 6月  19 20:00  public_key.pem
-rw-r--r--. 1 root  root      1112 6月  19 20:00  server-cert.pem
-rw-------. 1 root  root      1676 6月  19 20:00  server-key.pem
-rw-r-----. 1 root  root  16777216 6月  19 20:00  undo_001
-rw-r-----. 1 root  root  16777216 6月  19 20:00  undo_002

Modify permissions and start MySQL

[root@node2 ~]# setenforce 0 
[root@node2 ~]# chown -R mysql:mysql /var/lib/mysql
[root@node2 ~]# chmod -R 777 /var/lib/mysql
[root@node2 ~]# systemctl start mysqld.service
[root@node2 ~]# ps -ef |grep mysql
mysql      26627       1  4 23:57 ?       00:00:00 /usr/sbin/mysqld
root       26671   10438  0 23:57 pts/0    00:00:00 grep --color=auto mysql
[root@node2 ~]# cd /var/lib/mysql
[root@node2 mysql]# ll
all 190916
-rw-r-----. 1 mysql mysql       56 6月  19 23:57  auto.cnf
-rw-r-----. 1 mysql mysql      156 6月  19 23:57  binlog.000001
-rw-r-----. 1 mysql mysql       16 6月  19 23:57  binlog.index
-rwxrwxrwx. 1 mysql mysql     1680 6月  19 23:50  ca-key.pem
-rwxrwxrwx. 1 mysql mysql     1112 6月  19 23:50  ca.pem
-rwxrwxrwx. 1 mysql mysql     1112 6月  19 23:50  client-cert.pem
-rwxrwxrwx. 1 mysql mysql     1676 6月  19 23:50  client-key.pem
-rwxrwxrwx. 1 mysql mysql   196608 6月  19 23:57 '#ib_16384_0.dblwr'
-rwxrwxrwx. 1 mysql mysql  8585216 6月  19 23:50 '#ib_16384_1.dblwr'
-rwxrwxrwx. 1 mysql mysql     6059 6月  19 23:50  ib_buffer_pool
-rwxrwxrwx. 1 mysql mysql 12582912 6月  19 23:57  ibdata1
-rwxrwxrwx. 1 mysql mysql 50331648 6月  19 23:57  ib_logfile0
-rwxrwxrwx. 1 mysql mysql 50331648 6月  19 23:50  ib_logfile1
-rw-r-----. 1 mysql mysql 12582912 6月  19 23:57  ibtmp1
drwxrwxrwx. 2 mysql mysql      187 6月  19 23:57 '#innodb_temp'
drwxrwxrwx. 2 mysql mysql      143 6月  19 23:50  mysql
-rwxrwxrwx. 1 mysql mysql 27262976 6月  19 23:57  mysql.ibd
srwxrwxrwx. 1 mysql mysql        0 6月  19 23:57  mysql.sock
-rw-------. 1 mysql mysql        6 6月  19 23:57  mysql.sock.lock
drwxrwxrwx. 2 mysql mysql     8192 6月  19 23:50  performance_schema
-rwxrwxrwx. 1 mysql mysql     1676 6月  19 23:50  private_key.pem
-rwxrwxrwx. 1 mysql mysql      452 6月  19 23:50  public_key.pem
-rwxrwxrwx. 1 mysql mysql     1112 6月  19 23:50  server-cert.pem
-rwxrwxrwx. 1 mysql mysql     1680 6月  19 23:50  server-key.pem
drwxrwxrwx. 2 mysql mysql       28 6月  19 23:50  sys
-rwxrwxrwx. 1 mysql mysql 16777216 6月  19 23:57  undo_001
-rwxrwxrwx. 1 mysql mysql 16777216 6月  19 23:57  undo_002
[root@node2 mysql]# 

Note:

  1. Setenforce 0 is used to solve [InnoDB] Operating system error number 13 in a file operation.
  2. Directory permissions must be set to 777, just 755 will also cause an error

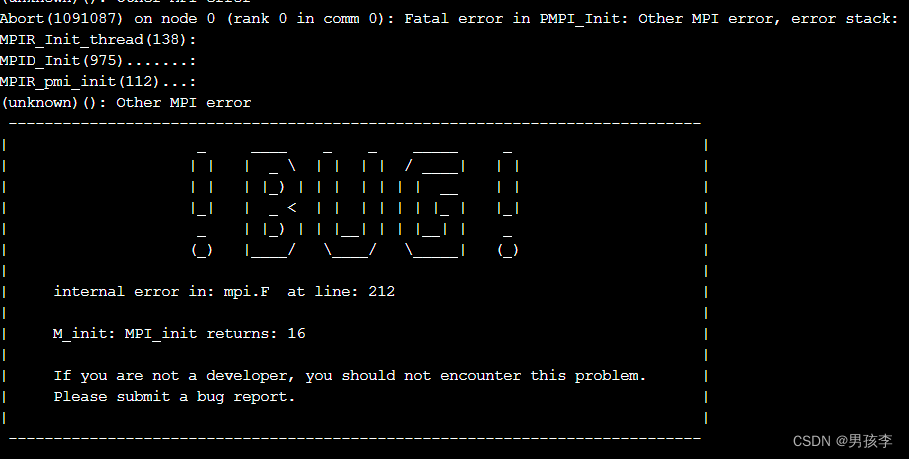
[Solved] Fatal error in PMPI_Init: Other MPI error, error stack:MPIR_Init_thread(138)

1. Problems

Use the compiler of onepai 2021.3. After compiling the program, use the slurm scheduling system to run the job and report an error:

2. Solutions

In the sbatch script of slurm, add the environment variable of libpmi2.so

export I_MPI_PMI_LIBRARY=../slurm/lib/libpmi2.so

If the application image is made in a container (such as docker)

1. Copy the libpmi2.so file into the container

2. At the same time, the corresponding environment variables are configured for export


[Solved] Compose error “HTTP request took too long to complete“

Recently, I noticed that the following error messages often appear in docker-compose:

ERROR: An HTTP request took too long to complete. Retry with --verbose to obtain debug information.
If you encounter this issue regularly because of slow network conditions, consider setting COMPOSE_HTTP_TIMEOUT to a higher value (current value: 60).

Adding COMPOSE_HTTP_TIMEOUT seems to only delay the error. Is this a known issue? Or is there a workaround?
Tried increasing the COMPOSE_HTTP_TIMEOUT environment variable and it didn’t work.

# Increase timeout period to 120 seconds.
export COMPOSE_HTTP_TIMEOUT=120;
# Rebuild all containers using the new images.
docker-compose up -d;

# or use docker-compose --verbose up -d to check out the errors

My Solution:

sudo service docker restart
docker-compose up

Maybe I have a high inode

df -ih			#  -i, --inodes   List information about information nodes, not data block usage
Filesystem     Inodes IUsed IFree IUse% Mounted on
udev             493K   390  492K    1% /dev
tmpfs            494K   537  494K    1% /run
/dev/xvda1       1.3M  1.2M   70K   95% /
tmpfs            494K     1  494K    1% /dev/shm
tmpfs            494K     3  494K    1% /run/lock
tmpfs            494K    16  494K    1% /sys/fs/cgroup
tmpfs            494K     4  494K    1% /run/user/1000

[Solved] gawk: error while loading shared libraries: libreadline.so.4

While cross-compiling, I encountered gawk: error while loading shared libraries: libreadline.so.4: cannot open shared object file: No such file or directory. The current build environment is x86_64, Ubuntu 20.04, the target runtime environment is mips32. The first thing I thought of when I encountered this problem was to install this lib.

On Ubuntu, we can use the apt-file program to find out where this library is installed. If you don’t have apt-file installed on your system, you need to install apt-file first, and then run it as follows:

$sudo apt-file update
$sudo apt-file search libreadline.so.4   #find no results
$sudo apt-file search libreadline.so    #returns the following
lib32readline-dev: /usr/lib32/libreadline.so

lib32readline8: /lib32/libreadline.so.8

lib32readline8: /lib32/libreadline.so.8.0

libreadline-dev: /usr/lib/x86_64-linux-gnu/libreadline.so

libreadline-gplv2-dev: /usr/lib/x86_64-linux-gnu/libreadline.so

libreadline5: /lib/x86_64-linux-gnu/libreadline.so.5

libreadline5: /lib/x86_64-linux-gnu/libreadline.so.5.2

libreadline5-dbg: /usr/lib/debug/libreadline.so.5

libreadline5-dbg: /usr/lib/debug/libreadline.so.5.2

libreadline8: /lib/x86_64-linux-gnu/libreadline.so.8

libreadline8: /lib/x86_64-linux-gnu/libreadline.so.8.0

libreadline.so.4 is a very old library and is no longer available on Ubuntu’s library sources, but try the later versions. Since the source code is developed and compiled on 32bit centos, choose the 32bit library: lib32readline8.

Run as below:

$sudo apt install lib32readline8

After installation, enter the /lib32 directory and you can see libreadline.so.8 and libreadline.so.8.0.

lrwxrwxrwx 1 root root     18 Feb 25  2020 /lib32/libreadline.so.8 -> libreadline.so.8.0
-rw-r--r-- 1 root root 311884 Feb 25  2020 /lib32/libreadline.so.8.0

Then run:

$ sudo ln -sv /lib32/libreadline.so.8.0 /lib32/libreadline.so.4

In $ls -l you can see that the symbolic link has been created.

However, running the cross-compilation task still reports the same error. After posting this issue on stack overflow, someone left a comment below reminding me to fix not libreadline.so.4, but the gawk version being too old.

I ran $gawk which prompted no such command, so

$sudo apt install gawk

Then Enter $gawk –version to check the other version, and return

GNU Awk 5.0.1, API: 2.0 (GNU MPFR 4.0.2, GNU MP 6.2.0)

Enter $whereis gawk to find its installation path:

gawk: /usr/bin/gawk /usr/lib/x86_64-linux-gnu/gawk /usr/share/man/man1/gawk.1.gz

The path is /usr/bin, and running the cross-compile job again still gives the same error, which means that there is another gawk installed in a directory that is called first when running the cross-compile. And this directory is not in the $PATH, or if it is, it is after /usr/bin.

I found the possible installation directory of gawk in the configuration file of the source code to be compiled, cd to that directory, run $gawk, and report the same error, and here it is. Run the following command:

$cp /usr/bin/gawk gawk

Run gawk in the current directory again to confirm that it has been updated to the latest version.

Run cross compilation again without error. The problem has been solved.
[Solved] failed (13: Permission denied) while reading upstream

Error Messages:

/usr/local/nginx/logs/error.log
2022/08/11 09:36:47 [crit] 2821940#0: *6263 open() "/usr/local/nginx/proxy_temp/2/29/0000000292" failed 
(13: Permission denied) while reading upstream, client: 15.60.178.88, server: demo.jichu.com, 
request: "GET /static/css/bootstrap.min.css.map HTTP/1.1", 
upstream: "http://15.60.178.88:3001/static/css/bootstrap.min.css.map", host: "demo.jichu.com"
2022/08/11 09:36:49 [crit] 2821940#0: *6261 open() "/usr/local/nginx/proxy_temp/3/29/0000000293" failed (
13: Permission denied) while reading upstream, client: 15.60.178.88, server: demo.jichu.com, 
request: "GET /class/studChoiceConfig?v=463&_=1660181808733 HTTP/1.1", 
upstream: "http://15.60.178.88:3001/class/stu?v=463&_=1660181808733", host: "demo.jichu.com", 
referrer: "http://demo.jichu.com/class/class"


Solution:
vi /usr/local/nginx/conf/nginx.conf
#use nobody;
Modify to
use root;
Restart nginx

[Solved] Docker Download Mirror Error: Cannot connect to the Docker daemon at…

If you want to download an image with docker, you will report an error

cannot connect to the docker daemon at unix:///var/run/docker.sock. Is the docker daemon running?

cause analysis: maybe docker did not exit normally last time, so docker did not start normally, and the docker process could not be found in the corresponding /var/run/ path.

Solution:
enter the command

systemctl start docker.service

Then you can download

[Solved] SSH connect Error: “WARNING: REMOTE HOST IDENTIFICATION HAS CHANGED“

1. Problem description

When testing the connectivity of the host with the Ping module of ansible, the host 192.168.18.80 is pinged for the first time, but there is something wrong with the host. Take it offline, replace it with a new one, and then Ping 192.168.18.80 again. The following error message appears:

[root@server ~]# ansible all -m ping
192.168.18.80 | UNREACHABLE! => {
    "changed": false,
    "msg": "Failed to connect to the host via ssh: @@@@@@@@@@@@@@@@@@@@@@@@@@@@@@@@@@@@@@@@@@@@@@@@@@@@@@@@@@@\r\n@    WARNING: REMOTE HOST IDENTIFICATION HAS CHANGED!     @\r\n@@@@@@@@@@@@@@@@@@@@@@@@@@@@@@@@@@@@@@@@@@@@@@@@@@@@@@@@@@@\r\nIT IS POSSIBLE THAT SOMEONE IS DOING SOMETHING NASTY!\r\nSomeone could be eavesdropping on you right now (man-in-the-middle attack)!\r\nIt is also possible that a host key has just been changed.\r\nThe fingerprint for the ECDSA key sent by the remote host is\nSHA256:zbEO7l6AqnhvNiZvVoy5KcYGHrn10CJw0ul169LeyHU.\r\nPlease contact your system administrator.\r\nAdd correct host key in /root/.ssh/known_hosts to get rid of this message.\r\nOffending ECDSA key in /root/.ssh/known_hosts:2\r\nPassword authentication is disabled to avoid man-in-the-middle attacks.\r\nKeyboard-interactive authentication is disabled to avoid man-in-the-middle attacks.\r\[email protected]: Permission denied (publickey,gssapi-keyex,gssapi-with-mic,password).",
    "unreachable": true
}

When SSH is used for remote connection, the following error occurs

[root@server ~]# ssh 192.168.18.80
@@@@@@@@@@@@@@@@@@@@@@@@@@@@@@@@@@@@@@@@@@@@@@@@@@@@@@@@@@@
@    WARNING: REMOTE HOST IDENTIFICATION HAS CHANGED!     @
@@@@@@@@@@@@@@@@@@@@@@@@@@@@@@@@@@@@@@@@@@@@@@@@@@@@@@@@@@@
IT IS POSSIBLE THAT SOMEONE IS DOING SOMETHING NASTY!
Someone could be eavesdropping on you right now (man-in-the-middle attack)!
It is also possible that a host key has just been changed.
The fingerprint for the ECDSA key sent by the remote host is
SHA256:zbEO7l6AqnhvNiZvVoy5KcYGHrn10CJw0ul169LeyHU.
Please contact your system administrator.
Add correct host key in /root/.ssh/known_hosts to get rid of this message.
Offending ECDSA key in /root/.ssh/known_hosts:2
ECDSA host key for 192.168.18.80 has changed and you have requested strict checking.
Host key verification failed.


2. Cause of problem

The identity of the SSH Remote Connection host is defaultly saved in ~/.ssh/known_hosts, each time you visit, you will check whether the host ID is the same. If not, you will be prompted with an error or warning to prevent man in the middle attacks.


3. Solution

Delete the information of the corresponding IP line in ~/.ssh/known_hosts, as shown in the following figure

[root@server ~]# vim  ~/.ssh/known_hosts
192.168.18.99 ecdsa-sha2-nistp256 AAAAE2VjZHNhLXNoYTItbmlzdHAyNTYAAAAIbmlzdHAyNTYAAABBBGEsej5rHzUx+GX65oiHKfOqDqFP2OdNhb0i80Hns0b2TObWTQMvscKjaryuh2oZbq+Esekhn98HXDNc30aEjzA=
192.168.18.199 ecdsa-sha2-nistp256 AAAAE2VjZHNhLXNoYTItbmlzdHAyNTYAAAAIbmlzdHAyNTYAAABBBHhaJ4VDE3HxK1AcsHNac4MTjv4IUauTLazQDwgh6lhCIt0qN5Zjj0+rh+isAZYOXdBp4S8K5p/YkTXalmU0CHQ=
192.168.18.80 ecdsa-sha2-nistp256 AAAAE2VjZHNhLXNoYTItbmlzdHAyNTYAAAAIbmlzdHAyNTYAAABBBHKpwuBsqrI1ogpSvLkJKJpKcXIO49sJJH3gJmykHWOp3cqfekCpXIppiEzhKslxgFEmd971DILXrpPguDEQ3UE=

[Solved] FTP Error: 553 Could not create file

FTP error 553 could not create file

Problem Description:
an error occurs when uploading a file using the FTP put command 553 could not create file

Solution:
1. View the local_root configuration information in the current configuration file.
example:

vim /etc/vsftpd/vsftpd.conf
local_root=/ftpFile

2. Check if there is a directory under local_rootfor the user who is currently logged in to ftp.
example:

[root@master ~]# cd /ftpFile/
[root@master ftpFile]# ll
taotally 0
drwxr-xr-x 2 admin admin 17 Aug   4 23:49 ftpFile

/ftpFile The user of the ftpFile file in the folder is admin, the username used to log in to ftp

3. Note that when using the put command, use the relative path instead of the absolute path, or use the command CD to the FTP file directory.
example:

[root@node01 ~]# ftp 192.168.169.141
Connected to 192.168.169.141 (192.168.169.141).
220 (vsFTPd 3.0.2)
Name (192.168.169.141:root): admin		# use admin to login
331 Please specify the password.
Password:
230 Login successful.
Remote system type is UNIX.
Using binary mode to transfer files.
ftp> ls		# You can use ls to see what files are in the current admin user's directory
227 Entering Passive Mode (192,168,169,141,87,162).
150 Here comes the directory listing.
drwxr-xr-x    2 1006     1006           17 Aug 04 15:49 ftpFile
226 Directory send OK.
ftp> put /home/diffUserFile.txt ftpFile/1111	# When using put to upload files, you can use absolute paths locally, and relative paths on the ftp side, but using absolute paths will report an error
local: /home/diffUserFile.txt remote: ftpFile/1111
227 Entering Passive Mode (192,168,169,141,128,45).
150 Ok to send data.
226 Transfer complete.
24 bytes sent in 9.1e-05 secs (263.74 Kbytes/sec)
ftp> 

or

[root@node01 ~]# ftp 192.168.169.141
Connected to 192.168.169.141 (192.168.169.141).
220 (vsFTPd 3.0.2)
Name (192.168.169.141:root): admin		# use admin to login
331 Please specify the password.
Password:
230 Login successful.
Remote system type is UNIX.
Using binary mode to transfer files.
ftp> cd /ftpFile/		# Use the cd command to enter the ftp specified directory
250 Directory successfully changed.
ftp> lcd /home		# Use lcd to go to the local file path
Local directory now /home
ftp> put diffUserFile.txt 2222		# This way it can all be done with relative paths
local: diffUserFile.txt remote: 2222
227 Entering Passive Mode (192,168,169,141,202,165).
150 Ok to send data.
226 Transfer complete.
24 bytes sent in 7.6e-05 secs (315.79 Kbytes/sec)
ftp>