Tag Archives: Operation and maintenance

Solve host key verification failed [valid]

Host key verification failed

When I wanted to connect to my server on the Mac, I found that there was a problem with my key, so Baidu took a look and made a record.

The first terminal is the picture of the problem, and the second terminal is a code to solve the problem

SSH keygen - R IP address you want to access
SSH keygen - R 192.168.1.5

Reference blog

zookeeper_ An error is reported when the exporter starts

Problem Description: two machines, one zookeeper_ Data can be found when the exporter is started normally, and the other one can be started normally, and then no data can be detected.

note: check through Prometheus ZK_ The exporter is alive, but the data of the machine reporting an error cannot be found

Error log: erro [0014] unable to open connection to zookeeper error = “dial TCP: lookup localhost on 8.8.8.8:53: no such host”

resolvent:

It’s a DNS problem, so check the/etc/resolv.conf file of the machine that reports an error and compare it with the file of the machine that does not report an error. If it is found that there is an inconsistency, change it to the constant one, and then solve the problem

Log in to Prometheus to view ZK_ Up data

Then the problem is solved

Consumer service instance error: HTTP get http://xxx/actuator/health: 503 output: {“status”: “out_of_service”

Phenomenon

Some back-end services register with consumer and report an error HTTP get http://xxx/actuator/health: 503 output: {"status": "out_of_service", but other services can be registered normally. Find a way to print thin error messages on the Internet

Print detailed error information

Configure in the error reporting module: application.YML or bootstrap.YML as follows:

management:
  endpoint:
    health:
      show-details: always  
  endpoints:
    web:
      exposure:
        include: '*'    

Or add the following configuration in application.Properties :

management.endpoint.health.show-details=always
management.endpoints.web.exposure.include=*

Finally, after printing the detailed error information, I found that it was the ES cluster. I thought it was the problem of the consumer configuration that led to the wrong direction during troubleshooting.

How to Solve Docker Portainer Connect Error

Container startup

[root@shusheng run]# docker run -d -p 9000:9000 --restart=always -v /var/run/docker.sock:/var/run/docker.sock --name prtainer-test portainer/portainer

Portal interface access

Connect error resolution

Many Google articles talk about permission, but I use root to start it
until later

[root@shusheng run]# setenforce 0

Successfully solved

[Solved] Docker Start Error: iptables failed: iptables –wait -t nat -A DOCKER -p tcp -d 0/0 –dport 10241

Start docker to report error content:
iptables failed: iptables –wait -t nat -A DOCKER -p tcp -d 0/0 –dport 10241 -j DNAT –to-destination 172.17.0.2:50000 ! -i docker0: iptables: No chain/target/match by that name.
(exit status 1)

Solution: Restart docker

systemctl restart docker

[Solved] Linux Error: tar: Error Is Not Recoverable: Exiting Now

Under the Linux operating system, download the xx.tar.gz file and execute tar -zxvf xx.tar.gz. The following errors occur during execution:

xxx.tar.gz: EOF tar with exception in archive file: error is not recoverable: exiting now

There are two solutions.

Solution 1: remove the Z in the decompression parameters and execute the command as tar – xvf xx.tar.gz.

The reason for this scheme is that the downloaded file is not “filtered and archived through gzip”, so adding the parameter Z cannot decompress normally but generally, this problem does not occur when downloading from the official website. Be sure to download the full version from the official website.

If the scheme still fails to decompress normally, try the second scheme.

Solution 2: re download or upload compressed files

this scheme is aimed at downloading compressed files that are not complete, that is, they are not downloaded normally. You can download it again in another way. For example, after downloading through WGet, the above problems occur during execution. You can try to download it directly on other machines, upload it to the target server, and then execute the above decompression command.

[Solved] Python urllib sending request Error: urllib.error.urlerror: <urlopen error [SSL: certificate_verify_failed]….>

Error:urllib.error.URLError: <urlopen error [SSL: CERTIFICATE_VERIFY_FAILED] certificate verify failed (_ssl.c:xxx)>

Solution:
Add the following codes before you use urllib.request.Request(url):

import ssl
ssl._create_default_https_context = ssl._create_unverified_context

Problem analysis

This is because the website visited is HTTPS://, which requires SSL authentication, and using urllib directly will lead to local authentication failure (the specific reason is not found out), so SSL is used_create_unverified_Context turn off authentication

Error recurrence

When request = urllib.Request.Request (URL, data) is executed, an error is reported. Cancel the comments in the upper two lines to solve the problem

import json
import urllib


def baidu_search():
    url = "https://www.baidu.com/s?"
    data = {"wd": "AHA"}
    data = json.dumps(data).encode('GBK')
    # import ssl
    # ssl._create_default_https_context = ssl._create_unverified_context  # If these two lines are not added, the next line reports an error
    request = urllib.request.Request(url, data)
    response = urllib.request.urlopen(request)
    content = response.read()
    print(str(content))


if __name__ == '__main__':
    baidu_search()

error: XML error: target ‘vdb‘ duplicated for disk sources ‘aaa.img‘ and ‘bbb.img‘

On a Sunday morning when you want to learn, try adding a hard disk to the KVM virtual machine with the command line.
create a disk
#qemu-img create – F qcow2/home/KVM FS/sy-b80915disk1.qcow2 10g

Bind disk to domain: sy-b80915
#virsh attach disk sy-b80915/home/KVM FS/sy-b80915disk1.qcow2 VDB — live — config

Later, I tried to unbind the VDA of the main disk. As a result, I accidentally unbind the VDA of the main disk
#virsh detach disk sy-b80915 VDA — live — config

But I unbound VDB, namely sy-b80915disk1.qcow2
#virsh detach disk sy-b80915 VDB — live — config

The virtual machine can still be restarted and used normally later, but I think the name of sy-b80915disk1.qcow2 is not good. Delete and recreate sy-b80915vdb.qcow2
#rm – RF/home/KVM/sy-b80915disk1.qcow2
#qemu-img create – F qcow2/home/KVM FS/sy-b80915vdb.qcow2 10g

Then bind
#virsh attach disk sy-b80915/home/KVM FS/sy-b80915vdb.qcow2 VDB — live — config
the results are as follows:
error: XML error: target ‘VDB’ duplicated for disk sources’ sy-b80915disk1. Img ‘and’ sy-b80915vdb. Img ‘
the big idea is to bind repeatedly, but it has been unbound before.

The only exception is that the main disk VDA is unbound accidentally, but the system can still run. So I checked the XML file. Compared with other virtual machines, I found that the XML file of SY – b80915 lacks the main disk VDA. When unbinding the VDA, the XML file is changed. So add VDA to the XML file again
execute the following command to edit the XML file:
#virsh edit sy-b80915
repair the XML definition of VDA, as shown in Figure 1:
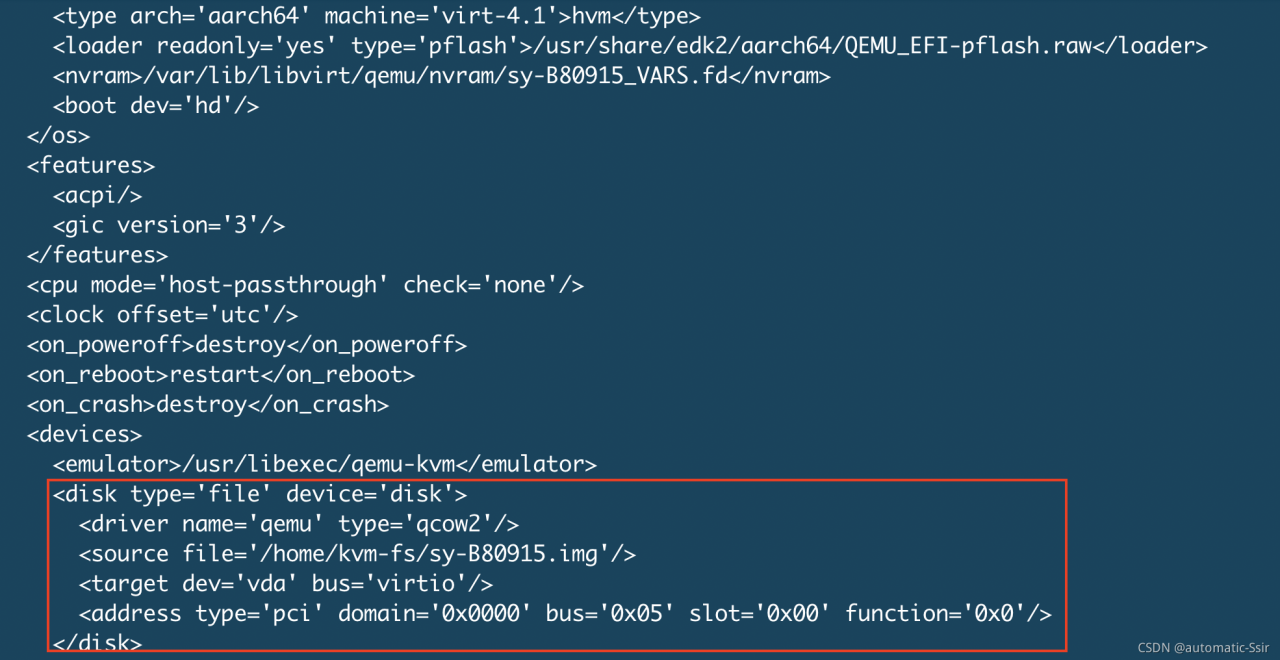
Figure 1

Then bind sy-b80915vdb.qcow2 again. Success
#virsh attach-disk sy-B80915 /home/kvm-fs/sy-B80915vdb.qcow2 vdb –live –config

[Solved] Multiple Yum update error: Failed to set locale, defaulting to C

Phenomenon:

yum update 
Failed to set locale, defaulting to C
Loaded plugins: fastestmirror
Loading mirror speeds from cached hostfile
 * base: mirrors.cqu.edu.cn
 * extras: mirrors.cn99.com
 * updates: mirrors.cn99.com
Resolving Dependencies
There are unfinished transactions remaining. You might consider running yum-complete-transaction, or "yum-complete-transaction --cleanup-only" and "yum history redo last", first to finish them. If those don't work you'll have to try removing/installing packages by hand (maybe package-cleanup can help).
--> Running transaction check
---> Package glibc.i686 0:2.17-317.el7 will be updated
--> Processing Dependency: glibc = 2.17-317.el7 for package: glibc-common-2.17-317.el7.x86_64
---> Package glibc.i686 0:2.17-325.el7_9 will be an update
--> Finished Dependency Resolution
Error: Package: glibc-common-2.17-317.el7.x86_64 (@anaconda)
           Requires: glibc = 2.17-317.el7
           Removing: glibc-2.17-317.el7.i686 (@base)
               glibc = 2.17-317.el7
           Updated By: glibc-2.17-325.el7_9.i686 (updates)
               glibc = 2.17-325.el7_9
           Available: glibc-2.17-322.el7_9.i686 (updates)
               glibc = 2.17-322.el7_9
           Available: glibc-2.17-323.el7_9.i686 (updates)
               glibc = 2.17-323.el7_9
           Available: glibc-2.17-324.el7_9.i686 (updates)
               glibc = 2.17-324.el7_9
 You could try using --skip-broken to work around the problem
** Found 23 pre-existing rpmdb problem(s), 'yum check' output follows:
32:bind-libs-lite-9.11.4-26.P2.el7_9.7.x86_64 is a duplicate with 32:bind-libs-lite-9.11.4-26.P2.el7_9.5.x86_64
32:bind-license-9.11.4-26.P2.el7_9.7.noarch is a duplicate with 32:bind-license-9.11.4-26.P2.el7_9.5.noarch
ca-certificates-2021.2.50-72.el7_9.noarch is a duplicate with ca-certificates-2020.2.41-70.0.el7_8.noarch
centos-release-7-9.2009.1.el7.centos.x86_64 is a duplicate with centos-release-7-9.2009.0.el7.centos.x86_64

Solution:

#yum-complete-transaction --cleanup-only
#yum history redo last
#package-cleanup --cleandupes
// Remove contradictory packages
#yum remove glibc-common-2.17-317.el7.x86_64 glibc-2.17-317.el7.i686
# yum update

[Solved] Zabbix Error: Cannot parse list of active checks

Question:

There is no data reported by the virtual machine, and an error is reported:

Cannot parse list of active checks

Solution:

1. Search the forum. The comment shows that there is a problem with the 10051 interface to the server. Check the firewall and no problem is found

2. The architecture adopts the mode of agent channel machine IP1 serverip2,

On the agent machine:

 tcping IP1 10051端口

The display is turned on. Continue troubleshooting

3. On the server machine, check the port status

tcping IP2 10051端口

It is found that the 10051 port is not open. Locate the problem, that is, the server problem. Restart the httpd service and solve it

systemctl restart httpd

[Solved] Error in installing docker requires: fuse overlayfs >= 0.7

Cause: there is an error docker during installation, and the docker of CentOS 7.9 installation reports an error. Requirements: fuse overlays> = 0.7

el7.x86_64
---> Package docker-scan-plugin.x86_64 0:0.8.0-3.el7 will be installed
---> Package libcgroup.x86_64 0:0.41-21.el7 will be installed
---> Package libseccomp.x86_64 0:2.3.1-4.el7 will be installed
--> Finished Dependency Resolution
Error: Package: 3:docker-ce-20.10.8-3.el7.x86_64 (docker-ce-stable)
           Requires: container-selinux >= 2:2.74
Error: Package: docker-ce-rootless-extras-20.10.8-3.el7.x86_64 (docker-ce-stable)
           Requires: fuse-overlayfs >= 0.7
Error: Package: docker-ce-rootless-extras-20.10.8-3.el7.x86_64 (docker-ce-stable)
           Requires: slirp4netns >= 0.4
Error: Package: containerd.io-1.4.9-3.1.el7.x86_64 (docker-ce-stable)


Solution:

#Go to the yum source configuration folder
cd /etc/yum.repos.d
mv CentOS-Base.repo CentOS-Base.repo_bak

Add an entry to /etc/yum.repos.d/docker-ce.repo at the top of the file, as follows
[centos-extras]
name=Centos extras - $basearch
baseurl=http://mirror.centos.org/centos/7/extras/x86_64
enabled=1
gpgcheck=0

# save and quit


#Then install the command:
yum -y install slirp4netns fuse-overlayfs container-selinux


Solve the problem of docker error: Unsupported compose file version: 3.2

The following error occurred when using docker to deploy the project today:

unsupported Compose file version: 3.2

It seems that there is a version problem by searching the data:
https://stackoverflow.com/questions/58007968/unsupported-compose-file-version-x-x

Solution:
upgrade the docker and docker compose versions to the latest versions.