Tag Archives: eclipse

Error in the project tag in the POM file of Maven project: failure to transfer

Question:
The Maven project was detected from SVN today, and the project label of the POM file after it was imported into ECLISE reported an error. The error content was very long, and the initial content was roughly Failure to Transfer…. + the version of a JAR package +…..
Solution:
Select the error report item, right-click on the item –>; Maven – & gt; Update Project, Force Updateo of Snapshots/Releases:

 
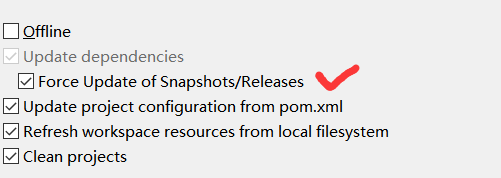
Just wait for the execution to finish, at least that’s how my error was resolved.


@Solution to override error

Sometimes the Java Eclipse project will always report an error with @Override when compiled on a different computer. It is fine to remove the @Override, but it cannot fundamentally solve the problem, because sometimes there are too many places for @Override.
This is an issue with the JDK, where @Override is JDK5, but does not support an implementation of the interface. JDK6 fixes this Bug by adding @Override to methods of parent classes and implementations of interfaces.
To fix this, first make sure you have JDK version 1.6 or higher installed on your machine (mine had JDK 1.7 installed),

Then, select the Eclipse menu Windows->; Preferences–> java-> Compiler–> Compiler Compliance Level Select 1.7, refresh the project, and recompile.
If the problem is not resolved, right-click on the project that reported the error and select Properties–>; Java Compiler–> Select 1.7 in Compiler Compliance Level to refresh the project and recompile.
Source of the original article: Click to open the article

How to solve the error after Java importing project

1. Right-click the project and select Preferences ->; Search project called Facets – & gt; Go to Java and select compile environment 1.7, enter Runtime, select a Tomcat, and click New:

Select Tomcat7, click Apply, and click OK:

Click Configuration, select the Tomcat you just selected, when done, click Apply, and click OK:

Then select the project and right-click ->; Select Build Path ->; Select Configure build path:

Select libraries – & gt; Select the JRE System Library ->; Click Edit to change the compile environment:

Select the default build environment, mine is JDK 1.8, and click Finish:

””Device not found” error causes and Solutions

This is a common error you may encounter when using SQLite in Android development.
See this in conjunction with my other article, “ADB is not an internal or external command, nor is it an executable application.”
Executing ADB shell under CMD. It is likely that your ADB version is low. (You can view your version of ADB with the adb version command.)
Here’s how to solve this problem.
Open the Android SDK Manager in Eclipse, upgrade the SDK Platform, and download the Google USB Driver. As shown in the figure below:


At this point, the problem is solved by executing adb.exe again.

Solution of server startup timeout in eclipse

Eclipse Server boot timeout solution
Server Tomcat V8.5 at localhost was unable to start within 45 seconds. If the Server requires more time, try increasing the timeout in the Server editor. Server Tomcat V8.5 at localhost was unable to start within 45 seconds
Solution:

    double-click the server
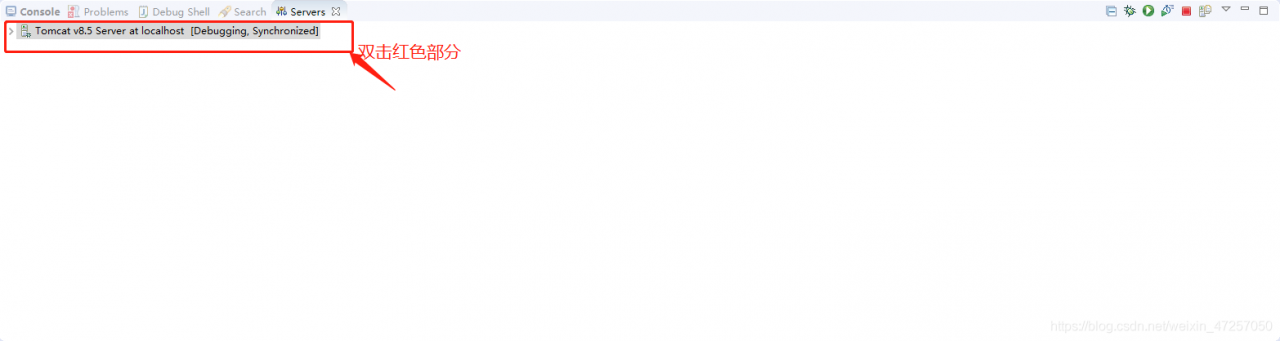
    find Timeouts – start, set up the server startup time restart the server is ok
    Welcome to scan the code and follow our QQ group or log in bilibili. Follow Bing Cola and share and communicate with us about front-end, back-end and big data development

Solution to garbled code problem after importing project in eclipse

Eclipse garbled words after importing the project solutions
after importing the project in Eclipse, if the project code in Chinese, may produce Chinese garbled question, take a look at how to solve below
1. Right-click on the project name and select Properties.

. In the right side of the Resource item, find Text File Encoding. By default, Inherited from Container (GBK) is selected, and select Other.

Using jmh in eclipse

1.Eclipse installs the M2E-APT tool

2. Import projects and add dependencies to POM files

<!-- https://mvnrepository.com/artifact/org.openjdk.jmh/jmh-core -->
<dependency>
    <groupId>org.openjdk.jmh</groupId>
    <artifactId>jmh-core</artifactId>
    <version>1.23</version>
</dependency>
<!-- https://mvnrepository.com/artifact/org.openjdk.jmh/jmh-generator-annprocess -->
<dependency>
    <groupId>org.openjdk.jmh</groupId>
	<artifactId>jmh-generator-annprocess</artifactId>
	<version>1.23</version>
	<!-- <scope>test</scope> -->
	<scope>provided</scope>
</dependency>

3. Before execution, the project needs to run MVn-clean-install before running the benchmark test

Vscode configuration connection server docker write code

The configuration steps
2. Local Docker service 3. Vscode configuration 4. use

1. Generate SSH key pairs
Ssh-keygen
all the way enter, default sound generated two files:
id_rsa
id_rsa.pub
transfer to the server, copy into a file: ~/.ssh/authorized_keys
if there is, add to the following
cat id_rsa.pud > > ~/.ssh/authorized_keys
2. Local Docker service
Docker “host= SSH ://@”
docker context create –docker “host= SSH :// @”
switch to this context:
docker context use
test :
docker info
3. Vscode configuration
Install plug-in
remote developement
docker
Use 4.
Attach Remote Host Container
server run docker
open vscode, hold shift+ CTRL +p, run docker contexts use
press shift+ CTRL +p, run remot-containers :Attach to Running Containers… , select the docker container running
and successfully press shift+k to open the docker container directory

What did project > clean do in eclipse

It felt like something, but I just forgot. Picture is truth, look at the answers on stack overflow.


So this step removes the class files that have been compiled in the project and recompiles them. That’s all. What’s the difference between
and build all, since eclipse builds on
The time stamp
Of the judgment mechanism. So when you press build all some classes that eclipse thinks the timestamp hasn’t changed won’t be recompiled.
I’m sure you know the difference between Clean and Build All.

Eclipse package explorer related problems and Solutions

Problems and Solutions:
Use case description: Right click on a project in the Package Explorer, select “Open in New Window”, close the previous Eclipse window, and close the new one
Problem: After opening Eclipse, the Package Explorer will always be in the project of open in new Window
Solutions: This solution personal feel very feasible, but may have a better way, my way is, direct delete/eclipse working directory workspace \. Metadata \. Plugins \ org. The eclipse UI. The workbench folder workbench. The XML file, then, the eclipse before some of the relevant Settings window will disappear, but this does not trouble, and this method can make the eclipse open load something small and open eclipse will fairly quickly
The
Problem and Solution ii:
Use case description: As mentioned in question 1 above, the project that opened in the new window was either deleted in Explorer or changed its name
Problem: The Package Explorer will always be empty
Solution: can be as a method to solve above problem, but there is a better, open the workbench. XML, find the input factoryID = “org. Eclipse. UI. Internal. Model. ResourceFactory”, change can be put behind the path values, the said the root directory “/”

Eclipse reset annotation shortcuts

I recently switched to a virtual machine and found that eclipse Settings on someone else’s virtual machine were a little bit bad. The biggest problem was that Ctrl+/ (keypad) was disabled, but Ctrl+/ (query key) can still be commented quickly.
I checked online blogs, and using what they said was the way to change the Toggle Comment Settings still didn’t work when writing C++
When I checked the Ctrl+/ setting, It turned out it wasn’t Toggle Comment, it was Comment/Uncomment
Process:
1. Click Window-& gt; preferences

2. Search for Comment/Uncomment, bind related keys in binding, and define when to take effect in when

There’s a weird thing here, Ctrl+/ (keypad) in the binding is Ctrl+ numpad_divide
Click copy Command, you can copy the same comment command, you can add your own shortcut to comment, I’ll add Ctrl+/ (big keyboard key) here

This allows you to annotate the
code with Ctrl+/ (small keyboard) and Ctrl+/ (large keyboard)

Error occurred during initialization of VM Could not reserve enough space for object heap

Error message:

Error occurred during initialization of VM
Could not reserve enough space for object heap

The Java Virtual machine (JVM) allocates more memory than the system has available, so there is not enough space for the JVM to create objects
Solution: You can see how much system memory is left on your machine to ensure that it is large enough to boot Java with -XMx512m-xMS512m-xx :MaxPermSize=256M
Such as Eclipse:
Set the appropriate parameters for the JVM (smaller than the current one)
(1) Click “Window-> Preferences-> Java-> Installed JREs “can be seen in all JRE’s.
(2) Click the JRE currently in use, and then click “Edit” on the right.
(3) Is the “Default VM Arguments” configuration parameter value of the JRE: -XMx512m-xms512m-xx :MaxPermSize=256M.