InternalError: Failed to create session. Errors and solutions
Introduction Error message solution
InternalErrorTraceback (most recent call last)
< ipython-input-4-d4cc2ca313a3> in < module>
10 model.compile(loss= ‘mse’, optimizer= ‘Adam’)
11 # fit network
— > 12 history = model.fit(X_train, y_train, epochs=3000, batch_size=16, validation_data=(x_test, y_test), verbose=2, shuffle=False)
13 #history = model.fit(X,y, epochs=3000, batch_size=16, Verbose = 2, shuffle = False)
14 # plot history
/usr/local/lib/python3.5/dist – packages/keras/models. Py fit in (self, x, y, batch_size, epochs, verbose, callbacks, validation_split, validation_data, shuffle, class_weight, sample_weight, initial_epoch, steps_per_epoch, validation_steps, **kwargs)
963 initial_epoch=initial_epoch,
964 steps_per_epoch=steps_per_epoch,
— > 965 validation_steps = validation_steps)
967 966 def the evaluate (self, x = None, y = None,
/usr/local/lib/python3.5/dist – packages/keras/engine/training. Py fit in (self, x, y, batch_size, epochs, verbose, callbacks, validation_split, validation_data, shuffle, class_weight, sample_weight, initial_epoch, steps_per_epoch, validation_steps, **kwargs)
1667 initial_epoch=initial_epoch,
1668 steps_per_epoch=steps_per_epoch,
-> 1669 validation_steps = validation_steps)
1671 1670 def the evaluate (self, x = None, y = None,
/usr/local/lib/python3.5/dist – packages/keras/engine/training. Py in _fit_loop (self, f, ins, out_labels, batch_size, epochs, verbose, callbacks, val_f, val_ins, shuffle, callback_metrics, initial_epoch, steps_per_epoch, validation_steps)
1204 ins_batch[i] = ins_batch[i].toarray()
1205
-> 1206 outs = f (ins_batch)
1207 if not isinstance (outs, a list) :
1208 outs = [outs]
/usr/local/lib/python3.5/dist – packages/keras/backend/tensorflow_backend py in the call (self, inputs)
2471 feed_dict[tensor] = value
2472 fetches = self.outputs + [self.updates_op] + self.fetches
-> 2473 session = get_session()
2474 updated = session.run(fetches=fetches, Feed_dict = feed_dict,
2475 * * self session_kwargs)
/usr/local/lib/python3.5/dist – packages/keras/backend/tensorflow_backend py in get_session ()
config = 174 Tf. ConfigProto (intra_op_parallelism_threads = num_thread,
175 allow_soft_placement = True)
– & gt; 176 _SESSION = tf. The Session (config = config)
177 Session = _SESSION 178 if not _MANUAL_VAR_INIT:
/usr/local/lib/python3.5/dist – packages/tensorflow/python/client/Session. Py in init (self, Target, graph, config)
1561
1562 “”
-& gt; 1563 super(Session, self).init(target, graph, config=config)
1564 # NOTE(mrry): Create these on first __enter__ to avoid a reference cycle.
1565 self._default_graph_context_manager = None
/usr/local/lib/python3.5/dist – packages/tensorflow/python/client/session. Py in init (self, target, graph, the config).
631 if self _created_with_new_api:
632 # pylint: Disable = protected – access
– & gt; 633 self._session = tf_session.TF_NewSession(self._graph._c_graph, opts)
634 # pylint: enable=protected-access
635 else:
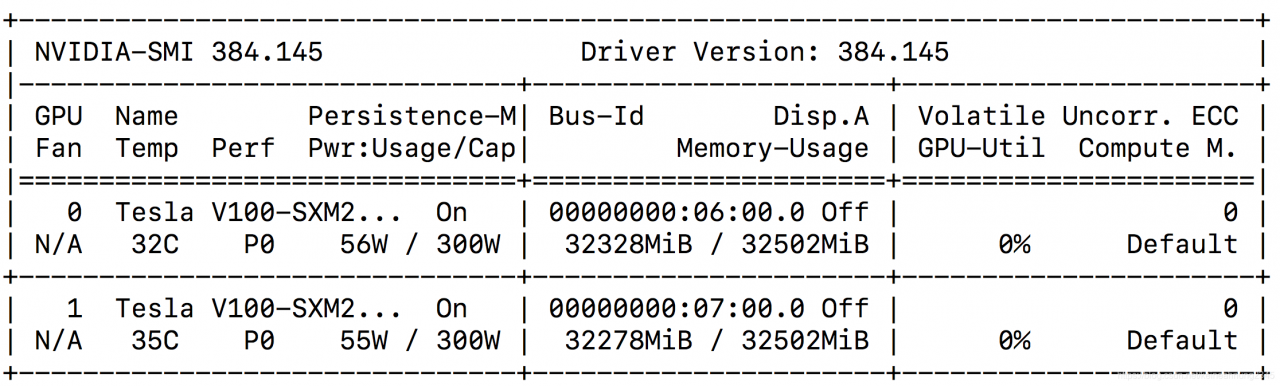
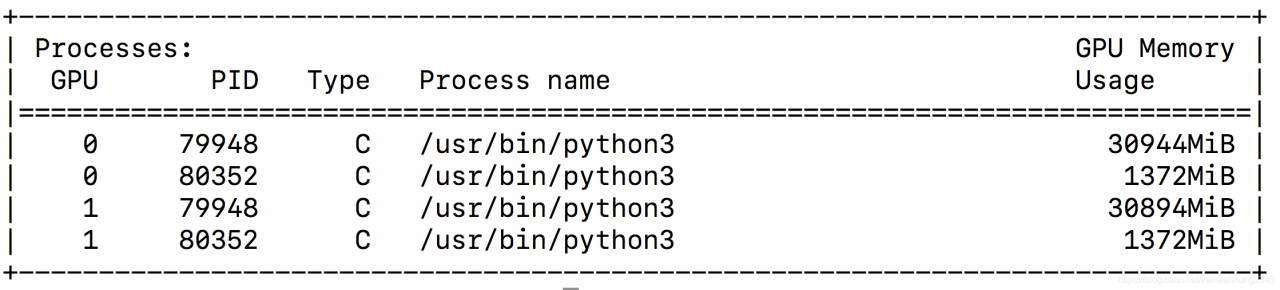
InternalError: Failed to create session.