Tag Archives: Deep learning

Solution of visdom enabling problem

When enabling visdom.server, stop in the M.E. scripts.It might take a while before an error is reported after a long interval.
The reason for this is that during the process of downloading part of the script, some websites were not accessible (maybe because of overseas websites or firewall block). The reason is unclear.
Solution: Comment the download_scripts() function call in visdom/server.py. The exact location of the visdom/server.py file may vary. But you’re using the Python directory. For example, mine under this path:

/usr/local/anaconda3/lib/python3.6/site-packages/visdom

You can sudo gedit server.py or su root, enter the root password, and then gedit server.py. Once opened, you can go directly to the end of the file to find download_scripts_and_run() and comment out the download_scripts().
Enable visdom.server at this point and it will not get stuck in the previous problem. However, the download_scripts are commented out and some of the parts required for the front end are not working properly.
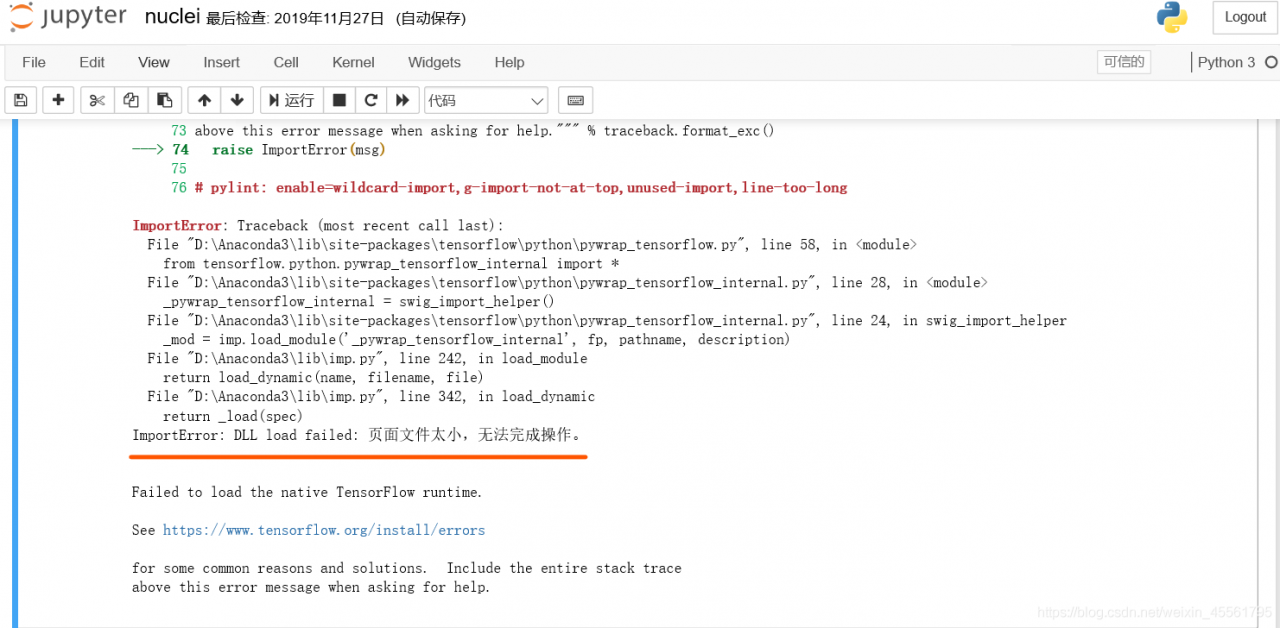
When you open localhost:8097, the page is blank (all blue) and there is no navigation bar as shown in the following image:

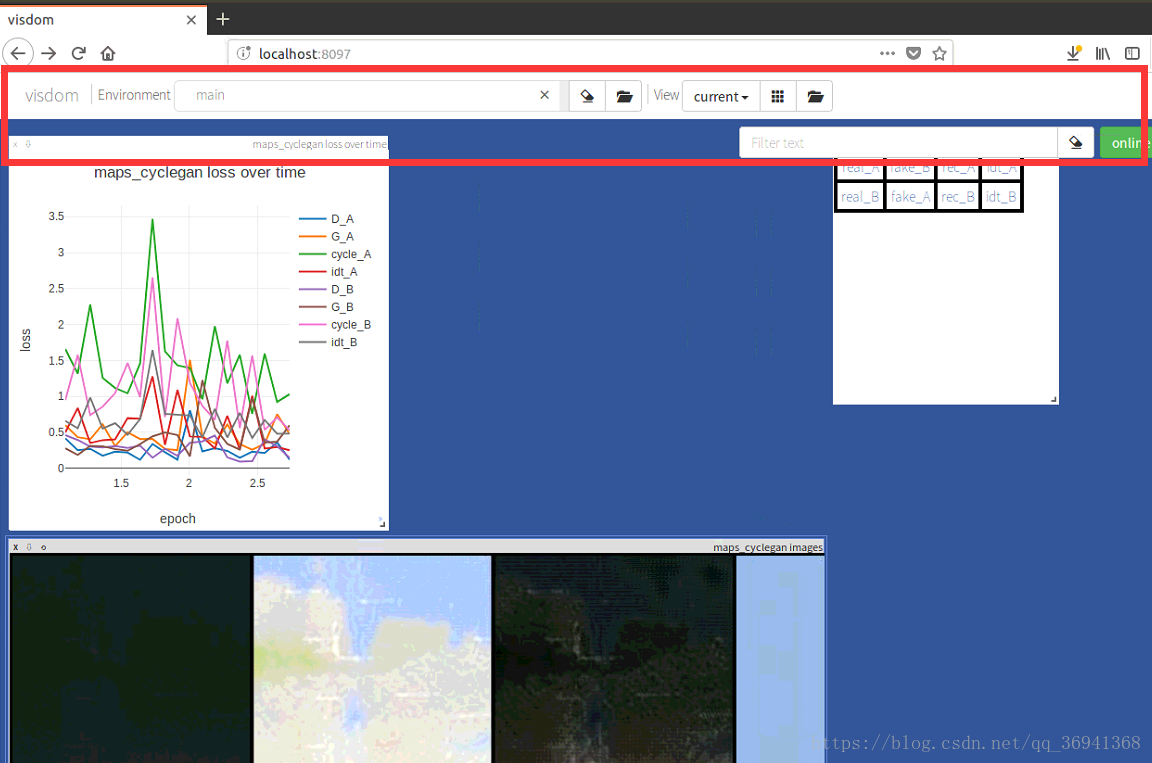
Cause: Viewing terminal will receive a 404 alert indicating that the page is not displaying properly due to some missing part.
Solution:

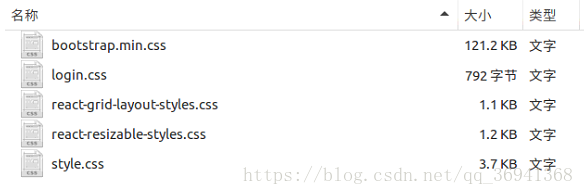
    tried online some change in the static index. The HTML file content method, solve the problem. Try manually downloading the missing file. Look for the URL in the download_scripts function of server.py from the previous operation. And compare the existing files of JS, CSS and Font files under visdom/static to download the missing files. The following is a list of the completed file directories. Click to download the missing files.
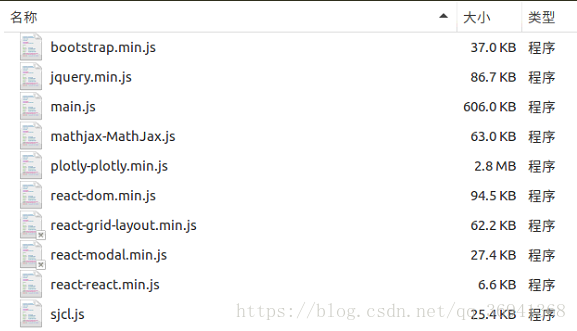
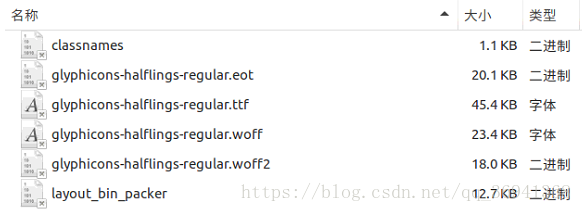


Website image:

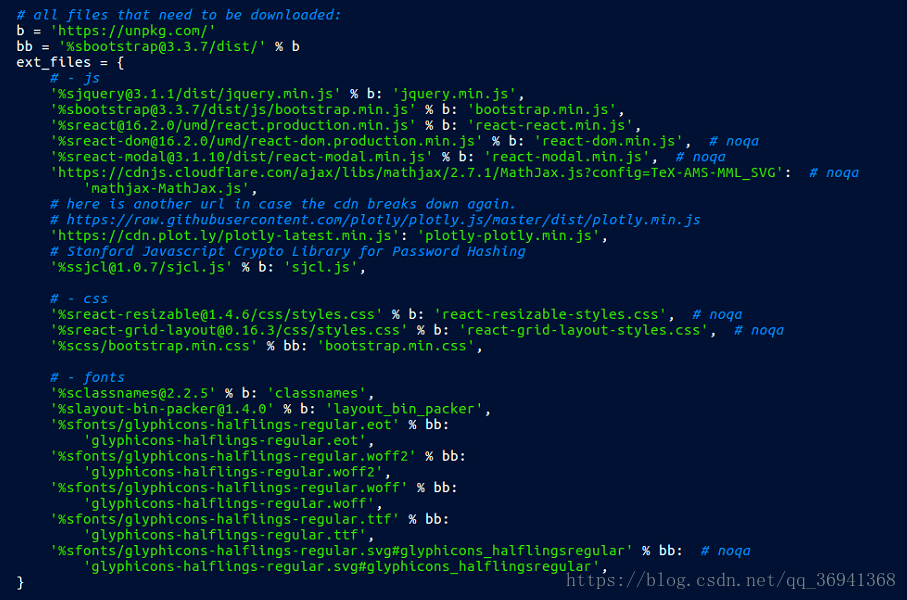
Here are two examples of web sites for reference:
https://unpkg.com/[email protected]/dist/jquery.min.js with %b
With % bb url (must be in the middle add [email protected]/dist /) : https://unpkg.com/[email protected]/dist/[email protected]
Some can be downloaded directly and some URL is open source format, you can copy to a text document, and then change the rename change format.
Note: Fonts/Glyphicons – Halflings-Regular. SVG did not download successfully, but it does not seem to affect the use of Visdom.

Solution of visdom startup failure in Windows 10

Task description
Recently collected a batch of data, want to call Cyclegan to complete the domain migration to see the effect. So I found the open source Cyclegan code on the Internet, the code can run normally, but the call to Visidom will always show an Error: HTTP Error. So record the process of my solution
 
Start the visdom

python -m visdom.server

Calling CMD to start visdom.server but the code will get stuck, stuck in downloading the script
 
To solve the caton
The reason is that the file is difficult to download. Here’s how to solve it
Find the location of the Visidom package in the current environment, roughly: ~\Lib\site-packages\visdom Open server.py and look for download_scripts and comment this line so that download_scripts() is not executed
After this operation, and then start Visidom, the model will run smoothly, and no exception thrown. But there is a problem, open the page blue screen.
 
To solve the blue screen
The reason for the blue screen is that it does not download properly. The solution here refers to two articles, both of which are cited in the following references
Into local visdom in static files, there is a index. The HTML files, the backup download reference (2) in the index. The HTML files, to replace the current folder has the backup index. The restart visdom HTML files, open the page, the question remains, to be the next step will be the backup of the original index. The HTML to replace the current index. The HTML restart visdom, problem solving
 
reference
https://blog.csdn.net/AnthongDai/article/details/79117472https://github.com/chenyuntc/pytorch-book/blob/2c8366137b691aaa8fbeeea478cc1611c09e15f5/README.md#visdom%E6%89%93%E4%B8%8D%E5%BC%80%E5%8F%8A%E5 %85%B6%E8%A7%A3%E5%86%B3%E6%96%B9%E6%A1%88
 
This article is the author’s original, reproduced need to indicate the source!

Error: importerror: DLL load failed: the page file is too small to complete the operation.

ImporError: DLL Load Failed: The page file is too small to complete operation.

Cause analysis,

2
2
2
2
2
2
2
2
2> Other programs are running, solution: wait for the other programs to finish running or close the other programs. Turn off all useless programs on your computer. Also, Python.ext should not be used by two programs at the same time. For example, if you are using PyDev + Anaconda, turn one off. *

Tensorflow image random_ There seems to be something wrong with the shift function

Environment: Python 3.6, TensorFlow 1.15
Hope for augmentation, using tf keras. Preprocessing. Image. Random_shift function
Unsupported operand type(s) for *: ‘Dimension’ and ‘float’
Line 446 in tensor_shape.py is return self * other
Return self * other –> return self * other –> return self * int(other)
The random_shift function does not work, and the image does not have any shift effects
As a last resort, change the design function to achieve random_shift function function
According to my requirements, first of all, two random numbers are generated by TF.Random. Uniform, which are used as the translation pixels of the width and height dimensions of the image. Then use tf.roll to translate the image in two dimensions of height and width. The code is as follows:

shift_num = tf.random.uniform(shape=[2], minval=-img_height/2, maxval=img_height/2, dtype=tf.dtype.int32)

img_out = tf.roll(img_in, shift=shift_num, axis=[1,2])

This code does what I need the random_shift function to do, but it’s slow
over

Summary of errors in installing texlive2017

Dao niu one afternoon, do not know why oneself can be wrong, sum up the wrong road that oneself have gone through now
From the https://tug.org/texlive/windows.html website to download the exe software first, and then the first error,

Error 1: Double-click to run the EXE file directly, select CustOME Setup — and then select Continue to install the last two items
Then has been installed about 3-5 G, and then the installation of the installation is broken, the network speed is not good, the road is not removed

Mistake 2: So I chose to run the EXE file and unpack the file. But it seems that because it is connected to the network, the unzip file is too little, failed
Method 1: Then success came, I went to download the ISO file,. Then right-click the unzip file, run the install-tl-advanced option, and select the Mini installation from the Setup option


Click Install a Package Install some packages we need. Install a Package>.

Here we need the following three packages, which can be directly searched by using the search box, as shown in the figure below:
Latexpdf-view (visual display)


In the latex after where the plug-in by clicking on the Settings , configuration of latex in the Tex Path add their installation latex in the bin directory is ok

After you have written it, press Ctrl+Alt+Bd you will see the following. On the left is the source code and on the right is the generated PDF file. Our simple LaTeX editor is ready. The result is an error,. I don't know why... This is complicated, so use Texstudio instead

ECCV 2020 panoramic segmentation papers (2 papers)

preface
The official series of Computer Vision Daily organized the large-scale inventory work of ECCV 2020
See above for details:
2020 target detection ECCV paper large inventory (49 papers) ECCV 2020 semantic segmentation large inventory (article 37) [ECCV paper 2020 instance segmentation paper inventory (12 paper) (https://blog.csdn.net/amusi1994/article/details/108999316)
This paper mainly includes: panoramic segmentation and other directions. Two papers have been sorted out, and the PDF of all papers have been packaged. Baidu cloud resources are as follows:

Link: https://pan.baidu.com/s/12WBsFFJKelcS7Fvrqiv3HQ
extraction code: t7nr

The article directories
Preface Panoramic Segmentation Paper Download PDF

Panoramic segmentation
Joint Semantic Instance Segmentation on Graphs with the Semantic Mutex Watershed

Author units: Heidelberg university paper: https://www.ecva.net/papers/eccv_2020/papers_ECCV/html/5393_ECCV_2020_paper.php code: no Chinese reading: no
Axial-DeepLab: Stand-Alone Axial-Attention for Panoptic Segmentation
Author unit: Johns Hopkins university, Google paper: https://www.ecva.net/papers/eccv_2020/papers_ECCV/html/1564_ECCV_2020_paper.php code: https://github.com/csrhddlam/axial-deeplab in Chinese reading: no
Paper PDF Download
The PDF of the above 14 papers has all been packaged, Baidu Cloud link:

Link: https://pan.baidu.com/s/12WBsFFJKelcS7Fvrqiv3HQ
extraction code: t7nr

module ‘os’ has no attribute ‘mknod’

The reason is that the code is running under Linux, but I am running under Windows. The ‘OS’ module in WIN is different, which does not have this property. Please modify it as follows:

os.mknod(os.path.join(args.save_path, "{}.lst".format(args.set)))

Instead, the final “w” is added according to your own needs.

open(os.path.join(args.save_path, "{}.lst".format(args.set)),"w")

Solve the problem of red wavy line in pychar when importing module written by oneself

Solve the problem of red wavy line in the module imported from Pycharm
A red wavy line appears in the module imported by myself in Pycharm, as shown in the figure below. However, it can operate normally. The main problem is the file directory, and the module simply imported by import cannot find the path.

if you don’t feel comfortable with the red wavy line, you can also choose to solve this problem. The next two steps will be completed.
step 1:
enter Settings, go to the Python Console under the Console, check the option “Add source roots to PYTHONPAT”, and then click OK
. Step 2:
right click on the Directory and select Mark Directory as in the popup menu bar, then continue to select Sources Root, and you will immediately see the red wavy line in the code has been automatically removed.

Using onnx to deploy models in mmdetection

Install ONNX
Making: https://github.com/onnx/onnx

conda install -c conda-forge protobuf numpy
sudo apt-get install protobuf-compiler libprotoc-dev
pip install onnx
pip install pytest==2.8 nbval

I started with PIP Install Pytest NBval and reported the following error,

Then I pass the prompt nbVAL 0.9.6 requires Pytest> =2.8, but you’ll have pytest 0.0.0 which is incompatible. I made a version of PyTest and retyped the command to install it successfully.
Then I input Pytest to verify whether the installation is successful. The prompt says that I did not install it. According to the following prompt, I input the following command and then input Pytest.

sudo apt install python-logilab-common

For example, If I go into a project folder and type PyTest, the output looks like the following to indicate that the installation is successful.

tf.one_ How to use hot ()

Tensorflow study notes
tf.one_hot
This paper only serves as a personal learning record, please refer to tensorFlow Chinese official website TF Chinese official website
Call format
tf.one_hot(indices, depth, on_value=None, off_value=None, axis=None, dtype=None, name=None)
Parameters that
Indices: Tensors of an index.
· depth: a scalar quantity defined in one_hot dimension
· on_value: a set of indices[j] = I (default: 1)
· off_value: a set of indices[j]! = I (default: 0)
· axis: axis to be filled (default: -1, a new innermost axis)
· dtype: the data type of the output tensor.
· name: the name of the operation (optional).
The output
A one_hot tensor
A possible mistake

    TypeError
    whether on_value or off_value does not match dtype. TypeError
    whether on_value and off_value do not match each other

prompt

    indices location value is on_value, while the other location is off_value. The on_value and OFF_value data types must match. If dType has a value, they must take the same value as the type displayed by DTYPE.
    if on_value has no value, the default value is 1, and the output is dtype.
    if off_value has no value, the default value is 0, and the output is dtype.
    if the indices have N dimensions, the output is N+1. If the indices are scalars, the output is a vector with a length of depth. If the indices are tensor with features, the output will be:
    . If the indices are indices with batch size [batch, features], the output will be:
    . If the indices are RaggedTensor, the axis must be positive and form an axis which is hard to form. The output is equivalent to the output of one_hot applied with a value of an irregular shape, and a new irregular shape is generated from the result.
    if dtype has no value, it will try to assume that the data type is on_value or off_value if one or both pass. If on_value, off_value, dtype have no value, dtpye will default to be tf.float32.
    ** note: if output of non-numeric types (such as tf.string, tf.bool, etc), on_value, off_value all need to have a value.

example

Exception ignored in: bound method basesession__ del__ Of

Error message

Exception ignored in: <bound method BaseSession.__del__ of <tensorflow.python.client.session.Session object at 0x000000001AB286D8>>
Traceback (most recent call last):
  File "python3.5.2\lib\site-packages\tensorflow\python\client\session.py", line xxx, in __del__
TypeError: 'NoneType' object is not callable

Reason: When the Python garbage collection mechanism collects the Session object, it finds that c_api_util or Tf_session has been collected, resulting in a null pointer. The following comment is the reason given when an exception is thrown in the source code of TensorFlow

# At shutdown, `c_api_util` or `tf_session` may have been garbage
# collected, causing the above method calls to fail. In this case,
# silently leak since the program is about to terminate anyway.

The solution
Method one:

import keras.backend as K

# your code

K.clear_session()

Method 2:

import gc

# your code

gc.collect()

reference
https://github.com/tensorflow/tensorflow/issues/3388
https://www.cnblogs.com/kaituorensheng/p/4449457.html

[depth concept] · introduction of EER (equal error rate)

· Introduction of the evaluation index EER(Equal Error Rate)
In-depth learning articles generally use Error probabilities such as EER(Equal Error Rate) as an objective criterion for measuring classifiers, and the RECEIVER Operating Characteristic (ROC) curve explains how to calculate EER.
Here is a brief introduction to the EER calculation
EER (Average error probability) is a biometric security system algorithm used to pre-determine its error acceptance rate and its error rejection rate threshold. When the rates are equal, the common value is called the equal error rate. This value indicates that the proportion of false acceptances is equal to the proportion of false rejections. The lower the iso-error rate, the higher the accuracy of biometric identification system.


Use other ROC evaluation criteria
AUC (area under thecurve), also is the area under the ROC curve, the greater the classifier, the better, the maximum value is 1, the blue stripes in the graph area is the blue curve corresponding AUCEER (equal error rate), that is, the value of the FPR = FNR, due to the FNR = 1 – TPR, can draw A from (0, 1) to (1, 0) in A straight line, finding the intersection point, in the figure A and B two points.