Tag Archives: Operation and maintenance

Kali starts SSH service error [How to Fix]

Kali starts SSH service and resolves error reports

1. Open the SSH configuration file (remember sudo)

sudo vim /etc/ssh/sshd_config

2. #permitrotlogin is changed to

PermitRootLogin yes

That is, remove #, and change the proposal password to yes
3. #passwordauthentication line to

PasswordAuthentication yes

4. Enter after saving and exiting

sudo /usr/sbin/sshd

Errors may be encountered

Missing privilege separation directory: /run/sshd

Solution:

sudo mkdir /run/sshd

Linux: How to Solve sudo operate Error

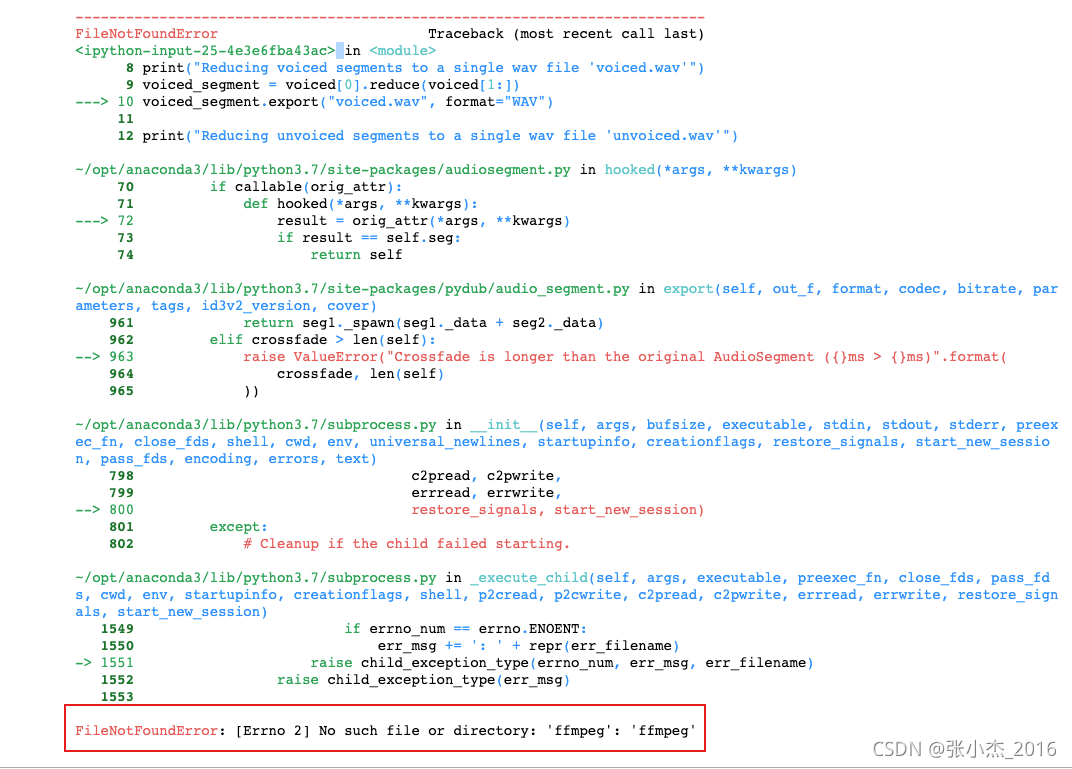
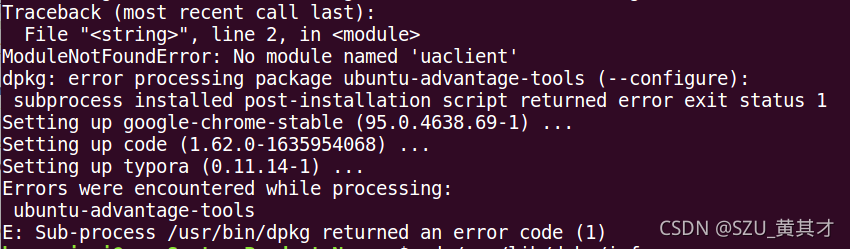
Here, I need to install a driver on the server. When using sudo command, the following error is reported
XXX (user name) is not in the sudoers file. This incident will be reported.
it should be noted that my user is not a super administrator user, but a new ordinary user developed by the super administrator user, The reason why the above error is reported is that this user is an ordinary user and does not have operation permissions on the operating system. Here, the super administrator needs to add top-level permissions to ordinary users in the configuration file sudoers. The operations are as follows:

1. Switch to root, directly enter Su in terminator, and then prompt for the password. The password here is the login password of super administrator

2. The/etc/sudoers file is read-only by default for all users (including the root user), so you need to add write permission to the sudoers file. The command is: CHMOD U + W/etc/sudoers

3. Edit the sudoers file VI/etc/sudoers
the sudoers file is as follows
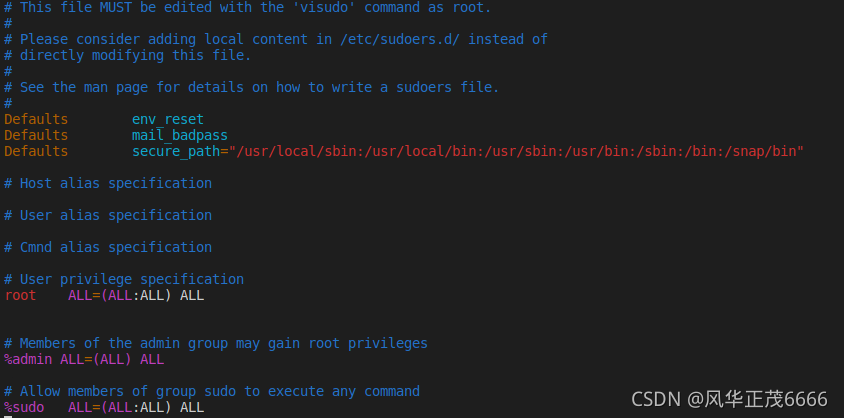
find this line root all = (all) all, and add XXX all = (all) all (XXX here is your user name)

PS: Here you can add any of the following four lines to sudoers

youuser ALL=(ALL) ALL
%youuser ALL=(ALL) ALL
youuser ALL=(ALL) NOPASSWD: ALL
%youuser ALL=(ALL) NOPASSWD: ALL

Line 1: allow user youuser to execute sudo command (password required).
line 2: allow users in user group youuser to execute sudo command (password required).
line 3: allow user youuser to execute sudo command without entering password.
line 4: allow users in user group youuser to execute sudo command, And do not enter the password when executing

4. Revoke sudoers file write permission. Command:

chmod u-w /etc/sudoers

[Solved] Mac ffmpeg Install Error: filenotfounderror: [errno 2] no such file or directory: ‘ffmpeg’: ‘ffmpeg’

Audio processing error: filenotfounderror: [errno 2] no such file or directory: ‘ffmpeg’: ‘ffmpeg’

An error occurs when the following code is executed

import audiosegment

print("Reading in the wave file...")
seg = audiosegment.from_file("voice_data/out_11.wav")

print("Information:")
print("Channels:", seg.channels)
print("Bits per sample:", seg.sample_width * 8)
print("Sampling frequency:", seg.frame_rate)
print("Length:", seg.duration_seconds, "seconds")

print("Detecting voice...")
seg = seg.resample(sample_rate_Hz=32000, sample_width=2, channels=1)
results = seg.detect_voice()
voiced = [tup[1] for tup in results if tup[0] == 'v']
unvoiced = [tup[1] for tup in results if tup[0] == 'u']

print("Reducing voiced segments to a single wav file 'voiced.wav'")
voiced_segment = voiced[0].reduce(voiced[1:])
voiced_segment.export("voiced.wav", format="WAV")

print("Reducing unvoiced segments to a single wav file 'unvoiced.wav'")
unvoiced_segment = unvoiced[0].reduce(unvoiced[1:])
unvoiced_segment.export("unvoiced.wav", format="WAV")

Error content

Solution:
use the command: brew install ffmpeg installation. If the following problems occur, let’s continue brew install ffmpeg installation without turning off the error message.

==> Downloading from https://pkg-containers.githubusercontent.com/ghcr1/blobs/sha256:c16266957db69346464e39967d41d5198f3550423d6
############################                                              40.0%
curl: (92) HTTP/2 stream 0 was not closed cleanly: PROTOCOL_ERROR (err 1)
Error: ffmpeg: Failed to download resource "rav1e"
Download failed: https://ghcr.io/v2/homebrew/core/rav1e/blobs/sha256:c16266957db69346464e39967d41d5198f3550423d6aabfb62919975cf52ea19

After that, new error messages are found as follows:

Error: The `brew link` step did not complete successfully
The formula built, but is not symlinked into /usr/local
Could not symlink bin/2to3
Target /usr/local/bin/2to3
already exists. You may want to remove it:
  rm '/usr/local/bin/2to3'

To force the link and overwrite all conflicting files:
  brew link --overwrite [email protected]

To list all files that would be deleted:
  brew link --overwrite --dry-run [email protected]

Follow the prompts and execute the following statements:

 rm '/usr/local/bin/2to3'
 brew link --overwrite [email protected]
 brew link --overwrite --dry-run [email protected]

GPG error:http://dl.google.com/linux/chrome/deb stable InRelease

0x00 problem description

	When updating apt sources with apt update today, it was exposed thatW: GPG error: http://dl.google.com/linux/chrome/deb stable InRelease: The following signatures couldn't be verified because the public key is not available: NO_PUBKEY 78BD65473CB3BD13

0x01 problem solving

	问The essence of the problem is that the public key 78BD65473CB3BD13 is missing, just add it.

0x02 specific steps

sudo apt-key adv --keyserver keyserver.ubuntu.com --recv-keys <PUBKEY>

[Solved] Ubuntu Terminal Error: subprocess installed post-installation script returned error exit status 1

An error occurred in the ubuntu terminal:subprocess installed post-installation script returned error exit status 1

An error occurred in the ubuntu terminal:subprocess installed post-installation script returned error exit status 1

System: Ubuntu 16.04

Error:

Use Command cd /sur/bin/dpkg/info

Folder usage: ls | grep ubuntu-advantage-tools*

The command to find the file with the error uses:sudo rm ubuntu-advantage-tools*
Delete is OK!

dpkg-deb: error: paste subprocess was killed by signal (Broken pipe)

1. Problem description

The following error occurred while attempting to install CUDA 10.2 on Ubuntu 18.04

dpkg-deb: error: paste subprocess was killed by signal (Broken pipe)
Errors were encountered while processing:
 /var/cache/apt/archives/nvidia-cuda-dev_9.1.85-3ubuntu1_amd64.deb
E: Sub-process /usr/bin/dpkg returned an error code (1)

2. Problem solving

1. Open the terminal and input sudo dpkg - I -- force overwrite XXX

 sudo dpkg -i --force-overwrite /var/cache/apt/archives/nvidia-cuda-dev_9.1.85-3ubuntu1_amd64.deb

2. Repair the damaged package

sudo apt-get -f install

3. Sprinkle flowers after completion

Parse error in ubantu/Linux system [How to Solve]

Parse error in ubantu/Linux system

This problem took me some time. In order to avoid forgetting to post a blog in the future

Phenomenon:

The execution code and error reporting contents are as follows:

reason:

This is because the standard supported by the Linux gcc compiler is different from the current C89 standard. This C standard requires that the declaration of variables in a block be placed in front of all non declarative statements.

We can see that on line 266, a definition statement is placed before the declaration statement, so an error is reported

Solution:

Put 266 this non declarative statement under all declarative statements
as shown in the following figure:

the compilation succeeded without error, and the problem was solved successfully

[Solved] Docker: Error response from daemon: driver failed programming external connectivity on endpoint mysq

docker: Error response from daemon: driver failed programming external connectivity on endpoint mysql (3d8d89f260c9258467f589d4d7d0c27e33ab72d732d1115d1eb42d708606edc4):
So far, the container is occupied

# docker ps -a
CONTAINER ID   IMAGE       COMMAND                  CREATED              STATUS    PORTS     NAMES
a57959032cc9   mysql:5.7   "docker-entrypoint.s…"   About a minute ago   Created             mysql
# docker rm a57959032cc9
a57959032cc9

Error starting userland proxy: listen tcp4 0.0.0.0:3306: bind: address already in use.
the following is the occupied port number

# netstat -tanlp
Active Internet connections (servers and established)
Proto Recv-Q Send-Q Local Address           Foreign Address         State       PID/Program name    
tcp        0      0 0.0.0.0:22              0.0.0.0:*               LISTEN      948/sshd            
tcp        0      0 0.0.0.0:3306            0.0.0.0:*               LISTEN      9217/mysqld         
tcp        0      0 172.18.7.111:39412      100.100.45.106:443      TIME_WAIT   -                   
tcp        0      0 172.18.7.111:22         58.100.92.78:9024       ESTABLISHED 6899/sshd: root@pts 

See for yourself which is occupied, and then delete it with kill + port number

[Solved] Web server failed to start. Port 8080 was already in use.

An error occurs when starting the jar package on the Linux server, as follows:

Description:
Web server failed to start. Port 8080 was already in use.
action:
identify and stop the process that’s listening on port 8080 or configure this application to listen on another port.
indicates that the web server failed to start and port 8080 is already in use. Check whether the last started task stopped

Solution steps:

1. Enter the bin directory
CD/usr/local/Tomcat/bin

2. Check whether Tomcat is closed
PS – EF | grep Java

3. Use the Tomcat shutdown command
./shutdown.sh (use with caution)
if you want to kill Tomcat directly, you can use the kill command to kill the process directly
kill – 9 7010

[Solved] Clone Linux Code Error: server certificate verification failed. CAfile: none CRLfile: none

The following error occurs in Git clone Linux source code:

Solution:

Enter in the terminal:

git config –global http.sslverify false
git config –global https.sslverify false

xport GIT_SSL_NO_VERIFY=1

Then the download is normal

[Solved] Failed to connect to server(code:1006)

Generally, the VNC configuration of the/etc/Nova/nova.conf configuration file is improper

Open, replace with

2. Modify novncproxy_base_URL, try to use IP address instead of domain name

For server_proxyclient_Address if you use a domain name, you need to modify the resolution in the local host file

Add a line: IP addresses Domain name

After modification Systemctl restart openstack-nova-compute.service restart the service

Problem solving