Tag Archives: linux

Solve the error: gpg: keyserver receive failed: No dirmngr

My personal blog: Zhang0Peter’s personal blog


Today’s error in using Add-apt-Repository is as follows:

gpg: keybox '/tmp/tmpnh5y5w9a/pubring.gpg' created
gpg: failed to start the dirmngr '/usr/bin/dirmngr': No such file or directory
gpg: connecting dirmngr at '/run/user/0/gnupg/d.rkeyjbdrrh3u6cjumf59ra5t/S.dirmngr' failed: No such file or directory
gpg: keyserver receive failed: No dirmngr

The reason for this error is that GPG is not installed on Linux:

apt install dirmngr

An error to solve

Error: Failed to synchronize cache for repo ‘fedora’

When executing DNF Update, you encountered the following problem:

[zhangz@zwfedora23 ~]$ sudo dnf update
[sudo] password for zhangz:
    Error: Failed to synchronize cache for repo 'fedora'
[zhangz@zwfedora23 ~]$

Later, it was found that the agent problem was set before:

  1 [main]
  2 gpgcheck=1
  3 installonly_limit=3
  4 clean_requirements_on_remove=True
  5
  6 #proxy=http://10.0.13.109:808
~
~
~
~
~
~
~
~
~
~
~
/etc/dnf/dnf.conf [TYPE=] [POS=0006,0001][100%] [LEN=6]
"/etc/dnf/dnf.conf" [readonly] 6L, 103C

Just comment out the proxy line above.
all the existing proxy line, because I need a proxy in the company, otherwise when I connect to the external network, direct dial-up Internet at home there is no proxy problem, the 10 network segment of the LAN address does not exist, so the use of DNF will prompt an error.

ansible Q&A: Failed to connect to the host via ssh: ssh_exchange_identification and Authentication or per

This document documents the errors and solutions encountered in using ansible.
Problem 1:[root@hostst -10-1-241-158 logs]# ssh 10.1.241.161
Read: Reset connection by peer point
ips10.1.241.159 | out of reach! = than; {
“change”:false ,
“msg”: “Connection failed via ssh: ssh_exchange_identification: read: peer\r\n reset”.
“Access”:really
}
Executable root10.1.241.161 -m shell -a ‘pwd’
| rc=0
module failed[root@hostst -10-1-241-158 logs]# ansible ips10.1.241.161 -m shell -a ‘pwd’
ips10.1.241.161 | out of reach! = than; {
“change”:false ,
“MSG”: “Authentication failed.”
“Access”:True.
}

Positioned because.
10.1.241.161 On the host computer
vi /etc/hosts.deny
Available sshd, sftp, telnet, ftp: 10.1.241.158
How to unlock / etc/hosts.deny
161 on implementation.
service denyhosts stop
Send DenyHosts SIGTERM
vi /etc/hosts.deny, delete the corresponding host information.

Authentication failed.” The error is because the user of :/ etc/ansible /host, does not have sudo privileges on the connected host:
vi /etc/sudoers
Just add the corresponding permissions.

Ansible reporting error: “Failed to connect to host via ssh:ssh_exchange_identification:read:connection reset peer \ r \ n”
ips10.1.241.159 | out of reach! = than; {
“change”:false ,
“msg”: “Connection failed via ssh: ssh_exchange_identification: read: peer\r\n reset”.
“Access”:really
}

Solution.
Service denyhosts stop
Cat/ dev/null in / etc/hosts.deny
Question 2.
ansible execution error: authentication or permission failure
+ ansible IPSMachines -m shell – ‘pwd’
root10.1.235.28 | out of reach! = than;{
“change”: false,
“Authentication or Permissions Failed.” In some cases, you may have been able to authenticate and have no permissions to the remote directory. Consider changing the remote temporary path in the ansibl .cfg to one rooted in \”/tmp\”. The failed command is:(umask 77 &amp &mkdir -p \\” ‘ echo $HOME/.ansible/tmp/ ansibler -tmp-1536806706.35-106960540689166 ‘ \”echo $ ansible-tmp-1536806706.35-106960540689166 ‘ \”), exit result 1″.
“Access”:really
}
root10.1.235.27 | out of reach! = than;{
“change”: false,
“Authentication or Permissions Failed.” In some cases, you may have been able to authenticate and have no permissions to the remote directory. Consider changing the remote temporary path in the ansibl .cfg to one rooted in \”/tmp\”. The command that fails is:(umask 77 &amp &mkdir -p \\” echo $HOME/.ansible/tmp/ ansibler -tmp-1536806706.35-1073010745840 ‘ \”echo $ ansible-‘ tmp-1536806706.35- 10730745840 ‘ \”), exit result 1,”
“Access”:really
}

The reason for this is that the password of the ansible user on the logged in host is incorrect, or the password has expired, just change the password of the corresponding user to the correct one;

Modify the screen resolution after installing Ubuntu 16.04 (xrandr: Failed to get size of gamma for output default)

Ubuntu 16.04 has only one option after installation, 1024×768. Using the xrandr command has an error:

xrandr: Failed to get size of gamma for output default

You can’t set it using the CVT command, nor can you modify xorg.conf.
Solutions:

打开:/etc/default/grub
搜索:#GRUB_GFXMODE=640x480
编辑:640x480 改成你想要的分辨率,并取消前面的#
例如:GRUB_GFXMODE=1920x1080 
更新:sudo update-grub
重启: reboot

If the above method has not been solved, then there is another situation is the video card driver has not been installed, the need to reinstall the video card driver can solve the above problem.

Install Xen virtual machine using virt-manager

directory
Install Xen Virtual Machine with Virt-Manager Install Xen Virtualization Install Virt-Manager check libvirtd service status Create Xen Virtual machine view issues encountered with virtual machine status

Install the Xen virtual machine using virt-Manager
This article focuses on how to install the Xen virtual machine on CentOS 7 using Virt-Manager. The following environments need to be prepared:
CentOS 7Xen virtualization Virt-managerVMware Workstation 12
Note: The desktop version of CentOS7 is installed on the same host as Xen virtualization and Virt-Manager for this environment


Install Xen virtualization
See my post on Installing Xen virtualization under CentOS 7 for details
Install the virt – manager
Use the following command to install

yum install -y virt-manager

Check the status of the libvirtd service
Use the following command to see that the service starts properly

systemctl status libvirtd


Create the Xen virtual machine
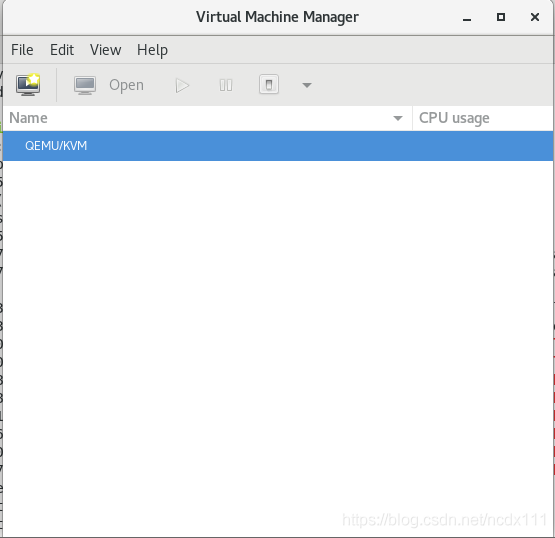
Open the virt-Manager interface

virt-manager


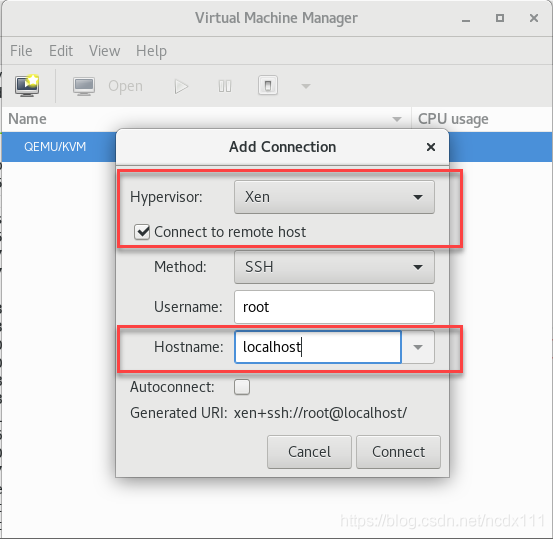
To connect to Xen virtualization, click File-> Add Connection, select Xen, where Hostname fill in Xen virtualization server IP
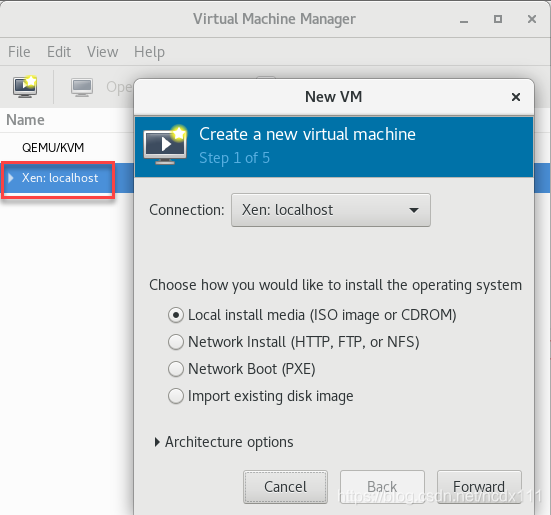
create virtual machine, right click Xen:localhost-> New opens the create page and selects the installation method specified.
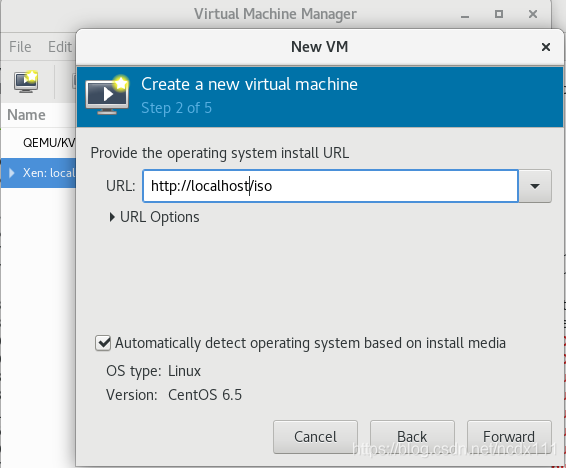
input Network Install Network Install installation address
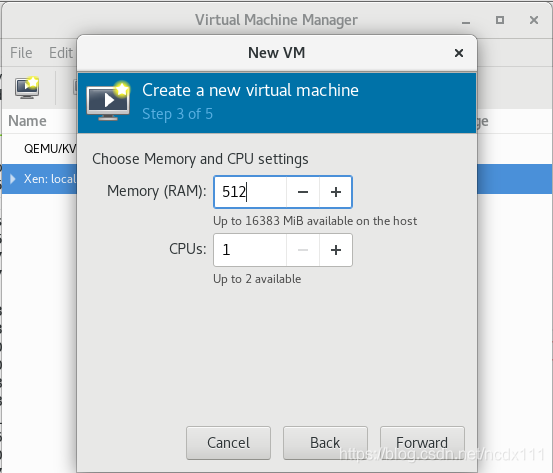
select the virtual machine memory and CPU configuration, the image installed in this paper is centos6.5-minnal version
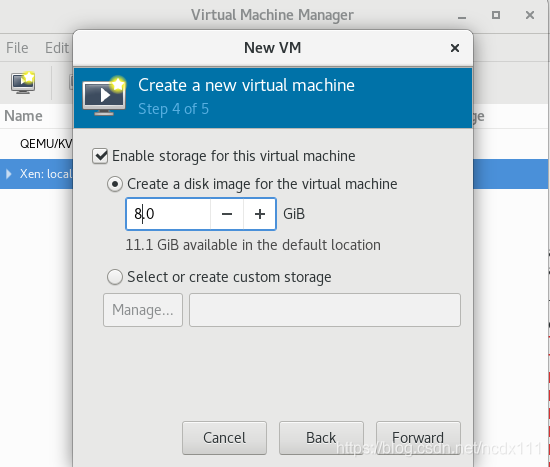
select the virtual machine disk size
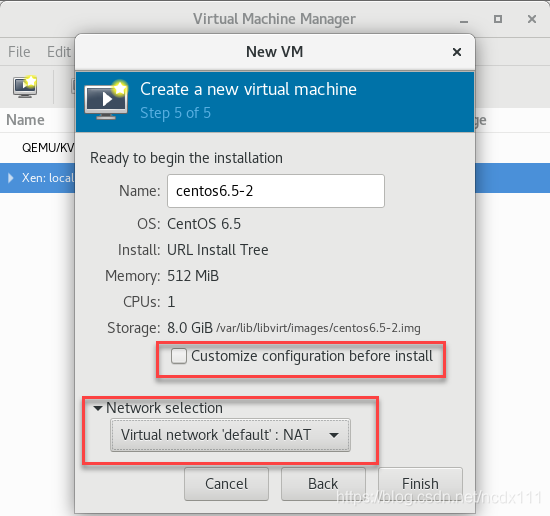
confirm the installation information (including the selection of Network configuration, whether to customize the configuration information), Check the first red box in the figure below if there is a custom requirement. click Finish to enter the installation interface. Installation steps are not described in this article, but you can find the installation tutorial by yourself
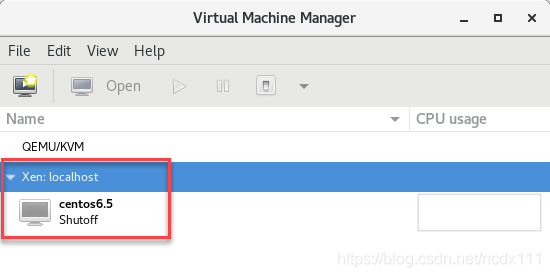
View virtual machine status

can be viewed through the virt-manager to enter the virtual machine command line by entering the following command

virsh


You can use help to view relevant commands. For example, enter the following command to see the virtual list and its status

list --all


Problems encountered
In the process of creating virtual machines using Virt-Manager, the following problems are encountered, and the solutions are attached for your reference.
:'internal error:process exited while connecting to monitor:qemu:could not load PC BIOS 'bs-256k.bin ' Unable to complete install:’internal error:process exited while connecting to monitor:qemu:could not load PC BIOS’ bs-256k.bin ‘ Just create a BIOS -256k.bin file under seabios directory

cp /usr/share/seabios/bios.bin /usr/share/seabios/bios-256k.bin

incapable to complete install:'interbal error:libxenlight failed to create new domain 'centos6.5' 1. There is a centos6.5 virtual machine in the current virtual machine list. Rename the currently created virtual machine or delete the existing virtual machine to
2. Use the command yum update qemu-img to update the file
3. Determine if the memory and CPU of the virtual machine being created is greater than the memory and CPU of the host, and ensure that the virtual machine’s resources are smaller than those of the host

ubuntu executes apt-get update and reports Failed to fetch/replace Ali source

Copyright Notice: This article is the original article of the blogger, and follows CC 4.0 BY-SA copyright agreement. Please attach the link of the original text and this statement.

the article links: https://blog.csdn.net/feiniao8651/article/details/60332535

in the ubuntu perform sudo apt to get the update, often an error:
 
Err http://security.ubuntu.com precise-security InRelease
Err, http://security.ubuntu.com precise ws-security the GPG
Temporary failure resolving ‘security.ubuntu.com’
Err http://cn.archive.ubuntu.com precise InRelease
Err http://cn.archive.ubuntu.com precise-updates InRelease
Err http://cn.archive.ubuntu.com precise-backports InRelease
Err, http://cn.archive.ubuntu.com precise the GPG
Temporary failure resolving ‘cn.archive.ubuntu.com’
Err http://cn.archive.ubuntu.com precise – updates the GPG
Temporary failure Resolving the ‘cn.archive.ubuntu.com’
Err http://cn.archive.ubuntu.com precise – backports the GPG
Temporary failure resolving ‘cn.archive.ubuntu.com’
Reading package lists… The Done
W: Failed to fetch HTTP:// http://cn.archive.ubuntu.com/ubuntu/dists/precise/InRelease
W: Failed to fetch HTTP:// http://cn.archive.ubuntu.com/ubuntu/dists/precise-updates/InRelease
W: Failed to fetch HTTP:// http://cn.archive.ubuntu.com/ubuntu/dists/precise-backports/InRelease
W: Failed to fetch HTTP:// http://security.ubuntu.com/ubuntu/dists/precise-security/InRelease
W: Failed to fetch http://security.ubuntu.com/ubuntu/dists/precise-security/Release.gpg Temporary failure resolving ‘security.ubuntu.com’
W: Failed to fetch http://cn.archive.ubuntu.com/ubuntu/dists/precise/Release.gpg Temporary failure resolving ‘cn.archive.ubuntu.com’
W: Failed to fetch http://cn.archive.ubuntu.com/ubuntu/dists/precise-updates/Release.gpg Temporary failure resolving ‘cn.archive.ubuntu.com’
W: Failed to fetch http://cn.archive.ubuntu.com/ubuntu/dists/precise-backports/Release.gpg Temporary failure resolving ‘cn.archive.ubuntu.com’
W: Some index files failed to download. They have been ignored, or old ones used instead.12345678910111213141516171819202122232425262728293031323334
It is generally recommended to use a domestic mirror source, such as 163 or aliyun’s mirror server
to add the following text to the /etc/apt/ source.list file
 
Deb http://mirrors.aliyun.com/ubuntu/ raring main restricted universe multiverse
deb http://mirrors.aliyun.com/ubuntu/ raring ws-security main restricted universe multiverse
deb http://mirrors.aliyun.com/ubuntu/ raring – updates the main restricted universe multiverse
deb raring – http://mirrors.aliyun.com/ubuntu/ programs main restricted universe multiverse
deb http://mirrors.aliyun.com/ubuntu/ raring – backports main restricted universe multiverse
deb – SRC http://mirrors.aliyun.com/ubuntu/ raring main restricted universe multiverse
deb – SRC http://mirrors.aliyun.com/ubuntu/ raring ws-security main restricted universe multiverse
deb – SRC http://mirrors.aliyun.com/ubuntu/ raring – updates the main restricted universe multiverse
deb – SRC http://mirrors.aliyun.com/ubuntu/ raring – programs main restricted universe multiverse
deb – SRC http://mirrors.aliyun.com/ubuntu/ raring – backports main restricted universe multiverse, 12345678910
However, executing sudo Apt-get update still gives an error. The problem is that DNS is not properly configured.
solution:
 
sudo vi /etc/resolv.conf1
add
 
Dynamic resolv.conf(5) file for glibc resolver(3) generated by resolvconf(8)
# DO NOT EDIT THIS file by HAND — YOUR CHANGES WILL BE OVERWRITTEN
nameserver 127.0.1.1

nameserver 223.5.5.5
nameserver 223.6.6.6
Then the SUdo Apt-get Update will work.
Reference:
ubuntu apt-get update failed to resolve.
Ubuntu operating system “Failed to fetch” error solution
docker Ubuntu container to replace the alibaba source
— — —
copyright notice: this article is the original article of CSDN blogger “feiniao8651”, following CC 4.0 by-sa copyright agreement, reprint please attach the original source link and this statement.
the original link: https://blog.csdn.net/feiniao8651/article/details/60332535

Tencent Cloud server encountered “Active: failed (Result: start-limit)” error when starting lightdm

I installed the GUI on Tencent Cloud server and failed to start LightDM:
[root @vm_0_11_centos GDM]# systemctl start lightdm
[root @vm_0_11_centos GDM]# systemctl status lightdm
● lightdm.service-light Display Manager
Loaded: loaded (/usr/lib/systemd/system/lightdm.service; enabled; Vendor presets: enabled)
Active: failed (Result: start-limit) since Sat 2020-04-04 12:02:18 CST; 6s ago
Docs: man:lightdm(1)
Process: 8495 ExecStart=/usr/sbin/lightdm (code=exited, status=1/FAILURE)
Main PID: 8495 (code=exited, status=1/FAILURE)
Apr 04 12:02:17 VM_0_11_centos systemd[1]: Unit lightdm.service entered failed state.
Apr 04 12:02:17 VM_0_11_centos systemd[1]: Triggering OnFailure= dependencies of lightdm.service.
Apr 04 12:02:17 VM_0_11_centos systemd[1]: lightdm.service failed.
Apr 04 12:02:18 VM_0_11_centos systemd[1]: lightdm.service holdoff time over, scheduling restart.
Apr 04 12:02:18 VM_0_11_centos systemd[1]: Stopped Light Display Manager.
Apr 04 12:02:18 VM_0_11_centos systemd[1]: start request repeated too quickly for lightdm.service
Apr 04 12:02:18 VM_0_11_centos systemd[1]: Failed to start Light Display Manager.
Apr 04 12:02:18 VM_0_11_centos systemd[1]: Unit lightdm.service entered failed state.
Apr 04 12:02:18 VM_0_11_centos systemd[1]: Triggering OnFailure= dependencies of lightdm.service.
Apr 04 12:02:18 VM_0_11_centos systemd[1]: lightdm.service failed.
Solution:
because the libdrm version is too low, so just update.
[root @vm_0_11_centos ~]# yum update libdrm
[root @vm_0_11_centos ~]# systemctl start lightdm
[root @vm_0_11_centos ~]# systemctl status lightdm
● lightdm.service-light Display Manager
the Loaded: the Loaded (/ usr/lib/systemd/system/lightdm. Service; enabled; Vendor presets: enabled)
Active: Active (running) since Sat 2020-04-04 22:21:33 CST; 6s ago

My cloud server instance type is a standard SA1, CENTOS 7.5-64-bit system.

[FAILED] Failed to start Raise network interfaces

[FAILED] Failed to start Raise network interfaces. The problem
The following error occurred when starting Linux and Windows did not communicate. The reason may be that DHCP and static IP conflict, using ifconfig command only ipv6 address without IPv4 address.
The solution
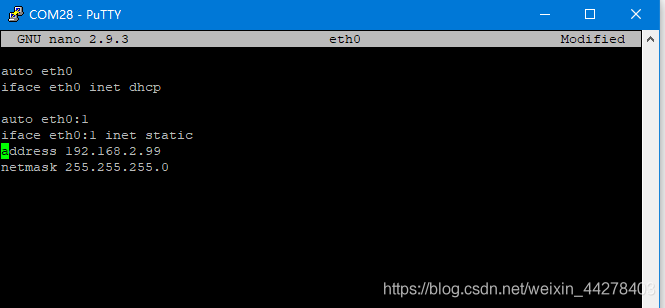
Modify the following files /etc/network/interfaces. D/eth0 , remove the static IP Settings or DHCP Settings section:
for example my:

remove DHCP, changed to:

auto eth0
iface eth0 inet static
address 192.168.2.99
netmask 255.255.255.0

Restart, problem solved.

Notes on using Reaver in Kali 2.0

1. At first
Use this command airmon-ng start wlan0 to get started. Note that in Kali 2.0 you no longer turn on mon0, but wlan0mon, so do not confuse this with the version of Kali 1.x
2. The command of Kali 1.x is invalid
In Kali 2.0, you must manually turn on the network card listening mode, so you need to manually turn on the listening mode after executing the above

ifconfig wlan0mon down
iwconfig wlan0mon mode monitor
ifconfig wlan0monp up

3. Pixiewps blessing
In Reaver 1.5.2, the -K 1 parameter was used to integrate PIxiewps, which greatly accelerated the speed of PIN enumerations, and the Dust Attack was used to increase the crack speed of affected chips from dozens of hours to a few seconds
4. Possible problems
Ray
here I will not repeat paste, I just put up the problems and errors, if encountered, go to the original address above looking for, thank the author of this article!
WPS transaction failed (code: 0x02)
0x02 and 0x03 mixed error
WPS transaction failed (code: 0x02) 0x04)
long warning
long warning Receive timeout
I have a problem 4, but at the beginning I can carry out PIN operation, after dozens of times of PIN, unable to Associate, I do not know whether it triggered the router’s security mechanism

MYSQL login error: mysqladmin: connect to server at’localhost’ failed

1. Mysql login error

mysqladmin: connect to server at ‘localhost’ failed
error: ‘Access denied for user ‘root’@’localhost’ (using password:

use service mysqld stop
mysqld_safe — skip-gran-tables &
enter mysql-uroot-p enter
> use mysql;
> update user set password=PASSWORD(“newpass”)where user=”root”;
change password to newpassord
> flush privileges; Update permission
> Quit out
service mysqld restart
mysql – uroot – p a new password to enter

= = = = = = = = = = = = = = = = = = = = = = = = = = = = = = = = = = = = = = = = = = = = = = = = = = = = = = = = = = =
2, forget the local root login password
solving process:
1, edit /etc/my.cnf
to [mysqld] configuration part to add a line
skate-grant-tables

; 2. Restart mysql
[root@localhost etc]# service mysqld restart
Shutting down mysql. [OK
Starting MySQL. [OK]

Welcome to
[root@localhost ~]# mysql-uroot-p MySQL
Enter password:
Enter

Welcome to

Commands end with the MySQL Monitor. or \g.
Your MySQL connection id is 1
Server version: 5.1.47-log Source distribution
Copyright (c) 2000, 2010, Oracle and/or its affiliates. All rights reserved.
This software comes with ABSOLUTELY NO WARRANTY. This is free software,
and you are welcome to modify and redistribute it under the GPL v2 license

Type ‘help; ‘ or ‘\h’ for help. Type ‘\c’ to clear the current input statement.

mysql> show databases;
+ — — — — — — — — — — — — — — — — — — — — +
| Database |
+ — — — — — — — — — — — — — — — — — — — — +
| information_schema |
| mysql |
| test |
+ — — — — — — — — — — — — — — — — — — — — +
3 rows in the set

execute the following statement
mysql> update user set password=password(“mysql”) where user=’root’;
Query OK, 4 rows affected (0.00 SEC)
rows matched: 4 Changed: 4 Warnings: 0

mysql> flush privileges;
Query OK, 0 rows affected (0.00 SEC)

4, delete the added “skip-gran-tables” row from /etc/my.cnf file, and restart mysql;
can log in normally with the new password;

= = = = = = = = = = = = = = = = = = = = = = = = = = = = = = = = = = = = = = = = = = = = = = = = =
Skip-grant-tables, a very useful mysql startup parameter, is described. As the name implies, you don’t start The grant-tables authorization table when mysql starts. What’s the use?Of course, it is useful to forget the administrator password. Operation method:

1, kill the original mysql:

rcmysqld stop

or:

service mysqld stop

or:

kill TERM mysqld
2. Start mysql with command line parameters:

/usr/bin/mysqld_safe – skip – grant – tables & amp;
3. Modify the administrator password:

use mysql;

update user set password=password(‘yournewpasswordhere’) where user=’root’;

flush privileges;

the exit;
4. Kill mysql, restart mysql

Samba shared server cannot be accessed and the path cannot be found

The Path cannot be found because the Samba Shared server is inaccessible
First blog post: P
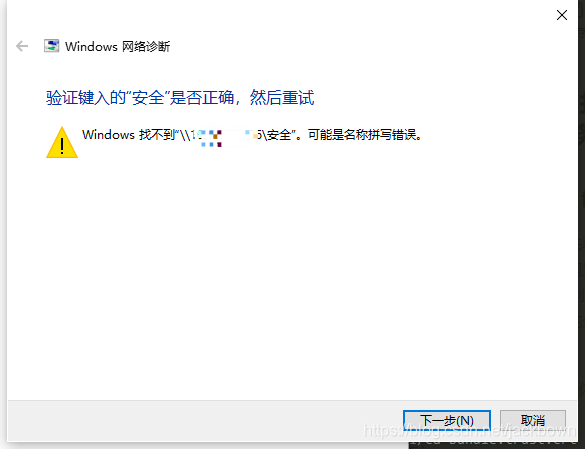
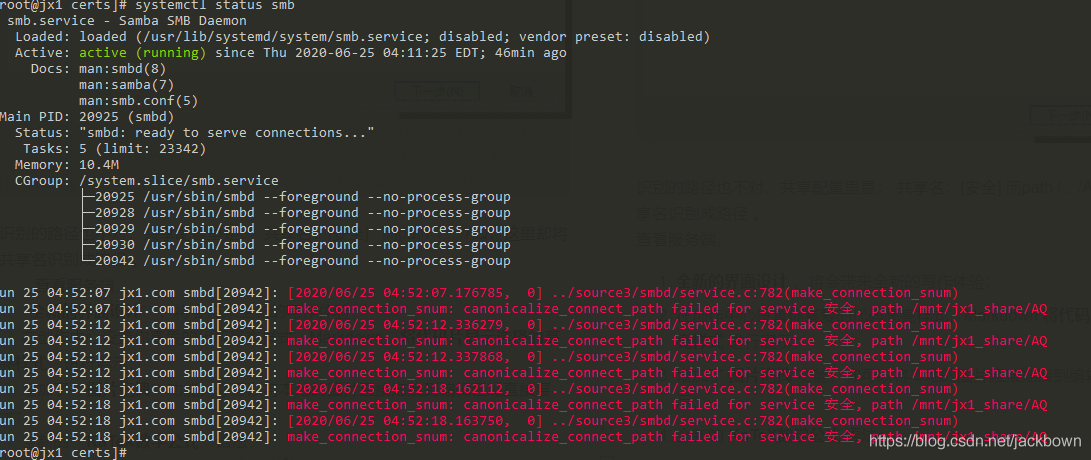
Windows access can only go to the root directory, opening the Shared subdirectory indicates that the path could not be found, spelling error may occur, and the server appears “make_connection_SNum: canonicalize_connect_Path Fail…”
As an amateur, recently tried to built a Shared server, using the virtual machine to do the test before, run successfully, permissions can be implemented, the day before yesterday with a spare industrial control server, reinstall the Samba server, configuration files, and access configuration is copied, is unable to access, the same Windows, access to the original virtual machine SMB, completely normal, and access to the physical machine SMB, input \ IP address, a successful connection, input user name and password, is normal to list the Shared directory, but want to get into Shared subdirectory, have been tip don’t have access to:

recognized the wrong path, the Shared configuration is: share name: [security] and path /… /AQ, which identifies the Shared name as a path.
looks at the server and prompts “make_connection_snum: canonicalize_connect_path fails for service security, path/MNT /jx1_share/AQ”, the same is true for logging.

Python module learning-Paramiko-Use python to throw an exception: Authentication failed.

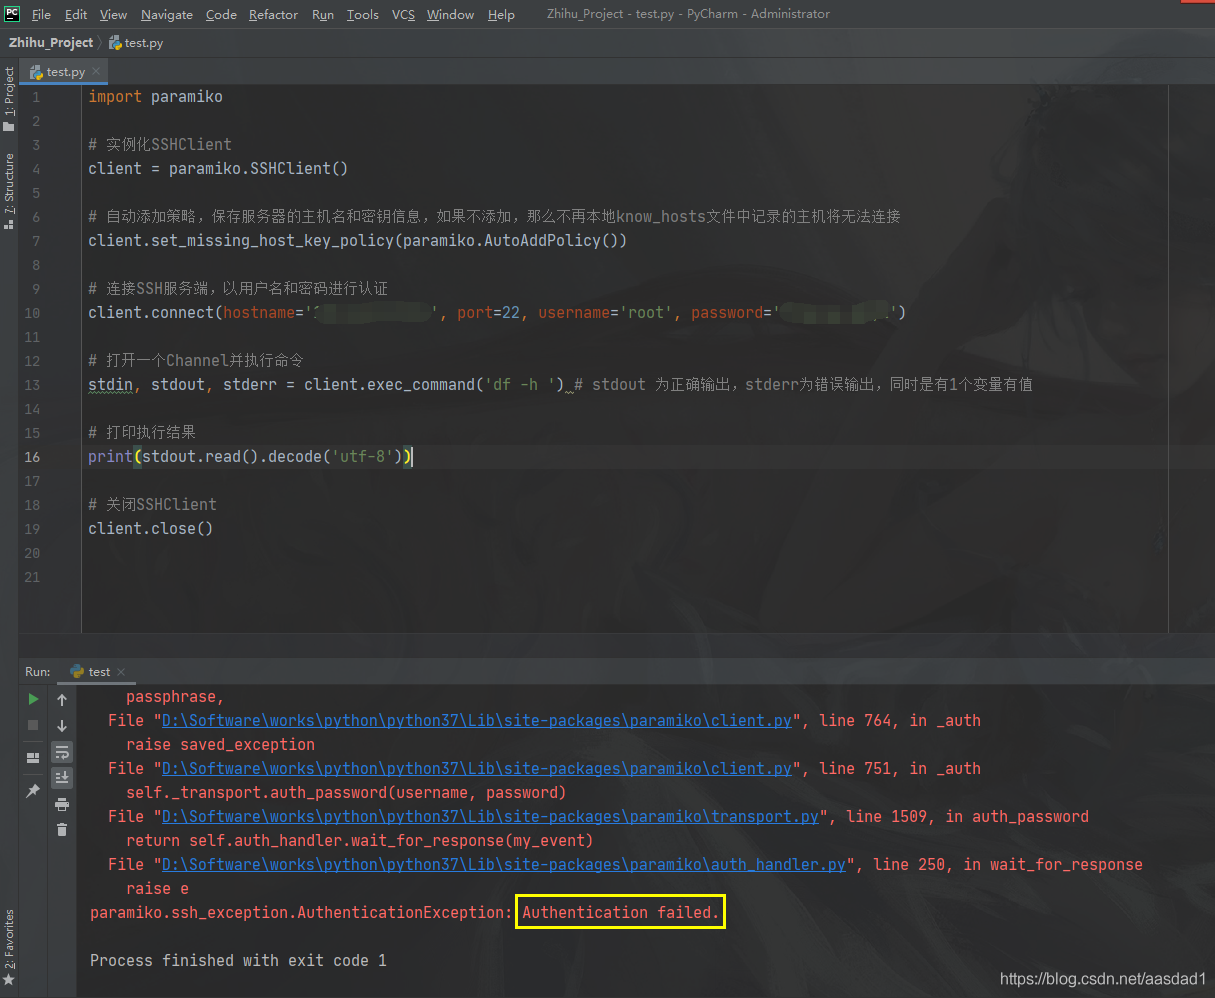
When an exception is thrown, paramiko. Ssh_exception. AuthenticationException: Authentication failed.
Please check:
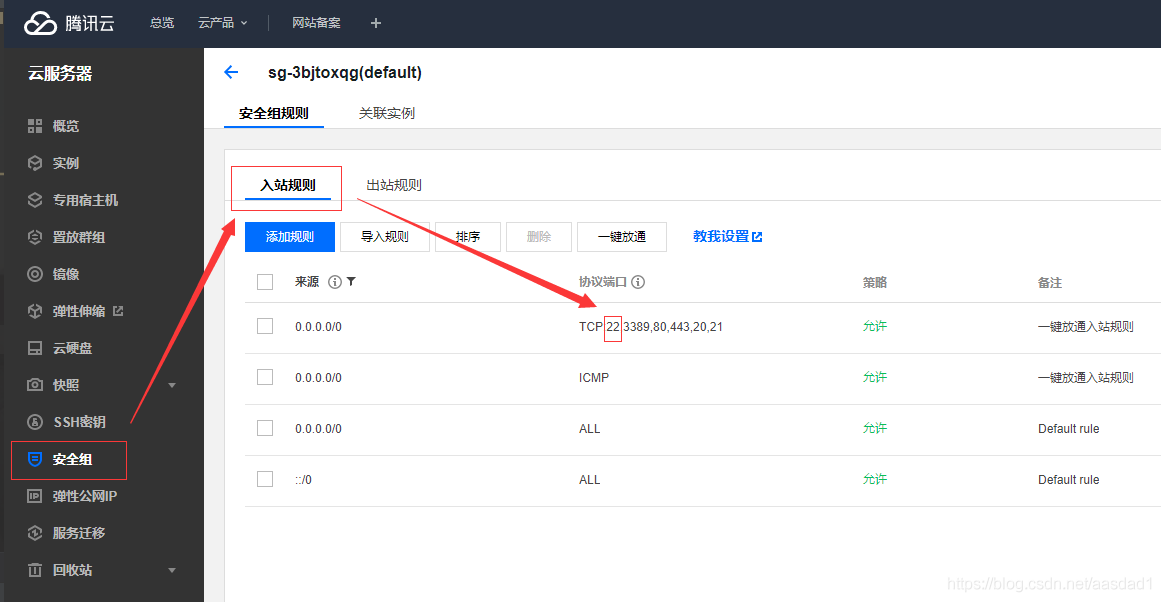
1. Is port 22 enabled on the cloud server?
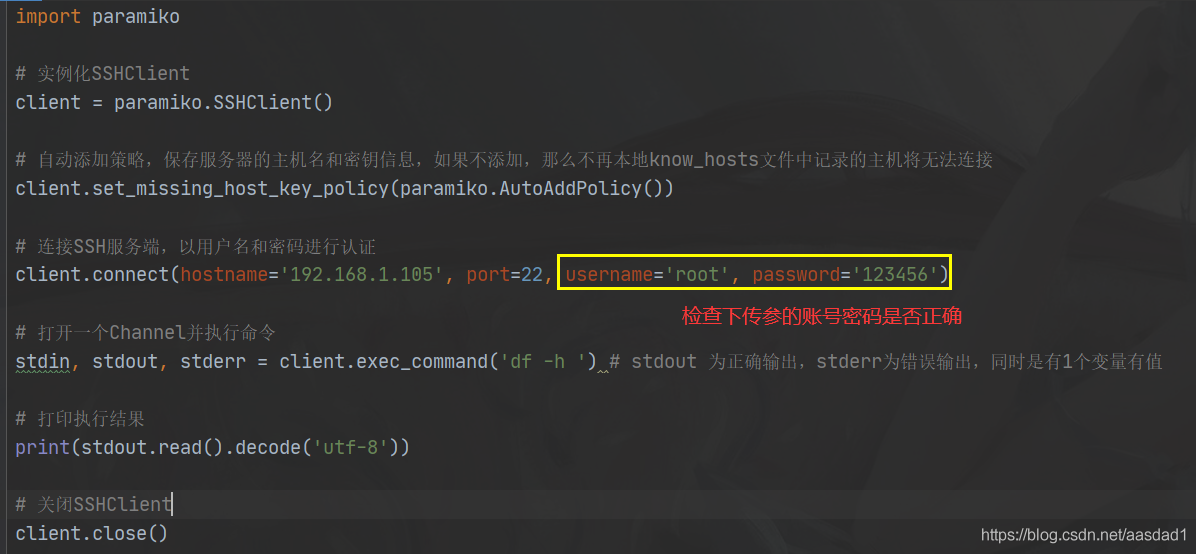
2. Is the password wrong when passing the parameter?

Error reporting example:

 
Operation method:
 
Take my Tencent Cloud as an example:
1. Click the security group rule to check whether the server opens port 22:

 
2. Check whether the code transmission parameter: account password is correct:

import paramiko

# 实例化SSHClient
client = paramiko.SSHClient()

# 自动添加策略,保存服务器的主机名和密钥信息,如果不添加,那么不再本地know_hosts文件中记录的主机将无法连接
client.set_missing_host_key_policy(paramiko.AutoAddPolicy())

# 连接SSH服务端,以用户名和密码进行认证
client.connect(hostname='192.168.1.105', port=22, username='root', password='123456')

# 打开一个Channel并执行命令
stdin, stdout, stderr = client.exec_command('df -h ') # stdout 为正确输出,stderr为错误输出,同时是有1个变量有值

# 打印执行结果
print(stdout.read().decode('utf-8'))

# 关闭SSHClient
client.close()

 
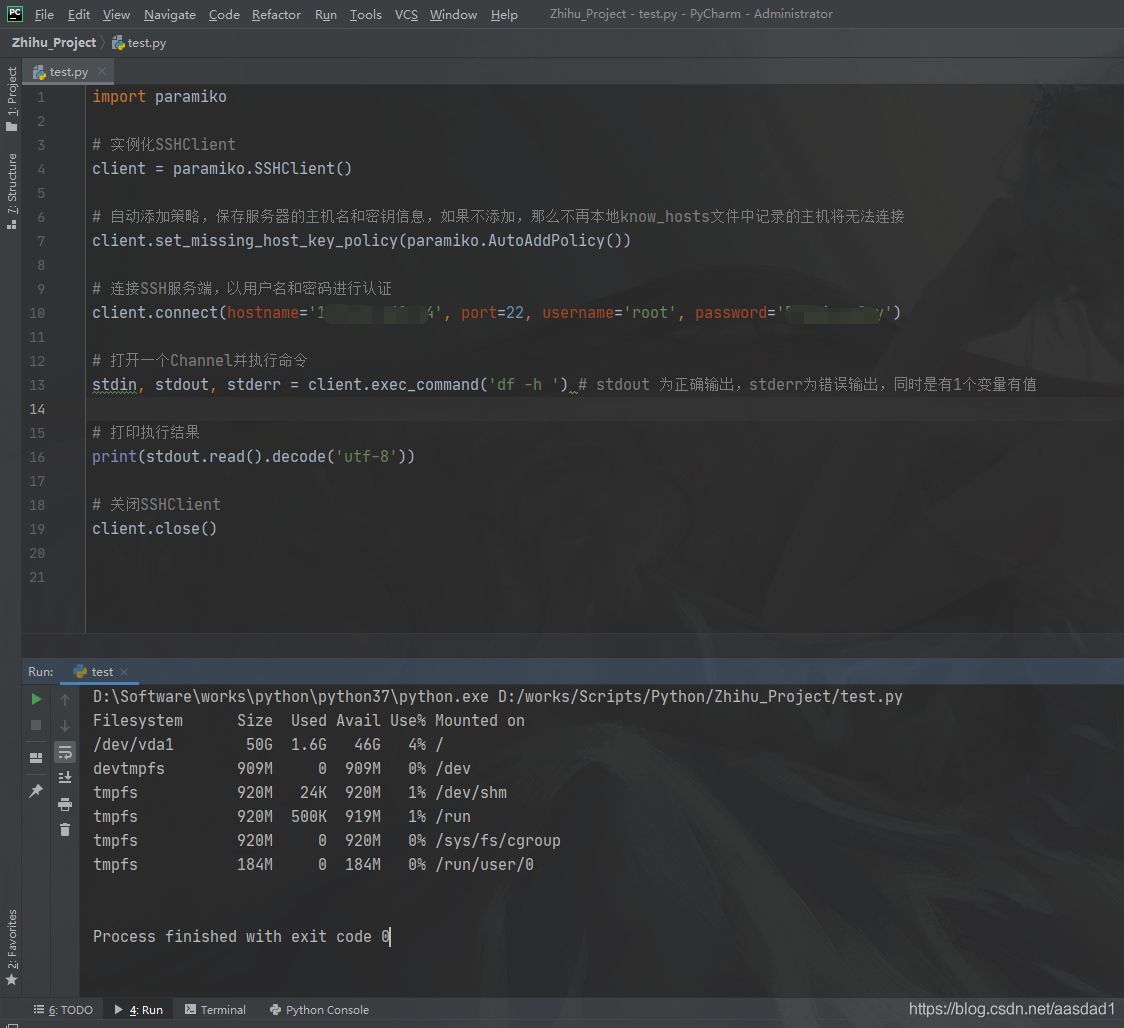
3. After checking, run the Linux command with Python: