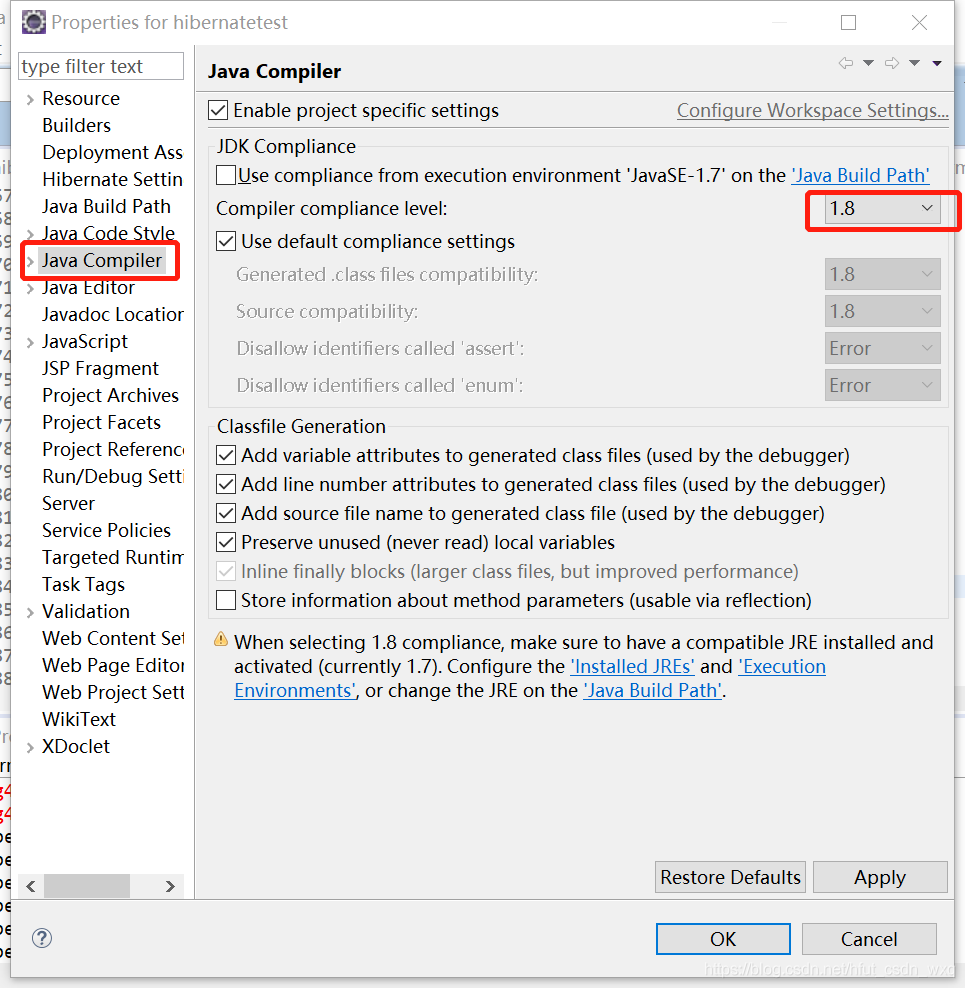
The default lower version of the JDK was used in the project creation process; just set the JDK version above 1.5.
right-click on the project and select properties at the bottom to go to the project configuration page
Tag Archives: eclipse
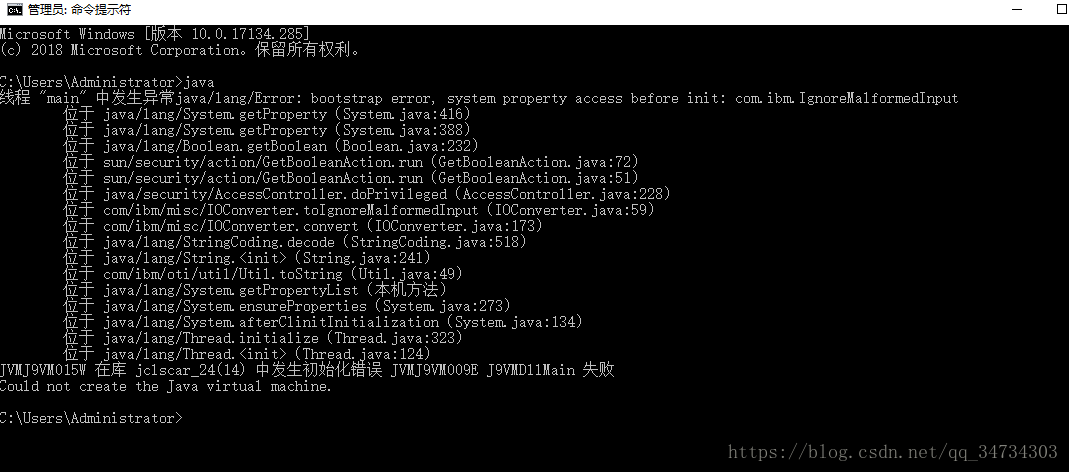
CMD input Java error could not create the Java virtual machine
CMD input JAVA error Could not create the JAVA Virtual Machine, solution
Write this post today, I hope that the students who encounter the following similar problems can refer to my solution to solve quickly, rather than spend a long time like me to explore!
Error message (part 1)
JAVA– CMD input JAVA error prompt: Could not create the JAVA Virtual Machine.
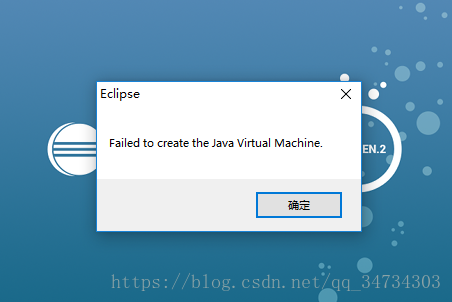
Eclipse — Open error: Fail to create the Java Virtual Machine.
Cause analysis,
because the path path has a Chinese directory or Chinese punctuation, causing Java and eclipse traversal path error. If I type path in CMD, I get something like this :
my error is because path =; D: \ development \ Java \ jdk1.8.0 _151; %JRE_HOME%\ jRE \bin %JRE_HOME%\ jRE \bin %JRE_HOME%\jre\bin %JRE_HOME%\jre\bin %JRE_HOME%\jre\bin

Error message (below)
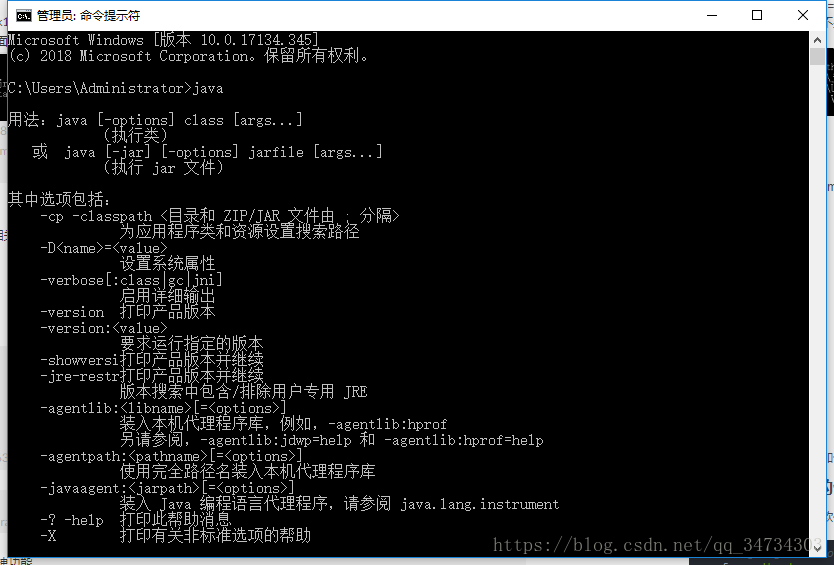
After the above error is fixed, enter Java in CMD again, the relevant information will appear, as follows:
Version 1.6.0 of the JVM is not suitable for the this product.version :1.8 or greater is required
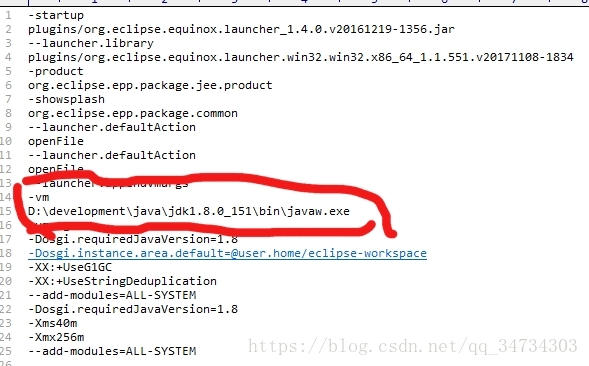
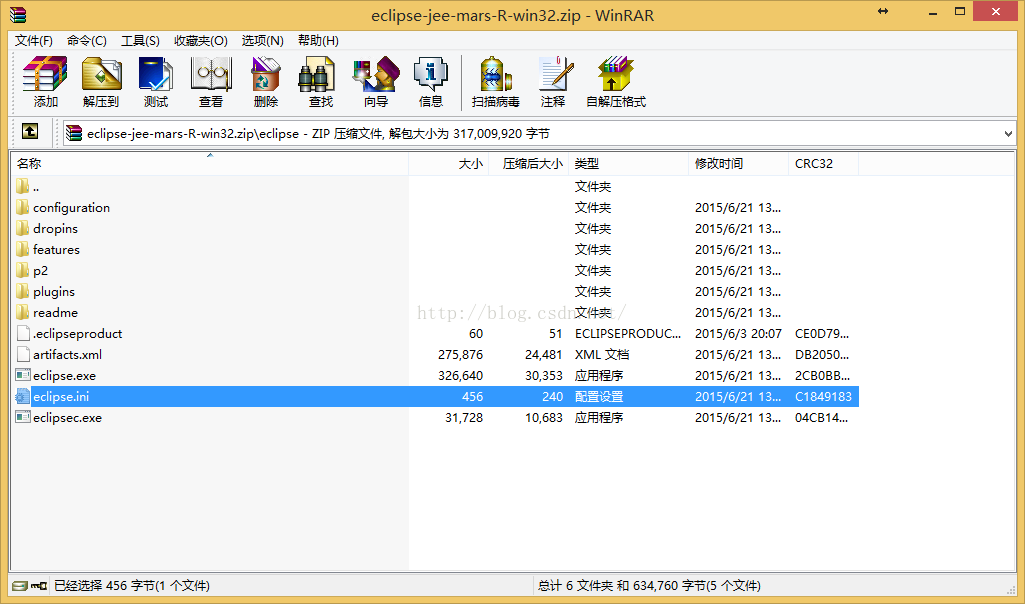
The current version of the JDK is too low, and Eclipse requires a higher version. The key point is that the version 1.8 is installed on my computer. How can this error still be found?After searching, I have to go to the path of CONFIGURING JDK in Ecipse.ini to find it.
-vm
D:\Program Files\Java\jre1.8.0_121\bin\javaw.exe// add these two lines (of course, the specific address shall be subject to their own address)
Could not publish server configuration for Tomcat v8.5 server at localhost
Could not publish Server Configuration for Tomcat V8.5 Server at localhost. The solution
Problem analysis
Possible exception: Multiple duplicate project names are stored in the Context tag in the server.xml file in the Servers file
The solution
Find the Servers file in Eclipse. Find the folder with the name of the server used to start the project in it, and under its directory find the server.xml file
At this time found that the document is very lengthy, small white shows that look dizzy..
Find the Design view at the bottom, click on the Design view to change the view, find the small arrow to the left of Servers, click on the small arrow to see the subdirectory of Servers, and keep looking for the small arrow until you find the Context.
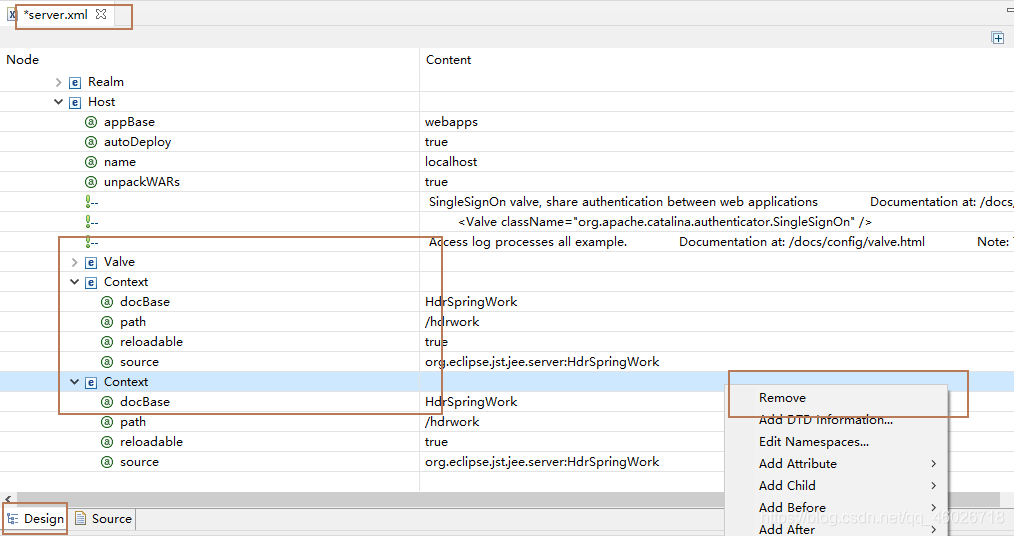
You can clearly see the duplicate item name in the Context, right-click on it and select Remove to remove the redundant Context save (Ctrl+S or click save in the upper left corner, the * on the file label will disappear).
We’re done. Go and restart the project.
Error loading in flex integration: Java / jdk1.6.0_ 35\jre\bin\server\ jvm.dll
Error loading: \ Java \ jdk1.6.0 _35 \ jre \ bin \ server \ JVM DLL
Error :
complie:
[exec] Error loading: D:\Program Files\Java\jdk1.6.0_35\jre\bin\server\ jvvm. DLL
[exec] Result: 6
Because flash builder is based on eclipse and eclipse is using Java technology and Java needs jre
to run and flash builder needs to run on a 32-bit jre if we have Java installed on 64 then this error will occur
solution
1. Download and install 32 jre
2. Edit FLEX_HOME\bin\jvm.config file and set java.home
for example :
#java.home=
java.home=D:/Program Files/Java/jre6-32
note :FLEX_HOME refers to flex SDK directory, such as D:\Program Files\Adobe Flash Builder 4.6\ SDKS \4.6.0
To solve the problem, start eclipse and return exit code = 13
The error can also be that installing Eclipse opens the browser automatically without actually doing the installation.
It’s actually the Java version and the Eclipse version that don’t match. 32-bit systems need to have 32-bit Java and Eclipse installed, and 64-bit is installed.
It’s actually the Java version and the Eclipse version that don’t match. 32-bit systems need to have 32-bit Java and Eclipse installed, and 64-bit is installed.
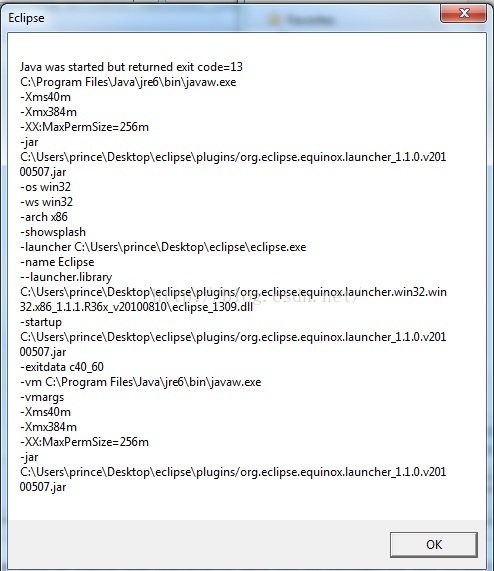
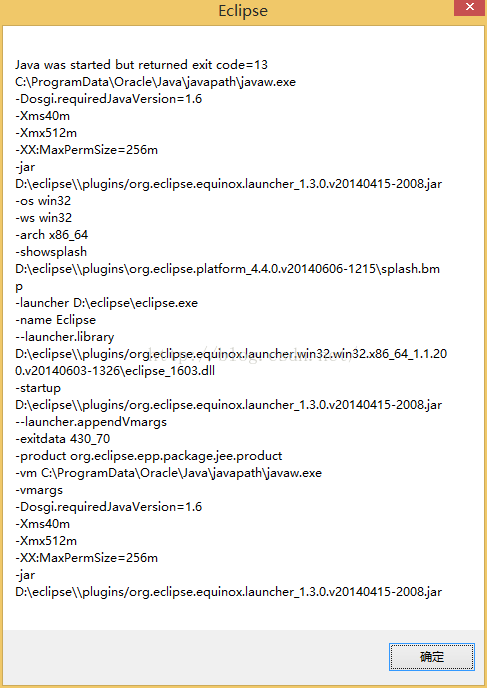
Java was started but returned exit code = 13
Java was started but returned exit code=13
As is shown in
The reason is that when you update the JRE through a third party, the third party installs a 32-bit JRE that doesn’t match the 64-bit Eclipse. (The error message — Launcher. Library has x86_64 to show that eclipse is 64-bit.)
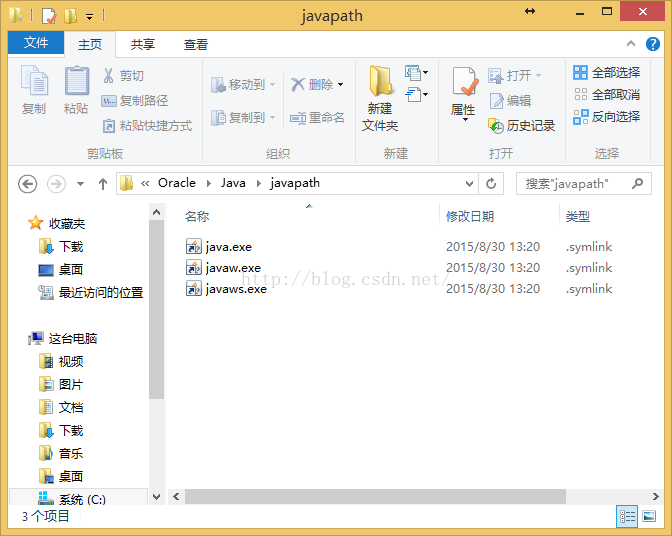
After installation JDK8/JRE8 adds an environment variable C:\ProgramData\Oracle\Java\ Javapath
The environment variable is three shortcuts, java.exe.lnk javaw.exe.lnk javaws.exe.lnk. Every time you install the JDK/JRE, these three shortcuts will update the path to the last JRE path
Cause found, reinstall the 64-bit JDK to fix the problem
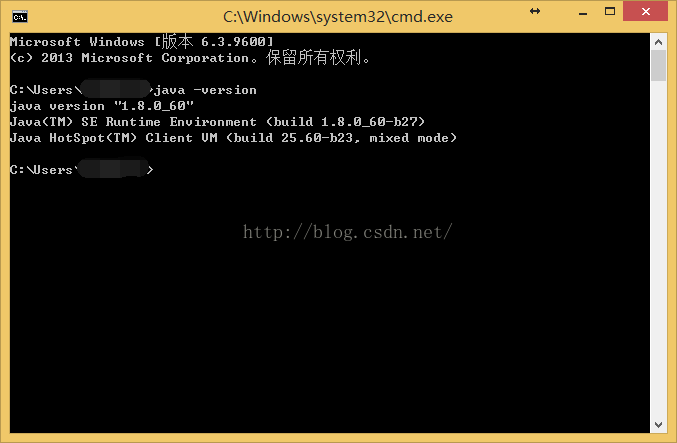
Attached is a comparison of the 1:32 bit 64-bit running java-Version commands
32 bit
As is shown in
The reason is that when you update the JRE through a third party, the third party installs a 32-bit JRE that doesn’t match the 64-bit Eclipse. (The error message — Launcher. Library has x86_64 to show that eclipse is 64-bit.)
After installation JDK8/JRE8 adds an environment variable C:\ProgramData\Oracle\Java\ Javapath
The environment variable is three shortcuts, java.exe.lnk javaw.exe.lnk javaws.exe.lnk. Every time you install the JDK/JRE, these three shortcuts will update the path to the last JRE path
Cause found, reinstall the 64-bit JDK to fix the problem
Attached is a comparison of the 1:32 bit 64-bit running java-Version commands
32 bit
C:\>java -version
java version "1.8.0_60"
Java(TM) SE Runtime Environment (build 1.8.0_60-b27)
Java HotSpot(TM) Client VM (build 25.60-b23, mixed mode)
A 64 – bit
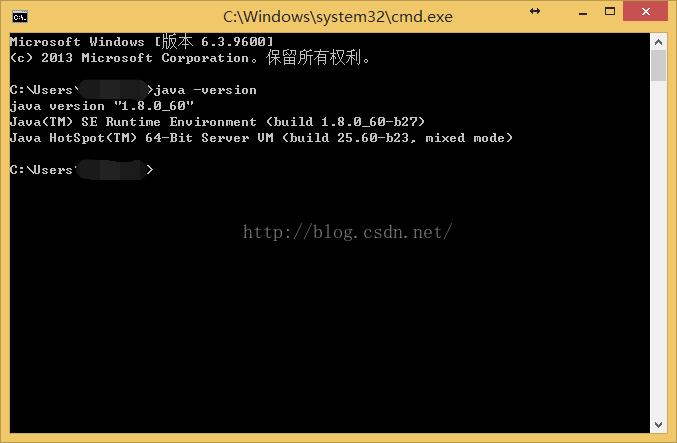
C:\>java -version
java version "1.8.0_60"
Java(TM) SE Runtime Environment (build 1.8.0_60-b27)
Java HotSpot(TM) 64-Bit Server VM (build 25.60-b23, mixed mode)
you can see that 64 is 64 Bit, 32 Bit is not
Annex 2: Determine whether Eclipse is 32-bit or 64-bit through eclipse directory specific files
The directory structure of eclipse32-bit and 64-bit is similar. We can look at the Eclipse.ini file after unziping and compare it with -launcher. Library to find if there is x86_64
As shown in the figure, the top is 32 bits and the bottom is 64 bits
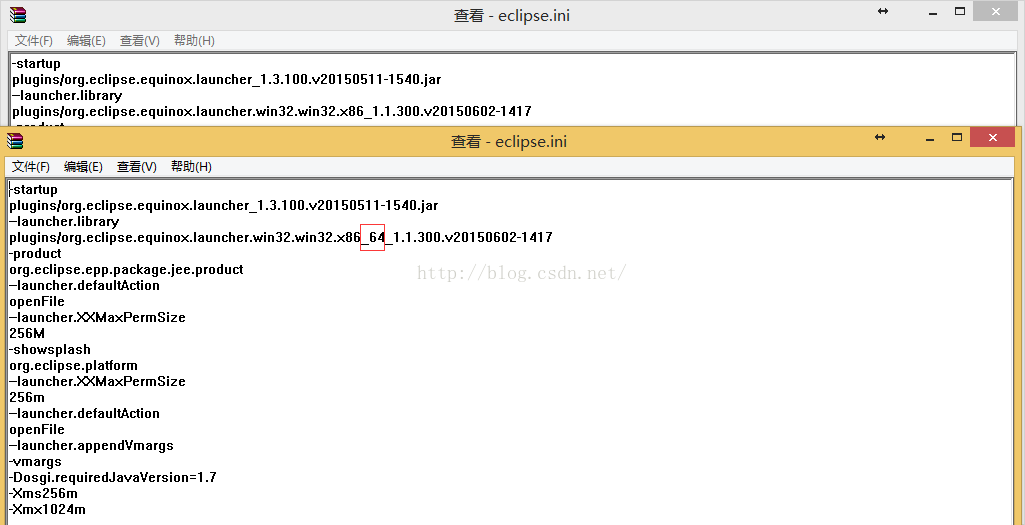
Eclipse directory structure
JVM start error: could not reserve enough space for object heap error
JVM startup error: Could not Reserve enough space for Object Heap error
First, understand what the parameters mean:
The
| parameter | meaning |
|---|---|
| — Xms2G Xmx2G | represents the minimum and maximum JVM heap available memory |
| – XX: PermSize -xx :MaxPermSize | represents the JVM’s metadata memory size |
Solve problems:
- eclipse startup error is:
Could not reserve enough space for object heap error current configuration is:
-xms512m-xmx1024m-xx :PermSize 512M : many SO answers are recommended to use JAVA_OPTION variable, but one answer is that the 32-bit process of Windows 7 cannot get more than 1200M of memory. This answer is a little reliable, SO I tried it. Download and install the 64BIT JDK and boot it up without error. Appendix:
When
- was converted to a 64-bit JDK, jrebel was found to fail. After a long search, one of the answers given on the official forums is to back up Jrebel32.dll, and then change the 64-bit Jrebel32.DLL to Jrebel32.dll. JVM out of memroy error report summary:
Java heap space: Increases -XMXpermgen space: Increases -xx :PermSizeRequested Array size: Error means that the size of the array created exceeds the maximum heap size, so the apparent solution is to either increase the size of -XMX or reduce the size of the array to be created.
Eclipse startup error: a Java runtime environment (JRE) or Java Development Kit (JDK) must be available
—————————
Eclipse
—————————
A Java Runtime Environment (JRE) or Java Development Kit(JDK)
must be available in order to run Eclipse. No Java Virtualmachine
was found after searching the following locations:
D:\eclipse\jre\bin\javaw.exe
javaw.exe in your current PATH
—
sure
—————————
before you solve this problem, make sure you have your own JAVA installation and environment variable configuration.
The first solution I used was to manually fill out a D:\ Eclipse \ JRE \bin\javaw.exe (the javaw.exe file can be found in the JDK’s bin directory) following the error message, and Eclipse will open as normal.
The above method is not a regular solution, so in order to prevent unknown problems, I finally took the second solution to solve.
open the Eclipse root, eclips.ini file, and add the first two lines:
-vm
C:\ProgramFiles\Java\jdk1.8.0_45\bin\javaw.exe (this is the absolute path of your installed javaw.exe)
reproduced from https://blog.csdn.net/xxm5571386/article/details/52972552
An error occurred while collecting items to be installed
When installing p3C plug-ins in eclipse, I will not elaborate here. This is a plug-in developed by Ali’s internal code standards that can help developers better regulate the code. If necessary, it can be installed. In addition ali Java development manual you can also read, the specification of the purple code style. Okay, theme, the following error will be reported when installing the plug-in:
An error occurred while collecting items to be installed
session context was:(profile=epp.package.jee, phase=org.eclipse.equinox.internal.p2.engine.phases.Collect, operand=, action=).
No repository found containing: osgi.bundle,org.aspectj.runtime.source,1.7.0.20120507134200
No repository found containing: osgi.bundle,org.eclipse.contribution.weaving.jdt.source,2.2.0.e36x-20120507-1400
No repository found containing: org.eclipse.update.feature,org.eclipse.contribution.weaving.source,2.2.0.e36x-20120507-1400
No repository found containing: osgi.bundle,org.eclipse.contribution.xref.core.source,2.2.0.e36x-20120507-1400
No repository found containing: org.eclipse.update.feature,org.eclipse.contribution.xref.source,2.2.0.e36x-20120507-1400
No repository found containing: osgi.bundle,org.eclipse.contribution.xref.ui.source,2.2.0.e36x-20120507-1400
No repository found containing: osgi.bundle,org.eclipse.net4j.jms.api,3.0.0.v20110215-1551
No repository found containing: osgi.bundle,org.springframework.roo.wrapping.protobuf-java-lite,2.3.0.0001
This is because some libraries can not connect, resulting in online installation failed, just add the url address of the library where the installation is.
The specific steps are as follows:
- click on the Windows of the Eclipse window — > Perference go to Install\update and click Available Software Sites
3. Click Add and, after calling the name, copy the missing path in the error message.
The above errors, for example, add the following path:
name: eclipse
location:https://www.eclipse.org/ajdt/downloads/
Therefore, if you encounter similar errors later, you can first look at what library is missing, and then add the corresponding library address.
Eclipse software Java solution: editor does not contain a main type error box
The editor does not contain a main type error box
When you run the Java file is, if the following error box pops up:
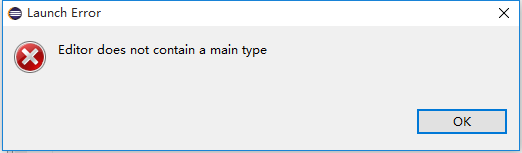
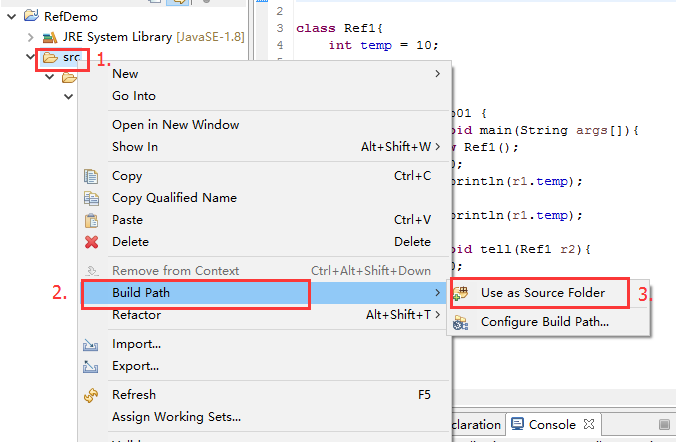
Reason for error: The current source code (all packages) is not added to build path (SRC path with the file directory inside)

Solution: Right click on: SRC path -> Build Path -> Use as Source Folder
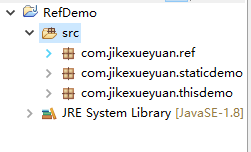
Now, the SRC path should look like this :(instead of a file directory, it looks like a Java package)
Eneditor does not contain a main type. eneditor does not contain a main type.
Reference site:
use the eclipse to run with the main function of the Java file, the editor does not contain a main type of mistakes box
http://blog.csdn.net/zt689/article/details/22161909
Eclipse can’t open an error: Error:could not find java SE Runtime Environment/Error: could not find java.dll
Eclipse could not find Java SE Runtime Environment/Error: could not find Java DLL
It’s not uncommon for a friend to fail to open an error message when using Eclipse
Error:could not find Java SE Runtime Environment/Error: could not find Java
This is mostly due to multiple installations and uninstalls; you may have two versions of the JDK installed on your computer
To solve this problem, there are the following solutions:
Methods a
After uninstalling, reconfigure your environment variables to prevent your environment variables from still being uninstalled.
Method 2
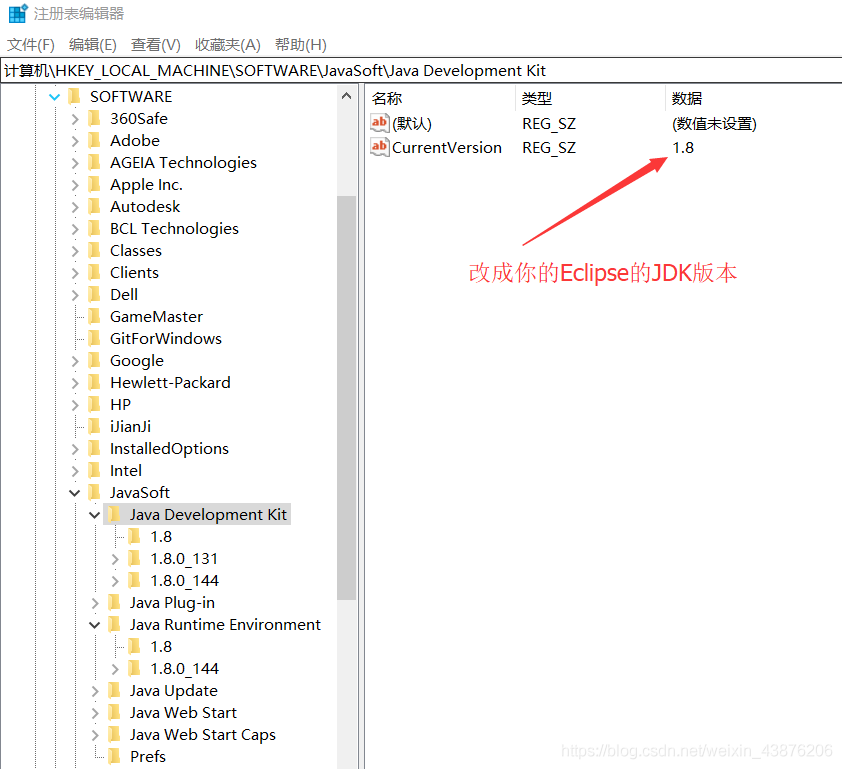
For example, when you open the 1.7 version of Eclipse, but when you install the 1.8 version, the CurrentVersion field of the registry is updated to 1.8, so you cannot open it. Could not find Java.dll change both CurrentVersion as shown by the arrow in the figure below to 1.7.
Note: Just change the version of the Eclipse JDK that you installed.

Eclipse Syntax error, annotations are only available if source level is 1.5 or greater
I. Problem descriptionSyntax error, annotations are only available if source level is 1.5 or greater, indicating that the annotations are only available in jdk1.5 or higher, as shown in the figure below:
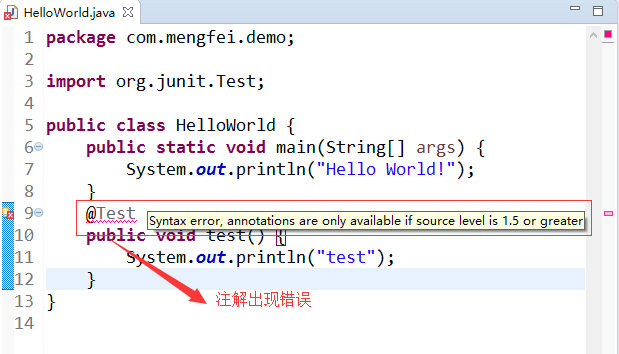
My JDK is configured to be 1.8, which is not supposed to be the case. I checked the configuration of my project and found the problem
Second, the cause of the problem
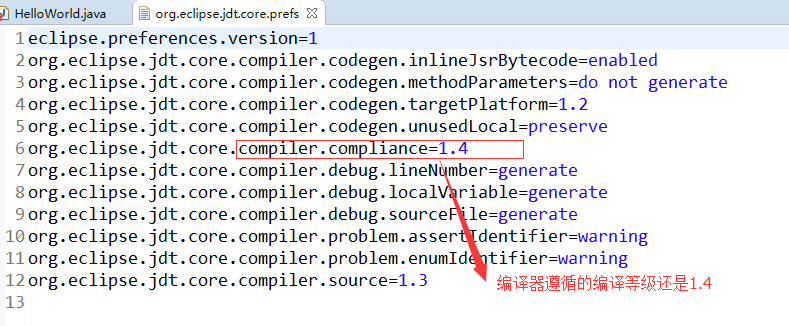
The compiler followed a low compilation level, used the default configuration file at project creation time, and did not update as configured with the JDK version
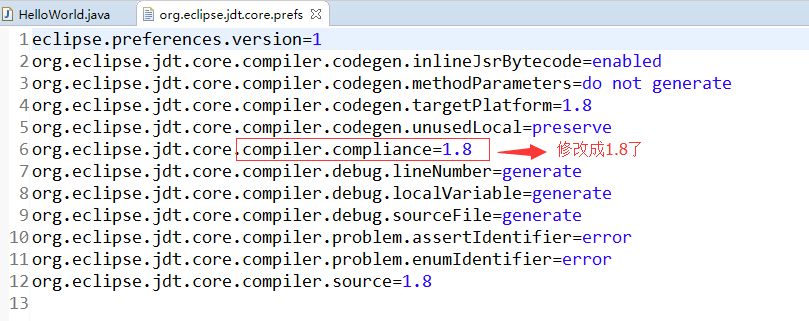
Here is the configuration information for the configuration file:
3. Solutions
1. Click the project shortcut Alt + Enter or right-click the project and select Properties at the bottom to enter the project configuration page
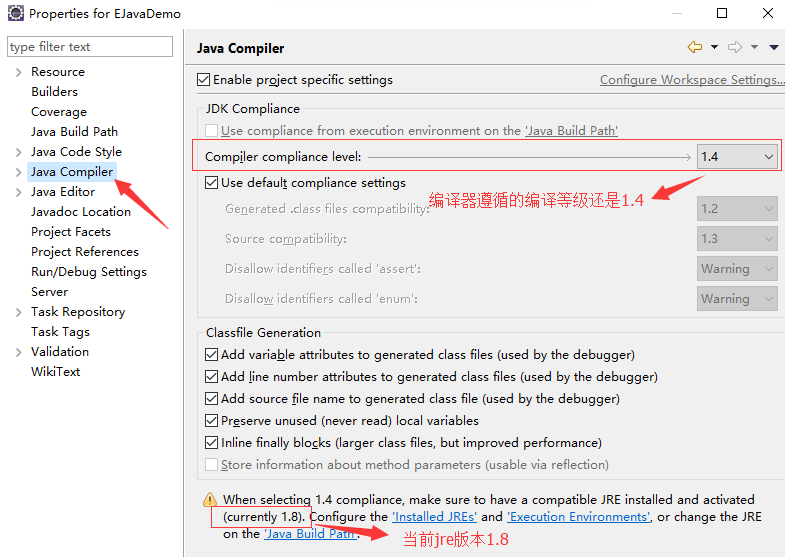
2. Modify the compilation level of the compiler
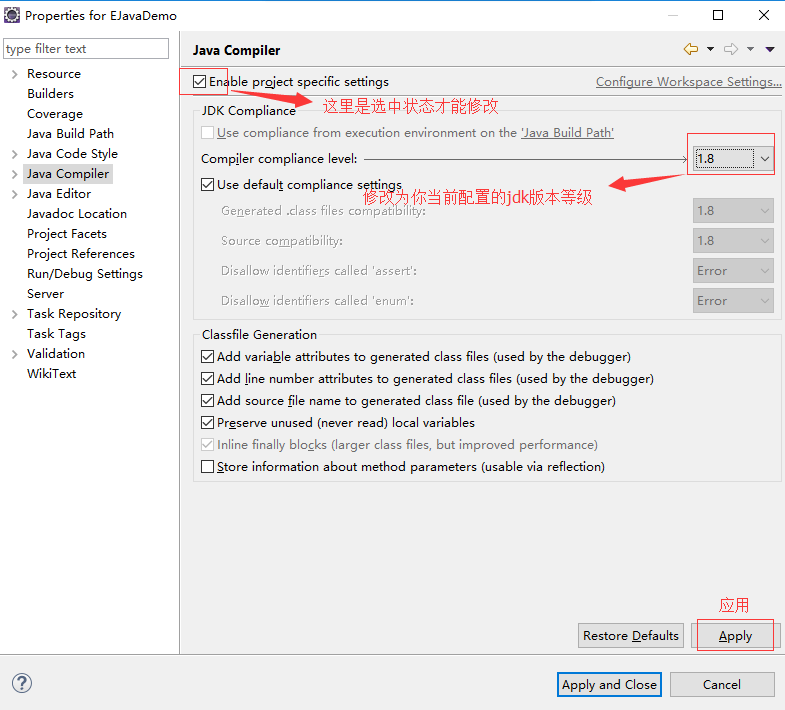
3. Change the configuration

4. The configuration file was modified successfully
Ok, problem solved