Tag Archives: Deep learning

Pysot installation and model testing

installation steps

– download the project file

https://github.com/STVIR/pysot.git

create conda environment

https://github.com/STVIR/pysot/blob/master/INSTALL.md

the second installation, manual configuration environment, the command is as follows, to add tsinghua source https://pypi.tuna.tsinghua.edu.cn/simple

conda create --name pysot python=3.7
conda activate pysot

conda install numpy
conda install pytorch=0.4.1 torchvision cuda90 -c pytorch
pip install opencv-python

pip install pyyaml yacs tqdm colorama matplotlib cython tensorboardX

# change dir to project

python setup.py build_ext --inplace

download model file

the baidu cloud https://github.com/STVIR/pysot/blob/master/MODEL_ZOO.md file download, only copy pysot/experiments in the file mode, PTH, not to replace the corresponding congfig. Yaml

configure the environment variable

export PYTHONPATH=/path/to/pysot:$PYTHONPATH

to export PYTHONPATH =/home/Cody/PycharmProjects/pysot: $PYTHONPATH

or use pycharm to configure

https://blog.csdn.net/sements/article/details/105495812/

demo run
Reference

https://blog.csdn.net/sements/article/details/105495812/

here use pycharm to run, select the corresponding Python compiler, and run -> Edit Configurations, set and select the running demo.py file, and add the running parameter

in paramters

–config .. /experiments/siamrpn_r50_l234_dwxcorr/config.yaml
–snapshot .. /experiments/siamrpn_r50_l234_dwxcorr/model.pth
–video ../demo/bag. Avi

effect display

Run demo.py, pop up the display box, select the area with the left mouse button and press enter to

Importerror: the perfect solution of no module named CV2!!! (not too good)

: on January 21, 2018, at 10:13 PM, I excitedly uploaded my CSDN blog from the Ubuntu system and sent an congratulatory message. I congratulated myself on solving the problem of ImportError: No module named cv2. It is like a phone call from another world (Ubuntu world) to the real world (Windows world).

it started a long time ago at 4:30 PM, when I was just a kid, a naive kid, getting ready to run a fast r-cnn demo on my Ubuntu system. Of course, the purpose is to test my caffe environment. This demo is the training model on Github, I won’t go into details, you can refer to this blogger’s tutorial, which is simple and clear. I won’t say.

my setup environment is

ubuntu14.04

caffe

opencv 3.0.0 – beta

anaconda2

but when you run the last step

./demo.py --cpu

suddenly appeared an error, the initial error can not find easydict module (
ImportError: No module named easydict

sudo pip install easydict

easydict installation, but still prompt can not find, actually this sentence after running if successful installation should be in your/usr/local/lib/python2.7 dist – packages folder has a easydict folder, but this time when wrong, because you try to run again./demo. Py – CPU, still can appear the error, That’s because easydict should be on your home/anaconda2/lib/python2.7/site – under the packages folder, why, that’s because the configuration of the environment on with me, because my python with the anaconda and not the python, so be it.

ImportError: No module named cv2

and then the main thing, which is that cv2 can’t be found, and I’m going to just say the solution here, just to give you a sense of perspective, is that when I come across this problem, I go from being a kid, a naive kid, to being a car brother.

step 1:

install python – opencv

sudo apt-get install python-opencv

See if it’s resolved. If it’s not resolved, look at step 2.

step 2:

find cv2. So copying files to your/usr/local/lib/python2.7 site – packages folder (in the case of no use you anaconda), how to find your cv2. So, I offer a very convenient method (must use this method, or you not seek) :

find/-name "cv2.so"

and then on the terminal CD to home, type python, python version number and so on, and then

>>>import cv2

If there is no error, the problem is solved.

in the absence of anaconda, by this point it should have been completely resolved, and if you haven’t resolved it yet, look at step 3:

step 3:

see the third step that USES the anaconda, find cv2 through the second step. So, reproduction cv2. So to home/anaconda2/lib/python2.7/site – packages folder, and then the second step, input the python, then input the import cv2. Just fine.

thank you! My show is over! Please enjoy the picture:

module ‘tensorflow_core._api.v2.train’ has no attribute ‘slice_input_producer’

module ‘tensorflow_core._api.v2.train’ has no attribute ‘slice_input_producer’

tensorflow version does not uninstall and reinstall

pip uninstall tensorflow

I reinstalled version 2.1.0 and reinstalled version 1.5.0, and did not report this error

pip install tensorflow==1.5.0


<标题>

tf.train.slice_input_producer()和tf.train.batch ()


Pytorch torchvision.datasets.ImageFolder Found 0 files in subfolders error for

Pytorch torchvision. Datasets. ImageFolder Found 0 files in subfolders error

recently in learning pytorch actual combat computer vision book, the case of cat and dog battle, according to the original code [external chain picture transfer failure, the source station may have anti-hotlinking mechanism, suggested to save the picture directly upload (C:\Users\dell\AppData\ Typora\typora-user-images\1602066856682.png)

encountered an error loading ImageFolder

[external chain image transfer failure, source station may have anti-hotlinking mechanism, suggested to save the picture directly upload (img-8llgfcz7-1602067092918)(C:\Users\dell\AppData\ Typora\typora-user-images\1602066954030. PNG)

918)]

create a new subfolder in the valid, error resolution.

Pytorch — nn.Sequential () module

In short, nn.Sequential() packs a series of operations into , which could include Conv2d(), ReLU(), Maxpool2d(), etc., which could be packaged to be invoked at any point, but would be a black box, which would be invoked at forward().

extract part of the AlexNet code to understand sequential:

class AlexNet(nn.Module):
    def __init__(self, num_classes=1000, init_weights=False):
        super(AlexNet, self).__init__()
        
        self.features = nn.Sequential(
            nn.Conv2d(3, 48, kernel_size=11, stride=4, padding=2),
            nn.ReLU(inplace=True),
            nn.MaxPool2d(kernel_size=3, stride=2), 
            nn.Conv2d(48, 128, kernel_size=5, padding=2),
            nn.ReLU(inplace=True),
            nn.MaxPool2d(kernel_size=3, stride=2),
            nn.Conv2d(128, 192, kernel_size=3, padding=1),
            nn.ReLU(inplace=True),
            nn.Conv2d(192, 192, kernel_size=3, padding=1),
            nn.ReLU(inplace=True),
            nn.Conv2d(192, 128, kernel_size=3, padding=1),
            nn.ReLU(inplace=True),
            nn.MaxPool2d(kernel_size=3, stride=2),
        )
        ......
        
    def forward(self, x):
        x = self.features(x)
        ......
        return x

init__, self. Features = nn.Sequential(…)

in forward() just use self.features(x) to

Some problems in installing wsl2 and NVIDIA docker in win10

recently dual system collapsed, so choose wsl2, save trouble in the future, the first is the installation method, here posted my reference to some posts and introduction:

win10 installation method of wsl2 and docker-ce:

https://blog.csdn.net/xianxi9883/article/details/107358445/

win10 on container virtualization:

https://blog.csdn.net/leenhem/article/details/105359112

http://www.xitongcheng.com/jiaocheng/win10_article_53803.html

introduces wsl2 installation driver and nvidia-docker method:

https://zhuanlan.zhihu.com/p/149517344

here are some of the problems I ran into:

is

curl https://get.docker.com | sh

speed is very slow, tried two days all can’t, finally changed a unicom network…

solved in minutes

followed by:

curl -s -L https://nvidia.github.io/nvidia-docker/gpgkey | sudo apt-key add -

prompt me GPG: no valid OpenPGP data found.

then I start from the browser open https://nvidia.github.io/nvidia-docker/gpgkey, download this file to the ubuntu folder

sudo apt-key add gpgkey

solution

and then

curl -s -L https://nvidia.github.io/nvidia-docker/$distribution/nvidia-docker.list | sudo tee /etc/apt/sources.list.d/nvidia-docker.list

because I couldn’t find nvidia-docker in the last update of the whole process, so I checked the nvidia-docker list and found nothing, so I opened the previous link separately, took the data and wrote it in by myself.

deb https://nvidia.github.io/libnvidia-container/stable/ubuntu16.04/$(ARCH) /
#deb https://nvidia.github.io/libnvidia-container/experimental/ubuntu16.04/$(ARCH) /
deb https://nvidia.github.io/nvidia-container-runtime/stable/ubuntu16.04/$(ARCH) /
#deb https://nvidia.github.io/nvidia-container-runtime/experimental/ubuntu16.04/$(ARCH) /
deb https://nvidia.github.io/nvidia-docker/ubuntu16.04/$(ARCH) /

, that’s what it is. If you want to open it yourself, you can use

https://nvidia.github.io/nvidia-docker/$distribution/nvidia-docker.list, where $distribution changing its own system name

and finally, success.

Visualization of training process based on tensorboard on Python

we know that pytorch itself comes with a data visualization tool, but when I used the visualization tool, I found that when I trained to use it, it would suddenly get stuck. It turned out that Pytorch incorporated the Tensorboard feature, and I read some blogs that said it was very easy to implement, so It took me some time to research and implement the change, so I Shared it again.

1. Configure the environment:

since we used pytorch to train the model before, tensorflow has never been installed, but if we use tensorboard, it will report an error if only tensorboard is installed. Also, note that the version to be installed should be at least version 1.14.
conda install tensorflow==1.14 will install the tensorboard

2. Tensorboard programming

from torch.utils.tensorboard import SummaryWriter
writer = SummaryWriter()
writer add_scalar(‘ Loss/train ‘, train_loss.avg, epoch)
writer.add_scalar(‘ lr ‘, lr, (‘ images’, grid, epoch)
grid = vutils.make_grid(image)
self.write.add_image (‘ images’, grid, epoch)

3. Visualize

, if done correctly, will generate a run folder under the current folder, which contains a file with many English letters.
at this point you in the terminal input tensorboard – logdir = runs will be
at this point, you can click on the url into the HTTP. But when I used it, I found that it didn’t work.
tensorboard –logdir=run absolute path, this is ok, you can try both!

NVIDIA docker failed to start normally

updated the nv driver to 450 last week, and then found that nvidia-docker could not start, error:

docker: Error response from daemon: OCI runtime create failed: container_linux.go:349: starting container process caused "process_linux.go:449: container init caused \"process_linux.go:432: running prestart hook 1 caused \\\"error running hook: exit status 1, stdout: , stderr: nvidia-container-cli: initialization error: driver error: failed to process request\\\\n\\\"\"": unknown.

USES the command:

$ nvidia-container-cli -k -d /dev/tty info

also gives an error:

-- WARNING, the following logs are for debugging purposes only --

I1001 02:01:39.488895 21811 nvc.c:281] initializing library context (version=1.0.7, build=b71f87c04b8eca8a16bf60995506c35c937347d9)
I1001 02:01:39.488944 21811 nvc.c:255] using root /
I1001 02:01:39.488952 21811 nvc.c:256] using ldcache /etc/ld.so.cache
I1001 02:01:39.488959 21811 nvc.c:257] using unprivileged user 1000:1000
W1001 02:01:39.490269 21812 nvc.c:186] failed to set inheritable capabilities
W1001 02:01:39.490334 21812 nvc.c:187] skipping kernel modules load due to failure
I1001 02:01:39.490648 21813 driver.c:133] starting driver service
E1001 02:01:39.490932 21813 driver.c:197] could not start driver service: load library failed: libcuda.so.1: cannot open shared object file: no such file or directory
I1001 02:01:39.491071 21811 driver.c:233] driver service terminated successfully
nvidia-container-cli: initialization error: driver error: failed to process request

so the corresponding version of cuda1

is upgraded

$ apt install libcuda1-450

and then back to normal

FCOS No CUDA runtime is found, using CUDA_HOME=’/usr/local/cuda-10.0′

FCOS appears No CUDA runtime is found, using CUDA_HOME=’/usr/local/cuda-10.0′

  • appear below error </ li>
    • reason for the error </ li>
    • view version </ li>
    • solution (cuda10.0 and torch did not match the 1.2.0) </ li> </ ul>

    )

    appears with the following error

    AssertionError:
    The NVIDIA driver on your system is too old (found version 10000).
    Please update your GPU driver by downloading and installing a new
    version from the URL: http://www.nvidia.com/Download/index.aspx
    Alternatively, go to: https://pytorch.org to install
    a PyTorch version that has been compiled with your version
    of the CUDA driver.

    error cause

    cuda version does not match the torch version
    . On my machine, the pytorch version is too new, while the cuda version is too old to match.
    is usually the torch version that does not fit

    view version

    NVCC -v

    # or pip3 list
    PIP list

    cuda10.0 with torch 1.3.1 mismatch </ p>

    solution (cuda10.0 and torch 1.2.0 match only)

    uninstall the original torch1.3.1
    pip3 uninstall torch
    # or
    PIP uninstall torch

    reshipment torch1.2.0
    pip3 install torch 1.2.0 torchvision </ mark> 0.4.0 -f https://download.pytorch.org/whl/torch_stable.html
    PIP install torch 1.2.0 torchvision </ mark> 0.4.0 – f https://download.pytorch.org/whl/torch_stable.html

    after checking whether torch1.2.0 has been installed successfully,
    pip3 list
    # or
    PIP list

    the final version of the cuda with torch version match go to website check can
    see pytorch website https://pytorch.org/get-started/previous-versions/ to see such a </ p>

How to use torch.sum()

torch. Sum () sums up one dimension of the input tensor data, which are divided into two forms:

1.torch.sum(input, dtype=None)
2.torch.sum(input, list: dim, bool: keepdim=False, dtype=None) → Tensor
 
input:输入一个tensor
dim:要求和的维度,可以是一个列表
keepdim:求和之后这个dim的元素个数为1,所以要被去掉,如果要保留这个维度,则应当keepdim=True
#If keepdim is True, the output tensor is of the same size as input except in the dimension(s) dim where it is of size 1. 

example:

a = torch.ones((2, 3))
print(a):
tensor([[1, 1, 1],
 		[1, 1, 1]])

a1 =  torch.sum(a)
a2 =  torch.sum(a, dim=0)
a3 =  torch.sum(a, dim=1)

print(a)
print(a1)
print(a2)

output:

tensor(6.)
tensor([2., 2., 2.])
tensor([3., 3.])

if you add keepdim=True, the dim dimension is kept from being squeezed

a1 =  torch.sum(a, dim=(0, 1), keepdim=True)
a2 =  torch.sum(a, dim=(0, ), keepdim=True)
a3 =  torch.sum(a, dim=(1, ), keepdim=True)

output:

tensor([[6.]])
tensor([[2., 2., 2.]])
tensor([[3., 3.]])

</ div>

Solution to unbalanced load of multiple cards (GPU’s 0 card is too high) in Python model training (simple and effective)

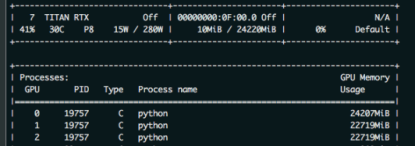
this paper mainly solves the problem that zero card of pytorch GPU occupies more video memory than other CARDS during model training. As shown in the figure below: the native GPU card is TITAN RTX, video memory is 24220M, batch_size = 9, and three CARDS are used. The 0th card video memory occupies 24207M. At this time, it just starts to run, and only a small amount of data is transferred to the video card. If the data is in multiple points, the video memory of the 0 card must burst. The reason why 0 card has higher video memory: During the back propagation of the network, the calculated gradient of loss is calculated on 0 card by default. So will be more than other graphics card some video memory, how much more specific, mainly to see the structure of the network.

as a result, in order to prevent training was interrupted due to out of memory. The foolhardy option is to set batch_size to 6, or 2 pieces of data per card.
batch_size = 6, the other the same, as shown in the figure below

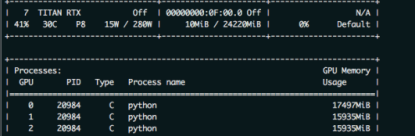
have found the problem?Video memory USES only 1,2 CARDS and less than 16 gigabytes of memory. The batch_size is sacrificed because the 0 card might exceed a little bit of video memory.
so there’s no more elegant way?The answer is yes. That is borrowed from the transformer – xl BalancedDataParallel used in the class. The code is as follows (source) :

import torch
from torch.nn.parallel.data_parallel import DataParallel
from torch.nn.parallel.parallel_apply import parallel_apply
from torch.nn.parallel._functions import Scatter


def scatter(inputs, target_gpus, chunk_sizes, dim=0):
    r"""
    Slices tensors into approximately equal chunks and
    distributes them across given GPUs. Duplicates
    references to objects that are not tensors.
    """

    def scatter_map(obj):
        if isinstance(obj, torch.Tensor):
            try:
                return Scatter.apply(target_gpus, chunk_sizes, dim, obj)
            except Exception:
                print('obj', obj.size())
                print('dim', dim)
                print('chunk_sizes', chunk_sizes)
                quit()
        if isinstance(obj, tuple) and len(obj) > 0:
            return list(zip(*map(scatter_map, obj)))
        if isinstance(obj, list) and len(obj) > 0:
            return list(map(list, zip(*map(scatter_map, obj))))
        if isinstance(obj, dict) and len(obj) > 0:
            return list(map(type(obj), zip(*map(scatter_map, obj.items()))))
        return [obj for targets in target_gpus]

    # After scatter_map is called, a scatter_map cell will exist. This cell
    # has a reference to the actual function scatter_map, which has references
    # to a closure that has a reference to the scatter_map cell (because the
    # fn is recursive). To avoid this reference cycle, we set the function to
    # None, clearing the cell
    try:
        return scatter_map(inputs)
    finally:
        scatter_map = None


def scatter_kwargs(inputs, kwargs, target_gpus, chunk_sizes, dim=0):
    """Scatter with support for kwargs dictionary"""
    inputs = scatter(inputs, target_gpus, chunk_sizes, dim) if inputs else []
    kwargs = scatter(kwargs, target_gpus, chunk_sizes, dim) if kwargs else []
    if len(inputs) < len(kwargs):
        inputs.extend([() for _ in range(len(kwargs) - len(inputs))])
    elif len(kwargs) < len(inputs):
        kwargs.extend([{} for _ in range(len(inputs) - len(kwargs))])
    inputs = tuple(inputs)
    kwargs = tuple(kwargs)
    return inputs, kwargs


class BalancedDataParallel(DataParallel):

    def __init__(self, gpu0_bsz, *args, **kwargs):
        self.gpu0_bsz = gpu0_bsz
        super().__init__(*args, **kwargs)

    def forward(self, *inputs, **kwargs):
        if not self.device_ids:
            return self.module(*inputs, **kwargs)
        if self.gpu0_bsz == 0:
            device_ids = self.device_ids[1:]
        else:
            device_ids = self.device_ids
        inputs, kwargs = self.scatter(inputs, kwargs, device_ids)
        if len(self.device_ids) == 1:
            return self.module(*inputs[0], **kwargs[0])
        replicas = self.replicate(self.module, self.device_ids)
        if self.gpu0_bsz == 0:
            replicas = replicas[1:]
        outputs = self.parallel_apply(replicas, device_ids, inputs, kwargs)
        return self.gather(outputs, self.output_device)

    def parallel_apply(self, replicas, device_ids, inputs, kwargs):
        return parallel_apply(replicas, inputs, kwargs, device_ids)

    def scatter(self, inputs, kwargs, device_ids):
        bsz = inputs[0].size(self.dim)
        num_dev = len(self.device_ids)
        gpu0_bsz = self.gpu0_bsz
        bsz_unit = (bsz - gpu0_bsz) // (num_dev - 1)
        if gpu0_bsz < bsz_unit:
            chunk_sizes = [gpu0_bsz] + [bsz_unit] * (num_dev - 1)
            delta = bsz - sum(chunk_sizes)
            for i in range(delta):
                chunk_sizes[i + 1] += 1
            if gpu0_bsz == 0:
                chunk_sizes = chunk_sizes[1:]
        else:
            return super().scatter(inputs, kwargs, device_ids)
        return scatter_kwargs(inputs, kwargs, device_ids, chunk_sizes, dim=self.dim)

you can see, in the code BalancedDataParallel inherited the torch. The nn. DataParallel, through the custom after 0, the size of the card batch_size gpu0_bsz, namely 0 card a bit less data. Balance the memory usage of 0 CARDS with other CARDS. The invocation code is as follows:

import BalancedDataParallel

 if n_gpu > 1:
    model = BalancedDataParallel(gpu0_bsz=2, model, dim=0).to(device)
    # model = torch.nn.DataParallel(model)

gpu0_bsz: 0 card batch_size of GPU;
model: model;
dim: batch dimension

as a result, we might as well just batch_size set to 8, namely gpu0_bsz = 2 try, the results are as follows:

the batch_size from 6 to 8 of success, because 0 put a batch less, therefore, will be smaller than the other CARDS. But sacrificing the video memory of one card to the video memory of others, eventually increasing the batch_size, is still available. The advantages of this method are even more obvious when the number of CARDS is large.
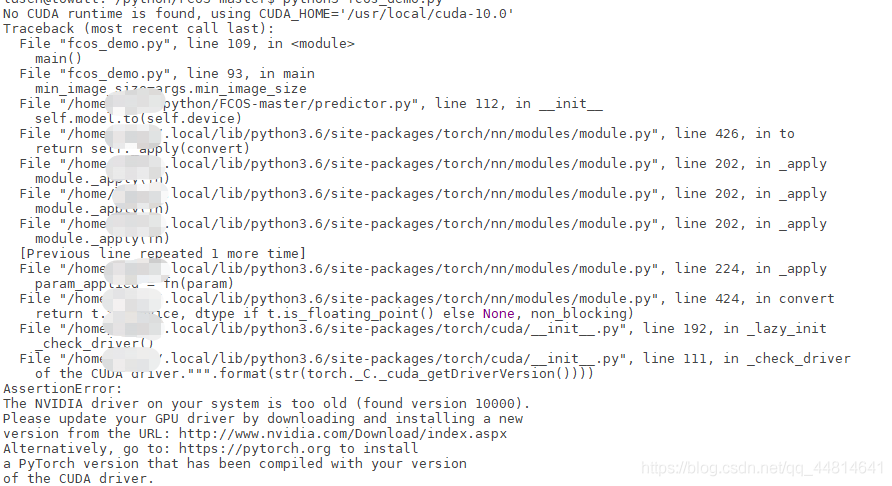