Tag Archives: The server

About Using SSH connection for Linux server

About using SSH to connect to the LIUNX server

Step 1

Generate the key on the server side

ssh-keygen -t rsa
Step 2

Add the public key to the server authorization file

id_rsa.pub >> authorized_keys
Step 3
cat id_rsa

Copy the private key to window, create a new text document and paste it. Use putty-gen to generate the private key *.ppk for putty

Step 4

Connection -> when using PuTTY Connection; SSH -> Auth Click Browse to select the generated *.ppk and then click Open

Import / export. SQL file / gzip file for MySQL under Linux

    ready. SQL file and upload to server login server MySQL import. SQL file
If you need to create the database for the entire database file you don’t need to create the database for the table file
Source *.sql //.sql file path
 
3. Export. SQL file
Export table structure
It’s going to be in the data directory
cd /mysql/data/
. /bin/mysqldump -uroot -p -d newdb > Newdb.sql // newdb database name
// Enter the password
 
Export data and table structures
It’s going to be in the data directory
cd /mysql/bin/
. /bin/mysqldump -uroot -p newdb > Newdb.sql // newdb database name
// Enter the password
 

    exports the gzip file
It’s going to be in the data directory
. /bin/mysqldump -uroot -p –default-character-set=utf8 xw_taes | gzip > /home/xw_taes_1.sql.gz
// Enter the password
 

    import gzip
In any directory
gzip -d < /home/xw_taes_1.sql.gz | mysql -uroot -p xw_taes_1
// Enter the password
Xw_taes_1 is the name of the database to import
There is no meeting

 
Note: Adding plaintext password directly will report an error

Action RPG demo source code (VC + OpenGL)

This demo was written last year, the program and source code was put in the VR forum (http://www.vrforum.cn) “OpenGL technology discussion area” in the top post, but for a long time the server deleted it, there are a lot of comrades to me code, so I now send the code for everyone to download.
It mainly demonstrates the call of MD2 file, the practice of character shadow, how to convert screen coordinates into 3D scene coordinates, and the control of characters.
is using old technology, hehe!
Press F1 to view help at run time.


Source code download:
arpg.part1.rar
arpg.part2.rar

Installing rabbitmq on alicloud server

1. Install Erlang
Because RabbitMQ is developed in the Erlang language, you install Erlang first

yum install erlang

Download the RPM package

 wget http://www.rabbitmq.com/releases/rabbitmq-server/v3.6.15/rabbitmq-server-3.6.15-1.el7.noarch.rpm

3. Install after downloading

yum install rabbitmq-server-3.6.15-1.el7.noarch.rpm

4. Restart the service after installation

service rabbitmq-server start

5. Check service status

service rabbitmq-server status

6. Install the plug-in

/sbin/rabbitmq-plugins enable rabbitmq_management 

Restart the service

service rabbitmq-server restart

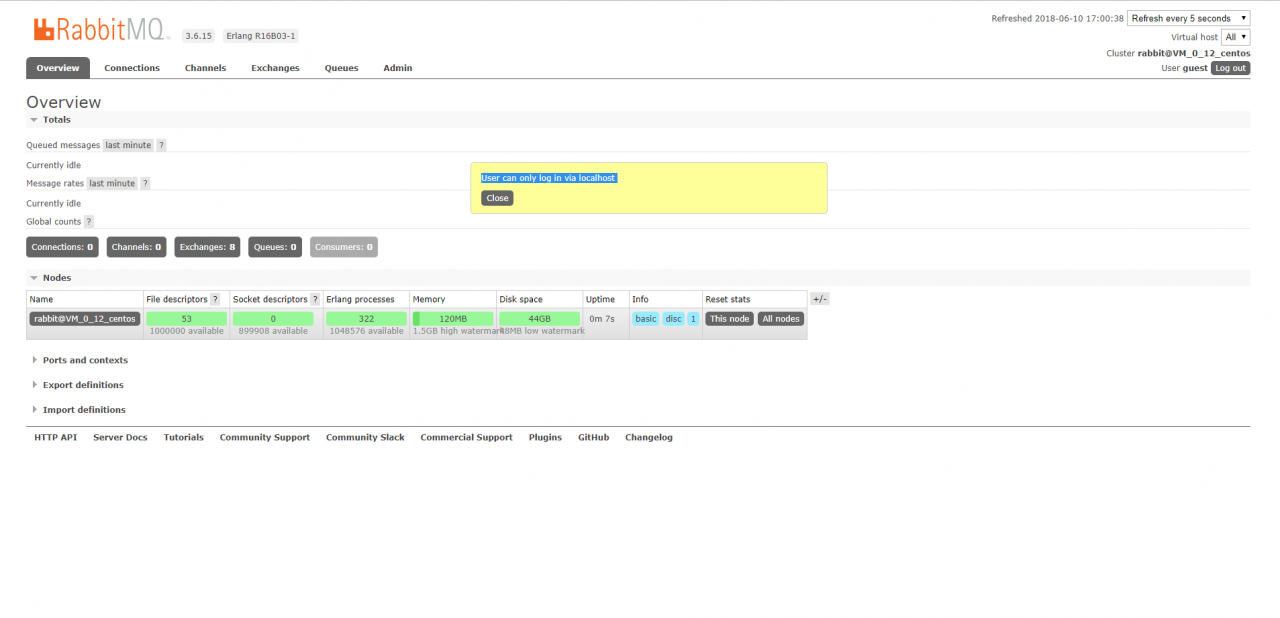
At this point, you can go to http://ip:15672 to access the page. The default password is “guest/guest”.
However, starting with version 3.3.0, access other than using guest/guest to log in to localhost is prohibited. The solution is to find
Rabbitmq_server-3.6.15 /ebin/ Rabbitmq_server-3.6.15 /ebin/ Rabbit.app

{loopback_users, [<<"guest">>]},

Is amended as:

{loopback_users, []},

Then restart it.
7. Access

Error installing network file system: Mount error 20 = not a directory

After upgrading to Fedora 9, I found it impossible to mount the Samba Shared file system as before.

when I use the following command:

$mount-t cifs //192.168.1.2/ Samba/MNT/Samba-o Username =test,password=test

mount samba share file gets the following error:

mount error 20 = Not a directory

Refer to the mount.cifs(8) manual page (e.g.man mount.cifs)

a Google search revealed that the problem could be due to the cifs file system not being compatible with older samba Shared servers, so either upgrading the samba server program or restricting the cifs would be required to fix the problem. According to the online advice, you can use:

$echo 0 > /proc/fs/cifs/LinuxExtensionsEnabled

modifies the cifs option to disable cifs extensions, and then mount is no problem.

but it was a bit cumbersome to do this every time I restarted, so I changed my system startup script so that I could put these mounts into my fstab and let the system mount automatically every time it was started. The methods are as follows:

modify /etc/init.d/netfs to add a line like the + sign in start as follows:

Case “$1” in the start)

+/sbin/modprobe cifs & amp; & echo 0 > /proc/fs/cifs/LinuxExtensionsEnabled

first execute “/sbin/modprobecifs” to load the cifs module, otherwise the file we want to modify LinuxExtensionsEnabled may not exist yet, and the modification will fail. Since rc*.d/S**netfs at different boot levels are linked to /etc/init.d/netfs, this change takes effect for all boot levels. Of course, if your system is not such a link, it is the same to modify the corresponding file.

there will be no problem installing the samba Shared file system after the restart.

Event id = 4321 error on server

Source: NTEBT
E ID:4321
 
The name “the CCDI: 1 d” cannot be registered to the IP address 10.64.50.8 interface. A machine with an IP address of 10.64.50.1 does not allow this name to be used by this machine.
For more information, please refer to the help and support center at http://go.microsoft.com/fwlink/events.asp.
 
Solution 1: Error reporting: NetBT4321 Processing method: NBtstat -a IP find the same name of the user and group, rename. Solution 2: Fix: Network connection →TCP/IP→WINS→ disable NetBIOS
 
or
Msconfig
and then turn off the TCP/IP NETBIOS help in the service entry

FileZilla 425 Can’t open data connection

Yesterday found that the company server being poisoned half a month, abnormal reminding email is not in their hand, alive when the chicken, half month is normal business running, if it weren’t for yesterday exploded with CPU can’t found dead, snapshot backup after reshipment system didn’t even find FTP death, active passive automatic all tried and can access to the directory but unable to traverse the file, is the problem of port:
First go to the server to open the firewall 80 (HTTP), 3306 (SQL), 443 (HTTPS), 21 (FTP) these open ports are open, at this time the website can normally access, but FTP still can not get the file as usual;
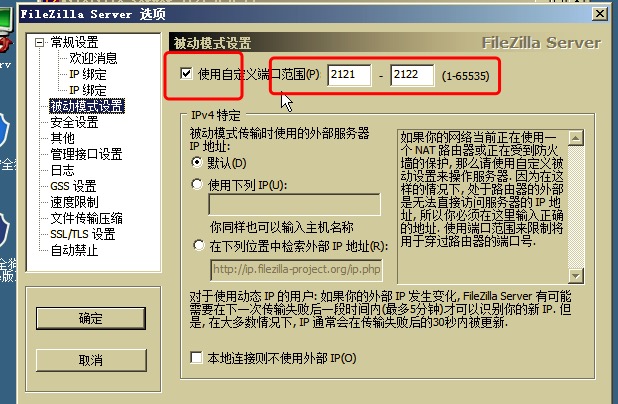
The server is ftPserV, but it has been changed to passive and port:
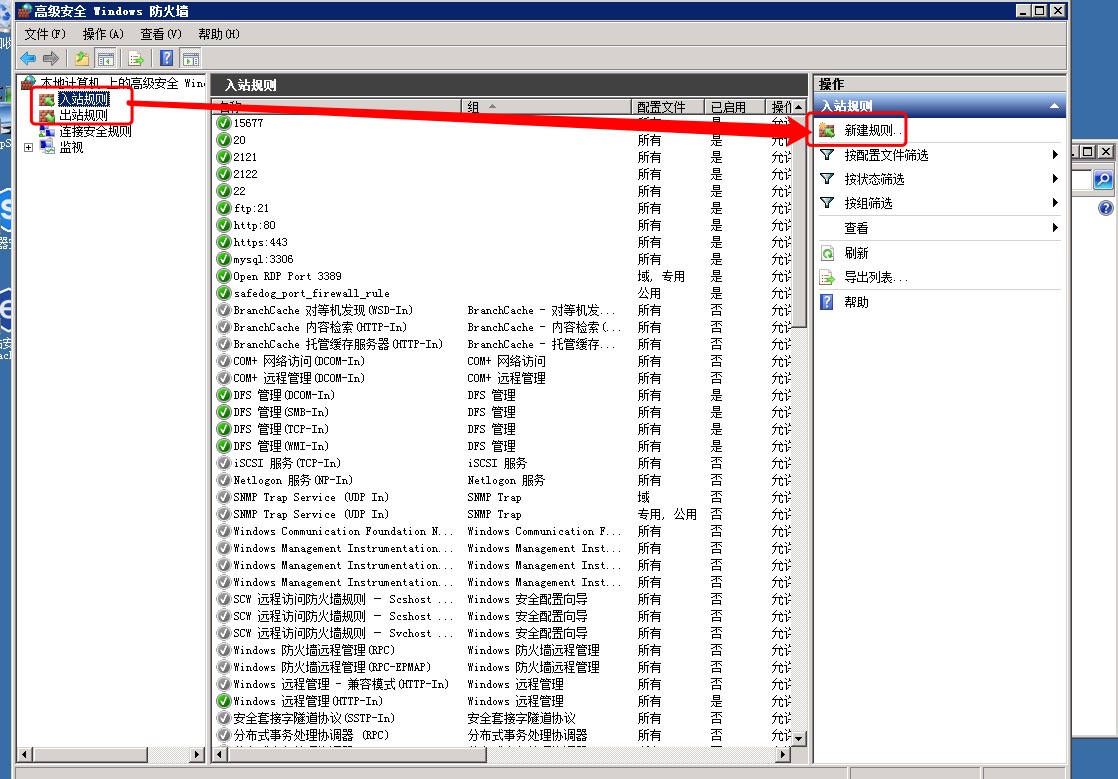
Then add these two ports to your firewall (note that both inbound and outbound rules are added) :

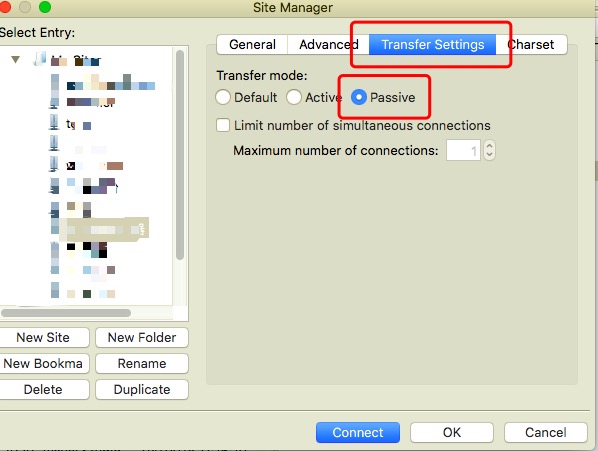
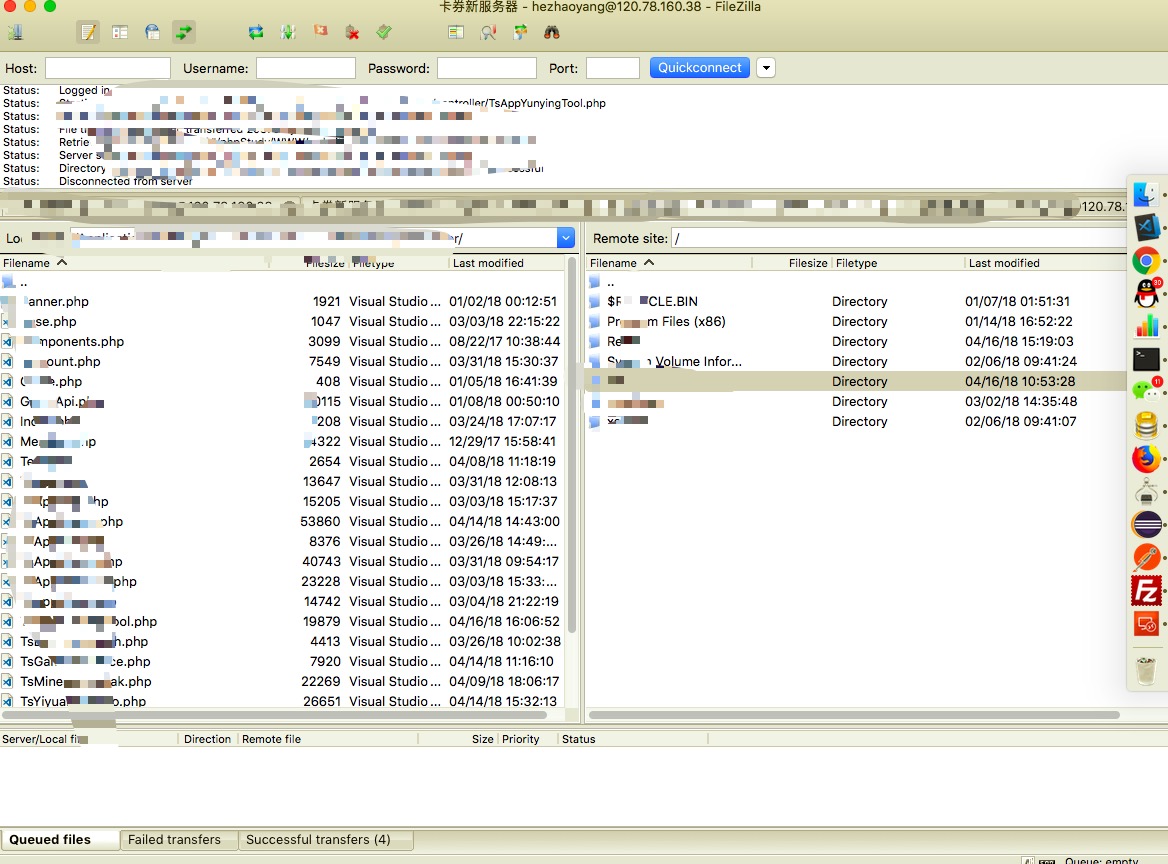
Filezilla for the client, change the mode to passive mode:

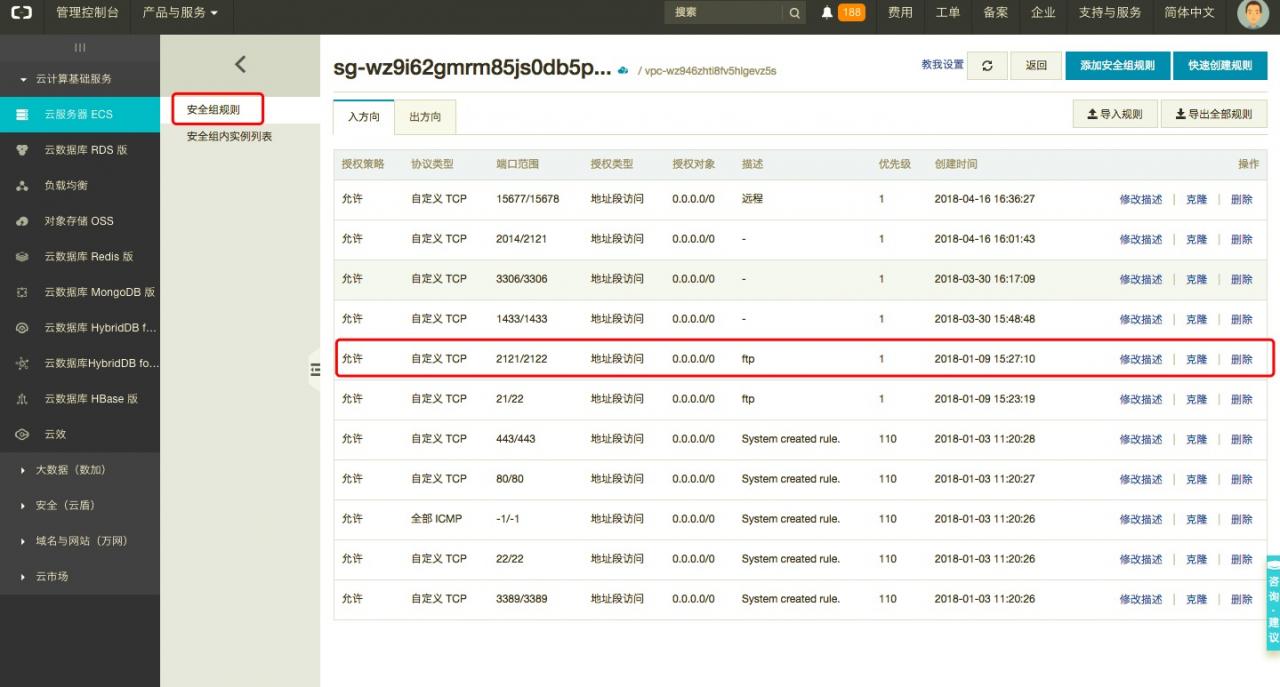
It turns out that it still doesn’t work. It turns out that the security group of Aliyun also needs to match these ports (both entering and leaving should be matched) :

At this point, FTP is perfectly linked.

node.js Server MySQL database connection timeout (error: connect etimeout)

Node. js server mysql database connection timeout problem
Sometimes connection timeouts occur while the Node server is connecting to the database. This Error is Error: Connect ETIMEDOUT. The error position in the code is line 421 to 433 of mysql’s Connection.js file:

Connection.prototype._handleConnectTimeout = function() {
  if (this._socket) {
    this._socket.setTimeout(0);
    this._socket.destroy();
  }

  var err = new Error('connect ETIMEDOUT');
  err.errorno = 'ETIMEDOUT';
  err.code = 'ETIMEDOUT';
  err.syscall = 'connect';

  this._handleNetworkError(err);
};

This error is literally a connection timeout, and then my error is due to the database connection problem, when creating the database should carefully compare the parameters of the problem, like me:
when creating the database connection pool:

pool = mysql.createPool({  
        host: "127.0.0.1",
        user: "user",
        password: "",
        database: "nodejs",
        port: 3306,
    });

The header information in the database is:

Source Server         : localhost
Source Server Version : 50624
Source Host           : localhost:3306
Source Database       : nodejs

Target Server Type    : MYSQL
Target Server Version : 50624
File Encoding         : 65001

It can be seen that there is a problem with the connection address of the server, so the connection was successful after changing to localhost

Syntax error near unexpected token `newline’script cannot be executed

Problem description
The run.sh script is executed to report an error with the following message:

/data/app/information-provider
: No such file or directory
: command not found
./run.sh: line 4: syntax error near unexpected token `newline'
'/run.sh: line 4: `case "$1" in  

Problem analysis
Look for the script. The script is fine, so I wonder if the file format is incorrect.
view the file with the following command,

cat -A run.sh

Find that in run.sh, the newline ends with ^M$

server="$( dirname "${BASH_SOURCE[0]}" )" && pwd ^M$
cd $server^M$
^M$
case "$1" in  ^M$
  ^M$
  ...

The solution
Execute the following statement to convert run.sh to a line break of $in the Linux environment

dos2unix run.sh

View the conversion file through Cat-a run.sh as:

server="$( dirname "${BASH_SOURCE[0]}" )" && pwd $
cd $server$
$
case "$1" in  $
  $

fatal error: Python.h: No such file or directory

Error:
system centos7.4 64-bit
python 2.7.5
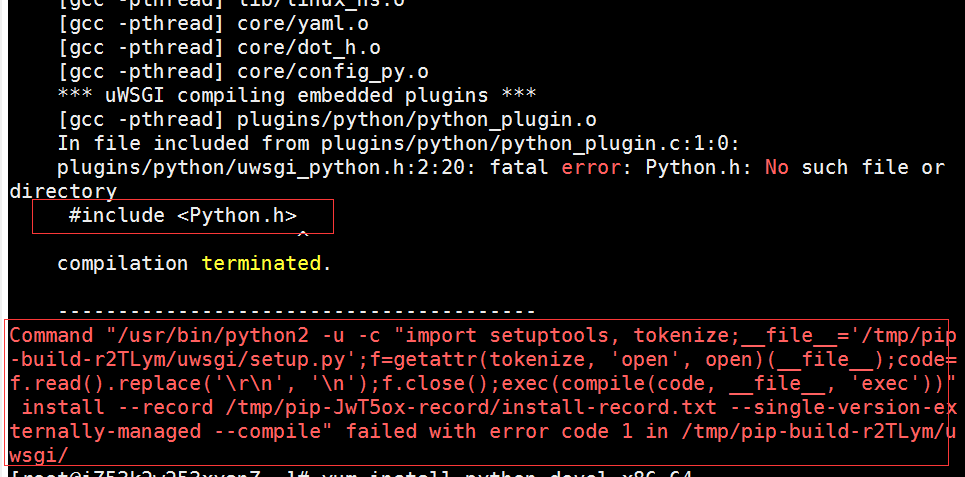
plugins/python/uwsgi_python.h:2:20: fatal error: Python.h: No such file or directory
#include < Python.h>
Command “/usr/ bin/python2-u-c” import setuptools, tokenize;
Command “/usr/ bin/python2-u-c” import setuptools, tokenize; The file = ‘/ TMP/PIP – build – r2TLym uwsgi/setup. Py “; F = getattr (tokenize, open, open) (file); Code = f.r ead (). The replace (‘ \ r \ n ‘, ‘\ n’); f.close(); exec(compile(code, file, ‘exec’)) “install –record/TMP/pip-jwt5ox-record /install-record. TXT –single-version –compile” failed with error code 1 in/TMP/pip-build-r2tlym /uwsgi/

Check the solution:
yum install python-devel.x86_64
Then run the installation and fix the problem.

Error 1045 (28000) access denied for user ‘root’ @’localhost ‘appears in MySQL under Windows system

Error 1045(28000) Access Denied for user ‘root’@’localhost’

From http://zxy5241.spaces.live.com/blog/cns! 7682A3008CFA2BB0! 361.entry
When installing mysql database in Windows operating system, you encounter Error 1045(28000) Access Denied for user ‘root’@’localhost’, you need to reset the password.
the specific method is:
1. First, find my. Ini configuration file in the installation directory, open the configuration file, find the line [mysqld], add skip-gran-tables below and save the file, and restart mysql dynamic service.
2. Then execute mysql -u root mysql
mysql> update user set password=password(‘newpassword’) where user=’root’;
mysql> Flush privileges;
where newpassword is root’s newpassword. 3. Remove the line that added to my. Ini configuration file just now, and finally restart mysql.

After installing mysql or uninstalling the downloaded free version, the default is no my.ini file.
. However, there are several similar files, such as [code] my-small-ini, my-media.ini, my-large. Ini, my-huge. Ini, [/code].
these files are the different configuration information recommended by mysql for different applications; But these configurations will only be applied if you put them in my. Ini.
where:
1, my-small. Ini is designed for small database. This model should not be used for databases that contain common items.
2, my-media.ini is designed for medium-sized databases. If you are using RHEL in the enterprise, you will have significantly more physical memory than the minimum RAM requirements for this operating system (256MB). As you can see, if you have that much RAM memory available, you can naturally run other services on the same machine.
3, my-larg.ini is designed for use exclusively with a SQL database. Since it can use up to 512MB of memory for the database, at least 1GB of RAM will be required on this type of system so that it can handle both operating system and database applications.
4, my-huge. Ini is designed for databases in enterprises. Such a database would require a dedicated server and 1GB or more of RAM. These choices are highly dependent on the amount of memory, the speed of the computer, the size of the database details, the number of users accessing the database, and the number of users loading and accessing data into the database. The performance of the database may change as the number of databases and users increases.

according to their own situation, select a file configuration copy to my. Ini file, of course, you need to create your own, just create a new file, and then copy into the configuration information.