Tag Archives: solution

The local program cannot access the test environment redis cluster through public IP_ compromise

First, scene description

1. Test environment installation redis6, cluster deployment, three master and three slave. That is to achieve high concurrency, high availability, high security.

2. Redis creates clusters through bind intranet IP.

3. The local and test environment are not in the same LAN, and there is no VPN, so it is impossible to access redis through the test intranet IP.

4. Note: through the redis client, using the public IP + port, you can access redis.

Problem: spring program can’t access redis correctly through IP + port of public network.

Reason: when spring accesses the redis cluster, it first obtains the intranet IP and ports of all nodes in the redis cluster through the configured public IP and ports, and then the program finally accesses redis through the intranet IP and ports.

Second, the solution

1. Install the redis singleton on the test server.

2. Configuration file redis.conf Set daemonize to yes, that is to realize the background startup of redis.

3. In the test environment network security group, add the white list of local environment public IP, open port 6379.

4. Modify the local configuration file in spring program to access redis configuration mode. In this way, all technicians can connect to the test environment redis locally, and each technology does not need to open the redis service locally.

spring:
  redis:
    host: 47.112.108.1
    port: 6379
    timeout: 5000ms
  pool:
    max-active: 8
    min-idle: 0
    max-idle: 8
    max-wait: -1


System architecture and product design of resource scheduling platform

Resource scheduling system, using spring boot to build system framework, spring cloud to achieve governance among multiple services, Eureka to achieve micro service registration and discovery, spring Data realizes the persistent management of all kinds of data; uses multi thread concurrent computing to improve system throughput and efficiency; uses thread asynchronous processing of ancillary business; uses asynchronous monitoring to reduce coupling; uses redis cache technology to reduce database pressure and improve system performance and response rate.

        Based on distributed job, multithread computing and asynchronous monitoring, it realizes the automatic scheduling of resources needed by business, the timing collection of task progress, the calculation of processing rate, the effective prediction of task end time, and the monitoring of resource usage and progress; it uses image to display resource usage to realize real-time monitoring of resources; it has a comprehensive resource usage monitoring mechanism and complete monitoring system Good server heartbeat detection mechanism, and support email early warning.


Can mybatis prevent SQL injection

1. Concept: what is SQL injection

sql injection : is a code injection technology, used to attack data-driven applications, malicious SQL statements are inserted into the executed entity fields.

It’s a common attack. If the attacker enters some special SQL fragments (such as “or 1 = 1”) on the form information or URL of the interface, it is possible to invade the application with incomplete parameter verification. Therefore, some work should be done in application development to prevent SQL injection. In some applications with high security requirements (such as banking software), SQL statements are usually replaced by stored procedures to prevent SQL injection. It’s a very safe way to deal with it.

answer: mybatis can prevent SQL injection, please continue to read.

2. Implementation: mybatis prevents SQL injection

<select id="selectByNameAndPassword" parameterType="java.util.Map" resultMap="BaseResultMap">
  select id, username, password, role
     from user
        where username = #{username,jdbcType=VARCHAR}
        and password = #{password,jdbcType=VARCHAR}
</select>
<select id="selectByNameAndPassword" parameterType="java.util.Map" resultMap="BaseResultMap">
    select id, username, password, role
        from user
        where username = ${username,jdbcType=VARCHAR}
        and password = ${password,jdbcType=VARCHAR}
</select>

the difference between # and $ in mybatis:

1. # will treat all incoming parameters as a string, and will automatically add a double quotation mark to it.

For example: where user name = # {user name}, if the value passed in is 111, then the value parsed into SQL is where user name = # {user name}. If the value passed in is ID, then the value parsed into SQL is where user name = # {user name}

2. $ directly displays and generates the incoming data in SQL.

For example: where user name = ${user name}, if the value passed in is 111, then the value parsed into SQL is where user name = 111

If the passed in value is; drop table user;, then the parsed SQL is: select id, username, password, role from user where username =; drop table user

3. The # method can prevent SQL injection to a great extent, while the $ method cannot prevent SQL injection.

4. The $ method is generally used to pass in database objects, such as table names

5. It is recommended to use #, to avoid using $. If you have to use parameters like “${XXX}”, you need to do a good job in filtering to prevent SQL injection attacks.

6. In mybatis, parameters with “${XXX}” format will directly participate in SQL compilation, so injection attack cannot be avoided. But when it comes to dynamic table names and column names, we can only use parameter formats like “${XXX}”. Therefore, such parameters need to be handled manually in the code to prevent injection.

[Conclusion] the format of “# {XXX}” should be used as much as possible when writing the mapping statement of mybatis. If you have to use parameters like “${XXX}”, you should do a good job of filtering manually to prevent SQL injection attacks.

3. Principle analysis: how does mybatis prevent SQL injection

Mybatis framework is a semi-automatic persistence layer framework , SQL statements need to be written manually by developers, at this time, SQL injection must be prevented. In fact, mybatis SQL has the function of “ input + output “, which is similar to the function structure. Please refer to the above two examples. Among them, parametertype indicates the input parameter type and resulttype indicates the output parameter type. In retrospect, if you want to prevent SQL injection, you have to do something about the input parameters. In the above code, #, is the part where input parameters are spliced in SQL. After the parameters are passed in, the executed SQL statement will be printed out, as follows:

select id, username, password, role from user where username=?and password=?

That is, no matter what kind of parameters you enter, the printed SQL will look like the above. Reason: mybatis enables the precompile function. Before SQL execution, SQL will be sent to the database for compilation. During execution, the compiled SQL will be used directly, and the parameter can replace the “?” in the place holder. Because SQL injection can only work on the compilation process, this way can avoid SQL injection attack.

[underlying implementation principle] how does mybatis precompile SQL?In fact, at the bottom of the framework, it is the Preparedstatement class in JDBC that works. Preparedstatement is a subclass of statement that we are very familiar with. Its objects contain compiled SQL statements. This “ready” approach not only improves security, but also improves efficiency when executing the same SQL multiple times. The reason is that the SQL has been compiled and there is no need to compile it again.

//Safe, pre-compiled
Connection conn = getConn();//Get the connection
String sql = "select id, username, password, role from user where id=?" ; // the statement will be pre-compiled before executing sql
PreparedStatement pstmt = conn.prepareStatement(sql); 
pstmt.setString(1, id); 
ResultSet rs=pstmt.executeUpdate(); 
......

//Unsafe, not pre-compiled
private String getNameByUserId(String userId) {
    Connection conn = getConn();//connected
    String sql = "select id,username,password,role from user where id=" + id;
    //When the id parameter is "3;drop table user;", the executed sql statement is as follows:
    //select id,username,password,role from user where id=3; drop table user;  
    PreparedStatement pstmt =  conn.prepareStatement(sql);
    ResultSet rs=pstmt.executeUpdate();
    ......
}

Conclusion

#{}: equivalent to Preparedstatement in JDBC

${}: is the value of the output variable

In short: # {} needs to be precompiled, which is safe; ${} only takes variable values without precompiling, which is not safe, and there is a risk of SQL injection attack.

If ${} is used after the order by statement, there is a risk of SQL injection when nothing is done. Need to develop this code level parameter verification, filtering parameters, parameter length, whether in the expected set, whether contains special or database keywords.
Cache penetration, cache breakdown and cache avalanche solutions

1. Preface

Cache is used in program design. The front-end sends data access request to the background

case 1: first, the data is retrieved from the cache and returned to the front end directly

case 2: if the data is not retrieved from the cache, the data will be retrieved from the database. After the data is retrieved, the cache will be updated first and then returned to the front end

case 3: if it is not found in the database, it will be returned to null directly.

2.Cache penetration [penetration cache, database, no data]

definition: cache penetration refers to the fact that there is no data in the cache and database, but the user constantly initiates requests, such as data with ID of “- 1” or data with ID of extra large and nonexistent. At this time, the user is likely to be an attacker, and the attack will lead to excessive pressure on the database.

solutions:

1) The verification is added in the interface layer. For example: ① user authentication verification, ② ID basic verification, ID & lt; = 0 direct interception and return.

2) Use temporary caching mechanism. If neither the cache nor the database can be retrieved, the key value pair can be written as key null, and a shorter cache validity time can be set (for example, 30 seconds. If the cache validity time is set too long, it may lead to the failure of normal use). In this way, users can be prevented from repeatedly using the same ID to brute force query attacks.

3.Cache breakdown [breakdown cache, can be found in database]

definition: cache breakdown refers to the fact that there is no data in the cache and there is data in the database (generally, the cache time is expired). At this time, because there are too many concurrent users, they can not read the data in the cache at the same time, and they go to the database to get the data at the same time, resulting in an instant increase in the pressure on the database.

solutions:

1) Hotspot data is set to never expire.

2) Add mutex lock to synchronize query operation. The reference code is as follows.

static Lock reenLock = new ReentrantLock();
   public List<String> getData() throws InterruptedException {
       List<String> result = new ArrayList<String>();
     
       // Fetching from the cache
       result = getDataFromCache();

       if (result.isEmpty()) {
           if (reenLock.tryLock()) {
               try {
                   System.out.println("Get the lock, fetch the database from the DB and write it to the cache");
                   // fetch data from database
                   result = getDataFromDB();

                   // Write the query data to the cache
                   setDataToCache(result);

               } finally {
                   reenLock.unlock();// Release the lock
               }

           } else {
               result = getDataFromCache();// check the cache again first
               
               if (result.isEmpty()) {
                   System.out.println("No lock, no data in cache, waiting...") ;
                   Thread.sleep(100);//wait
                   return getData();//retry
               }

           }
       }

       return result;

   }

Note:

1) If there is data in the cache, the result will be returned directly.

2) If there is no data in the cache, get the lock and get the data from the database. Before releasing the lock, other parallel threads will wait for 100ms, and then go to the cache again to get the data. In this way, we can prevent the database from repeatedly fetching data and updating data in the cache.

3) Of course, this is a simplified process. In theory, it would be better if the lock could be added according to the key value. That is, thread a’s fetching key1 data from the database does not prevent thread B’s fetching key2 data. The above code obviously can’t do this. scheme: lock can be fine-grained to key.

4、 Cache avalanche

definition: cache avalanche refers to the phenomenon that a large amount of data in the cache is due to the expiration time, and the amount of query data is huge, which leads to too much pressure on the database and even down the machine.

different from “cache breakdown”: cache breakdown refers to the concurrent query of the same data; cache avalanche refers to the fact that different data have basically expired at the same time, and many data cannot be found in the cache, so they turn to query the database.

solutions:

1) When saving data to redis in batches, the failure time of each key is set to a random value, so as to ensure that the data will not fail in a large area at the same time.

setRedis(Key,value,time + Math.random () * 10000);

2) If redis is a cluster deployment, the hotspot data can be evenly distributed in different redis databases to avoid the problem of all failure.

3) Hotspot data settings will never expire. If there is an update operation, the cache can be updated.

Successful cases of redis distributed lock

1. Custom distributed lock tool class

package com.cache.redis.demo.util;

import org.apache.commons.lang.time.DateFormatUtils;
import org.slf4j.Logger;
import org.slf4j.LoggerFactory;
import org.springframework.data.redis.connection.RedisStringCommands;
import org.springframework.data.redis.connection.ReturnType;
import org.springframework.data.redis.core.RedisCallback;
import org.springframework.data.redis.core.RedisTemplate;
import org.springframework.data.redis.core.types.Expiration;

import java.nio.charset.StandardCharsets;
import java.util.HashMap;
import java.util.Map;
import java.util.UUID;

/**
 * redisImplementing distributed locks
 * */
public class RedisLockHelper {

    private static final Logger log = LoggerFactory.getLogger(RedisLockHelper.class);

    /**
     * Default interval for lock acquisition by rotation, in milliseconds
     */
    private static final int DEFAULT_ACQUIRE_RESOLUTION_MILLIS = 100;

    private static final String UNLOCK_LUA;

    static {
        StringBuilder sb = new StringBuilder();
        sb.append("if redis.call(\"get\",KEYS[1]) == ARGV[1] ");
        sb.append("then ");
        sb.append("    return redis.call(\"del\",KEYS[1]) ");
        sb.append("else ");
        sb.append("    return 0 ");
        sb.append("end ");
        UNLOCK_LUA = sb.toString();
    }

    private RedisTemplate redisTemplate;

    private final ThreadLocal<Map<String, LockVO&>&> lockMap = new ThreadLocal<&>();

    public RedisLockHelper(RedisTemplate redisTemplate) {
        this.redisTemplate = redisTemplate;
    }

    /**
     * Get the lock and wait if it is not acquired
     *
     * @param key redis key
     * @param expire lock expiration time, in seconds
     */
    public void lock(final String key, long expire) {
        try {
            acquireLock(key, expire, -1);
        } catch (Exception e) {
            throw new RuntimeException("acquire lock exception", e);
        }
    }

    /**
     * If the lock is not acquired within the specified time, false is returned. otherwise, true is returned.
     *
     * @param key redis key
     * @param expire lock expiration time, in seconds
     * @param acquireTimeout The lock timeout period, -1 means never, in seconds.
     */
    public boolean lock(final String key, long expire, long acquireTimeout) throws RuntimeException {
        try {
            return acquireLock(key, expire, acquireTimeout);
        } catch (Exception e) {
            throw new RuntimeException("acquire lock exception", e);
        }
    }

    /**
     * 
     *
     * @param key redis key
     */
    public void unlock(String key) {
        try {
            release(key);
        } catch (Exception e) {
            throw new RuntimeException("release lock exception", e);
        }
    }


    private boolean acquireLock(String key, long expire, long acquireTimeout) throws InterruptedException {
        //If it was previously fetched and did not time out, then return the fetch success
        boolean acquired = acquired(key);
        if (acquired) {
            return true;
        }

        long acquireTime = acquireTimeout == -1 ?-1 : acquireTimeout * 1000 + System.currentTimeMillis();
        String currentTimeStr = DateFormatUtils.format(System.currentTimeMillis(),"yyyy-MM-dd HH:mm:ss.SSS");
        String acquireTimeStr = DateFormatUtils.format(acquireTime,"yyyy-MM-dd HH:mm:ss.SSS");
        log.info("Current time: {}, Timeout time.{}",currentTimeStr,acquireTimeStr);


        //The same process, for the same key lock, only allows the first one to try to get it.
        synchronized (key.intern()) {
            String lockId = UUID.randomUUID().toString();
            do {
                long before = System.currentTimeMillis();

                boolean hasLock = tryLock(key, expire, lockId);

                //Acquire lock successfully
                if (hasLock) {
                    long after = System.currentTimeMillis();
                    Map<String, LockVO&> map = lockMap.get();
                    if (map == null) {
                        map = new HashMap<&>(2);
                        lockMap.set(map);
                    }
                    map.put(key, new LockVO(1, lockId, expire * 1000 + before, expire * 1000 + after));
                    log.debug("acquire lock {} {} ", key, 1);
                    return true;
                }

                Thread.sleep(DEFAULT_ACQUIRE_RESOLUTION_MILLIS);

            } while (acquireTime == -1 || acquireTime &> System.currentTimeMillis());
        }
        log.debug("acquire lock {} fail,because timeout ", key);
        return false;
    }

    private boolean acquired(String key) {
        Map<String, LockVO&> map = lockMap.get();
        if (map == null || map.size() == 0 || !map.containsKey(key)) {
            return false;
        }

        LockVO vo = map.get(key);

        if (vo.beforeExpireTime < System.currentTimeMillis()) {
            log.debug("lock {} maybe release, because timeout ", key);
            return false;
        }
        int after = ++vo.count;
        log.debug("acquire lock {} {} ", key, after);
        return true;
    }

    private void release(String key) {
        Map<String, LockVO&> map = lockMap.get();
        if (map == null || map.size() == 0 || !map.containsKey(key)) {
            return;
        }

        LockVO vo = map.get(key);

        if (vo.afterExpireTime < System.currentTimeMillis()) {
            log.debug("release lock {}, because timeout ", key);
            map.remove(key);
            return;
        }
        int after = --vo.count;
        log.debug("release lock {} {} ", key, after);

        if (after &> 0) {
            return;
        }

        map.remove(key);
        RedisCallback<Boolean&> callback = (connection) -&>
                connection.eval(UNLOCK_LUA.getBytes(StandardCharsets.UTF_8), ReturnType.BOOLEAN, 1,
                        (RedisPrefix.LOCK_REDIS_PREFIX + key).getBytes(StandardCharsets.UTF_8), vo.value.getBytes(StandardCharsets.UTF_8));
        redisTemplate.execute(callback);
    }


    private boolean tryLock(String key, long expire, String lockId) {
        RedisCallback<Boolean&> callback = (connection) -&>
                connection.set((RedisPrefix.LOCK_REDIS_PREFIX + key).getBytes(StandardCharsets.UTF_8),
                        lockId.getBytes(StandardCharsets.UTF_8), Expiration.seconds(expire), RedisStringCommands.SetOption.SET_IF_ABSENT);
        return (Boolean) redisTemplate.execute(callback);
    }

    private static class LockVO {
        private int count;
        private String value;
        private long beforeExpireTime;
        private long afterExpireTime;

        LockVO(int count, String value, long beforeExpireTime, long afterExpireTime) {
            this.count = count;
            this.value = value;
            this.beforeExpireTime = beforeExpireTime;
            this.afterExpireTime = afterExpireTime;
        }
    }

}

2. Business thread

package com.cache.redis.demo.service;

import com.cache.redis.demo.util.RedisLockHelper;
import lombok.extern.slf4j.Slf4j;
import org.springframework.data.redis.core.StringRedisTemplate;

@Slf4j
public class MyThread implements Runnable {
    public static Integer count = 0;

    private String threadName;
    private StringRedisTemplate stringRedisTemplate;

    public MyThread() {
    }

    public MyThread(String threadName, StringRedisTemplate stringRedisTemplate) {
        this.threadName = threadName;
        this.stringRedisTemplate = stringRedisTemplate;
    }

    @Override
    public void run() {
        String key = "sync-key";
        RedisLockHelper redisLockHelper = new RedisLockHelper(stringRedisTemplate);
        //Way 1: Do not set the lock timeout time, the lock expires in 2 seconds
        redisLockHelper.lock(key, 2L);

        // mode 2: no lock timeout of 5 seconds and lock expiration of 2 seconds
       /* Boolean flag = redisLockHelper.lock(key, 2L,5L);
        log.info("Obtain synchronization lock identification.{}",flag);
        if(false == flag){
            return;
        }*/

        count++;
        log.info("Action" + this.threadName + "output:" + count);

        redisLockHelper.unlock(key);
    }
}

3. Testing

package com.cache.redis.demo.util;

import com.cache.redis.demo.service.MyThread;
import org.springframework.data.redis.connection.RedisStandaloneConfiguration;
import org.springframework.data.redis.connection.jedis.JedisConnectionFactory;
import org.springframework.data.redis.core.StringRedisTemplate;
import org.springframework.data.redis.serializer.Jackson2JsonRedisSerializer;
import org.springframework.data.redis.serializer.StringRedisSerializer;

import java.util.concurrent.ExecutorService;
import java.util.concurrent.Executors;

public class TestLock {

    public static void main(String[] args) {
        StringRedisTemplate stringRedisTemplate = getRedisTemplate();
        ExecutorService fixedThreadPool = Executors.newFixedThreadPool(10);

        for (int i = 0; i < 100; i++) {
            MyThread myThread = new MyThread("threadName" + i, stringRedisTemplate);
            fixedThreadPool.execute(myThread);
        }

    }

    public static StringRedisTemplate getRedisTemplate() {
        RedisStandaloneConfiguration config = new RedisStandaloneConfiguration();
        config.setHostName("127.0.0.1");
        config.setPort(6379);
        config.setPassword("pp@123e");
        JedisConnectionFactory jedisConnectionFactory = new JedisConnectionFactory(config);
       /* JedisConnectionFactory jedisConnectionFactory = new JedisConnectionFactory();
        jedisConnectionFactory.setHostName("127.0.0.1");
        jedisConnectionFactory.setPort(6379);
        jedisConnectionFactory.setPassword("pp@123e");*/

        StringRedisTemplate stringRedisTemplate = new StringRedisTemplate();
        Jackson2JsonRedisSerializer<Object&> fastJsonRedisSerializer = new Jackson2JsonRedisSerializer<Object&>(Object.class);
        //value fastJsonRedisSerializer
        stringRedisTemplate.setValueSerializer(fastJsonRedisSerializer);
        stringRedisTemplate.setHashValueSerializer(fastJsonRedisSerializer);
        //key StringRedisSerializer
        stringRedisTemplate.setKeySerializer(new StringRedisSerializer());
        stringRedisTemplate.setHashKeySerializer(new StringRedisSerializer());

        stringRedisTemplate.setConnectionFactory(jedisConnectionFactory);

        stringRedisTemplate.afterPropertiesSet();

        return stringRedisTemplate;
    }
}

Log separation using tool cronlog

Foreword: Tomcat log is cut by date

Using cronolog to segment the image of tomcat9 catalina.out Log; Tomcat’s catalina.out The log file cannot be divided by date. All the log files are output and written to a single file catalina.out In this way, the. Out log will become larger and larger, and the cost of operation and maintenance will increase. To archive log files by date, cronolog can be used to realize log segmentation.

1. Step 1: cronlog installation

Use the yum command to install cronlog

yum install cronolog

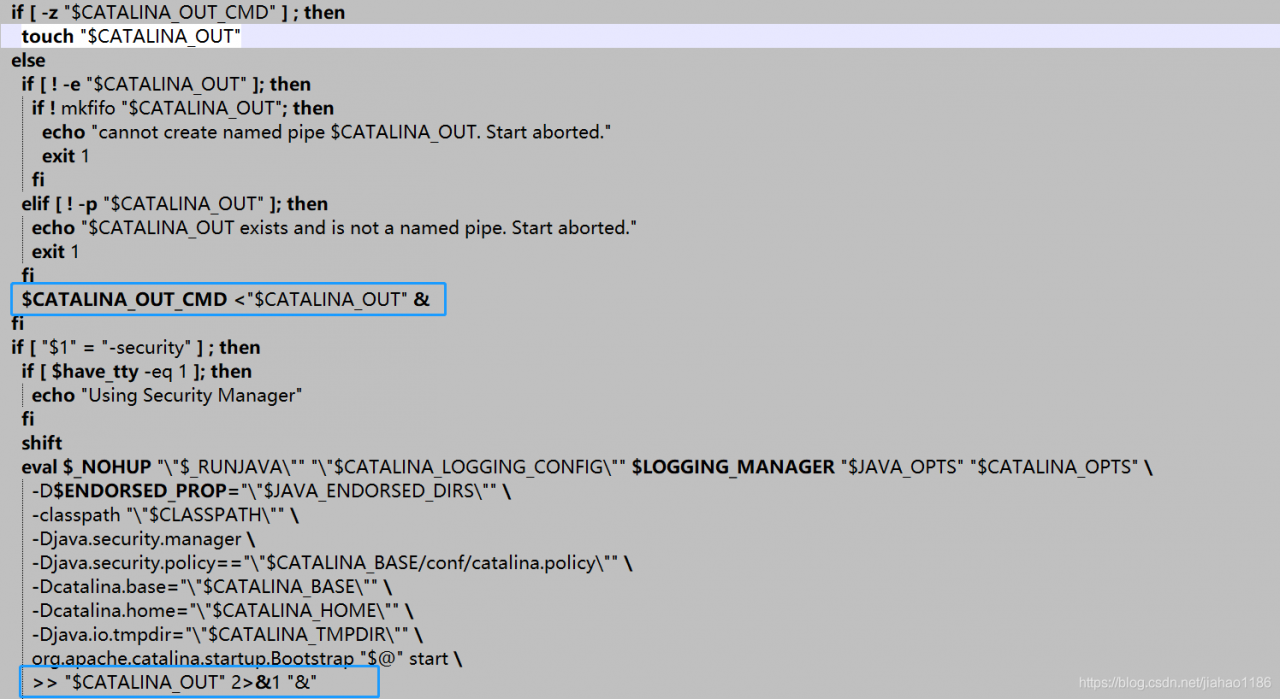
2. Step 2: modify catalina.sh Documents

Directory: Tomcat/bin/ catalina.sh

Original setting:

After modification:

shift
 # touch "$CATALINA_OUT"
  if [ "$1" = "-security" ] ; then
    if [ $have_tty -eq 1 ]; then
      echo "Using Security Manager"
    fi
    shift
    eval $_NOHUP "\"$_RUNJAVA\"" "\"$LOGGING_CONFIG\"" $LOGGING_MANAGER $JAVA_OPTS $CATALINA_OPTS \
      -D$ENDORSED_PROP="\"$JAVA_ENDORSED_DIRS\"" \
      -classpath "\"$CLASSPATH\"" \
      -Djava.security.manager \
      -Djava.security.policy=="\"$CATALINA_BASE/conf/catalina.policy\"" \
      -Dcatalina.base="\"$CATALINA_BASE\"" \
      -Dcatalina.home="\"$CATALINA_HOME\"" \
      -Djava.io.tmpdir="\"$CATALINA_TMPDIR\"" \
      org.apache.catalina.startup.Bootstrap "$@" start \
      2&>&1 | /usr/local/sbin/cronolog "$CATALINA_BASE/logs/catalina-%Y-%m-%d.out" &

  else
    eval $_NOHUP "\"$_RUNJAVA\"" "\"$LOGGING_CONFIG\"" $LOGGING_MANAGER $JAVA_OPTS $CATALINA_OPTS \
      -D$ENDORSED_PROP="\"$JAVA_ENDORSED_DIRS\"" \
      -classpath "\"$CLASSPATH\"" \
      -Dcatalina.base="\"$CATALINA_BASE\"" \
      -Dcatalina.home="\"$CATALINA_HOME\"" \
      -Djava.io.tmpdir="\"$CATALINA_TMPDIR\"" \
      org.apache.catalina.startup.Bootstrap "$@" start \
      2&>&1 | /usr/local/sbin/cronolog "$CATALINA_BASE/logs/catalina-%Y-%m-%d.out" &

  fi

3. Step 3: restart Tomcat

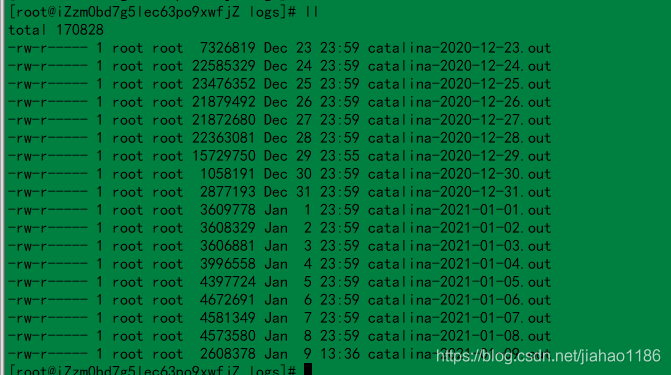
Restart Tomcat and the log will take effect according to the date. A screenshot of the log file is shown below.


Two implementation methods of spring boot scan mapper interface class

1. Method 1: use annotation @ mapper

Add annotation on all mapper interfaces @ mapper; spring boot starts annotation auto scanning.

The following is the Default scan configuration of spring boot. When auto scan is started, all custom beans will be automatically scanned

2. Method 2: use annotation @ mapperscan

Add the annotation @ mapperscan to the springboot startup class to mark the package path of Dao. Once and for all, recommended!!

import org.mybatis.spring.annotation.MapperScan;
import org.springframework.boot.SpringApplication;
import org.springframework.boot.autoconfigure.SpringBootApplication;
import org.springframework.cloud.client.discovery.EnableDiscoveryClient;
import springfox.documentation.swagger2.annotations.EnableSwagger2;

@EnableSwagger2
@EnableDiscoveryClient
@MapperScan(basePackages = {"com.mp.service.provider.dao"})
@SpringBootApplication
public class MpServiceProviderApplication {
    public static void main(String[] args) {
        SpringApplication.run(MpServiceProviderApplication .class, args);
    }
}


Spring boot uses configuration interface webmvcconfigurer to solve cross domain problems

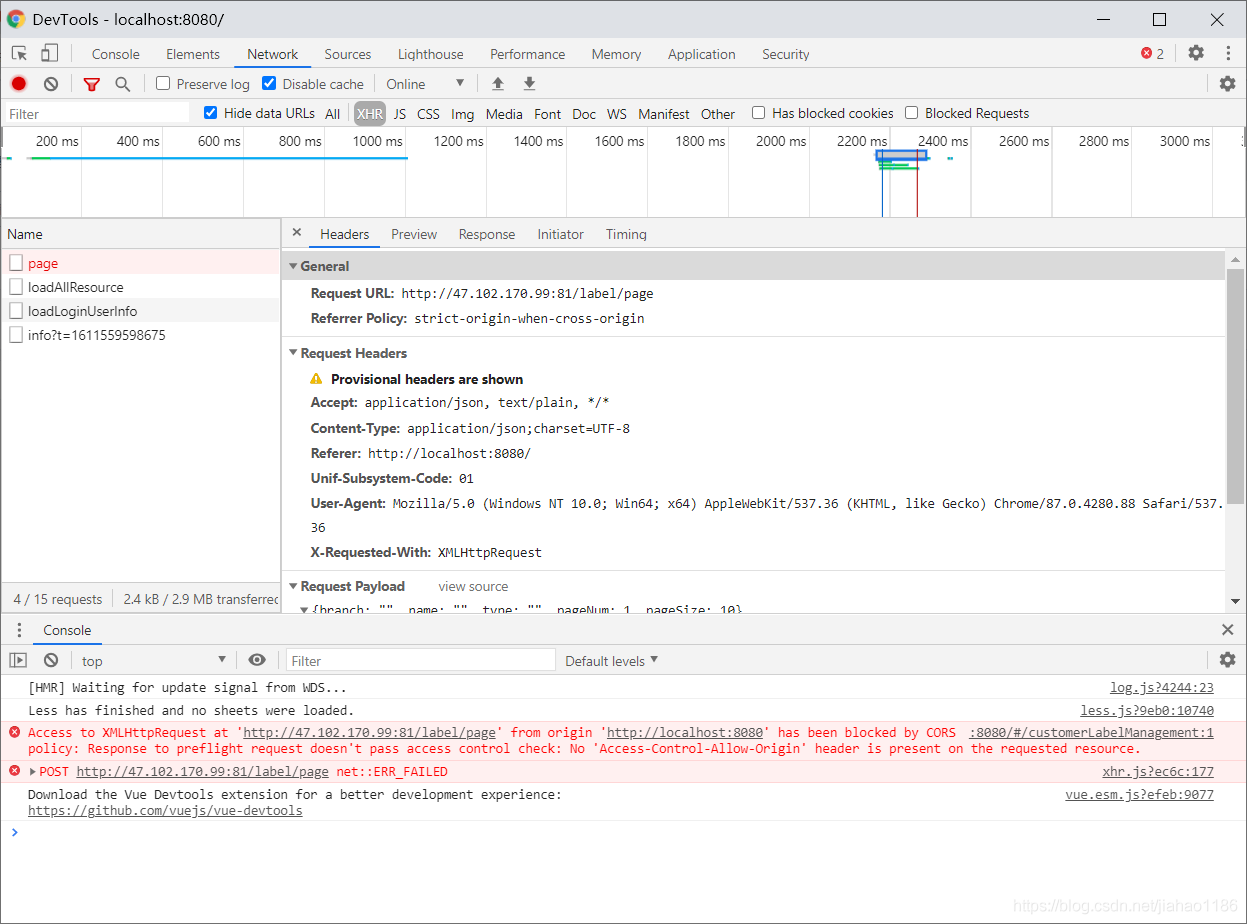
1. Problem Description: cross domain problem in front end call interface

2. Solution, add the following classes

import org.springframework.context.annotation.Bean;
import org.springframework.context.annotation.Configuration;
import org.springframework.web.servlet.config.annotation.CorsRegistry;
import org.springframework.web.servlet.config.annotation.WebMvcConfigurer;

@Configuration
public class CorsConfiguration {
    @Bean
    public WebMvcConfigurer corsConfigurer() {
        return new WebMvcConfigurer() {
            @Override
            public void addCorsMappings(CorsRegistry registry) {
                registry.addMapping("/**")
                        .allowCredentials(true)
                        .allowedMethods("POST", "GET", "PUT", "OPTIONS", "DELETE")
                        .allowedOrigins("*");
            }
        };
    }

}

The <> <<<<<<<<<<<<<<<<<<<<< <<< <<<< << <<<<<<<< <<<<<<<<< > access control allow- Credentials

allowedheads string array class or interface no access control request heads

exposed heads string array class or interface no access control expose heads

Note:

1) Attribute value, origins: configure the sources that can be accessed, for example: 0 https://adong.blog.csdn.net/article/details/113126033 * indicates that all domain names are allowed.

2) Property methods: configure the methods of cross domain request support, such as get, post, delete, put, and return all supported methods at one time.

3) Attribute maxage: configures the valid time of the pre check request. The unit is seconds. It indicates how long the second pre check request does not need to be issued.

4) Attribute allowcredentials: configure whether to allow sending cookies for credential requests. Cookies are not sent by default.

5) Attribute allowedheaders: configure the allowed custom request headers for pre checking requests.

6) Attribute exposedheaders: configure the header information of the response, in which other header information can be set. Without configuration, cache control, content language, content type, expires, last modified and pragma fields can be obtained by default.

SVN Error:svn: E230001: Server SSL certificate verification failed: certificate issued

Cause analysis: SVN certificate failed

Solution:

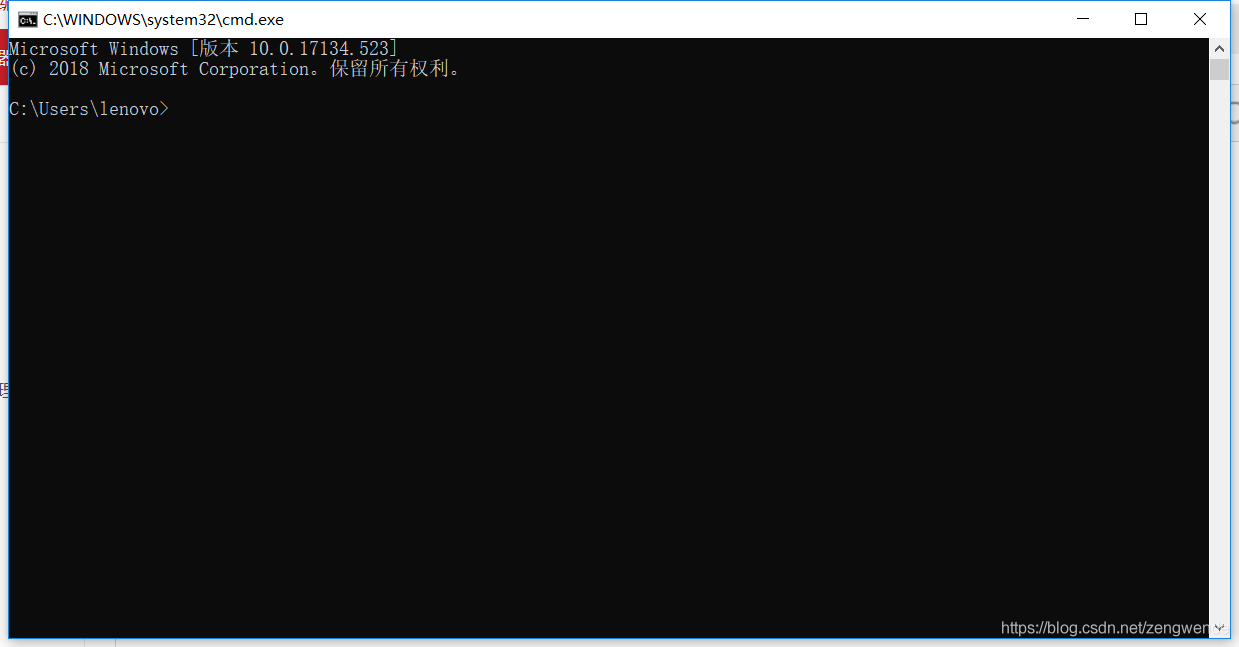
1. Open command desk (CMD)

2. Enter SVN LS address (example: SVN LS) https://111.111.111.111/svn/abc )

3. After the console outputs, enter P and enter (this command is to ask SVN to ignore the certificate and then follow the prompt to solve the problem of server SSL certificate verification failed: certificate issued)