Tag Archives: solution

Solution of device eth0 does not see to be present, delaying initialization. Error in network card under Linux

Today, when I was practicing under Linux, I saw two network cards under the ifconfig command, one is the l0 network card, and the other is eth1. At the beginning, it was l0 and eth0. I don’t know how it became eth1, so I became obsessive-compulsive and deleted all network card configurations. As a result, when I restarted the network service, it was a tragedy…

First of all, let’s talk about the reason why my network card changed from eth0 to eth1: it was due to the previous operation error, and I didn’t know this before, so I followed the online tutorial. As a result, I configured eth0 to eht0, and the system couldn’t find it. Later, due to the configuration failure, I configured it once, and the result became eth1. Until today, I found this error…

Because I couldn’t change eth0, I saw that there was a tutorial on the Internet, but it didn’t work.. (I don’t know why.) so I deleted all the network card configuration with one hand. The steps are as follows:

First, stop the network service

1./etc/sysconfig/network scripts directory, delete the network card configuration that you want to delete. I want to delete eth1, so RM – RF ifcfg-eth1, and so on

2./etc/sysconfig/Networking/devices directory, delete all files, simple and easy

3./etc/sysconfig/Networking/profiles/default directory, delete all files related to eth1

After starting the network service, there should be only one l0 network card left, and the service is stopped

Write network card configuration file

1./etc/sysconfig/network scripts directory, write the configuration file with VI, here I name it ifcfg-eth0 (my eth0 is finally coming back)

The configuration is as follows:

DEVICE=eth0
ONBOOT=yes
IPADDR=172.168.0.108
BOOTBROTO=none
NETMASK=255.255.255.0
PREFIX=24

Here is a simple write a few configuration, complete configuration I can not remember, there is no need to remember. I found a more complete configuration on the Internet, you can have a look

DEVICE=eth0 #Indicates the device name
NM_CONTROLLED=yes #network mamager's parameter, effective in real time, no need to reboot
ONBOOT=yes #Set to yes to enable network connection automatically on power on
IPADDR=192.168.21.129 #IP address
BOOTPROTO=none # set to none to disable DHCP, set to static to enable static IP address, set to dhcp to enable DHCP service
NETMASK=255.255.255.0 #subnet mask
DNS1=8.8.8.8 #the first dns server
TYPE=Ethernet #Network type is: Ethernet
GATEWAY=192.168.21.2 #set gateway
DNS2=8.8.4.4 #second dns server
IPV6INIT=no #Disable IPV6
USERCTL=no #Whether to allow non-root user to control the device, set to no, can only be changed by root user
HWADDR=00:0C:29:2C:E1:0F #Mac address of the NIC
PREFIX=24
DEFROUTE=yes
IPV4_FAILURE_FATAL=yes
NAME="System eth0" #Define the device name


After I started the network service, I reported the error of device eth0 does not see to be present, delaying initialization. After searching on the Internet, I found that it was caused by the MAC address mismatch. There are two solutions

1. 70 persistent in/etc/udev/rules. D directory- net.rules File, open, modify the MAC address inside, and ifcfg-eth0 can be the same

2. Delete/etc/udev/rules.d/70-persistent directly- net.rules File, then restart, simple and crude

After restart, we will find that the network service can start normally, and the current network card is l0 and eth0



Method of adding operation button for each line of data in DataGrid of easyUI

When I was working on the project today, I wanted to add an operation button after each column of data in the DataGrid of easyUI. At the beginning, I wanted to splice strings in the background and return them with JSON. But after testing, I found that this method didn’t work. I searched the Internet and sorted them out as follows:

In fact, it’s very easy to add a row of custom columns. When JS declares DataGrid, add the following code

<span style="font-size:18px;">{field:'operate',title:'act',align:'center',width:$(this).width()*0.1,
	formatter:function(value, row, index){
		var str = '<a href="#" name="opera" class="easyui-linkbutton" ></a>';
		return str;
}}</span>

This line of code is defined under the columns property, and it must be added

<span style="font-size:18px;">onLoadSuccess:function(data){  
        $("a[name='opera']").linkbutton({text:'buy',plain:true,iconCls:'icon-add'});  
},</span>

If you don’t add this, there will be no button style in that operation column. It’s just a hyperlink. You can use LinkButton or other buttons according to your needs


Mongodb java version 3.X, prompt “XXX (an encryption algorithm) is not available” when there is a user name and password

First of all, describe the project environment: Maven + mongodb-java-driver-3.2.2

The original project was written with Mongo 2. X driver, and then upgraded to 3. X. The first big change is user name and password verification.

This is the way to get mongoclient.


import java.util.ArrayList;
import java.util.List;
import java.util.Properties;

import com.mongodb.MongoClient;
import com.mongodb.MongoClientURI;
import com.mongodb.MongoCredential;
import com.mongodb.ServerAddress;

/**
 * MongoDBUtils
 * @author administration
 *
 */
public class DBUtil {

	/**
	 * Connect to mongoDB with username password (MongoCredential method)
	 * @param mongodbAddr
	 * @param databaseName
	 * @return
	 */
	public static MongoClient getMongoClientByCredent(String mongodbAddr, String databaseName){
		MongoClient mongoClient;
		Properties p = TDTFile.getProperAddr("db.properties");
		String user = p.getProperty("username");
		String pswd = p.getProperty("password");
		List<ServerAddress> serverAddrList = new ArrayList<ServerAddress>();
		ServerAddress serverAddress = new ServerAddress(mongodbAddr);
		serverAddrList.add(serverAddress);
		List<MongoCredential> credentialList = new ArrayList<MongoCredential>();
		MongoCredential credential = MongoCredential.createCredential(user, databaseName, pswd.toCharArray());
		credentialList.add(credential);
		mongoClient = new MongoClient(serverAddrList, credentialList);
		return mongoClient;
	}
	
	/**
	 * Connect to mongoDB with username password (URI method)
	 * @param mongodbAddr
	 * @param databaseName
	 * @return
	 */
	public static MongoClient getMongoClientByURI(String mongodbAddr, String databaseName){
		MongoClient mongoClient;
		Properties p = TDTFile.getProperAddr("db.properties");
		String user = p.getProperty("username");
		String pswd = p.getProperty("password");
		//System.out.println(user + "," + pswd);
		String uri = String.format("mongodb://%s:%s@%s/%s", user, pswd, mongodbAddr, databaseName);
		System.out.println(uri);
		MongoClientURI mongoClientURI = new MongoClientURI(uri);
		mongoClient = new MongoClient(mongoClientURI);
		return mongoClient;
	}
	
}

Two ways are no problem, run well in eclipse. But!! After packaging with MVN package, it can’t be used. After a night and a day’s analysis, I locked the root cause of the error in the statement that the command line executed the command. My sentence is like this:

java -Djava.ext.dirs=../lib Other parameters

The problem lies in the – D parameter. Baidu knows that – D is equivalent to setting external environment variables. Since my main method relies on many third-party jar packages, it seems that there is nothing wrong with it. But it ignores a problem, that is

After using the – D parameter to specify other directories, Java needs to load% Java_ The jar package in the home% \ JRE/lib/ext directory is no longer loaded!! I searched the usage of – D parameter on the Internet for a long time, but no one mentioned it.. But it’s hard for me. One day is wasted here..


Solution:

Package the required external dependent packages, including some packages such as JDK’s own encryption algorithm, into lib with Maven. Problem solving. By the way, the algorithm package required by mongodb3. X is% Java_ HOME%\jre\lib\ext\sunjce_ provider.jar


(Keil MDK) UCOS floating point support abnormal solution

Recently, we encountered a problem, that is, the printf display of floating-point calls in uCOSII is abnormal, but the support for floating-point calls on bare metal machines is normal. Here are the details.

When calling printf to debug floating-point numbers in UCOS, it is correct in memory, but print data is 0, and other shaping data are normal.

The running result on bare metal is completely normal, that is to say, the problem lies in UCOS.

According to the information, this is because the user task stack is not aligned with octets. When running bare metal programs, the system’s default stack octets are aligned, but UCOS’s user task stack is not.

Align the user stack octets.


Solution:

1. Solutions under IAR: (untested)

Through # pragma data_ Alignment specifies the number of bytes to align

For example:


#pragma data_alignment=8

OS_STK Task1_LED1_Stk[Task1_LED1_Stk_Size];

#pragma data_alignment=8

OS_STK T

2. Solutions under keil MDK: (available for personal testing)

Add the force octet alignment command before the task stack declaration, as follows:

__align(8) static OS_STK  TaskEquipmentStk[TASK_EQUIPMENT_STK_SIZE];
__align(8) static OS_STK  TaskUartRcvStk[TASK_UARTRCV_STK_SIZE];
__align(8) static OS_STK  TaskFileRcvStk[TASK_FILERCV_STK_SIZE];
__align(8) static OS_STK  TaskFtpStk[ TASK_FTP_STK_SIZE ];
__align(8) static OS_STK  TaskErrorRateRS485Stk[ TASK_ERROR_RATE_RS485_STK_SIZE ];


Detailed explanation of the reasons

The history of this is that arm itself does not support non aligned data access; Therefore, with a 64bit data operation instruction, the instruction requires 8-byte alignment.

Furthermore, after a certain version of the compiler (rvct3?) AAPCs requires stack 8-byte alignment.

AAPCs with 8-byte alignment first, then cm3. Pay attention to the sequence. Before cm3 r2p0, automatic stack pressing does not require 8 alignment, and r2p0 seems to be forced alignment.

Printf’s 8-alignment is required by the C runtime and has nothing to do with hardware. The C RTL manual is written and can be read. Its root lies in the requirements of AAPCs; AAPCs is rooted in instructions like LDRD.

In other words, in the future, if 128bit data operation is available and arm does not support non alignment, AAPCs may be upgraded to 16 byte alignment.

404 solution for WordPress Chinese tag

One of the common problems in blogs or websites built by WordPress is that the Chinese tag link does not exist. Google Administrator Tool prompt grabs 404 errors. In particular, windows hosts often have Chinese tag link grabbing errors, and Chinese tags cannot be displayed normally. Or Chinese tags can be displayed normally, but 404 errors will appear after clicking the link, which brings great inconvenience to users and is extremely difficult It greatly reduces the friendliness of the website.

How to solve this problem?

First method:

Open WP include/ classes.php (before 3.1) or WP include/class- wp.php (after 3.1 +, hereinafter referred to as the new version) find line 154 (the new version is line 142)

$pathinfo = $_ SERVER['PATH_ INFO';

Replace with:

$pathinfo = mb_ convert_ encoding($_ SERVER['PATH_ INFO'], 'UTF-8', 'GBK');

Find line 159 (the new version is line 147)

$req_ uri = $_ SERVER['REQUEST_ URI'];

Replace with:

$req_ uri = mb_ convert_ encoding($_ SERVER['REQUEST_ URI'], 'UTF-8', 'GBK');

After my personal test, this method can be used, the new version of the statement may be different from the above, but the method is basically the same, the corresponding statement can be replaced.

Second method:

1. Found in the WP includes folder at the root of the site“ rewrite.php ”This document;

2. Back it up“ rewrite.php ”In case of error (we’d better back up the original code before changing the code);

3. Open“ rewrite.php ”We find the following code in the file:

function get_tag_permastruct()
{
   if (isset($this-&gt;tag_structure)) 
  {
    return $this-&gt;tag_structure;
  }
  if (empty($this-&gt;permalink_structure)) 
  { 
    //Change this line
    $this-&gt;tag_structure = '';
    return false;
  }
  if (empty($this-&gt;tag_base))
  $this-&gt;tag_structure = $this-&gt;front . 'tag/';
  else$this-&gt;tag_structure = $this-&gt;tag_base . '/';
  $this-&gt;tag_structure .= '%tag%';
  return $this-&gt;tag_structure;
}

4. Put some of them together

" if (empty($this-&gt;permalink_structure)) { ”

Amend to read

“ if (! empty($this-&gt;permalink_structure)) { ";

Note that there is only a “!” sign in English. After testing, this method is very effective. PS. didn’t find the code in this file directly…

The third method: the final solution to the Chinese tag 404 error is actually ISAPI_ Rewrite pseudo static rules are not well written, which leads to the failure to find the web page file. In fact, just change the rules: the previous tag pseudo static rules

RewriteRule /tag/(.*)$ /index\.php\?tag=$1

Changed rules

RewriteRule /tag/(.*)/$ /index\.php\?tag=$1

I didn’t test this method, so I can’t guarantee its availability. Please back it up before modification!

Third method:

If the above two methods are not feasible, we recommend another method: alias each tag.

Alias is another URL friendly name. It is usually lowercase and can only contain letters, numbers and hyphens.

But for blogs with more than 100 Chinese tags, this method has a huge workload. Use with caution.

This method can link English tags normally, but it works for websites with Chinese tag problems, but it doesn’t work for websites with 404 English tag links.

[Solved] Illegal access: this web application instance has been stopped already

The environment at that time:

When testing the UAT project, I suddenly found that the project could not be accessed normally. In fact, there are many times when the project is still in good condition in the last second and explodes in the next second. It’s very uncomfortable, especially when testing the joint debugging

So he opened the log with curiosity and found that the original report was wrong

java.lang.IllegalStateException: Illegal access: this web application instance has been stopped already.
 
Could not load [java.beans.PropertyChangeEvent]. The following stack trace is thrown for debugging 

purposes as well as to attempt to terminate the thread which caused the illegal access.

His general meaning is that the web application has stopped and can’t load something called XXXXXXXX.

Then kill the Tomcat process, and then get up
to solve the problem….

be careful:

if you restart tomcat, you cannot solve the problem.
to modify the server.xml , add a child element to the tag, find the tag, and set the attribute value of reloadable to reloadable = false.

It means hot deployment, which is convenient for developers

[Solved] javax.management.InstanceNotFoundException: com.alibaba.druid:type=DruidDataSourceStat

There was a problem when the test server restarted Tomcat

javax.management.InstanceNotFoundException: com.alibaba.druid:type=DruidDataSourceStat

the main reason for the error: 

there are multiple Tomcat on the server, and they all use Druid  to do so

solution: 

modify the catalina.sh :
add this sentence Code: Java_ OPTS=”- Ddruid.registerToSysProperty=true ”


Nginx realizes the same background service for portal and business

The first stage: modify the initial path access in the framework

The default access address was modified. Because I was not familiar with the configuration of the framework at that time, and there was no architecture related documentation, the attempt failed. Although the modification is completed, you can directly access the home page of the portal according to the domain name, but the back-end business can’t be accessed normally. I doubt that I have changed something. If you are familiar with ruoyi architecture and have completed this modification method, please give me more advice.

The second stage: using nginx to separate the front and back of the portal

The portal page of the website uses static HTML pages, and then the data request is implemented through Ajax. Configure two domain names to resolve to the server where the service is located, the first level domain name to access the portal related functions, and the second level domain name to access the background management page. Two schemes are prepared. One is to simply use HTML and Ajax. First, nginx forwards the request to the HTML page according to the domain name, and then uses Ajax to get the data from the background when the page is initialized. The second is to use Vue, which is actually an optimization on the first one. Through the loop contained in Vue and other tags, it is easy to load and echo the data, but When the page is loaded, the unresolved Vue variables will be displayed first. The experience is very poor, so this method is abandoned. I think the efficiency and page rendering experience of the first method will be very poor, so in the case of other implementation methods, I will not consider this method for the moment. In fact, these two methods can achieve basic requirements such as data loading.

The third stage: directly using the page of the original project

At the beginning, I didn’t think of this method, but later when I modified the second method, I suddenly thought that according to the previous project experience, I can do redirection jump in nginx, so I began to try this way. The basic idea is: configure two servers in nginx to monitor port 80, and judge which server to enter according to the domain name. When the access is a first-class domain name, judge the website related business, that is, judge whether the URL contains only the domain name. If it contains only the domain name, then redirect the request to the path of the portal home page. For other requests, handle them normally .

No more nonsense. Go directly to nginx configuration

server {
	listen 80;
	server_name ywgl.*****.com;
	index index.html;
	set $ht_server 127.0.0.1:8080;
	
	location /{
		proxy_pass_header Server;
		proxy_set_header Host $http_host;
		proxy_set_header X-Real-IP $remote_addr;
		proxy_set_header X-Scheme $scheme;
		proxy_pass http://$ht_server;

	}
  
}
server {
	listen 80;
	server_name www.******.com;
	index index.html;
	set $mh_server 127.0.0.1:8888;


	location /{
		
		proxy_pass_header Server;
		proxy_set_header Host $http_host;
		proxy_set_header X-Real-IP $remote_addr;
		proxy_set_header X-Scheme $scheme;
		
		if ($request_uri ~* "^/$") {
			rewrite ^/(.*)$ http://www.******.com/home/index?; # Preventing multiple redirects
		}
		proxy_pass http://$mh_server ;
	}


}

explain:

$request_ Uri ~ * “^/$” this condition is to determine whether the access request is www. * * *. Com, not www. * * *. COM/*/*, because even if the access request is www. * * *. Com, nginx will send a $request_ What URI gets will still contain a ‘/’.

Finally, if you have any ideas, welcome to exchange.

Summary of jQuery autocomplete plug-in

Requirement: realize the prompt effect similar to Baidu search, that is, you can filter the options in the drop-down list through keywords

There are ready-made autocomplete plug-ins in layui and iView, but they need to integrate the dependencies related to layui and iView. I just want to realize this function in a simple business environment, and there is no integrated environment in the business framework of the system, so this method has low cost performance.

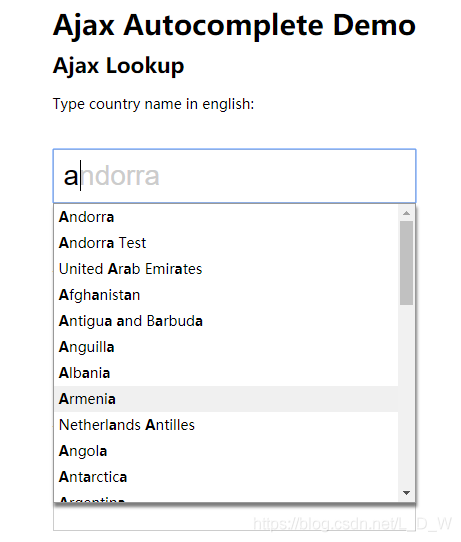
I found a case of using jQuery for integration on the Internet and studied it by myself. The notes in the original chestnut are not very clear, which is not easy for people like me who have not understood and studied the autocomplete component of jQuery before. Don’t talk too much nonsense. Paste the effect picture first

The above screenshot is an example, which I used for integration in my project. Ajax can achieve real-time access and fixed source array filter values. Next, I will post the codes of the two examples:

The first method is to use source array

    var countries = {
        "AD": "Andorra",
        "A2": "Andorra Test",
        "AE": "United Arab Emirates",
        "AF": "Afghanistan",
        "AG": "Antigua and Barbuda"
        }
    var countriesArray = $.map(countries, function (value, key) { return { value: value, data: key }; });
    $('#autocomplete-ajax').autocomplete({
        lookup: countriesArray,   // If this attribute is written, it means that a fixed array of data is used, even if the serviceUrl attribute is also available, it will not take effect
        lookupFilter: function(suggestion, originalQuery, queryLowerCase) {
            var re = new RegExp('\\b' + $.Autocomplete.utils.escapeRegExChars(queryLowerCase), 'gi');
            return re.test(suggestion.value);
        },
        onSelect: function(suggestion) {
            $('#selction-ajax').html('You selected: ' + suggestion.value + ', ' + suggestion.data);
        },
        onHint: function (hint) {
            $('#autocomplete-ajax-x').val(hint);
        },
        onInvalidateSelection: function() {
            $('#selction-ajax').html('You selected: none');
        }
    });

The second way: Ajax real-time access

    var countriesArray = $.map(countries, function (value, key) { return { value: value, data: key }; });

    //jQuery ajax mock,Simulate background processing of incoming requests
    $.mockjax({
        url: '*',
        responseTime: 2000,
        response: function (settings) {
            var query = settings.data.query,
                queryLowerCase = query.toLowerCase(),
                re = new RegExp('\\b' + $.Autocomplete.utils.escapeRegExChars(queryLowerCase), 'gi'),
                suggestions = $.grep(countriesArray, function (country) {
                     // return country.value.toLowerCase().indexOf(queryLowerCase) === 0;
                    return re.test(country.value);
                }),
                response = { // Note that the return format must be in this format
                    query: query,
                    suggestions: suggestions
                };

            this.responseText = JSON.stringify(response);
        }
    });
    // Initialize ajax autocomplete:
    $('#autocomplete-ajax').autocomplete({
        serviceUrl: '/autosuggest/service/url',
        // lookup: countriesArray, // This must be commented out, otherwise the countriesArray array in the property will be used instead of taking the ajax request in the serviceUrl
        lookupFilter: function(suggestion, originalQuery, queryLowerCase) {
            var re = new RegExp('\\b' + $.Autocomplete.utils.escapeRegExChars(queryLowerCase), 'gi');
            return re.test(suggestion.value);
        },
        onSelect: function(suggestion) {
            $('#selction-ajax').html('You selected: ' + suggestion.value + ', ' + suggestion.data);
        },
        onHint: function (hint) {
            $('#autocomplete-ajax-x').val(hint);
        },
        onInvalidateSelection: function() {
            $('#selction-ajax').html('You selected: none');
        }
    });

In this way, we need to pay attention to the following points:

    1. when using serviceurl, the lookup attribute must be commented out; the serviceurl attribute is configured with the real request path of the background, and the above configuration is to simulate the background processing by using mockjax, and the corresponding mockjax code does not need to be reflected in the program; the format of the data returned by the background must be strictly in accordance with: {“query”: query, “suggestions”: suggestions}, Suggestions is the filtered data, and you can debug the specific format to understand it; </ OL>

The following is my own specific code:


$(function () {
    'use strict';

    // Initialize ajax autocomplete:
    $('#autocomplete-ajax').autocomplete({
        serviceUrl: 'http://127.0.0.1/test/autosuggest/userInfo/4028805e6d5e3155016d637627d80157',
        lookupFilter: function(suggestion, originalQuery, queryLowerCase) {
            var re = new RegExp('\\b' + $.Autocomplete.utils.escapeRegExChars(queryLowerCase), 'gi');
            return re.test(suggestion.value);
        },
        onSelect: function(suggestion) {
            $('#selction-ajax').html('You selected: ' + suggestion.value + ', ' + suggestion.data);
        },
        onHint: function (hint) {
            $('#autocomplete-ajax-x').val(hint);
        },
        onInvalidateSelection: function() {
            $('#selction-ajax').html('You selected: none');
        }
    });
    
});

last:

You are welcome to exchange and study with me. Because this article was written after the event, I can’t remember which God’s code was written at that time. The source code has to be written down. The website is as follows: www.jq22.com , the specific use of the case has not been found, the following is the source code link I downloaded before, can be downloaded for free, if there is infringement, please contact to delete.

be careful:

1. When using Ajax dynamic request, the plug-in will pass a query parameter to the background: I use @ requestparam (name = query “, required = false) string query to accept it;

2. When using Ajax dynamic request, the return format is fixed, and the name of the return attribute should not be modified. The return format code is as follows

@Getter
@Setter
@ToString
public class Result1 implements Serializable {

	@ApiModelProperty("Query criteria")
	private String query;
	
	@ApiModelProperty("return output")
	private List<Result12> suggestions;
}

@Getter
@Setter
@ToString
public class Result12 implements Serializable {

	@ApiModelProperty("name")
	private String value;
	
	@ApiModelProperty("key")
	private String data;
}

Android listview entry button click state chaos solution

Problems:

Click the button button on listview item, click to change the display state of button, slide the button on listview item is reused, the corresponding button state on item is not corresponding, and the button state on item is chaotic.

Analysis of the reasons:

Listview item caching mechanism: for better performance, listview will cache line items (the view corresponding to a line). Listview gets the items of each line through the getview function of the adapter. During sliding,

A. if a line item has already been shown on the screen, if the modified item is not in the cache, put it into the cache, otherwise update the cache;

B. before obtaining the line items that slide into the screen, it will first determine whether there are available items in the cache. If there are, it will be passed to the getview of the adapter as the convertview parameter.

In this way, getview writing can make full use of the cache and greatly improve the performance of listview. Even if there are tens of thousands of line items, the maximum number of inflates is n, and N is the maximum number of listview line items displayed on a screen.

According to the above caching principle, the reuse of listview will cause the chaos of the control state on the item.

For detailed analysis, please refer to http://www.trinea.cn/android/android-listview-display-error-image-when-scroll/

Solution:

The idea of Java programming is that everything is an object. If the status of an item is recorded in the corresponding object of each item, through the field of the object, each time you click to change the field value of the object, each time you display the status of the control on the item, you can judge the field value of the object. The problem of chaos has to be solved.

Add a field to the entry object without reason, but the server does not need this field. In order to unify the front and back ends, this will cause trouble. Therefore, when we add the Boolean value of state judgment to the object, we add the field modifier keyword transient before the field in the bean. For example, if the judgment Boolean value added in the bean is ischeck, then it is private transient Boolean ischeck in the bean;

Transient as the name suggests: (from Youdao dict)

Transient phenomena; passing passengers; migratory birds

In Java, “transient” modifier is a special annotation to indicate that the modified field is ignored in serialization.

For detailed analysis, please refer to http://www.cnblogs.com/gaojing/archive/2011/04/14/2844973.html

Conclusion:

Therefore, adding a field to the entry object (in order to record the state of the object) and adding the keyword “transient” in front of the field can solve the problem of confusion when clicking the listview entry button~