Append system (“pause”) at the end of the main function;
Having a return 0 statement; Just write a line above the return statement.
Having a return 0 statement; Just write a line above the return statement.
1, Put DLL file: C:\Windows\ SYSWOW64
Or C: \ Windows \ windows32
2, lib and h: C:\Program Files (x86)\Microsoft Visual Studio\2017\Enterprise\VC\Tools\MSVC\
The lib is placed in the lib folder.
H is placed in the GL folder in Include, which needs to be created.
Download address: https://files-cdn.cnblogs.com/files/inku/opengl%E6%96%87%E4%BB%B6.zip
= = = = = = = = = = = =
Find VC\Tools\MSVC\. Where it’s not bold, it’s different for everyone. Enterprise is the VS version.
Lib: C:\Program Files (x86)\Microsoft Visual Studio\2017\Enterprise\VC\Tools\MSVC\14.16.27023\ Lib \x86
H: C:\Program Files (x86)\Microsoft Visual Studio\2017\Enterprise\VC\Tools\MSVC\14.16.27023\ Include \ GL
= = = = = = = = = = = =
Possible exceptions:
1. Unable to find glut32.dll. Use another path for step 1.
2. Unable to find GL \ Glut. h, create new GL file.
3. Notice the selection of Debug in VS.

Reproduced in: https://www.cnblogs.com/inku/p/10159867.html
cd Pangolin
mkdir build
cd build
cmake ..
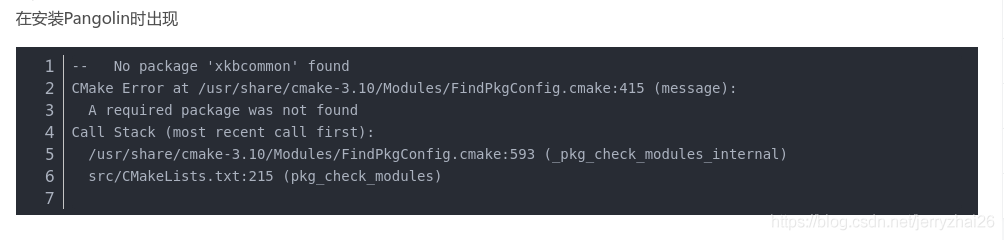
cmake --build .Pangolin: I tried to reinstall Pangolin because the pictures I drew with Pangolin kept flashing, so I used Locate to find the SO shared library. After deleting Pangolin, I reinstalled Pangolin. After compiling, I had to make install Pangolin to successfully generate SO files. However, after reloading the drawing is still flashing, I don’t know why. If anyone knows, I’d appreciate it if you could leave me a message
Nagios is an open source software that can be used for network and infrastructure monitoring. Nagios will monitor servers, switches, applications and services. It alerts the System Administrator when something goes wrong and also alerts back when the issues has been rectified.
Using Nagios you can:
Monitor your entire IT infrastructure. Identify problems before they occur. Know immediately when problems arise. Share availability data with stakeholders. hypothetical questionDetect security breaches. Plan and budget for IT upgrades. Reduce downtime and business losses.
Scenario
In this tutorial i am going to use two systems as mentioned below.
Nagios server:
Operating system : Ubuntu 14.04 LTS Server
IP Address       : 192.168.1.250/24
Nagios client:
Operating System : Ubuntu 14.04 Desktop
IP Address       : 192.168.1.100/24
Prerequisites
Make sure your server have installed with fully working LAMP stack. If not, follow the below link to install LAMP server On Ubuntu 14.04 and earlier versions.
Install LAMP Server On Ubuntu 14.04
Install Nagios
Install nagios and nagios plugin using the following command:
sudo apt-get install nagios3 nagios-nrpe-pluginDuring installation, you’ll have to answer some simple questions. First, you’ll be asked to configure your mail server to get alerts from your nagios server.
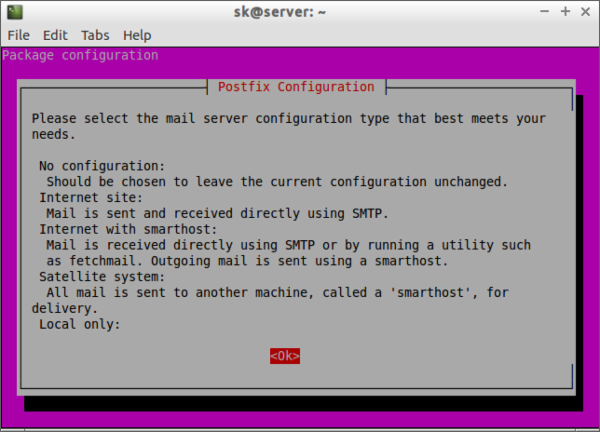
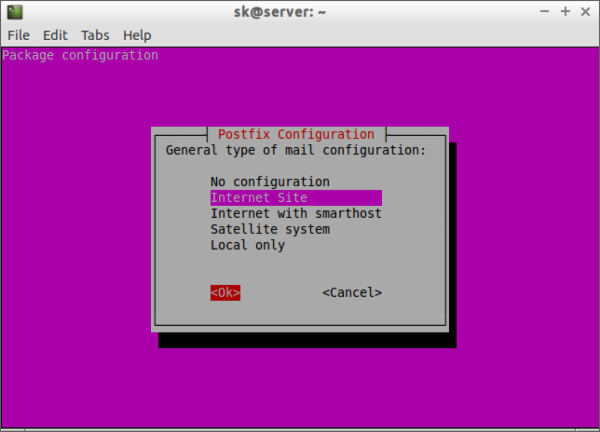
Select the type of mail configuration:
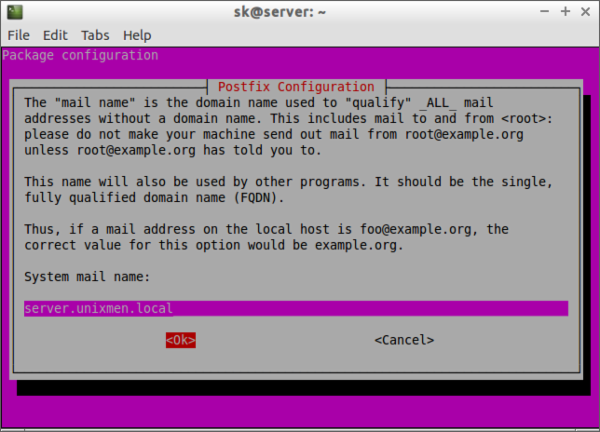
Enter the system mail name. It will be automatically selected by the installer. If not, enter it manually.
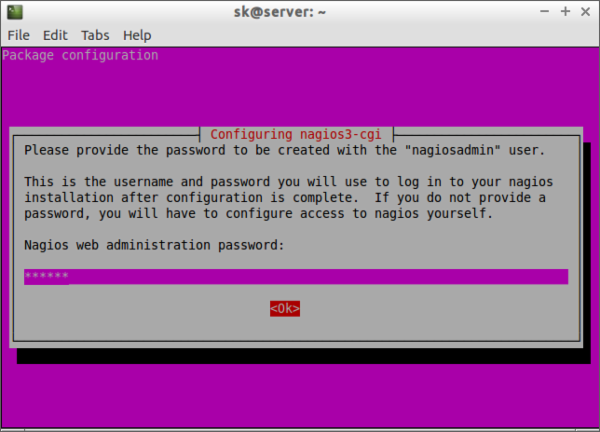
Enter the “nagiosadmin” password.
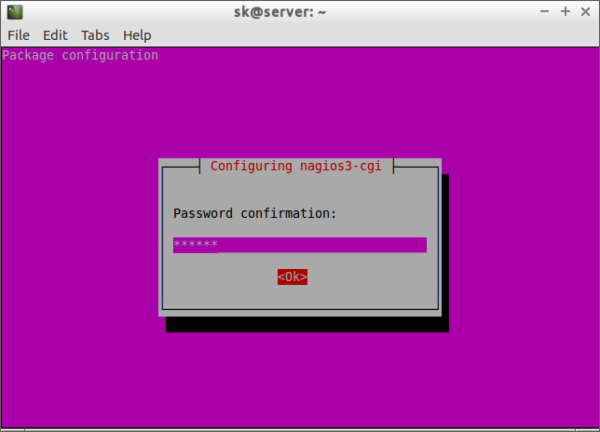
Re-enter the nagiosadmin password.
Configure Nagios
After nagios and nagios plugins installation, assign the permissions of www-data directory to nagios user, and set executable permission to the /var/lib/nagios3/ directory.
sudo usermod -a -G nagios www-data
sudo chmod -R +x /var/lib/nagios3/
By default, Nagios won’t check for external commands, just to be on the cautious side. If you want to be able to use the CGI command interface, you will have to enable this.
To do that, edit file /etc/nagios3/nagios.cfg ,
sudo nano /etc/nagios3/nagios.cfgFind the line,
check_external_commands=0
And change it to:
check_external_commands=1
Save and close the file. Restart nagios service.
sudo /etc/init.d/nagios3 restartAccess Nagios Web console
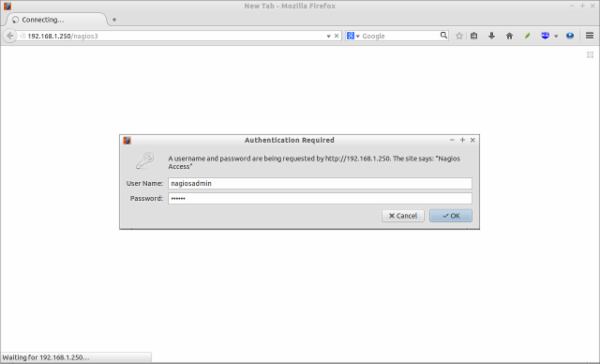
Open up the web browser and point it to http://ip-address/nagios3 . You’ll be asked to enter the username and password. Enter username as nagiosadmin and the password that you’ve created earlier.
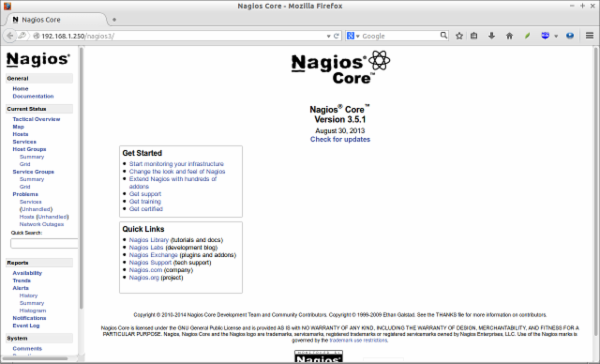
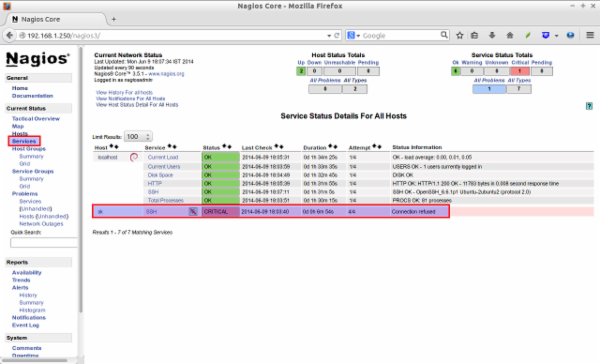
This is how my Nagios web console looked.
Click on the Hosts section on the left pane to list of hosts being monitored.
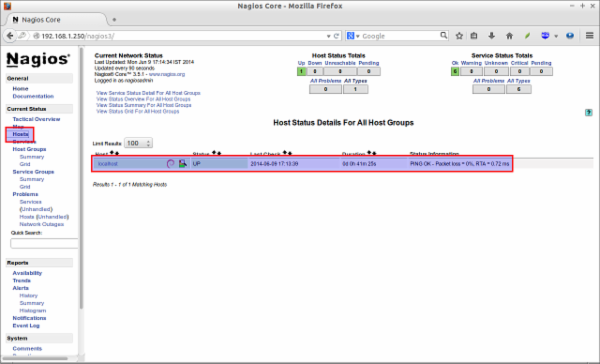
If you want to see the complete details of a monitoring hosts, click on the respective monitoring hosts in the above window.
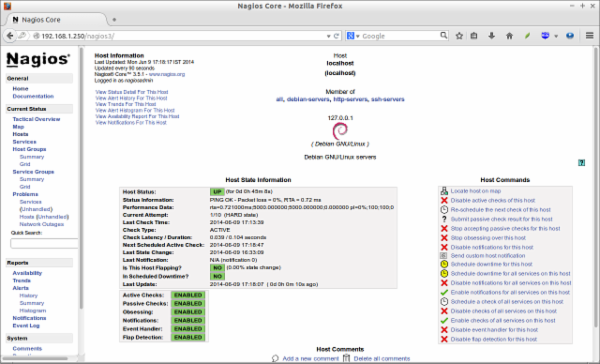
As you see in the above picture, the localhost(Nagios server) itself only is being monitored by default. We have to add the clients to monitor them now.
Add Monitoring targets
Now let us add some clients to monitor by Nagios server. To do that we have to install nrpe and nagios-plugins packages in our monitoring targets.
sudo apt-get install nagios-nrpe-server nagios-pluginsConfigure Monitoring targets
Edit /etc/nagios/nrpe.cfg file,
sudo nano /etc/nagios/nrpe.cfgAdd your Nagios server ip address:
[...]
allowed_hosts=127.0.0.1 192.168.1.100
[...]
Start/Restart nrpe service as shown below.
sudo /etc/init.d/nagios-nrpe-server restartNow, go back to your Nagios server to add the clients to be monitored through nagios server. By default, Debian based systems uses a configuration directory called /etc/nagios3/conf. d/ where nagios3-common, other packages and the local admin can dump or link all object configuration files into.
In the object configuration files, you can define hosts, host groups, contacts, contact groups, services, etc. You can split your object definitions across several config files if you wish, or keep them all in a single config file.
Ex:
cfg_file=/etc/nagios3/objects/commands.cfg
cfg_file=/etc/nagios3/objects/contacts.cfg
cfg_file=/etc/nagios3/objects/timeperiods.cfg
cfg_file=/etc/nagios3/objects/templates.cfg
Also, You can tell Nagios to process all config files (with a .cfg extension) in a particular directory by using the cfg_dir directive.
In this tutorial, I will tell Nagios to process client config files in a particular directory.
Edit /etc/nagios3/nagios.cfg file,
sudo nano /etc/nagios3/nagios.cfgand uncomment the following line.
[...]
cfg_dir=/etc/nagios3/servers
Create a directory called servers under /etc/nagios3/ location.
sudo mkdir /etc/nagios3/serversCreate config file to the client to be monitored. In my case, I want to monitor my Ubuntu desktop which has IP address 192.168.1.100 , and hostname as sk .
sudo nano /etc/nagios3/servers/clients.cfgAdd the following lines:
define host{

use                             generic-host

host_name                       sk

alias                           sk

address                         192.168.1.100

max_check_attempts              5

check_period                    24x7

notification_interval           30

notification_period             24x7

}
Save and close the file.
Here, sk is my Ubuntu 14.04 client host name, and 192.168.1.100 is the IP address of my client.
Restart nagios service.
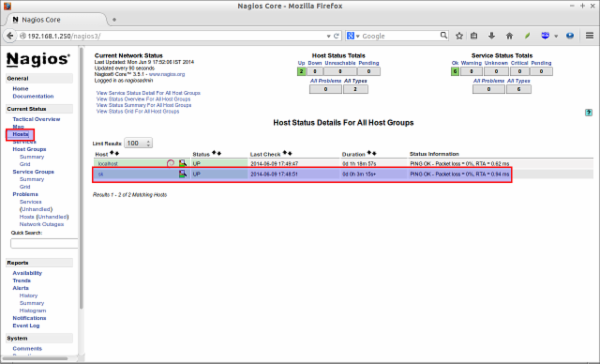
sudo /etc/init.d/nagios3 restartNow, open the nagios web console again in the browser and navigate to “Hosts” section in the left pane. You should see the newly added client will be visible there. Click on the host to see if there is anything wrong or alerts. Please note that you have to wait 90 seconds after any changes in your nagios server.
Click on the monitoring target, you’ll get the detailed output:
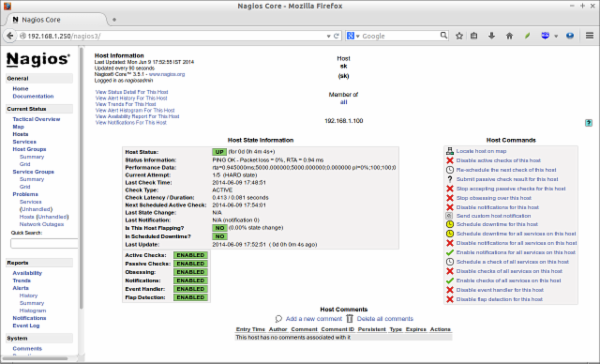
Like this way, you can define more clients by creating a separate config files /etc/nagios3/servers directory for each client.
Define services
We have defined the monitoring host before. Now let us add some services of the monitoring host. For example, to monitor the ssh service, add the following lines shown in red colour in the /etc/nagios3/servers/clients.cfg file.
sudo nano /etc/nagios3/servers/clients.cfgAdd the lines shown in red color:
define host{

use                             generic-host

host_name                       sk

alias                           sk

address                         192.168.1.100

max_check_attempts              5

check_period                    24x7

notification_interval           30

notification_period             24x7

}
define service {
        use                             generic-service
        host_name                       sk
        service_description             SSH
        check_command                   check_ssh
        notifications_enabled           0
        }
Save and close the file. Restart Nagios.
sudo /etc/init.d/nagios3 restartNow log in to Nagios web console and check for the added services. Navigate to Services section, you should see the ssh service will be available there.
To know more about object definitions such as Host definitions, service definitions, contact definitions and more please do visit here . This page will describe you the description and format of all nagios object definitions.
That’s it. Happy Monitoring with Nagios!
Reference Links:
Nagios Homepage
Use GLUT and GLEW to use OpenGL shaders in the Codeblocks environment
At compile time, report:
undefined reference to `_imp__glewInit’
error
Use the following Settings:
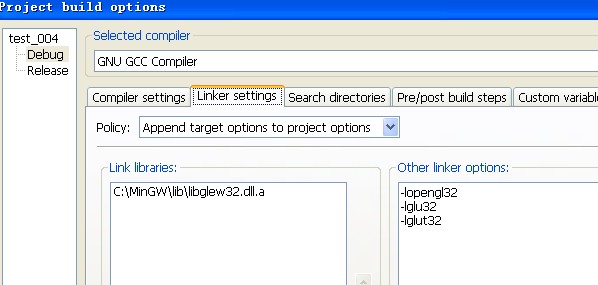
It is ok
Reproduced in: https://www.cnblogs.com/vilyLei/articles/3356711.html
#pragma comment(lib, "legacy_stdio_definitions.lib")2. LNK2019 cannot parse the external symbol _main, which is used in the function “int __cdeclinvoke_main(void)” (?invoke_main@yahxz) is referenced
This is because the program does not have a main function, so the link fails. There are two ways to solve this problem: one is to write a main function as the entry point; The other is in the property page ->; The linker – & gt; On your system, change the first line from /subsytem:console to
/subsystem:windows
3. The arguments of type ‘char *’ participating in type ‘LPCWSTR’ are not compatible.
The argument of type “const char *” is not compatible with the parameter of type “LPCWSTR”.
This is due to the fact that VS2015 uses the Unicode character set. I have tried many methods to solve this problem for a long time, but the most convenient way to solve this problem is in the property page ->; In general, change the character set line from using the Unicode character set to using the multi-byte character set
1.2 a complementary
if after the previous configuration still doesn’t work, can also be so give it a try. Right-click Project-> on an existing Project; Build Option, add the following in Linker Settings:
glut32
opengl32
glu32
winmm
gdi32
glaux
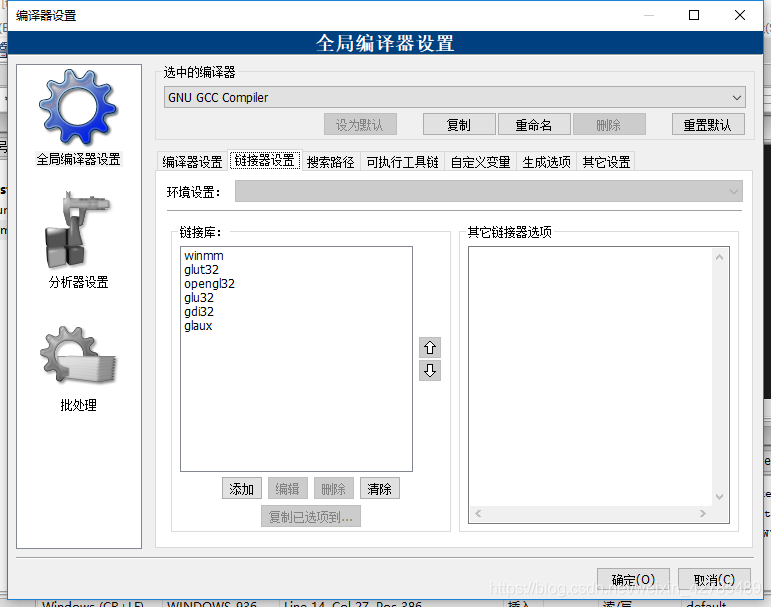
I was a program configuration how can not run up, and then listen to a classmate’s advice, according to his practice, add the above several, and then OK. I don’t know where he found such a scheme. I don’t know if it’s a coincidence, but I’ll write it down first.
1.3 two very tangled problems
but painfully two problems, other students basic didn’t meet, I must have met… Compiling is not through, tangled, and then according to the following method to get it done.
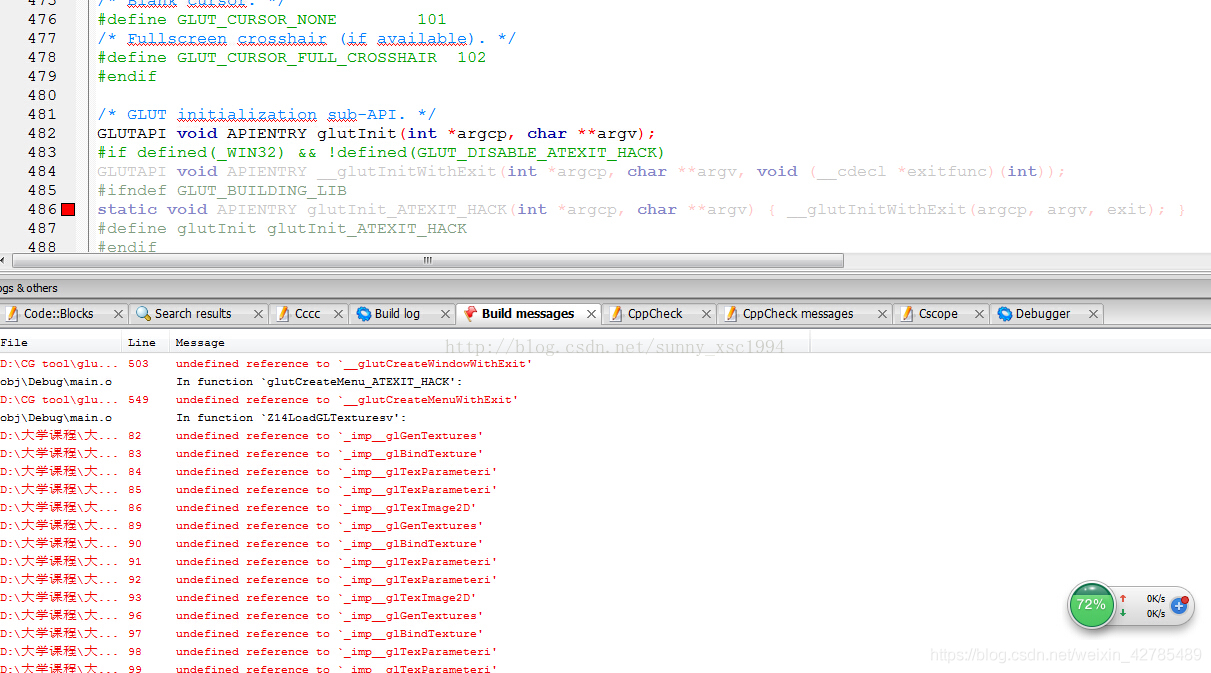
All in all a lot of red errors…
define _STDCALL_SUPPORTED
#define _STDCALL_SUPPORTED
#define/stdcall_supported
#define/stdcall_supported
#define/stdcall_supported
#define/stdcall_supported
#define/stdcall_supported
#define/stdcall_supported
#define/stdcall_supported
There you go, just write this at the very beginning of your code.
No. 2
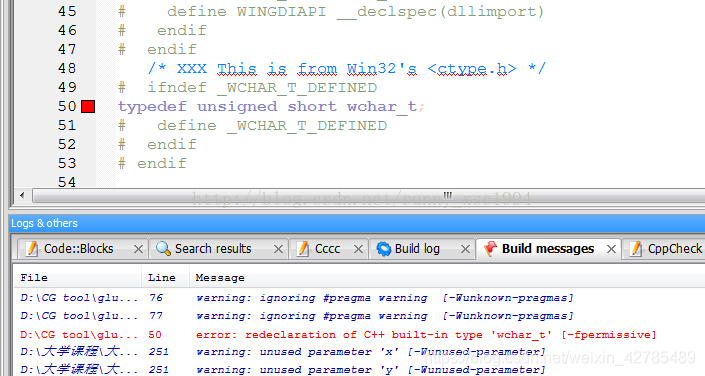
error: redeclaration of c + + built – in type ‘would be’ [- fpermissive]
text will jump out of a code, there are so few lines
use Google search, you can refer to this person to answer the question why
If wchart is already defined (to short for example), butthe
hartdefined macro is not, the line will then be treated as:
t>ef unsigned short short;
Which is a redeclaration of the built-in type. (don’t use the .h btw, it’s not used anymore per standard) is adding defines such that the typedef is not executed, or undef’ing wchar_t if it is a macro such that the typedef is legal.
#define _WCHAR_T_DEFINED
#define _WCHAR_T_DEFINED
#define _WCHAR_T_DEFINED
#define
Then my problem solved so merrily
— — — — — — — — — — — — — — — — — — — — —
the author:
if the Chen “source: CSDN
the original: https://blog.csdn.net/sunny_xsc1994/article/details/44301841
GLUT is an acronym for OpenGL Utility Toolkit, which is a toolkit that can be used to write OpenGL programs. GLUT is great for learning OpenGL, but it’s not good for developing relatively complex user interfaces. Today I’ll talk about how GLUT is used in Codeblocks.
This topic has been are discussed in both English and Chinese, English version see http://www.sci.brooklyn.cuny.edu/~goetz/codeblocks/glut/, Chinese see “using glut in CodeBlocks (opengl) for Windows”.
Here, paraphrase it again.
Let’s first look at the output of an example program called GLUT.
First, you need to prepare three files, glut32.dll, glut32.lib, Glut.h.
These three files can be downloaded from the Internet. GLUT32 is a dynamically linked library,.h is required at compile time,.lib records the basic information of the library function, and.dll is the implementation of the specific function, which needs to be dynamically loaded when the program runs.
Copy glut32.dll to c:\ Windows /system.
Copy glut32.lib to C :\ Program Files (x86)\codeblocks\mingw\lib.
Copy Glut. h to C :\program files\codeblocks\mingw\include\GL.
Now open Codeblocks, create a new project, and select GLUT Project.
Give the project a name, and then the next step is to specify the location of the GLUT toolkit.
Now that the project is set up, click Compile and run it. It turns out that there are a lot of errors.
To make it work, add the header #include “Windows.h” to the automatically generated main.cpp file, and then compile and run it, and the resulting window will appear. The graphical device interface function is included in Windows.h.
Reproduced in: https://blog.51cto.com/11190017/1762229
Codeblocks OpenGL configuration process
Configuring blog recommendations
There are many online configuration tutorial, I think this blog is better: https://blog.csdn.net/qq_41594445/article/details/102965475
because there are codeblocks & amp; OpenGL configuration file download address, and are free!
I made a lot of pit steps in configuring Codeblock + OpenGL, so note it here to prevent others from falling into the pit.
Pit to step on: Codeblock version issues
Don’t go to the website to download the latest Codeblock! .
Because we usually download codeblocks -XX. XX (version number)mingw-setup version of the codeblocks program, it comes with mingw! So if you download the latest version of Codeblocks, the MinGW version will also be the latest.
This affects the later “can not find-lglut32 “spooky error that occurs when a GLUT item is created in Codeblocks. The “can not find-lxxxx “problem is caused by missing lib files. The “can not find” error can not find the “can not find” error in the “can not find” error in the “can not find” error.
I have looked for many tutorials on Baidu and Google, but there is no solution to this problem.
then, I carefully looked at the codeblocks error message when build the GLUT project, found codeblocks build log output in the process of looking for “glut32. Lib”, in which there is a display compiler has reached glut32..lib file location, but ignored the file, shown as “skipping” incompatible XXX, checked the found that this is because the library file version and platform version without corresponding problems!
Then, I uninstalled the latest version of Codeblocks, installed the old version of Codeblocks, followed the tutorial above, and it worked!
lesson
Hope everyone can install smoothly ~
Opencv_contribCmake problem: CMakeError at cmake/OpenCVUtils cmake: 1043 (file)
opencv3.2+opencv_contrib+cmake/ u> opencv3.2+opencv_contrib+cmake opencv3.2+opencv_contrib+cmake opencv3.2+opencv_contrib+cmake
I checked it online and said that OpenCVContrib and OpenCV must have the same version number, but I did download the 3.2.0 version. Further view is opencv_contrib320 \ modules \ \. Within DNN download \ bd5e3eed635a8d32e2b99658633815ef file out of the question, is automatically downloaded in the download protobuf – CPP – 3.1.0. Tar and need is protobuf – CPP – 3.2.0. Tar, then separate download protobuf – CPP – 3.2.0. Replaced the tar, and success
Refer to the article: https://blog.csdn.net/lulumi2016/article/details/77984546