Tag Archives: linux

/sbin/mount.vboxsf: mounting failed with the error: No such device

centos7 VM VirtualBox setting Shared directory error.

Step 1: create the VM VirtualBox Shared directory

1. Create VM’s Shared directory under window D:\workspace

2. Create a Shared directory under Linux mkdir/MNT /workspace

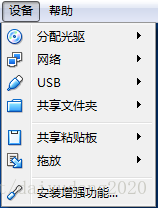
3. Set the Shared directory

on the VM operation interface

Step 2: install the control

1. For Linux, install controls

yum groupinstall “GNOME Desktop” “Graphical Administration Tools”

ln -sf /lib/systemd/system/runlevel5.target /etc/systemd/system/default.target

2. Restart the system, enter the interface centos7 system, then install the enhanced functions on the operation interface of VM, and click run to install

Step 3: mount the Shared disk

mount -t vboxsf workspace /mnt/workspace

ln-s/MNT /workspace /home/daiyu (soft connection to user daiyu)

step 3: /sbin/mount.vboxsf: mounting failed with the error: No such device

solution:

yum clean all
yum update
yum install kernel
yum install kernel-devel
yum install kernel-headers
yum install GCC
yum install make
reboot

0


CD /opt/ vboxadd
./vboxadd setup
reboot

perform step 3 again and succeed.

the original source: http://blog.csdn.net/daiyudong2020/article/details/58073520

End;

Solution to “the grub PC ‘package failed to install into / target / when installing Ubuntu server

“The ‘grub-pc’ package failed to install into /target/ “this is a problem I encountered in The process of installing Ubuntu server 14.10, solution: disconnect The network at The appropriate time (I was configuring APT) during The installation process, or directly install without network. this scheme has been tried by the author and confirmed to be feasible.


launch failed.Binary Not found in Linux / Ubuntu solution

launch failed.Binary not found the solution:

first of all when you’re confused about mingw solutions online, I’ll tell you to stop reading about mingw. Under Linux, mingw is not used, but

is directly completed by Linux GCC

1, look at your Eclipse Console output, if there is g++ not found, it means your system g++ did not install successfully.

Solution: Ctrl+Alt+t to terminal (console) mode, enter sudo apt-get install g++

2, not yet?

Project-> Properties-> C/C++Build-> Settings-> Binary Parsers

check GNU Elf Parser and Elf Parser

and then don’t forget about Project-> Build All (Ctrl+B), then run (Ctrl+ F11)

. If you see the item below come out called Binaries, Congradulations! Configured successfully, ready to run!

3, not yet?

check your file name is XXX. CPP ?And XXX must not contain “. “such symbols


under Windows is best used mingw…

http://hi.baidu.com/doctorjohnson/blog/item/2fafa2431187e11d9213c67e.html

【wget failed】Connecting to 127.0.0.1:7890… failed: Connection refused.

always reports this error when downloading the configuration file while configuring the coolfly agent. At first, I thought it was the problem that the agency website gave out there, stalling for a long time is not good. Then during wine installation today, after adding the PPA Channel, execute the Apt-get Update to report the same error. The error was finally found at

set before the proxy address, not changed back.

--2020-02-18 12:10:33--  https://rbq.caipin.pro/link/cias4tBlguQQ9EVF?clash=1
Connecting to 127.0.0.1:7890... failed: Connection refused.

although (set) inside (network proxy) was changed back to automatic, it could be seen from env| grep-i proxy command that the system was still accessed through the proxy port, but VPN was not set successfully at this time, so it became unable to download.

i2@i2:~/Downloads $ env|grep -I proxy
http_proxy=http://127.0.0.1:7890/
socks_proxy=socks://127.0.0.1:7891/
https_proxy=https://127.0.0.1:7890/

the solution is as follows [1] :

$ unset http_proxy
$ unset https_proxy
 
$ env|grep -I proxy
未输出任何东西

Specific reference:

[1]
the author: no slope of the former Soviet union
link: https://www.jianshu.com/p/d6730c16a4c9
source: Jane books
copyright owned by the author. Commercial reprint please contact the author for authorization, non-commercial reprint please indicate the source.

“Failed to load session” Ubuntu “problem solving summary

“Failed to load session “ubuntu” problem solving summary :

1.
sudo apt-get update
sudo apt-get install
sudo dpkg-reconfigure ubuntu-desktop
Sudo reboot
sudo apt-get install gnome-session
sudo apt-get install lightdm
sudo apt-get install unity-greeter
sudo dpkg-reconfigure lightdm

2. Rebooting the computer appears. Unable to login in the login screen. User login failed.
enter the password and return to the login interface

infinite loop, unable to find the reason.

later found that the unity-2d-launcher was not installed.

tried a lot in the middle, but nothing worked. Basically apt-get Install Unity-2D-Launcher and GnOMe-Session. I don’t know which one worked.

3
4 sudo apt-get install GDM
5

sudo apt-get install –reinstall GDM

0
1 sudo apt-get remove –purge GDM
2
3
4 sudo apt-get install GDM
5

restart invalid, as if the default is lightdm. Some people recommend GDM, I don’t care.

anyway, the problem was finally solved. Still happy.

4
3.
install apt-get unity-2d launcher gnome-session

install GDM

sudo apt-get update
0
1 sudo apt-get update
0
1 sudo apt-get GDM
2
3 default use lightdm
4
5 We’re done now.

4.

looked for some ways, finally found that GDM is not installed (GDM is GNOME graphics desktop landers), the solution:
sudo apt-get-d install –reinstall GDM

sudo apt-get remove –purge GDM

sudo apt-get install GDM

How to solve SVN authorization failed error

how to solve SVN Authorization failed error

to recommend a cat smoking site: love cats (http://15cat.com), I hope you like

Conf:
[general]
anon-access = read
authth-access = write
password-db = passwd
authz-db = authz

2, passwd:
[users]
admin=123

3, authz:
[groups]
//
admin = rw

appears authorization failed exception, usually in the authz file or svnserv.conf, the user group or user authorization is not well configured, as long as the setting [/] can represent all the resources in the root directory, if you want to limit the resources, you can add the subdirectory.

Centos8 solves SSH secure shell error algorithmic negotiation failures

the new server version has arrived at CentOS8 today, but SSH Secure Shell is still 3.2.9 years ago, so I encountered an error in the title when connecting to the server. This question is a tragic waste of my time.

there are many, many posts on the web that address this problem, and they all go like this:

Sshd_config
sudo vim /etc/ssh/sshd_config

2. at the end of the file add the following information
Ciphers either aes128 – CBC, aes192 – CBC, aes256 – CBC, either aes128 – CTR, aes192 – CTR, aes256 – CTR, 3 des – CBC, arcfour128, arcfour256, arcfour, blowfish – CBC, cast128 – CBC
MACs Hmac – md5, hmac – sha1, [email protected], hmac – ripemd160 digest, hmac – sha1-96, hmac – md5-96
KexAlgorithms diffie-hellman-group1-sha1,diffie-hellman-group14-sha1,diffie-hellman-group-exchange-sha1,diffie-hellman-group-exchange-sha256,ecdh-sha2-nistp256,ecdh-sha2-nistp384,ecdh-sha2-nistp521,diffie-hellman-g roup1-sha1,[email protected]

3. after saving SSH service
sudo /etc/init.d/ SSH restart

everyone said it was good, but after I tried it, it was tragic. After I added the configuration, I could not restart SSH and it would report an error.

these two articles explain the real reason and offer a solution:

https://blog.csdn.net/pgmzyy/article/details/88586101

https://blog.csdn.net/Vertoria/article/details/82226340

, however, I still failed to solve the problem, and finally decided to abandon the outdated SSH Secure Shell Client and replace it with FileZilla to solve the problem: FileZilla also supports SSH protocol to transfer files, and its operation is slightly more humane than SSH Secure Shell Client

Samba error: session setup failed: NT_ STATUS_ LOGON_ FAILURE

On the command line, type the command:

~ $smbclient – L \ \ 127.0.0.1

session setup failed: NT_STATUS_LOGON_FAILURE

this is because the user ID executing the smbclient command is not a user of the samba service. The solution is as follows:

add the changed user ID to samba

~$smbpasswd -a user ID

set password as required

so that the user ID becomes a user of the samba service, enter the command

~ $smbclient – L \ \ 127.0.0.1

Domain = = [Example] the OS/Unix Server = [Samba 3.6.3]

Sharename Type the Comment

— — — — — — — — — — — — — — — — —

print $Disk Printer Drivers

cdrom Disk Samba server’s cd-rom

Music Disk Music files

IPC$IPC IPC Service (Samba File Server)

Domain = = [Example] the OS/Unix Server = [Samba 3.6.3]

Server Comment

— — — — — — — — — — — — — — — –

Test1 Samba File Server

Test2

Workgroup Master

— — — — — — — — — — — — — — — –

Example Test2

problem solved.


=============================================================


1. Session setup failed: NT_STATUS_LOGON_FAILURE
this error means that the user is wrong, it may be that the user does not exist, it may also be that the password is wrong, or the user exists in one of the users of samba and the system,
in a word is that the user and password have problems
. The NT_STATUS_BAD_NETWORK_NAME
error indicates that the Shared directory does not exist, or that the permissions are not right
, as in my case. I have a user named xiaowang. In the home directory of xiaowang, I created a new share directory,
, and added share to smb.conf to make it myshare. However, I have designated the valid user of this Shared directory as guest(also a user in the system). Now I have the share directory under home.

==================================================================================

the solution in the latest centos is to run the following command to resolve the samba NT_STATUS_BAD_NETWORK_NAME problem:
setsebool -p samba_enable_home_dirs=1

viewing the logs caused by the samba process being blocked by SELinux from accessing the home directory:
Feb 26 22:56:22 igosvr setroubleshoot: SELinux is preventing the samba daemon from reading users’ home directories. For complete SELinux messages. run sealert -l 6e7522fa-f56c-400e-9e04-3722033573b5


confirm that the SMB service above REDHAT has started and IPTABLES has closed

Virtual environment: error: virtualenv is not compatible with this system or executable

I install the python virtual environment

with the following command

pip install --user virtualenv
#不行的话用下一句命令安装virtualenv
#sudo apt-get install python-virtualenv

python virtual environment installation successful, I created a Virtualenv directory in my home directory. I’m going to put all the virtual environments in this directory. Then, go to this directory and I’ll use the following command to create a virtual environment (I’ll call this virtual environment flask-env)

virtualenv helloworld

, however, it reports the following error message

solution:

open. Bashrc

with the following command

sudo gedit ~/.bashrc

add the following information

on the last line of the open file

export LD_LIBRARY_PATH=$LD_LIBRARY_PATH:/home/helloworld/anaconda3/lib

note: cannot have Spaces, on either side of the equal sign “=”/home/helloworld/anaconda3/lib this part is the python lib address, to write this part according to your specific situation.

and then rerun

virtualenv helloworld

virtual environment is created successfully, and the activation command is as follows:

vivian@vivian-Super-Server:~/HelloWorld$ virtualenv helloworldUsing base prefix '/home/vivian/anaconda3'
New python executable in /home/vivian/HelloWorld/helloworld/bin/python
Installing setuptools, pip, wheel...done.
vivian@vivian-Super-Server:~/HelloWorld$ source helloworld/bin/activate

close virtual environment

deactivate

note: the path of the virtual environment cannot have Chinese, otherwise this problem will also occur