Tag Archives: linux

CentOS 8.2 installation-solve Error setting up base repository

Install CentOS 8.2- Error setting up Base Repository
Prepare to download the system image to make the U disk boot disk

CentOS 8 also came out for a while, replacing CentOS 8.2 on your computer from 7.6 with new, in keeping with the old principle. Removed the original system drive and installed a new 250G Samsung 850EVO. Prepare to install CentOS 8.2.
The preparatory work
Download system image
Direct downloads are not available on the CentOS official website and are required from a mirror. Can download directly, also can use thunderbolt and so on. For intramural traffic users, they can use uTorrent to use ipv6 and download it from the mirror of other universities (Shanghai Jiaotong University mirror station) to avoid heavy traffic. CentOS 8.2 provides boot, dvd1 and minimal installation methods. For convenience, the DVD1 image package (i.e., Cenos-8.2.2004-x86_64-dvd1.iso) was downloaded.
Make U disk starter disk
Cenos-8.2.2004-x86_64-dvd1.iso images are huge, at 7.66 GB, compared with about 4 GB for CentOS 7.6. It is recommended to prepare a larger USB flash disk for the startup disk. A 64GB or larger USB flash disk is recommended. I started to use a 16-g USB flash disk to make the startup disk. In the installation process, Error setting up the base Repository would occur. At one point, I thought it was a mirror file error and dropped it three times from three different mirror sources. It turns out that installing directly with virtual machines. Iso mirroring is not problematic, while ultraISO usb flash drives are. It took a 64GB USB stick to make the error go away. If you have doubts about your usb flash drive or are worried that you are not familiar with the installation process, you can use the virtual machine to install the usb flash drive first, then install it on a physical machine.
When using a normal USB flash drive for Installation, the Software-Installation Source will become Local media.

in this way, only need to select the SYSTEM partition in system-installation Destination, usually just select /boot and/and swap. No other partitions are selected.
is then installed normally.

Linux Mint installs Hadoop environment

Using Hadoop-Language-2.8.4.jar, the command is as follows: ./share/hadoop/tools/lib/hadoop – streaming – 2.8.4. Jar – input/Mr – – the output/input/* Mr – output – the file/home/LZH/external/Mapper. Py – Mapper ‘Mapper. Py’ – the file/home/LZH/external/Reducer. Py – Reducer ‘Reducer.py’
Problem 1: bash:/share/hadoop/tools/lib/hadoop – streaming – 2.8.4. Jar: Permission denied
Solution: expand the file permissions, chmod -r 777/share/hadoop/tools/lib/hadoop – streaming – 2.8.4. Jar
Invalid File (bad Magic Number): Exec format Error
Solution: I was careless, and the command omitted the hadoop JAR in the front, and added it, namely: Hadoop jar./share/hadoop/tools/lib/hadoop – streaming – 2.8.4. Jar – input/Mr – – the output/input/* Mr – output – the file/home/LZH/external/Mapper. Py – Mapper ‘Mapper. Py’ – the file/home/LZH/external/Reducer. Py – Reducer ‘Reducer.py’
Problem 3 May be encountered: Mapper.py and reduc. py have to be turned to executable. Chmod +x filename modification permission is executable
When writing MapReduce in Python, it’s a good idea to start with: #! The /usr/bin/env python statement
And finally it works

Hadoop worked fine, but for other reasons, I pressed the power button to force a shutdown, huh?After starting start-up, start start-up all-sh, and then JPS check that there is a missing Datanode in Hadoop, FS-LS/Input, it is found that it cannot connect to 127.0.0.1. Restart hadoop again when starting Hadoop, it is found that it can also create folders by running the command Hadoop, FS-LS/Input, but there is a problem 3 when putting file: Put the File/input/inputFile. TXT. _COPYING_ could only be replicated to 0 home nodes minReplication (= 1). There are 0 datanode (s) running and no node (s) are excluded in this operation.
At this point, stop-all.sh discovers no Proxyserver to stop and no Datanode to stop. (pro test the first solution is successful)
Reason 1: Every time the Namenode Format creates a namenodeId again, while under Hadoop.tmp. dir contains the ID generated by the last format. The Namenode format cleans up the data under the Namenode, but does not clean up the data under the Datanode, which causes failure at startup.
Here are two solutions:

rm -rf /opt/hadoop/ DFS /name/*
rm -rf/rf /hadoop/ DFS /name/*
remove the contents of the “DFS. Datand. data.dir”
rm-rf /opt/hadoop/ DFS /data/*
2) delete files beginning with “hadoop” under “hadoop.tmp.dir”
rm-rf /apt/hadoop/ TMP /hadoop*
3) reformat hadoop
hadoop namenode-format
4) start hadoop
The disadvantage of the start-all-sh
scheme is that all the important data on the original cluster is gone. Therefore, the second scheme is recommended:
1) modify the namespaceID of each Slave so that it is consistent with the Master’s namespaceID.
or
2) modify the Master’s namespaceID to match the Slave’s namespaceID.
Master “namespaceID” located in the “/ opt/hadoop/DFS/name/current/VERSION” file, the Slave “namespaceID” is located in the “//opt/hadoop/DFS/data/current/VERSION” file.

reason 2: the problem is that hadoop USES the mapred and DFS process Numbers on the datanode when it stops. While the default process number is saved under/TMP, Linux defaults to delete files in this directory every once in a while (usually a month or 7 days). Therefore, after deleting the two files of Hadoop-Hadoop-Jobtracker. pid and Hadoop-Hadoop-Namenode. Pid, the Namenode will naturally not find the two processes on the Datanode.
configuring export HADOOP_PID_DIR in the configuration file hadoop_env.sh solves this problem.
In the configuration file, the default path for HADOOP_PID_DIR is “/var/hadoop/pids”, we will manually create a “Hadoop” folder in the “/var” directory, if it already exists, do not create it, remember to chown the permissions to hadoop users. Then kill the process of the Datanode and Tasktracker in Slave (kill -9 process number), restart -all.sh and stop-all.sh without a “No Datanode to stop”, indicating that the problem has been solved.

Run.sh: Bash:./run.sh: Permission denied
Solutions:
Use the command chmod to modify the directory. Sh permissions can be
Such as chmod u + x *. Sh
A Container killed on requisition.exit code is 143.
I just ran out of memory. There are two ways to solve it perfectly:
1. Several more Mapper and Reducer are specified during the runtime:
-d mapred.map.tasks=10 \ #command [genericOptions] [commandOptions]
-d mapred.reduce.tasks=10 \ # note that -d is genericOptions,
before the other parameters
– numReduceTasks 10
2. Modify yarn-site.xml to add the following attributes:

<property>
   <name>yarn.nodemanager.vmem-check-enabled</name>
   <value>false</value>
   <description>Whether virtual memory limits will be enforced for containers</description>
</property>

<property>
   <name>yarn.nodemanager.vmem-pmem-ratio</name>
   <value>4</value>
   <description>Ratio between virtual memory to physical memory when setting memory limits for containers</description>
</property> 

Reference:

[Python] Implement Hadoop MapReduce program in Python: calculate the mean and variance of a set of data

Linux mounting errors (Error mounting /dev/sda8 at /media)

Mount an NTFS partition that cannot be accessed from Windows under Linux
About Windows 7, the computer installed Ubantu in the other partition (not allocated space under Win7). After installing Ubuntu, the user was not allowed to access the Windows 7 partitions by myself. Error mounting /dev/sda8 at /media/my/XXX: commandline ‘mount-t “ntFs-o” was not allowed
Solution:

Open terminal: If ntFS-3G is not installed, sudo Apt-get install NTFS-3G

Fix the appropriate partition for mounting errors such as /dev/sda8 in the prompt, enter:
sudo ntfsfix /dev/sda8
Just hit enter.

syntax error near unexpected token `then’ problem solution

#! /bin/bash
#if program test

echo ‘a:’
read a
If [“$a” = “English”]; then
echo “right”
else
echo “wrong”
fi

I wrote the shell script according to the procedure on the video, but “syntax error near token ‘then'” appeared during the execution. After looking at the syntax error near token’ then’ for half a day, I did not find out the reason. After searching the Internet for a long time, I finally understood the reason: There is no space between if and ‘[‘. In addition, when executing, I also found that there must be space on both sides of’ = ‘, otherwise there will be an error, not a syntax error, but no matter what value is assigned to a, the program will get the statement after if is false, thus resulting in wrong.

cygrunsrv: Error starting a service: QueryServiceStatus: Win32 error 1062: Solution

Source: http://blog.csdn.net/wangxw8746/article/details/9382155

Cause of the problem: Probably the /var/log permissions are not set correctly. First execute mkpasswd and mkGroup to regenerate the permission information, then delete the SSHD service and reconfigure
Solutions:
$ mkpasswd -l > /etc/passwd
$ mkgroup -l > /etc/group
$ cygrunsrv -R sshd
$ ssh-host-config -y
$ cygrunsrv -S sshd

When linux installs rpm, it prompts: can’t create transaction lock on /var/lib/rpm/.rpm.lock error

Install the RPM package under Linux with a non-root user. Error can’t create transaction lock on /var/lib/ RPM /.rpm. Lock.

[hadoop@hadoop186 rpm]$ rpm -ivh libconfuse-2.5-4.el5.x86_64.rpm 
Warning: libconfuse-2.5-4.el5.x86_64.rpm: ヘッダ V3 DSA/SHA1 Signature, key ID 217521f6: NOKEY
エラー: can't create transaction lock on /var/lib/rpm/.rpm.lock (許可がありません)


Error reason: Permission problem

[hadoop@hadoop186 sbin]$ ll  /var/lib/rpm/
Totally 95584
-rw-r--r--. 1 root root 10678272  7月 10 11:41 2014 Basenames
-rw-r--r--. 1 root root    12288  5月  4 11:58 2014 Conflictname
-rw-r--r--. 1 root root  2170880  7月 10 11:41 2014 Dirnames
-rw-r--r--. 1 root root 10604544  7月 10 11:41 2014 Filedigests
-rw-r--r--. 1 root root    36864  7月 10 11:41 2014 Group
-rw-r--r--. 1 root root    24576  7月 10 11:41 2014 Installtid
-rw-r--r--. 1 root root    86016  7月 10 11:41 2014 Name
-rw-r--r--. 1 root root    24576  5月  5 15:29 2014 Obsoletename
-rw-r--r--. 1 root root 73293824  7月 10 11:41 2014 Packages
-rw-r--r--. 1 root root  1331200  7月 10 11:41 2014 Providename
-rw-r--r--. 1 root root   667648  7月 10 11:41 2014 Provideversion
-rw-r--r--. 1 root root    12288  3月 27 14:11 2014 Pubkeys
-rw-r--r--. 1 root root   512000  7月 10 11:41 2014 Requirename
-rw-r--r--. 1 root root   323584  7月 10 11:41 2014 Requireversion
-rw-r--r--. 1 root root   163840  7月 10 11:41 2014 Sha1header
-rw-r--r--. 1 root root    77824  7月 10 11:41 2014 Sigmd5
-rw-r--r--. 1 root root    12288  3月 27 14:46 2014 Triggername
-rw-r--r--  1 root root    24576  7月 10 11:41 2014 __db.001
-rw-r--r--  1 root root   229376  7月 10 11:41 2014 __db.002
-rw-r--r--  1 root root  1318912  7月 10 11:41 2014 __db.003
-rw-r--r--  1 root root   753664  7月 10 11:41 2014 __db.004

solution:
Enter “su” and password at the terminal, log in root, and log in as root will not be prompted

[hadoop@hadoop186 rpm]$ su - root
パスワード:
[root@hadoop186 ~]# pwd
/root
[root@hadoop186 ~]# cd /home/hadoop/rpm/
[root@hadoop186 rpm]# ll
合計 164
-rw-rw-r--. 1 hadoop hadoop 31792  6月 20 17:00 2014 argtable-2.13-2.el6.x86_64.rpm
-rw-rw-r--  1 hadoop hadoop 87025  7月 10 11:38 2014 libconfuse-2.5-4.el5.x86_64.rpm
-rw-rw-r--  1 hadoop hadoop 15013  7月 10 11:38 2014 libconfuse-devel-2.5-4.el5.x86_64.rpm
-rw-rw-r--. 1 hadoop hadoop 26256  6月 20 17:00 2014 log4c-devel-1.2.4-1.el6.x86_64.rpm
[root@hadoop186 rpm]# rpm -ivh libconfuse-2.5-4.el5.x86_64.rpm 
警告: libconfuse-2.5-4.el5.x86_64.rpm: ヘッダ V3 DSA/SHA1 Signature, key ID 217521f6: NOKEY
準備中...                ########################################### [100%]
   1:libconfuse             ########################################### [100%]
[root@hadoop186 rpm]# rpm -ivh libconfuse-devel-2.5-4.el5.x86_64.rpm
警告: libconfuse-devel-2.5-4.el5.x86_64.rpm: ヘッダ V3 DSA/SHA1 Signature, key ID 217521f6: NOKEY
準備中...                ########################################### [100%]
   1:libconfuse-devel       ########################################### [100%]
[root@hadoop186 rpm]# 

Solution to “An error occurred while loading the archive” appears when decompressing the rar file compressed package

The installation
The reason is that the Linux version does not support RAR commercial/non-free formats by default, we just need to install UNrar.
compression

sudo apt-get install rar

Unpack the function

sudo apt-get install unrar


Reference:

    https://blog.csdn.net/KiWi_VC/article/details/88041211https://blog.csdn.net/songbinxu/article/details/80435665https://www.cnblogs.com/jiu0821/p/9066462.html


How to solve the problem of Cannot find module’npmlog’ when installing nodejs under Linux

I used Ubuntu version of Linux, downloaded nodeJS6 executable file compression package from nodeJS official website, extracted it into folder under the Window, and uploaded it to Linux server through WinSCP.
Configure environment variables:
Add a nodejs.sh script under /etc/profile.d/, which reads as follows:

export NODE_HOME=/home/TECS/nodejs/node-v6.11.1-linux-x64
export PATH=$PATH:$NODE_HOME/bin
export NODE_PATH=$NODE_HOME/lib/node_modules

If you want to make the configuration work without restarting the machine, repeat the three commands from the command line.
Running NPM-V at this time Cannot find Module ‘NPMLOG’ error.
The solution
CD command enter /home/TECS/nodejs/node-v6.11.1-linux-x64/bin then execute the following command to establish the soft connection:

ln -s ../lib/node_modules/npm/bin/npm-cli.js

The generated NPM-cli.JS soft connection is then renamed to NPM. The original NPM file is not available.

mv npm-cli.js npm

Solution to stray’\357′ in program when gcc is compiled

Link: http://blog.chinaunix.net/uid-23089249-id-61541.html

I got a few header files from my colleagues. It’s ok to compile with GCC, but a whole bunch of them came up when I compiled with ARM-Linux-gcc!

SerialPort.h:1: error: stray ‘\357’ in program

SerialPort.h:1: error: stray ‘\273’ in program

SerialPort.h:1: error: stray ‘\277’ in program

Look at these errors confused, after looking up the Internet, found that some characters in the file compiler does not support. If you look for these characters one by one, you’ll probably be looking for a long time! The simplest solution:
Put the files into The Windows system, use “Notepad” to open these files, and then “save as”, choose the code ASNI, and then under Linux to re-compile with the compiler, generally can pass!

Experience:

The first time: unknown;

Second time: when compiling QT program, prompt this error; According to the above method solved.

Linux Fatal Python error: Py_Initialize Unable to get the locale encoding

Question.

python lx@lx-PC: ~ $
Can’t find a platform independent library & lt; prefix>
Platform Dependency Library Not Found& lt; exec_prefix>
Consider setting the dollar PYTHONHOME & lt; prefix> [: & lt; exec_prefix>]
python fatal error: Py_Initialize: cannot get region code
ModuleNotFoundError: No module is named “code”.

Similar problems:Commanded conda

The temporary solution is.

export PATH="/home/[your_name]/anaconda/bin:$PATH"

However, after the next restart, this problem will still occur, so we need acivate ~/.bash_profile

. ~/.bash_profile
#or
source ~/.bash_profile

That should get us there.

The first step is to find the Python directory

1. Default Python installation


Normally, Python comes pre-loaded with Linux, but at a lower level, for example, Python2.7.10 is pre-loaded with Ubuntu15.

Use the command: which Python to see the current Python installation path:

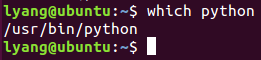
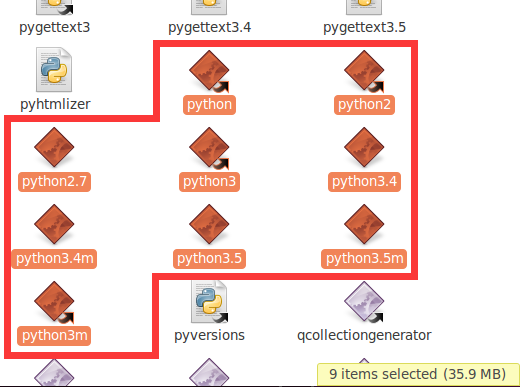
If you open the corresponding path, you can see that the python directory has these files, that is, the directory with similar files (Python, Python 2, Python 2.7) is the corresponding Python directory in your system:

If a version of Python3 is not explicitly required, the 2.7.10 version can be used instead.
It is explicitly required to use Python3 and then make changes.

One thing to note here is that python, Python 2, Python 3 exist in the figure above, which means that versions 2 and 3 are installed,

step 2:

Linux adds the command to PATH:
LinuxApacheBash
Simply put, PATH is a string variable for a set of paths. When you type a command that doesn’t have any paths, LINUX looks for that command in the PATH record. If there is, it will be executed, if there is no prompt command can not be found. For example, in the root directory/can enter the command ls, in the directory /usr can also enter ls, but in fact ls command is not in the two directories, when you enter ls command LINUX will go to /bin,/usr/bin,/sbin and other directories to find the command. PATH is the variable that defines the PATH strength such as /bin:/sbin:/usr/bin, where the colon is the separator between directories.
How to customize path:
if you new compiler installed an apache under/usr/local/apache, every time you want to start not to knock a string of characters (#/usr/local/apache/bin/apachectl start) to use it, but direct anywhere like ls direct input like this (# apachectl start) a brief command. In this case, you need to change the environment variable PATH, or to be more precise, add a value to PATH, /usr/local/apache/bin. There are three ways to add /usr/local/apache/bin to your PATH:
1, directly from the command line setup PATH
# PATH = $PATH:/usr/local/apache/bin
using this method, applies only to the current session, that is to say, whenever logout or cancellation of system, the PATH Settings will be failure.
2, set in the profile PATH
# vi/etc/profile
find export line, a new line below, content is: the export PATH = $PATH:/usr/local/apache/bin.
note: = no Spaces on either side of the equal sign. This is the best approach, and will not change unless you manually force the PATH value to change.
the change to PATH does not take effect immediately after you edit /etc/profile. If you want to take effect immediately, you can execute the # source profile command.
3, in the current user profile set PATH
# vi ~ /. Following the
modify the PATH line, the/usr/local/apache/bin added, such as: the PATH = $PATH: $HOME/bin:/usr/local/apache/bin.
# source ~/.bash_profile
for this change to take effect. Note: this method only works for the current user. The modification is invalid for other users.

When you find that the new path /usr/local/apache/bin is useless or not needed, you can delete your custom path in the /etc/profile or ~/.bash_profile previously modified.

Step 3:
Add the path to the.profile:
export PATH=”$PATH:/home/lx/anaconda3/bin”

$sudo gedit ~/.profile(or. Bashrc)

$sudo gedit ~/.profile(or. Bashrc)

$sudo gedit ~/.profile(or. Bashrc)
export PATH= “$PATH:your path1:your path2…”
save the file, log out and log in again, the variable takes effect.
variables added this way are only valid for the current user.
$sudo gedit /etc/profile

export PATH= “$PATH:your path1:your path2…”
after the file is edited and saved, restart the system and the variable takes effect.
variables added this way are valid for all users.
$sudo gedit /etc/environment
find the following PATH variable:
PATH=”<
$sudo gedit /etc/environment
PATH=”< . >”
modify the PATH variable by adding your own PATH, for example:
PATH=”< . > : your path1: your path2…”
paths are separated by colons. The file is also rebooted into effect, affecting all users.
note that you are not adding export PATH=… .

method 4: directly under the terminal input

$sudo export PATH=”$PATH:your path1:your path2…
variable takes effect immediately, but the Settings become invalid after the user logs out or the system restarts, suitable for temporary variable Settings. Note: modifications to methods 2 and 3 need to be made with care, especially through root, which can lead to some serious system errors if modified incorrectly. Therefore, I recommend using the first method. Also, embedded Linux development is best not done under root (unless you are already familiar with Linux!!). To avoid serious system errors due to improper operation.

the following is an error for the environment file changes lead to problems and solutions of example:

problem: because not careful in the/etc/environment in environment variables lead to cannot login
tip: don’t set in the/etc/environment export PATH that will lead to can not login system after restart
the solution:
enter command mode in the login interface Alt + CTRL +f1, if not root user need to type (root user is not allowed to be so verbous, gedit edit will not be displayed)
/usr/bin/sudo /usr/bin/vi /etc/environment
cursor move to export PATH** line, press d to delete the line twice;
input :wq save exit;
then type /sbin/reboot to restart the system (it may prompt you to need to boot, at this point direct power off)