Tag Archives: linux

[Solved] NVIDIA-SMI has failed because it couldn‘t communicate with the NVIDIA driver.

After restarting the server, the NVIDIA driver cannot be connected.

NVIDIA-SMI has failed because it couldn't communicate with the NVIDIA driver. Make sure that the latest NVIDIA driver is installed and running.

Solution:
check the version number of NVIDIA driver installed before

ls /usr/src | grep nvidia

Output

sudo apt install dkms
sudo dkms install -m nvidia -v 460.73.01

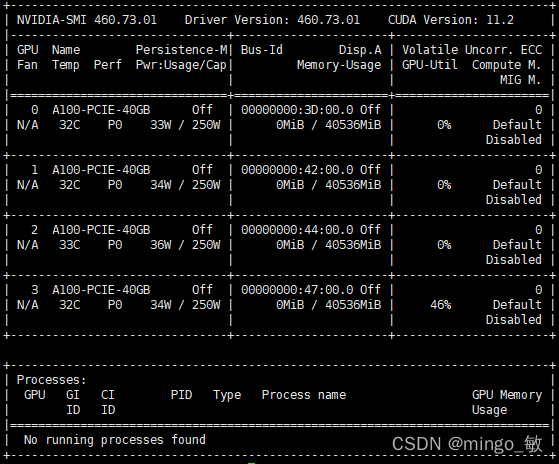
Finally, The familiar interface is back

Ansible Use yum module to install rpm Error: Request failed: <urlopen error [SSL: CERTIFICATE_VERIFY_FAILED] certificate v

Project scenario:

Today I used Ansible to install postgresql-13 and wrote the following test script from the official installation tutorial.

- hosts: postgresql
  gather_facts: false
  tasks:
    - name: install pg repo
      yum:
        name: https://download.postgresql.org/pub/repos/yum/reporpms/EL-7-x86_64/pgdg-redhat-repo-latest.noarch.rpm
        state: present
    - name: install pg
      yum:
        name: postgresql13-server
        state: present
    - name:
      stat:
        path: "/var/lib/pgsql/data/pg_hba.conf"
      register: postgres_data
    - name:
      shell: "/usr/pgsql-13/bin/postgresql-13-setup initdb"
      when: not postgres_data.stat.exists
    - name:
      systemd:
        name: postgresql-13
        enabled: yes
        daemon_reload: yes
        state: started

Problem Description:

the following error occurs when running the script:

fatal: [172.17.200.2]: FAILED! => {"ansible_facts": {"discovered_interpreter_python": "/usr/bin/python"}, "changed": false, "msg": "Failure downloading https://download.postgresql.org/pub/repos/yum/reporpms/EL-7-x86_64/pgdg-redhat-repo-latest.noarch.rpm, Request failed: <urlopen error [SSL: CERTIFICATE_VERIFY_FAILED] certificate verify failed (_ssl.c:618)>"}

Solution:

Just modify https to http in https://download.postgresql.org/pub/repos/yum/reporpms/EL-7-x86_64/pgdg-redhat-repo-latest.noarch.rpm

[Solved] WSL error: wslregisterdistribution failed with error: 0x800701bc

1. Introduction

For the new computer, WSL has installed Ubuntu. When entering Ubuntu, an error occurs

WslRegisterDistribution failed with error: 0x800701bc

2. Solution

This is because the wsl2 kernel is not updated

Enter the administrator permission command line, WSL — update

wsl --update
Checking for updates...
Downloading updates...
Installing the update...
This change will take effect the next time WSL is fully rebooted. To force a reboot, run "wsl --shutdown".
Kernel version: 5.10.60.1

Then force restart

wsl --shutdown

[Solved] Some index files failed to download.They have been ignored, or old ones used instead

sudo apt-get updateerror:

Err:1 http://ppa.launchpad.net/wireshark-dev/stable/ubuntu bionic InRelease
  Temporary failure resolving 'ppa.launchpad.net'
Err:2 http://security.ubuntu.com/ubuntu bionic-security InRelease
  Temporary failure resolving 'security.ubuntu.com'
Err:3 http://archive.ubuntu.com/ubuntu bionic InRelease
  Temporary failure resolving 'archive.ubuntu.com'
Err:4 http://archive.ubuntu.com/ubuntu bionic-updates InRelease
  Temporary failure resolving 'archive.ubuntu.com'
Err:5 http://archive.ubuntu.com/ubuntu bionic-backports InRelease
  Temporary failure resolving 'archive.ubuntu.com'
Reading package lists... Done
W: Failed to fetch http://archive.ubuntu.com/ubuntu/dists/bionic/InRelease  Temporary failure resolving 'archive.ubuntu.com'
W: Failed to fetch http://archive.ubuntu.com/ubuntu/dists/bionic-updates/InRelease  Temporary failure resolving 'archive.ubuntu.com'
W: Failed to fetch http://archive.ubuntu.com/ubuntu/dists/bionic-backports/InRelease  Temporary failure resolving 'archive.ubuntu.com'
W: Failed to fetch http://security.ubuntu.com/ubuntu/dists/bionic-security/InRelease  Temporary failure resolving 'security.ubuntu.com'
W: Failed to fetch http://ppa.launchpad.net/wireshark-dev/stable/ubuntu/dists/bionic/InRelease  Temporary failure resolving 'ppa.launchpad.net'
W: Some index files failed to download. They have been ignored, or old ones used instead.

Use Ping www.google.comtest the network. If it appears: Ping: www.google.com: temporary failure in name resolution is a network problem,

Solution:

first

sudo vim /etc/systemd/resolved.conf

Modify DNS as follows:

[Resolve]
DNS=8.8.8.8
#FallbackDNS=
#Domains=
#LLMNR=no
#MulticastDNS=no
#DNSSEC=no
#Cache=yes
#DNSStubListener=yes

Modify the following configuration file

vim /etc/resolv.conf 

Add the following:

nameserver 8.8.8.8

Then restart:

reboot

Just update the source after restart:

sudo apt-get update

Linux Connect Error: network.service failed [How to Solve]

Today, you can’t connect the virtual machine with finalshell. Later, you can modify the static IP address and restart the network.service.failed, display failed to start LSB: bring up/do...

Solution:

    1. Stop the NetworkManager service
systemctl stop NetworkManager
systemctl  disable NetworkManager
    1. Restart the network
systemctl restart network 

[Solved] NVIDIA-SMI has failed because it couldn‘t communicate with the NVIDIA driver.

1. Error
nvidia-smi input error:
NVIDIA-SMI has failed because it couldn’t communicate with the NVIDIA driver. Make sure that the latest NVIDIA driver is installed and running.
input torch.cuda.is_available() return false

2. Solution

Simply execute two commands.

sudo apt-get install dkms
sudo dkms install -m nvidia -v 470.94 (470.94 is the driver version number)

Use the command ll /usr/src/ to see a nvidia-470.94/ folder underneath, the version number varies from your computer

[Solved] wsl Error: WslRegisterDistribution failed with error: 0x800701bc

After WSL is enabled on the windows system, install Ubuntu in the Microsoft Store, and then open Ubuntu. Prompt:
Cause:
After wsl1 is upgraded to wsl2, but the kernel is not upgraded, so this error message will appear, just go to Microsoft WSL official website to download and install the latest WSL2 Linux kernel update package for x64 computers.

Solution:
1、Download the latest wsl installation package, download address: https://wslstorestorage.blob.core.windows.net/wslblob/wsl_update_x64.msi

2、After downloading the installation package, just run the installation directly!

CentOS 8: No URLs in mirrorlist error [How to Solve]

Question:

In CentOS 8, there is an error using yum. There is no URL in the image list, similar to the following:

Error: Failed to download metadata for repo 'appstream': Cannot prepare internal mirrorlist: No URLs in mirrorlist

reason:

On January 31, 2022, the CentOS team finally removed all packages of CentOS 8 from the official image.

CentOS 8 has expired on December 31, 2021, but the software package has been retained on the official image for some time. Now they are transferred to https://vault.centos.org

Solution:

If you still need to run CentOS 8, you can run it in/etc/yum repos. Update the source in D. Use vault.centos.Org instead of mirror.centos.org.

sudo sed -i -e "s|mirrorlist=|#mirrorlist=|g" /etc/yum.repos.d/CentOS-*
sudo sed -i -e "s|#baseurl=http://mirror.centos.org|baseurl=http://vault.centos.org|g" /etc/yum.repos.d/CentOS-*

Essentially, it replaces the previous URL with the URL that is still running. This problem should be solved within this period of time.

Ubuntu install and compile OpenCV3.4.0 fatal error: dynlink_nvcuvid.h: No such file or directory #include <dynlink_nv

Problems encountered

fatal error: dynlink_nvcuvid.h: No such file or directory #include <dynlink_nvcuvid.h>

Solution
Add: -dbuild_opencv_cudacodec=OFF

mkdir build
cd build
cmake -D CMAKE_BUILD_TYPE=RELEASE -D CMAKE_INSTALL_PREFIX=/usr/local -D BUILD_TIFF=ON -DBUILD_opencv_cudacodec=OFF ..

sudo make -j12
sudo make install

Problems encountered

[ WARN:0] cvCreateFileCaptureWithPreference: backend FFMPEG doesn't support legacy API anymore.

Solution

install opencv3.4.0 

It must be 3.4.0, others 3.4 X is wrong
3.4.0 download address https://codeload.github.com/opencv/opencv/tar.gz/refs/tags/3.4.0
Then install the extension package of OpenCV 3.4.0, download address, https://codeload.github.com/opencv/opencv_contrib/tar.gz/refs/tags/3.4.0

[Solved] Ubuntu Server 18.4 System /etc/sudoers: syntax error near line 32

Cause: Because the /etc/sudoers file was previously edited with a problem, the default Ubuntu system could not use sudo to raise power after saving, and could not use root privileges causing a big problem; the default Ubuntu system root was not allowed to log in, and the root login password had not been set before; sadly, it could not be modified by directly logging into the root account.

The problem is in /etc/sudoers: syntax error near line 32 of the sudoers file.

Solution.

1. open two shell windows with the normal user “ubuntu”.

2, in the first ssh session execute “echo $$” and write down the PID

3, in the second ssh session, execute “pkttyagent –process PID”.

4. Execute “pkexec visudo” in the first ssh session and then enter the password in the second ssh session. This will give you access to the /etc/sudoers file, then you will know the error line and modify the data.

5. Use the nano editor for editing by default.

1、Execute "Ctrl+O" #Save
2, after the implementation of "Ctrl + O", the output will be "File Name to Write sudoers.tmp", in tmp after the implementation of the carriage return * 
3、Execute "Ctrl+X "* #Exit

At this time, when you open the shell link, you will not report an error when using sudo and Su rights raising behavior;

[Solved] Linux Error: ENOSPC: System limit for number of file watchers

Problem:
System: Ubuntu 18
problem scenario: when using react scaffold to write a case, the command NPM start is unsuccessful, and an error: enospc: system limit for number of file watchers occurs.

Solution:
error: enospc: system limit for number of file watchers error is that the system of the file monitor has a limit and reaches the default upper limit, so the limit needs to be increased
you can use the instruction $cat/proc/sys/FS/inotify/max_user_watch to see

root@:~$ cat /proc/sys/fs/inotify/max_user_watch
es
524288

New instructions can be set for temporary limit increase:

$ sudo sysctl fs.inotify.max_user_watches=524288
$ sudo sysctl -p

Permanent increase limit

$ echo fs.inotify.max_user_watches = 524288 | sudo tee -a /etc/sysctl.conf 
$ sudo sysctl -p