Tag Archives: linux

Solutions to network connection problems in Ubuntu 16.04.3

Ubuntu 16.04 network problem solving
Background:
Recently, we need to use Ubuntu16.04 version to build Huawei’s Mind Studio platform, and there is a problem of blocked network.
Solution process:
First I checked my virtual machine network Settings to see if there was anything wrong with the network Settings
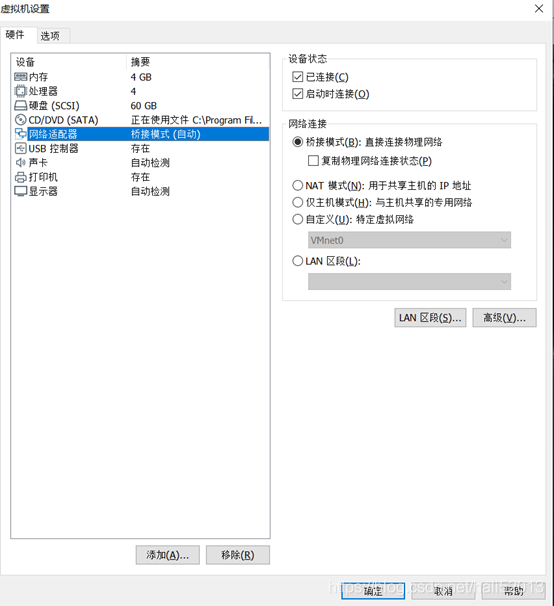
Then I started looking for the problem in the Ubuntu network Settings and entered ifconfig in the terminal to see if the IP card information was working properly.
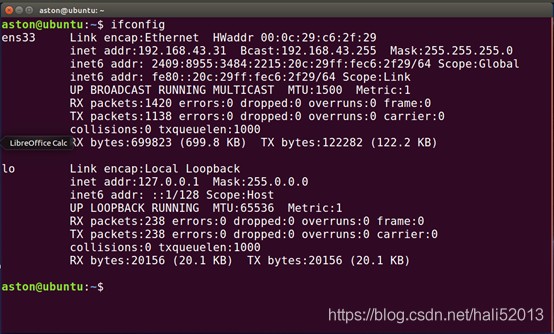
ah
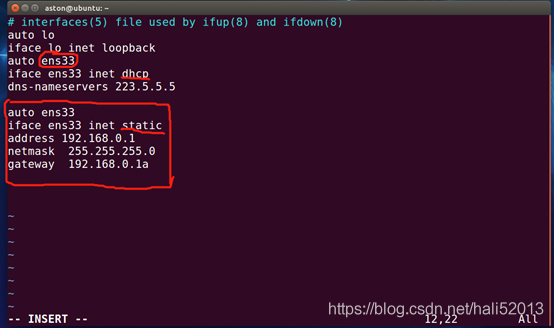
VirtualBox Failed to start LSB:Bring up/down Networking problem

Background:
Static (BOOTPROTO=static # static address protocol)

When using Service Restart Network, you cannot restart the network.

Restarting network (via systemctl): Job for network.service failed. See *systemctl status network.service* and *journalctl -xn* for details.

2. According to the prompt use systemctl status network. The service to check the detailed error message:

 network.service - LSB: Bring up/down networking
   Loaded: loaded (/etc/rc.d/init.d/network; bad; vendor preset: disabled)
   Active: failed (Result: exit-code) since Mon 2017-03-13 23:24:37 CST; 16s ago
     Docs: man:systemd-sysv-generator(8)
  Process: 2878 ExecStart=/etc/rc.d/init.d/network start (code=exited, status=1/FAILURE)

Mar 13 23:24:37 centos7 network[2878]: RTNETLINK answers: File exists
Mar 13 23:24:37 centos7 systemd[1]: network.service: control process exited, code=exited status=1
Mar 13 23:24:37 centos7 systemd[1]: Failed to start LSB: Bring up/down networking.
Mar 13 23:24:37 centos7 systemd[1]: Unit network.service entered failed state.
Mar 13 23:24:37 centos7 systemd[1]: network.service failed.

LSB: A set of standard specifications for Linux. Can make Linux conform to software architecture, or file system architecture standard specifications.
If you make sure your network card configuration information is correct (/etc/sysconfig/network-scripts/ifcfg-xxx), and most of the methods on the web are overwritten, such as:

    Add the MAC address in the configuration file (/etc/sysconfig/network-scripts/ifcfg-xxx)

    HWADDR=08:00:27:8c:4d:46

    Close the NetworkManager configuration DNS and restart……

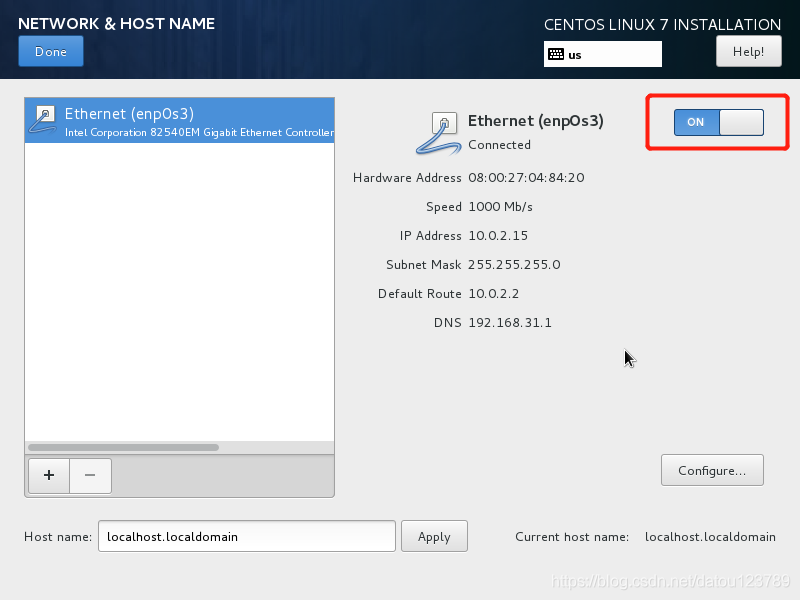
Try turning on the Ethernet configuration when installing Linux CentOS, as shown below:
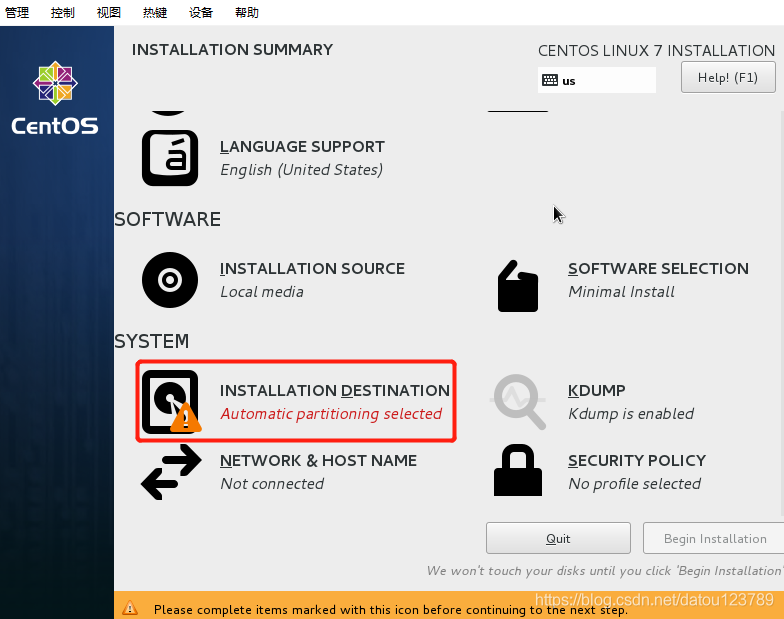
Turn on the Internet
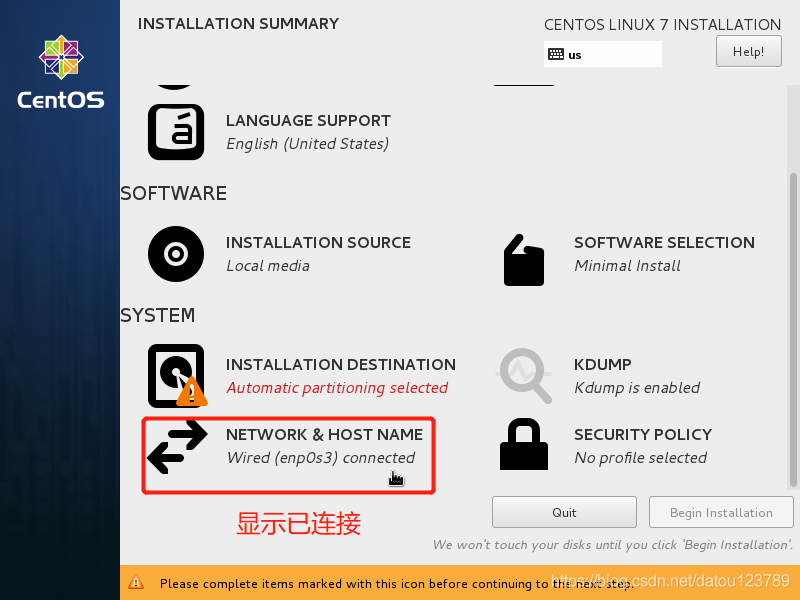
After the installation will find, magically effective O(∩_∩)O ha ~. (Mine is like this)


Development board cannot be mounted, uboot has a lot of JFFS2: alert information

References and materials:
“Uboot sf command usage” kickxxx
When running the development board, it prompts the following alarm:

cp: can't stat '/progs/rec/*': No such file or directory
/dev/mtdblock5
jffs2: jffs2_scan_eraseblock(): Magic bitmask 0x1985 not found at 0x00000010: 0xdde4 instead
jffs2: jffs2_scan_eraseblock(): Magic bitmask 0x1985 not found at 0x00000014: 0x9a31 instead
jffs2: jffs2_scan_eraseblock(): Magic bitmask 0x1985 not found at 0x00000018: 0x2648 instead
jffs2: jffs2_scan_eraseblock(): Magic bitmask 0x1985 not found at 0x0000001c: 0xb317 instead
jffs2: jffs2_scan_eraseblock(): Magic bitmask 0x1985 not found at 0x00000020: 0xe2ae instead
jffs2: jffs2_scan_eraseblock(): Magic bitmask 0x1985 not found at 0x00000024: 0x36f7 instead
jffs2: jffs2_scan_eraseblock(): Magic bitmask 0x1985 not found at 0x00000028: 0xe9f5 instead
jffs2: jffs2_scan_eraseblock(): Magic bitmask 0x1985 not found at 0x0000002c: 0xecb9 instead
jffs2: jffs2_scan_eraseblock(): Magic bitmask 0x1985 not found at 0x00000030: 0xc0b5 instead
jffs2: jffs2_scan_eraseblock(): Magic bitmask 0x1985 not found at 0x00000034: 0x5339 instead
jffs2: Further such events for this erase block will not be printed
………… ………… …………
………… ………… …………
………… ………… …………
jffs2: Empty flash at 0x00072000 ends at 0x00072010
jffs2: Empty flash at 0x00074000 ends at 0x00074004
jffs2: Empty flash at 0x00074008 ends at 0x00074010
jffs2: Empty flash at 0x00076000 ends at 0x00076010
jffs2: Empty flash at 0x00078000 ends at 0x0007800c
jffs2: Empty flash at 0x0007a000 ends at 0x0007a010
jffs2: Empty flash at 0x0007c000 ends at 0x0007c010
jffs2: Empty flash at 0x0007e000 ends at 0x0007e010
jffs2: Cowardly refusing to erase blocks on filesystem with no valid JFFS2 nodes
jffs2: empty_blocks 0, bad_blocks 0, c->nr_blocks 8
mount: mounting /dev/mtdblock5 on /etc/conf.d/ failed: Input/output error
/home/bashrc.sh: line 38: can't create /proc/sys/vm/extra_free_kbytes: nonexistent directory

probe 0x0;
SF probe 0x0; sf erase 0x780000 0x800000


SF read erase
read erase
SF read erase
SF read erase
SF read>se
SF read erase>r> SF write erase
SF read erase
SF read erase
SF read erase
SF read erase
SF write

command

explain

use example

meaning

sf, the probe [[bus:] cs] [hz] [mode]

init flash device on given SPI bus and chip Select

sf, read addr offset len

read 'len bytes starting at "offset" to the memory at "addr"

sf, read 0x82000000 0x10000 0x20000 ash offset 0x10000(64KB), length 0x20000(128KB), 0x82000000 Offset and length minimum unit operation is Byte

sf, write addr offset len

write 'len bytes from memor at' addr to flash at "offset"

0 x82000000 sf, write 0x0 0x200008200 0000 bytes, 0x0 bytes, 0x20000 bytes, 0x0 bytes, 0x0 bytes, 0x0 bytes, 0x0 bytes Offset and length minimum unit operation is Byte

sf, erase offset [+] len

erase 'len bytes from' offset '+' len 'round up' len 'to block size

sf, erase 0 x0 0x10000 ase block at offset 0x0 to 0x10000 Erase block at offset 0x0 Offset and len parameters must be erase block aligned

sf, update addr offset len

erase and write 'len bytes from the memory at "addr" to flash the at "Offset"


From the SF command, we can see several points:

Support Byte level read and write operation, support random access.
How to verify the effect of reading and writing
command can combine uboot md, sf, read, sf, write involves memory operations, can use the md for memory data
md x82000000 0 0 x100
0 x82000000 printing, 256 bytes of memory length range data

If the reference quotes your creation, and the reference, data does not sign your name, please do contact me to add, bring trouble to you!

Failed to initialize nvml driver / library version mismatch due to automatic update of NVIDIA driver

failed to initialize NVML driver/library version mismatchfailed to initiate NVML driver/library version mismatch. failed to initiate NVML driver/library version mismatch
This situation is generally Nvidia’s driver is automatically updated, enter the command to view the log, it is automatically updated

$ cat /var/log/apt/history.log
Start-Date: 2021-01-12  06:14:29
Commandline: /usr/bin/unattended-upgrade
Upgrade: libnvidia-compute-450:amd64 (450.80.02-0ubuntu0.18.04.2, 450.102.04-0ubuntu0.18.04.1), libnvidia-encode-450:amd64 (450.80.02-0ubuntu0.18.04.2, 450.102.04-0ubuntu0.18.04.1), nvidia-kernel-common-450:amd64 (450.80.02-0ubuntu0.18.04.2, 450.102.04-0ubuntu0.18.04.1), xserver-xorg-video-nvidia-450:amd64 (450.80.02-0ubuntu0.18.04.2, 450.102.04-0ubuntu0.18.04.1), libnvidia-gl-450:amd64 (450.80.02-0ubuntu0.18.04.2, 450.102.04-0ubuntu0.18.04.1), libnvidia-fbc1-450:amd64 (450.80.02-0ubuntu0.18.04.2, 450.102.04-0ubuntu0.18.04.1), libnvidia-decode-450:amd64 (450.80.02-0ubuntu0.18.04.2, 450.102.04-0ubuntu0.18.04.1), libnvidia-cfg1-450:amd64 (450.80.02-0ubuntu0.18.04.2, 450.102.04-0ubuntu0.18.04.1), nvidia-utils-450:amd64 (450.80.02-0ubuntu0.18.04.2, 450.102.04-0ubuntu0.18.04.1), nvidia-dkms-450:amd64 (450.80.02-0ubuntu0.18.04.2, 450.102.04-0ubuntu0.18.04.1), nvidia-compute-utils-450:amd64 (450.80.02-0ubuntu0.18.04.2, 450.102.04-0ubuntu0.18.04.1), libnvidia-ifr1-450:amd64 (450.80.02-0ubuntu0.18.04.2, 450.102.04-0ubuntu0.18.04.1), nvidia-driver-450:amd64 (450.80.02-0ubuntu0.18.04.2, 450.102.04-0ubuntu0.18.04.1), libnvidia-extra-450:amd64 (450.80.02-0ubuntu0.18.04.2, 450.102.04-0ubuntu0.18.04.1), nvidia-kernel-source-450:amd64 (450.80.02-0ubuntu0.18.04.2, 450.102.04-0ubuntu0.18.04.1)
End-Date: 2021-01-12  06:16:37

Referring to StackFlow, it was decided to restart the server, which was resolved after the restart.
I have to say that this driver update is really annoying. Anyone who reads this blog and knows how to disable this driver update on Ubuntu, please leave a comment in the comments section (for the time being, only on Windows)

How to replace strings in VIM

Replacement string
Global, replace string:
Command mode :% s/old/new/g
Old, new does not need double quotes, g is global, without g is the first line to be changed example: % s/test_shm_tool.c/$(SOURCE)/g local, replace string:
: n1, n2 s/old_str/new_str/g, add c if each line is confirmed

Firewall CMD command in CentOS 7

 
In CentOS 7
Temporarily open FTP service
# is firewall – CMD – add – service = FTP
 
Open the FTP service permanently
# is firewall – CMD – add – service = FTP – permanent
Permanent ban
# is firewall – CMD – remove – service = FTP – permanent
success
 
Enabling Settings
# systemctl restart firewalld
 
Check if the Settings are in effect
# iptables – L – n | grep 21
 
ACCEPT the TCP – 0.0.0.0/0 0.0.0.0/0 TCP DPT: 21 ctstate NEW
Check firewall status
# is firewall – CMD – state
 
running
 
# systemctl stop firewalld
 
# is firewall – CMD – state
 
not running
 
 
# is firewall – CMD – list – all
Public (default) interfaces: sources: services: dhcpv6-client FTP SSH ports: masquerade: no forward-ports: ICMP-blocks: rich rules:
 
The name of the service in FirewallD
# firewall-cmd –get-service amanda-client bacula DHCP dhcpv6 dhcpv6-client DNS FTP high-availability HTTP HTTPS iMAP ipp ipp ip-client ipsec kerberos kpasswd ldap ldaps libvirt libvirt-tls mdns mountd ms-wbt mysql nfs ntp openvpn pmcd pmproxy pmwebapi pmwebapis pop3s postgresql proxy-dhcp radius rpc-bind samba samba-client smtp ssh telnet tftp tftp-client transmission-client vnc-server wbem-https
 
Query the enabling status of the service
# firewall-cmd –query-service FTP yes # firewall-cmd –query-service SSH yes # firewall-cmd –query-service samba no # firewall-cmd –query-service HTTP no
Join the Port you want to open
# firewall-cmd –add-port=3128/ TCP # firewall-cmd –list-all public (default) interfaces: sources: services: dhcpv6-client FTP SSH ports: 3128/ TCP masquerade: no forward-ports: firewall-cmd –add-port=3128/ TCP # firewall-cmd –list-all public (default) interfaces: sources: services: dhcpv6-client FTP SSH ports: 3128/ TCP masquerade: no forward-ports: The icmp – blocks: rich rules:


-bash: cannot create temp file for here-document: No space left on device

Phenomenon of 1.
[Bug MC-108686] – CD to a directory with TAB key

-bash: cannot create temp file for here-document: No space left on device

Reason 2.
Cannot create temporary file document, there is no space left on device (tells us disk space is full)
3. Clean up your files
df-h

du -sh /*

du -sh /root/*


3.4 Find the maximum file
(1) If the largest file is a log file or a backup file, this file can be cleared; (2) If you want to keep this maximum file, you have to expand the disk space.

The garbled problem of hot deployment in nginx

Nginx-style IK hot deployment and its messy code problems
1. Create dic file

2 under the sibling directory of nginx. Adds a remote participle to the ik participle configuration file
After
is configured, restart nginx and elastic search.
Linux system configuration is the same as window configuration
if there is a problem with messy code, please see the following messy code solution
Messy code problem solved, pro – test available
1. Add nginx to Server
default_type 'text/html'; charset utf-8;
Add the following code to Elastic

-Xms1g
-Xmx1g
-Dfile.encoding=GBK

Vscode configuration connection server docker write code

The configuration steps
2. Local Docker service 3. Vscode configuration 4. use

1. Generate SSH key pairs
Ssh-keygen
all the way enter, default sound generated two files:
id_rsa
id_rsa.pub
transfer to the server, copy into a file: ~/.ssh/authorized_keys
if there is, add to the following
cat id_rsa.pud > > ~/.ssh/authorized_keys
2. Local Docker service
Docker “host= SSH ://@”
docker context create –docker “host= SSH :// @”
switch to this context:
docker context use
test :
docker info
3. Vscode configuration
Install plug-in
remote developement
docker
Use 4.
Attach Remote Host Container
server run docker
open vscode, hold shift+ CTRL +p, run docker contexts use
press shift+ CTRL +p, run remot-containers :Attach to Running Containers… , select the docker container running
and successfully press shift+k to open the docker container directory