[root@iZwz9bpgupcehi7r19i7uaZ ~]# source /etc/vimrc
-bash: /etc/vimrc: line 15: syntax error near unexpected token "autocmd"' -bash: /etc/vimrc: line 15:if has(“autocmd”)’
Solution:
/etc/vimrc No need for source at all
[root@iZwz9bpgupcehi7r19i7uaZ ~]# source /etc/vimrc
-bash: /etc/vimrc: line 15: syntax error near unexpected token "autocmd"' -bash: /etc/vimrc: line 15:if has(“autocmd”)’
Solution:
/etc/vimrc No need for source at all
Install Google without interface
1. Install chrome on the command line of Ubuntu server version
sudo apt-get install libxss1 libappindicator1 libindicator7
wget https://dl.google.com/linux/direct/google-chrome-stable_current_amd64.deb
sudo dpkg -i google-chrome*.deb # Might show "errors", fixed by next line
sudo apt-get install -f
google-chrome --version # check the version
2. Drivers of different browsers
Chrome:https://sites.google.com/a/chromium.org/chromedriver/downloads

Firefox:https://github.com/mozilla/geckodriver/releases

Edge:https://developer.microsoft.com/en-us/microsoft-edge/tools/webdriver/

Safari:https://webkit.org/blog/6900/webdriver-support-in-safari-10/
3. Test whether the installation is successful
from selenium import webdriver

chrome_options = webdriver.ChromeOptions()
chrome_options.add_argument('--headless')
chrome_options.add_argument('--disable-gpu')
chrome_options.add_argument('--no-sandbox')
client = webdriver.Chrome(chrome_options=chrome_options, executable_path='your path')
client.get("https://www.baidu.com")
print (client.page_source.encode('utf-8'))
client.quit()
4. Error in running selenium, permission denied. Add executable permissions to driver files
。
command: sudo chmod +x chromedriver
Symptom: The
boot display: GRUB loading
error: unknow filesystem
grub rescue>
Reason:
The following operations have been found to cause this problem:
1. I want to delete ubuntu, so I directly delete/format the partition where ubuntu is located under windows.
2. Adjust the disk, use tools to merge/divide/adjust/delete partitions, so that the number of disk partitions has changed.
3. Reinstall the system and install linux to the new partition. The original partition has been formatted, but grub2 has not been reinstalled.
4. Use ubuntu backup tools/derivative manufacturing tools, etc., to restore the main partition to the old version of 8.X. As a result, the old version of grub is grub1, so grub2 is destroyed.
All in all, because the operator does not know that grub2 is divided into two parts, one part (in general) is written on mbr, and the other part is written in the /boot/grub directory of a certain partition (if /boot is partitioned separately, write directly In the /grub directory of the corresponding partition). Due to the above operations, the part in the mbr of grub2 cannot find the part in the /grub directory (or the part has been deleted).
Idea:
Method 1, delete grub2 completely, so that this prompt no longer appears: It is
suitable for people who no longer want to use ubuntu and want to switch back to windows.
This is very simple, as long as you have a Windows boot disk (not Ghost), use it to start, to select the installation location, do not need to actually install, just exit and restart.
Or use it to boot to the fault repair station, run fixboot or fixmbr.
Under the win7 command line, it is executed: BootRec.exe /fixmbr
(/Fixmbr to repair mbr, /FixBoot to repair boot sector, /ScanOs to detect installed win7, /RebuildBcd to rebuild bcd.)
Note: In the installation interface, use shift+F10 to enter the dos interface and enter the command.
Method 2, reinstall and repair grub2
1. First use the ls command to find which partition Ubuntu is installed on:
enter the following command under grub rescue>:
Code: ls
Will list all disk partition information, for example:
Quote: (hd0,1),(hd0,5),(hd0,3),(hd0,2)
2. Then call the following commands in turn: X means each partition number.
If there is no separate partition for /boot, use the following command:
Code: ls (hd0,X)/boot/grub
If /boot is partitioned separately, use the following command:
Code: ls (hd0,X)/grub
Under normal circumstances, hundreds of files will be listed. Many of the file extensions are .mod, .lst and .img, and one file is grub.cfg. Assuming that when (hd0,5) is found, the files in the folder are displayed, which means that Linux is installed in this partition.
4. If you find the correct grub directory, try to temporarily associate the two parts of grub as follows: The
following is the command for /boot without a separate partition:
Reference: grub rescue>set root=(hd0,5)
grub rescue>set prefix=(hd0,5)/boot/grub
grub rescue>insmod /boot/grub/normal.mod
The following is the command for a separate partition of /boot: (These sentences need to be verified)
Reference: grub rescue>set root=(hd0,5)
grub rescue>set prefix=(hd0,5)/grub
grub rescue>insmod /grub/normal.mod
Then call the following command to display the missing grub menu.
grub rescue>normal
But don’t be happy. If you restart at this time, the problem still exists, we need to enter Linux to repair grub.
Start up, after entering ubuntu, execute in the terminal:
Code: sudo update-grub
sudo grub-install /dev/sda
(Sda is your hard disk number, do not specify the partition number, for example, sda1, sda5, etc. are not correct)
Has the restart test restored the grub boot menu? Congratulations on your successful recovery!
5. If you can’t find the correct /grub directory, such as the third and fourth misoperations, try to find whether there are Linux core files, and then call the following commands in turn: X means each partition number:
grub rescue>, enter:
if /boot has no separate partition:
Code: ls (hd0,X)/boot
If /boot is partitioned separately, then:
Code: ls (hd0,X)
Find a file with a name similar to vmlinuz-3.0.0-12-generic. This is the linux core file. If found, write down the X value in (hd0,X). Suppose that when (hd0,5) is found, the files in the folder are displayed.
Then start with live cd or live usb, and enter the following commands in the ubuntu terminal of live cd (the “5” in sda5 must be changed to the value recorded above) (the two sentences need to be verified):
if there is no separate partition for /boot :
Code: sudo mount /dev/sda5 /mnt
sudo grub-install –boot-directory=/mnt/boot /dev/sda
If /boot is partitioned separately, then:
Code: sudo mount /dev/sda5 /mnt
sudo grub-install –boot-directory=/mnt /dev/sda
Then restart it.
(The above two commands can also solve the problem that grub is installed in the wrong location when ubuntu is installed, and grub is not installed to /dev/sda, which causes the problem of ubuntu startup items directly entering windows during startup, but you need to determine the “5 “Change to what number.)
6. If there is no linux core file, then reinstall it completely.
Such an error occurred when running./configure. Here is the solution.
Problem description
Environmental Science:
ubuntu 16.04
In operation:
wget -q http://pyyaml.org/download/libyaml/yaml-0.1.7.tar.gz \
      && sudo tar xvf yaml-0.1.7.tar.gz -C /usr/local \
      && cd /usr/local/yaml-0.1.7 \
      && sudo ./configure \
I made a mistake and said:
configure: error: C compiler cannot create executables
Solution
1. Confused period
Take this error message to check,
configure: error: C compiler cannot create executables https://stackoverflow.com/questions/10357804/configure-error-c-compiler-cannot-create-executableshow to fix configure: error: C compiler cannot create executables https://askubuntu.com/questions/647583/how-to-fix-configure-error-c-compiler-cannot-create-executables
There is no solution at all
2. Find a solution
Therefore, we can only continue to study and find that we can check config. Log , go in and check carefully, and find the following errors:
/usr/bin/ld: cannot find crt1.o: No such file or directory
/usr/bin/ld: cannot find crti.o: No such file or directory
/usr/bin/ld: cannot find -lc
/usr/bin/ld: cannot find crtn.o: No such file or directory
collect2: error: ld returned 1 exit status
Then Find /usr/bin/ld: cannot find crti.o: No such file or directory
Find the Below:
cannot find crti.o: No such file or directory https://askubuntu.com/questions/251978/cannot-find-crti-o-no-such-file-or-directory Finally found the right one for my scene:.
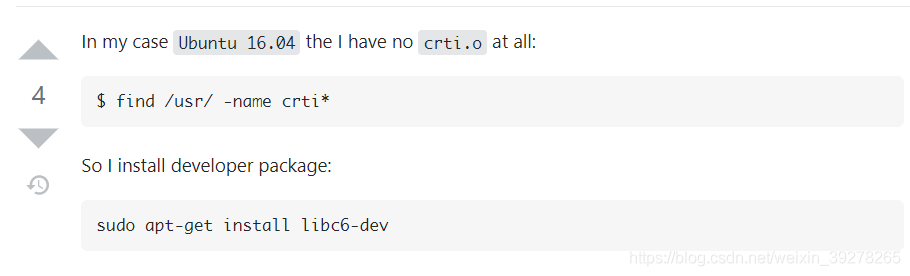 crti.o not found: no such file or directory https://qastack.cn/ubuntu/251978/cannot-find-crti-o-no-such-file-or-directory /usr/bin/ld: cannot find -l* The solution to the error …… https://www.huaweicloud.com/articles/7a0fa982b8037ab67800648c5beaf69a.html cpp: usr/bin/ld: cannot find -l<nameOfTheLibrary> https://stackoverflow.com/questions/30600978/cpp-usr-bin-ld-cannot-find-lnameofthelibrary /usr/bin/ld: cannot find -lxxx solutionhttps://www.cnblogs.com/zhming26/p/6164131.html
3、Specific solutions
Run.
sudo apt-get install libc6-dev
Then run configure again.
Summary
above. Still need to go through some twists and turns. No problem.
To install git from the command prompt:

D:\PycharmProjects\pythonProject\venv\Scripts>pip install -q git+https://github.
com/tensorflow/examples.git
  ERROR: Error [WinError 2] The system cannot find the specified file. while executing command git c
lone -q https://github.com/tensorflow/examples.git 'C:\Users\ADMINI~1\AppData\Lo
cal\Temp\pip-req-build-50tp7914'
ERROR: Cannot find command 'git' - do you have 'git' installed and in your PATH?
D:\PycharmProjects\pythonProject\venv\Scripts>pip install git
ERROR: Could not find a version that satisfies the requirement git (from version
s: none)
ERROR: No matching distribution found for git
Pychar install git

It doesn’t work after installation.
Go to the official website to download an installation:
https://git-scm.com/download/win
Git bash process:
GitHub tutorial git bash detailed tutorial
Git bash using detailed tutorial
The process is also very complicated.
Error
chiyukunpeng@chiyukunpeng: ~$ git clone --recursive https://github.com/mrnabati/CenterFusion.git
is being cloned to 'CenterFusion'...
fatal: unable to access 'https://github.com/mrnabati/CenterFusion.git/': gnutls_handshake() failed: The TLS connection was non-properly terminated.
Solution
# check proxy
chiyukunpeng@chiyukunpeng: ~$ git config --global -l
http.postbuffer=524288000
http.proxy=http://proxy.server.com:8080
http.proxy=http://127.0.0.1

# Delete proxy variables one by one
chiyukunpeng@chiyukunpeng: ~$ git config --global  --unset http.proxy http://127.0.0.1
chiyukunpeng@chiyukunpeng: ~$ git config --global  --unset http.proxy http://proxy.server.com:8080
chiyukunpeng@chiyukunpeng: ~$ git config --global  --unset http.postbuffer
Using the sudo Yum install docker CE docker CE cli containerd.io command to install docker, an error is reported, and the log is as follows:

I am using alicloud’s image source.
Solution:
modify the configuration file/etc/yum.conf and add sslverify = 0.
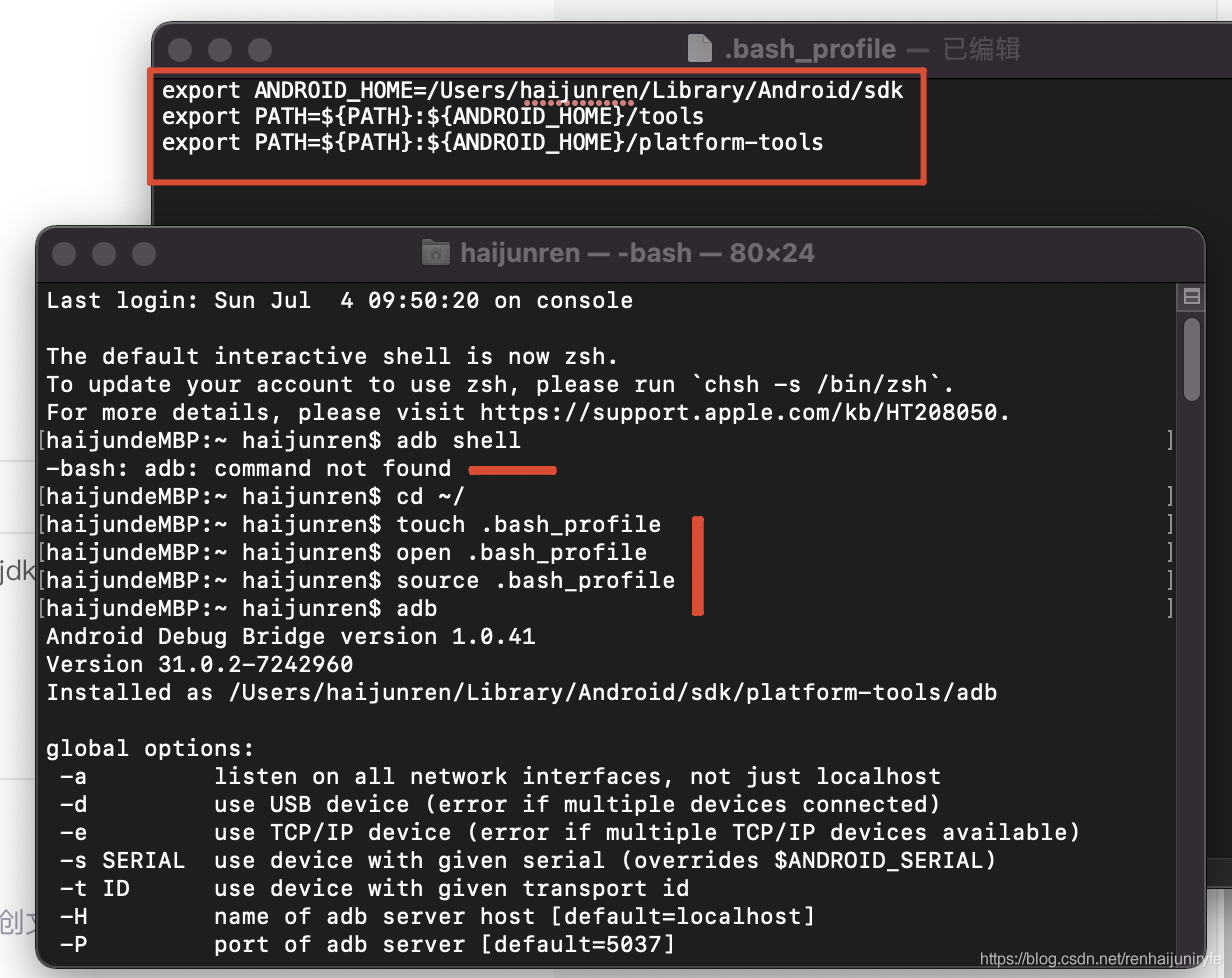
When the MAC system uses ADB for the first time, it reports an error because it needs to configure tools,
When using the MAC for development, you use the ADB instruction to perform some operations. If you have not configured the Android environment variables, you will encounter the problem of ADB: command not found. You need to configure the Android environment variables on the Mac
Operation steps:
1. Open the terminal terminal of the Mac and enter Cd ~/[enter the home directory of the current user]
2. Enter touch. Bash_ Profile [if not. Bash_ Profile, create a file]
3. Enter open. Bash_ Open the file we created and a text edit box will pop up. If the environment is configured for the first time, the text edit box will be blank.
4 . export ANDROID_ HOME=/Users/haijunren/Library/Android/sdk
export PATH=${PATH}:${ANDROID_ HOME}/tools
export PATH=${PATH}:${ANDROID_ Home}/platform tools
note: Android in 4_ Home should be filled in according to its own SDK path, and the rest can be copied directly. As for the SDK path, you can open Android studio and search the SDK in preference (Windows setting) to view it
Enter source. Bash in the terminal_ Profile [make our changes effective]
Enter ADB [verify whether the configuration is complete, if the ADB: command not found is not displayed, the configuration is complete]
Some people on the Internet recommend changing the content of the. Condar file, but I failed
Some people may recommend re installing anaconda, but that would be too cumbersome
CONDA update CONDA the problem can be solved immediately by updating the CONDA version
In C + +,
char* p = "abc"; // valid in C, invalid in C++warning: ISO C++ forbids converting a string constant to ‘char*’ [-Wwrite-strings]
Change to the following warning disappears
char* p = (char*)"abc"; // OKperhaps
char const *p = "abc"; // OKReason analysis:
When learning C or C + +, we all know that if the types of variables on both sides of the equal sign are different during the assignment operation, the compiler will perform an operation called implicit conversion to make the variables be assigned.
In the above expression, “ABC” to the right of the equal sign is an invariant constant, which is called string literal in C + +, type is const char *, and P is a char pointer. What happens if you force the assignment?That’s right. We convert the constant coercion type on the right to a pointer. As a result, we are modifying a const constant. The result of compilation will be determined by the compiler and the operating system. Some compilers will pass, some will throw exceptions, and even if they pass, they may be killed because of the sensitivity of the operating system.
This kind of operation of directly assigning string literal to pointer is considered as deprecated by developers, but because many codes have this habit in the past, it is preserved for compatibility
1: After installing ffmpeg, check whether to install ffmpeg
Implementation: ffmpegHere’s the explanation. No problem
root@hroot-virtual-machine:~/ffmpeg-4.2.2# ffmpeg
ffmpeg version 4.2.2 Copyright (c) 2000-2019 the FFmpeg developers
  built with gcc 9 (Ubuntu 9.3.0-17ubuntu1~20.04)
  configuration: --enable-libx264 --enable-libx265 --enable-libvpx --enable-libfdk-aac --enable-libmp3lame --enable-libopus --enable-nonfree --enable-gpl --enable-opengl --enable-filter=gltransition --extra-libs='-lGLEW -lglfw -ldl'
  libavutil      56. 31.100/56. 31.100
  libavcodec     58. 54.100/58. 54.100
  libavformat    58. 29.100/58. 29.100
  libavdevice    58.  8.100/58.  8.100
  libavfilter     7. 57.100/ 7. 57.100
  libswscale      5.  5.100/ 5.  5.100
  libswresample   3.  5.100/ 3.  5.100
  libpostproc    55.  5.100/55.  5.100
Hyper fast Audio and Video encoder
usage: ffmpeg [options] [[infile options] -i infile]... {[outfile options] outfile}...

Use -h to get full help or, even better, run 'man ffmpeg'
Check whether the configuration gltransition is installed
root@hroot-virtual-machine:~/ffmpeg-4.2.2# ffmpeg -v 0 -filters | grep gltransition
 T.. gltransition      VV->V      OpenGL blend transitions
Test whether gltransition runs successfully
//Create a file to store the material
?CD/
?MKDIR img
?CD img
root@hroot-virtual-machine:/img# ll
total 1248
drwxr-xr-x  2 root root   4096 Jul   2 11:38 ./
drwxr-xr-x 21 root root   4096 Jul   2 10:05 ../
-rw-r--r--  1 root root 185169 Jul   2 10:05 1.jpg
-rw-r--r--  1 root root  67524 Jul   2 10:05 2.jpg
-rw-r--r--  1 root root 149603 Jul   2 10:05 3.jpg
-rw-r--r--  1 root root 188339 Jul   2 10:05 4.jpg
-rw-r--r--  1 root root 176810 Jul   2 10:05 5.jpg
-rw-r--r--  1 root root 487613 Jul   2 10:53 bgm.m4a
Check out the special effects files we downloaded
root@hroot-virtual-machine:~/ffmpeg-gl-transition/gl-transitions/transitions# ll
total 320
drwxr-xr-x 2 root root 4096 7月   1 18:22 ./
drwxr-xr-x 6 root root 4096 7月   1 18:22 ../
-rw-r--r-- 1 root root  462 7月   1 18:22 angular.glsl
-rw-r--r-- 1 root root  752 7月   1 18:22 Bounce.glsl
-rw-r--r-- 1 root root 2593 7月   1 18:22 BowTieHorizontal.glsl
-rw-r--r-- 1 root root 2541 7月   1 18:22 BowTieVertical.glsl
-rw-r--r-- 1 root root 1908 7月   1 18:22 BowTieWithParameter.glsl
-rw-r--r-- 1 root root  245 7月   1 18:22 burn.glsl
-rw-r--r-- 1 root root  981 7月   1 18:22 ButterflyWaveScrawler.glsl
-rw-r--r-- 1 root root  485 7月   1 18:22 cannabisleaf.glsl
-rw-r--r-- 1 root root  550 7月   1 18:22 CircleCrop.glsl
-rw-r--r-- 1 root root  422 7月   1 18:22 circle.glsl
-rw-r--r-- 1 root root  408 7月   1 18:22 circleopen.glsl
-rw-r--r-- 1 root root  392 7月   1 18:22 colorphase.glsl
-rw-r--r-- 1 root root  364 7月   1 18:22 ColourDistance.glsl
-rw-r--r-- 1 root root  627 7月   1 18:22 CrazyParametricFun.glsl
-rw-r--r-- 1 root root  623 7月   1 18:22 crosshatch.glsl
-rw-r--r-- 1 root root  228 7月   1 18:22 crosswarp.glsl
-rw-r--r-- 1 root root 2396 7月   1 18:22 CrossZoom.glsl
-rw-r--r-- 1 root root 1738 7月   1 18:22 cube.glsl
-rw-r--r-- 1 root root  361 7月   1 18:22 directional-easing.glsl
-rw-r--r-- 1 root root  315 7月   1 18:22 Directional.glsl
-rw-r--r-- 1 root root  498 7月   1 18:22 directionalwarp.glsl
-rw-r--r-- 1 root root  577 7月   1 18:22 directionalwipe.glsl
-rw-r--r-- 1 root root  533 7月   1 18:22 displacement.glsl
-rw-r--r-- 1 root root 1627 7月   1 18:22 DoomScreenTransition.glsl
-rw-r--r-- 1 root root 1221 7月   1 18:22 doorway.glsl
-rw-r--r-- 1 root root  378 7月   1 18:22 Dreamy.glsl
-rw-r--r-- 1 root root 1163 7月   1 18:22 DreamyZoom.glsl
-rw-r--r-- 1 root root  413 7月   1 18:22 fadecolor.glsl
-rw-r--r-- 1 root root  136 7月   1 18:22 fade.glsl
-rw-r--r-- 1 root root  558 7月   1 18:22 fadegrayscale.glsl
-rw-r--r-- 1 root root 2231 7月   1 18:22 FilmBurn.glsl
-rw-r--r-- 1 root root  522 7月   1 18:22 flyeye.glsl
-rw-r--r-- 1 root root 2242 7月   1 18:22 GlitchDisplace.glsl
-rw-r--r-- 1 root root  607 7月   1 18:22 GlitchMemories.glsl
-rw-r--r-- 1 root root 2300 7月   1 18:22 GridFlip.glsl
-rw-r--r-- 1 root root  356 7月   1 18:22 heart.glsl
-rw-r--r-- 1 root root 1644 7月   1 18:22 hexagonalize.glsl
-rw-r--r-- 1 root root 7518 7月   1 18:22 InvertedPageCurl.glsl
-rw-r--r-- 1 root root  585 7月   1 18:22 kaleidoscope.glsl
-rw-r--r-- 1 root root  647 7月   1 18:22 LeftRight.glsl
-rw-r--r-- 1 root root  682 7月   1 18:22 LinearBlur.glsl
-rw-r--r-- 1 root root  189 7月   1 18:22 luma.glsl
-rw-r--r-- 1 root root 3812 7月   1 18:22 luminance_melt.glsl
-rw-r--r-- 1 root root  390 7月   1 18:22 morph.glsl
-rw-r--r-- 1 root root 1127 7月   1 18:22 Mosaic.glsl
-rw-r--r-- 1 root root  339 7月   1 18:22 multiply_blend.glsl
-rw-r--r-- 1 root root 1444 7月   1 18:22 perlin.glsl
-rw-r--r-- 1 root root  361 7月   1 18:22 pinwheel.glsl
-rw-r--r-- 1 root root  584 7月   1 18:22 pixelize.glsl
-rw-r--r-- 1 root root  464 7月   1 18:22 polar_function.glsl
-rw-r--r-- 1 root root  326 7月   1 18:22 PolkaDotsCurtain.glsl
-rw-r--r-- 1 root root  364 7月   1 18:22 Radial.glsl
-rw-r--r-- 1 root root  444 7月   1 18:22 randomNoisex.glsl
-rw-r--r-- 1 root root  399 7月   1 18:22 randomsquares.glsl
-rw-r--r-- 1 root root  378 7月   1 18:22 ripple.glsl
-rw-r--r-- 1 root root  878 7月   1 18:22 rotate_scale_fade.glsl
-rw-r--r-- 1 root root  348 7月   1 18:22 rotateTransition.glsl
-rw-r--r-- 1 root root  376 7月   1 18:22 SimpleZoom.glsl
-rw-r--r-- 1 root root  771 7月   1 18:22 squareswire.glsl
-rw-r--r-- 1 root root  455 7月   1 18:22 squeeze.glsl
-rw-r--r-- 1 root root 8015 7月   1 18:22 StereoViewer.glsl
-rw-r--r-- 1 root root 1539 7月   1 18:22 swap.glsl
-rw-r--r-- 1 root root  715 7月   1 18:22 Swirl.glsl
-rw-r--r-- 1 root root 4051 7月   1 18:22 tangentMotionBlur.glsl
-rw-r--r-- 1 root root  650 7月   1 18:22 TopBottom.glsl
-rw-r--r-- 1 root root  651 7月   1 18:22 TVStatic.glsl
-rw-r--r-- 1 root root 1399 7月   1 18:22 undulatingBurnOut.glsl
-rw-r--r-- 1 root root  429 7月   1 18:22 WaterDrop.glsl
-rw-r--r-- 1 root root  397 7月   1 18:22 wind.glsl
-rw-r--r-- 1 root root  274 7月   1 18:22 windowblinds.glsl
-rw-r--r-- 1 root root  299 7月   1 18:22 windowslice.glsl
-rw-r--r-- 1 root root  192 7月   1 18:22 wipeDown.glsl
-rw-r--r-- 1 root root  192 7月   1 18:22 wipeLeft.glsl
-rw-r--r-- 1 root root  192 7月   1 18:22 wipeRight.glsl
-rw-r--r-- 1 root root  192 7月   1 18:22 wipeUp.glsl
-rw-r--r-- 1 root root 1073 7月   1 18:22 ZoomInCircles.glsl
Get absolute path
root@hroot-virtual-machine:~/ffmpeg-gl-transition/gl-transitions/transitions# pwd
/root/ffmpeg-gl-transition/gl-transitions/transitions

--------Then go back to the material folder where
cd /img
Start the test
ffmpeg \
-t 1 -loop 1 -i 1.jpg \
-t 1 -loop 1 -i 2.jpg \
-filter_complex \
"gltransition=offset=0.5:duration=0.5:source=/root/ffmpeg-gl-transition/gl-transitions/transitions/crosswarp.glsl" \
-y out.mp4
Source: followed by the absolute path of the special effects file
The results showed that: 1
root@hroot-virtual-machine:/img# ffmpeg \
> -t 1 -loop 1 -i 1.jpg \
> -t 1 -loop 1 -i 2.jpg \
> -filter_complex \
> "gltransition=offset=0.5:duration=0.5:source=/root/ffmpeg-gl-transition/gl-transitions/transitions/crosswarp.glsl" \
> -y out.mp4
ffmpeg version 4.2.2 Copyright (c) 2000-2019 the FFmpeg developers
  built with gcc 9 (Ubuntu 9.3.0-17ubuntu1~20.04)
  configuration: --enable-libx264 --enable-libx265 --enable-libvpx --enable-libfdk-aac --enable-libmp3lame --enable-libopus --enable-nonfree --enable-gpl --enable-opengl --enable-filter=gltransition --extra-libs='-lGLEW -lglfw -ldl'
  libavutil      56. 31.100/56. 31.100
  libavcodec     58. 54.100/58. 54.100
  libavformat    58. 29.100/58. 29.100
  libavdevice    58.  8.100/58.  8.100
  libavfilter     7. 57.100/ 7. 57.100
  libswscale      5.  5.100/ 5.  5.100
  libswresample   3.  5.100/ 3.  5.100
  libpostproc    55.  5.100/55.  5.100
Input #0, image2, from '1.jpg':
  Duration: 00:00:00.04, start: 0.000000, bitrate: 37033 kb/s
    Stream #0:0: Video: mjpeg (Baseline), yuvj444p(pc, bt470bg/unknown/unknown), 400x400 [SAR 1:1 DAR 1:1], 25 fps, 25 tbr, 25 tbn, 25 tbc
Input #1, image2, from '2.jpg':
  Duration: 00:00:00.04, start: 0.000000, bitrate: 13504 kb/s
    Stream #1:0: Video: mjpeg (Baseline), yuvj444p(pc, bt470bg/unknown/unknown), 400x400 [SAR 1:1 DAR 1:1], 25 fps, 25 tbr, 25 tbn, 25 tbc
[AVFilterGraph @ 0x565112acce40] Error initializing filter 'gltransition' with args 'offset=0.5:duration=0.5:source=/root/ffmpeg-gl-transition/gl-transitions/transitions/crosswarp.glsl'
Error initializing complex filters.
Operation not permitted
Error initializing filter ‘gltransition’ is a problem
The solution is as follows:
Install xvfb (skip if installed)
sudo apt-get -y install xvfbThen start xvfb (thread blocking)
Xvfb :1 -screen 0 1280x1024x16Then call xvfb to execute the special effect
env DISPLAY=:1 ffmpeg 命令For example, the sentence that just reported an error:
env DISPLAY=:1 ffmpeg \
	-t 1 -loop 1 -i 1.jpg \
	-t 1 -loop 1 -i 2.jpg \
	-filter_complex \
	"gltransition=offset=0.5:duration=0.5:source=/root/ffmpeg-gl-transition/gl-transitions/transitions/crosswarp.glsl" \
	-y out1.mp4
If the instructions are not saved after execution, let’s check:
root@hroot-virtual-machine:/img# ll
	total 1336
	drwxr-xr-x  2 root root   4096 7月   2 11:49 ./
	drwxr-xr-x 21 root root   4096 7月   2 10:05 ../
	-rw-r--r--  1 root root 185169 7月   2 10:05 1.jpg
	-rw-r--r--  1 root root  67524 7月   2 10:05 2.jpg
	-rw-r--r--  1 root root 149603 7月   2 10:05 3.jpg
	-rw-r--r--  1 root root 188339 7月   2 10:05 4.jpg
	-rw-r--r--  1 root root 176810 7月   2 10:05 5.jpg
	-rw-r--r--  1 root root 487613 7月   2 10:53 bgm.m4a
	-rw-r--r--  1 root root  89138 7月   2 11:49 out1.mp4	(Our picture plus special effects composite video)
Video add special effects, no EGL must install xvfb, with xvfb to add special effects
Env display =: 1 this must be added before executing the command
How to Solve /usr/local/libexec/mecab/mecab-dict-index error:/usr/local/libexec/mecab/mecab-dict-index: error while loading shared libraries: libmecab.so.2: cannot open shared object file: No such file or directory
Solution:
(myconda) root@************:/mnt/mecab-0.996# /usr/local/libexec/</