Tag Archives: Mocha ITOM

Nginx, which is suitable for front-end H5 requests, routes and forwards according to the URL and cuts the URL

1. Ruqirement
nginx accepts the request url uniformly and forwards it
http://172.16.51.91:9000/api/order/create/44010000
http://172.16.51.91:9000/api/order/create/44060000
目标:
http://172.15.10.13:9001/api/order/create
http://172.15.10.13:9002/api/order/create
2. nginx Settings

server {
        listen      9000;
        server_name  172.16.51.91;

		location ~*(44010000)$ {
                rewrite ^/(.*)/44010000$ http://172.15.10.13:9001/$1 permanent;
        }
		 location ~*(44060000)$ {
                 rewrite ^/(.*)/44060000$ http://172.15.10.13:9002/$1 permanent;
        }	

}

Nginx routes and forwards according to the URL and cuts the URL

1. Ruqirement
nginx accepts the request url uniformly and forwards it
http://172.16.51.91:9000/44010000/api/order/create
http://172.16.51.91:9000/44060000/api/order/create
goal:
http://172.15.10.13:9001/api/order/create
http://172.15.10.13:9002/api/order/create
2. nginx Setting

server {
    listen   9000;
    server_name 172.16.51.91;

	location /44010000/ {
		    proxy_pass http://172.15.10.13:9001/;
    }
		 location /44060000/ {
         proxy_pass http://172.15.10.13:10002/;
    }
}

Solution: configuration of multiple front ends separated from front end and back end of nginx

1. Business scenarios

According to the business requirements, the front-end code needs to distinguish between the main business code and the sub business code.

2. Solutions

Routing is based on the root of the relative path.

3. Configuration file

  server {
        listen       9207;
        server_name  192.168.30.158;
        root /home/qdfinance/apps/pages/insure_wx/;

        #Front-end dependent business code pages are routed with relative paths to root/h5
        location /h5/ {
          root    /home/qdfinance/apps/pages/insure_wx_h5/;
          add_header Cache-Control "no-cache, no-store";
          rewrite ^/h5/(.*)$ /index.html  break;
        }
		#Reverse proxy tomcat service
        location/{
           proxy_set_header Host $host:$server_port;
           proxy_pass   http://192.168.80.192:8098/;
           root /home/qdfinance/apps/pages/insure_wx/;
           error_page 404 /index.html;
        }
		#Front-end main business code page
        location   =/{
          root /home/qdfinance/apps/pages/insure_wx/;
          add_header Cache-Control "no-cache, no-store";
        }
        location /index.html {
          root  /home/qdfinance/apps/pages/insure_wx/;
          add_header Cache-Control "no-cache, no-store";
        }
        location /statich5/ {
           root /home/qdfinance/apps/pages/insure_wx_h5/; 
        } 
  
        location /static/ {
          root  /home/qdfinance/apps/pages/insure_wx/;
        }
        location /detail/ {
          rewrite ^/(.*)$ /index.html last;
        }
		location /me {
          rewrite ^/(.*)$ /index.html last;
        }
        location /login/ {
          rewrite ^/(.*)$ /index.html last;
        }
        location /customer {
          rewrite ^/(.*)$ /index.html last;
        }
        location /customer-add {
          rewrite ^/(.*)$ /index.html last;
        }
        location /subscribe {
          rewrite ^/(.*)$ /index.html last;
        }
        location /order {
          rewrite ^/(.*)$ /index.html last;
        }
        location /order-detail {
          rewrite ^/(.*)$ /index.html last;
        }
        location /main {
          rewrite ^/(.*)$ /index.html last;
        }
        location /auth {
          rewrite ^/(.*)$ /index.html last;
        }
        location /policy {
          rewrite ^/(.*)$ /index.html last;
        }
        location /intellect {
          rewrite ^/(.*)$ /index.html last;
        }
		location /intellectanswerlist {
          rewrite ^/(.*)$ /index.html last;
        }
		location /immed {
          rewrite ^/(.*)$ /index.html last;
        }
        location /docking {
          rewrite ^/(.*)$ /index.html last;
        }
		location /success {

          rewrite ^/(.*)$ /index.html last;
        }
		location /error {
          rewrite ^/(.*)$ /index.html last;
        }
    }

Optimization and upgrade solution for one click deployment without Jenkins under Linux

1. Scene

Jenkins one click deployment has not been installed under Linux.

2. Operation process

① Manual upload.

② Delete history code.

③ Unzip the war package.

④ Delete the war package.

⑤ Restart Tomcat.

⑥ Show logs.

3. Process disassembly

1) Use the RZ command to upload the war package.

2) Use the following command to complete the rest of the work in one go. Note: the last line is reserved for carriage return and line feed to ensure that the command will be executed.

cd   /opt/codes/portal-system
rm -rf  META-INF
rm -rf  WEB-INF
rm -rf importDataModel.xlsx
unzip portal-system-1.0.0. RELEASE.war
rm -rf portal-system-1.0.0. RELEASE.war
/opt/server/tomcat_ portal_ system/bin/ restart.sh
 

3) restart.sh Please refer to the previous blog post for the script.

4. Incremental design scheme

cd /opt/codes/portal-system/WEB-INF/classes
rz
rm -r com
unzip com.zip  
rm -rf com.zip  
/opt/server/tomcat_ portal_ system/bin/ restart.sh
#tail -f /opt/server/tomcat_ portal_ system/logs/ info.log

Nginx front end and back end separation + service cluster reverse proxy

1. Scene

Nginx implements the separation of front and back end, and the reverse proxy of service cluster.

2. Nginx configuration instance

upstream portal-system {
       server 127.0.0.1:8061 max_fails=3 fail_timeout=30s;
       server 172.31.88.30:8061 max_fails=3 fail_timeout=30s;
}

server {
        listen       80;
        server_name  47.102.168.177;
        root /opt/pages/dispatch-portal-system/;

       location/{
         proxy_set_header Host $host:$server_port;
         proxy_pass   http://portal-system;
       }

       location /images/ {
         alias  /opt/images/dispatch-portal-system/;
       }
       
       location /favicon.ico {
         root /opt/images/dispatch-portal-system/;
       }
       
       location /api/user/updateImage/ {
          proxy_set_header Host $host:$server_port;
          proxy_pass   http://127.0.0.1:8061/;
       }

       location   =/{
          root /opt/pages/dispatch-portal-system/;
          add_header Cache-Control "no-cache, no-store";
       }
	   
        location /index.html {
          root  /opt/pages/dispatch-portal-system/;
          add_header Cache-Control "no-cache, no-store";
        }

        location /static/ {
          root  /opt/pages/dispatch-portal-system/;
        }

}


NxL job cluster nginx routing forwarding and reverse proxy

1. Scene

Two servers are deployed with XXL job respectively to build a high availability cluster

Provide easy request URL

2. Nginx configuration

 upstream xxl-jobs {
        server 192.168.30.01:9500 max_fails=3 fail_timeout=30s;
        server 192.168.30.02:9500 max_fails=3 fail_timeout=30s;
    }

     server {
        listen    8888;
        server_name  localhost;
        location/{
            proxy_pass http://xxl-jobs;
            index  index.html index.htm;
        }
        error_page   500 502 503 504  /50x.html;
        location = /50x.html {
            root   html;
        }
    }


Use jstack to output the stack information in Java process to the specified file and analyze it

1. Printing stack information using jstack command

jstack -l pid >> thread.txt

Parameter: – l long lists to print out additional lock information. Jstack – L PID can be used to observe the lock holding status when a deadlock occurs

Examples

jstack -l 7052 >> thread.txt

2. Analyze stack information

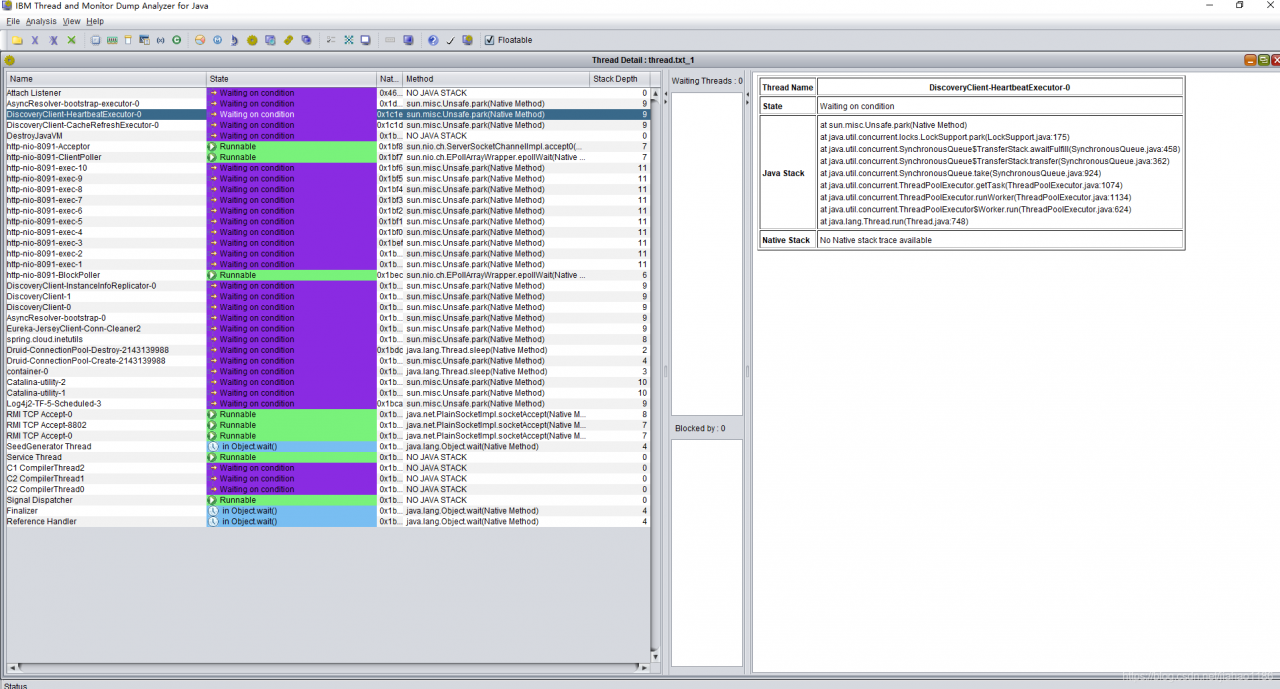
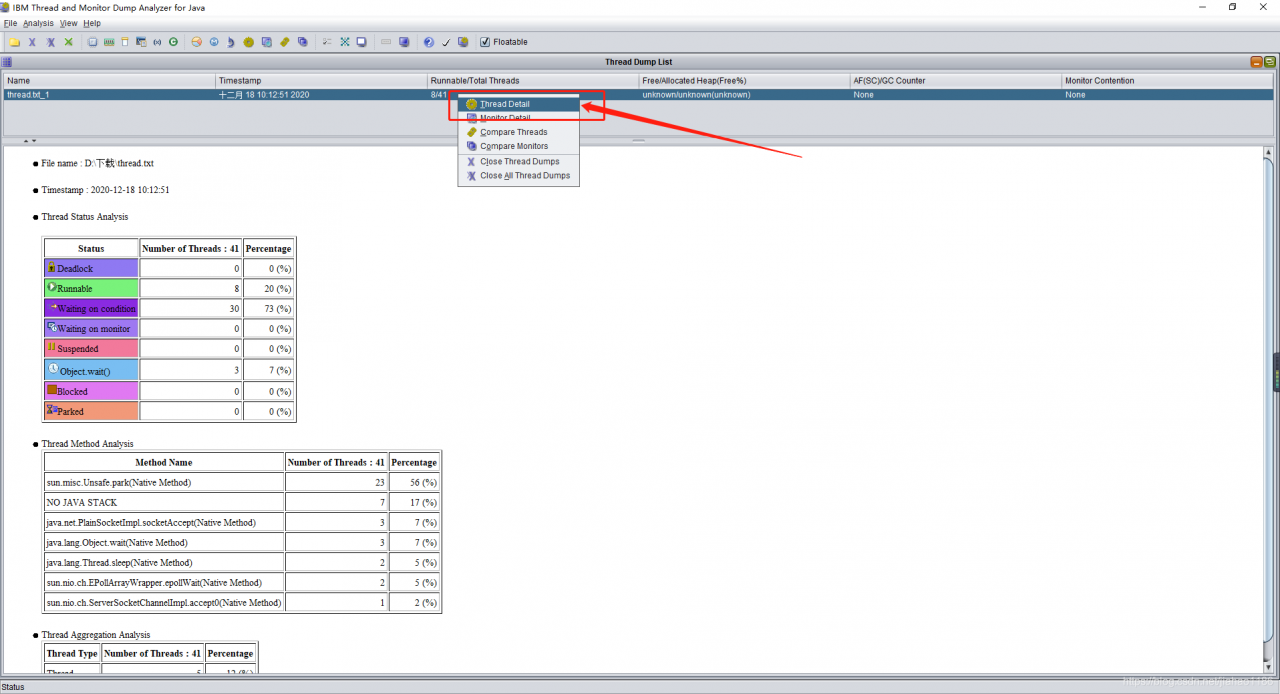
take thread.txt Download it locally and use IBM thread and monitor dump analyzer for Java to open the analysis

Update project manually_ Solution of too large jar package in springboot

1. Problem scenario

Project update, upload the entire jar package, too large, resulting in long upload time, update or upgrade too slow.

2. Solutions

1) Store jars that are not updated frequently in a separate folder LIBS.

2) Frequently updated jars are typed as one jar.

3、 pom.xml to configure

1) The final jar package contains the updated jar package

2) Folder LIBS kicks out jars that are often updated

<build>
        <plugins>
            <plugin>
                <groupId>org.apache.maven.plugins</groupId>
                <artifactId>maven-source-plugin</artifactId>
            </plugin>
            <plugin>
                <groupId>org.apache.maven.plugins</groupId>
                <artifactId>maven-jar-plugin</artifactId>
            </plugin>
            <plugin>
                <groupId>org.apache.maven.plugins</groupId>
                <artifactId>maven-dependency-plugin</artifactId>
                <executions>
                    <execution>
                        <id>copy-dependencies</id>
                        <phase>prepare-package</phase>
                        <goals>
                            <goal>copy-dependencies</goal>
                        </goals>
                        <configuration>
                            <outputDirectory>${project.build.directory}/libs</outputDirectory>
                            <overWriteIfNewer>true</overWriteIfNewer>
                            <includeScope>runtime</includeScope>
                            <excludeGroupIds>com.mp,com.mp.common.spring,com.mp.common.util</excludeGroupIds>
                        </configuration>
                    </execution>
                </executions>
            </plugin>
            <plugin>
                <groupId>org.springframework.boot</groupId>
                <artifactId>spring-boot-maven-plugin</artifactId>
                <configuration>
                    <layout>ZIP</layout>
                    <includes>
                        <include>
                            <groupId>com.mp</groupId>
                            <artifactId>mp-dispatch-service-api</artifactId>
                        </include>
                        <include>
                            <groupId>com.mp.common.spring</groupId>
                            <artifactId>common-spring-jpa</artifactId>
                        </include>
                        <include>
                            <groupId>com.mp.common.spring</groupId>
                            <artifactId>common-spring-base</artifactId>
                        </include>
                        <include>
                            <groupId>com.mp.common.util</groupId>
                            <artifactId>common-util</artifactId>
                        </include>
                    </includes>
                </configuration>
                <executions>
                    <execution>
                        <goals>
                            <goal>repackage</goal>
                            <goal>build-info</goal>
                        </goals>
                    </execution>
                </executions>
            </plugin>
            <plugin>
                <groupId>org.apache.maven.plugins</groupId>
                <artifactId>maven-surefire-plugin</artifactId>
                <configuration>
                    <skip>true</skip>
                </configuration>
            </plugin>
        </plugins>
    </build>


Nginx reverse proxy MySQL

1. Scene

Mysql database in the pure Intranet environment, no public IP, no VPN.

2. Programme

Install nginx on a server with public IP and in the same Intranet environment with MySQL service to realize the routing and forwarding of MySQL access.

3. Nginx installation

Nginx version needs 1.9 or above. Nginx not only implements HTTP reverse proxy, but also supports TCP reverse proxy.

1) When compiling nginx, you need to add the parameter — with stream to load NGX_ stream_ core_ Module

Examples

./configure –prefix=/opt/software/nginx –with-http_ stub_ status_ module –with-http_ ssl_ module –with-stream –with-stream_ ssl_ module –with-pcre=/usr/local/src/pcre-8.35

4. Nginx configuration file nginx.conf

Monitor port 3307 with public IP server, and jump to port 3306 of 172.31.88.27.

Special note: stream should be in the same level directory as HTTP

stream {
    upstream mysql3306 {
        hash $remote_addr consistent;
        server 172.31.88.27:3306 weight=5 max_fails=3 fail_timeout=30s;
    }
	
	 server {
        listen 3307;
        proxy_connect_timeout 10s;
        proxy_timeout 200s;
        proxy_pass mysql3306;
    }
}


The local program cannot access the test environment redis cluster through public IP_ compromise

First, scene description

1. Test environment installation redis6, cluster deployment, three master and three slave. That is to achieve high concurrency, high availability, high security.

2. Redis creates clusters through bind intranet IP.

3. The local and test environment are not in the same LAN, and there is no VPN, so it is impossible to access redis through the test intranet IP.

4. Note: through the redis client, using the public IP + port, you can access redis.

Problem: spring program can’t access redis correctly through IP + port of public network.

Reason: when spring accesses the redis cluster, it first obtains the intranet IP and ports of all nodes in the redis cluster through the configured public IP and ports, and then the program finally accesses redis through the intranet IP and ports.

Second, the solution

1. Install the redis singleton on the test server.

2. Configuration file redis.conf Set daemonize to yes, that is to realize the background startup of redis.

3. In the test environment network security group, add the white list of local environment public IP, open port 6379.

4. Modify the local configuration file in spring program to access redis configuration mode. In this way, all technicians can connect to the test environment redis locally, and each technology does not need to open the redis service locally.

spring:
  redis:
    host: 47.112.108.1
    port: 6379
    timeout: 5000ms
  pool:
    max-active: 8
    min-idle: 0
    max-idle: 8
    max-wait: -1
 

Log separation using tool cronlog

Foreword: Tomcat log is cut by date

Using cronolog to segment the image of tomcat9 catalina.out Log; Tomcat’s catalina.out The log file cannot be divided by date. All the log files are output and written to a single file catalina.out In this way, the. Out log will become larger and larger, and the cost of operation and maintenance will increase. To archive log files by date, cronolog can be used to realize log segmentation.

1. Step 1: cronlog installation

Use the yum command to install cronlog

yum install cronolog

2. Step 2: modify catalina.sh Documents

Directory: Tomcat/bin/ catalina.sh

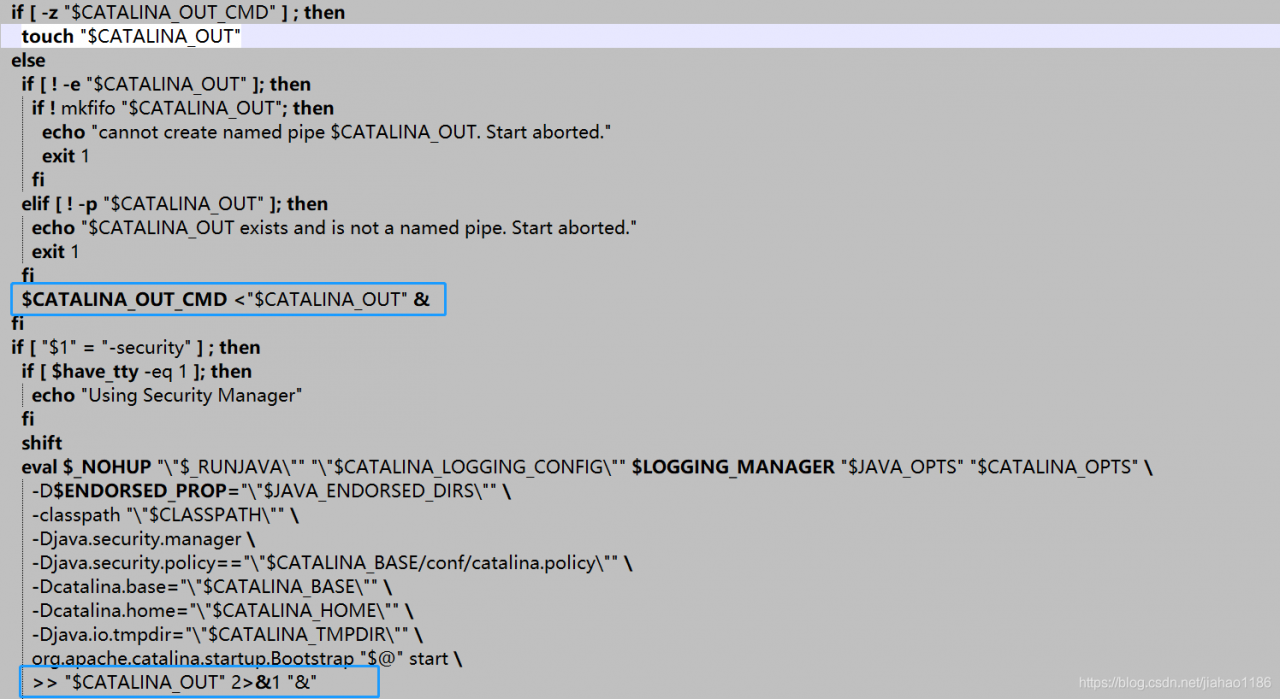
Original setting:

After modification:

shift
 # touch "$CATALINA_OUT"
  if [ "$1" = "-security" ] ; then
    if [ $have_tty -eq 1 ]; then
      echo "Using Security Manager"
    fi
    shift
    eval $_NOHUP "\"$_RUNJAVA\"" "\"$LOGGING_CONFIG\"" $LOGGING_MANAGER $JAVA_OPTS $CATALINA_OPTS \
      -D$ENDORSED_PROP="\"$JAVA_ENDORSED_DIRS\"" \
      -classpath "\"$CLASSPATH\"" \
      -Djava.security.manager \
      -Djava.security.policy=="\"$CATALINA_BASE/conf/catalina.policy\"" \
      -Dcatalina.base="\"$CATALINA_BASE\"" \
      -Dcatalina.home="\"$CATALINA_HOME\"" \
      -Djava.io.tmpdir="\"$CATALINA_TMPDIR\"" \
      org.apache.catalina.startup.Bootstrap "$@" start \
      2&>&1 | /usr/local/sbin/cronolog "$CATALINA_BASE/logs/catalina-%Y-%m-%d.out" &

  else
    eval $_NOHUP "\"$_RUNJAVA\"" "\"$LOGGING_CONFIG\"" $LOGGING_MANAGER $JAVA_OPTS $CATALINA_OPTS \
      -D$ENDORSED_PROP="\"$JAVA_ENDORSED_DIRS\"" \
      -classpath "\"$CLASSPATH\"" \
      -Dcatalina.base="\"$CATALINA_BASE\"" \
      -Dcatalina.home="\"$CATALINA_HOME\"" \
      -Djava.io.tmpdir="\"$CATALINA_TMPDIR\"" \
      org.apache.catalina.startup.Bootstrap "$@" start \
      2&>&1 | /usr/local/sbin/cronolog "$CATALINA_BASE/logs/catalina-%Y-%m-%d.out" &

  fi

3. Step 3: restart Tomcat

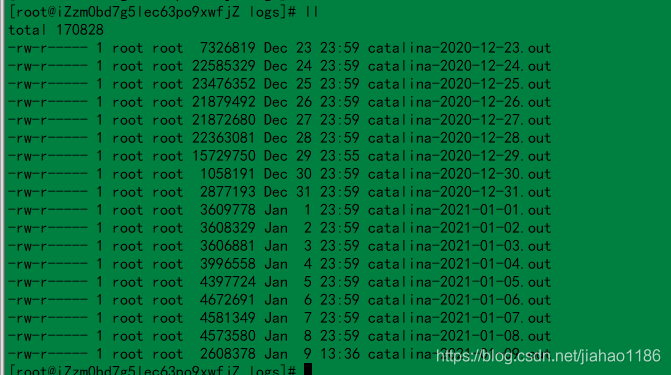
Restart Tomcat and the log will take effect according to the date. A screenshot of the log file is shown below.