edit file /proc/sys/kernel/core_pattern by vim, save E667: Fsync failed
echo “core-%e-%p-%t” | sudo dd of=/proc/sys/kernel/core_pattern
reference: https://askubuntu.com/questions/167819/im-getting-fsync-failed-error-why
edit file /proc/sys/kernel/core_pattern by vim, save E667: Fsync failed
echo “core-%e-%p-%t” | sudo dd of=/proc/sys/kernel/core_pattern
reference: https://askubuntu.com/questions/167819/im-getting-fsync-failed-error-why
when installing ubuntu with livecd, ubi-partman failed with code 141 May occur when the hard disk partition step is taken. The solution:
Ctrl+Alt+t pop-up terminal, input:
sudo fdisk /dev/sda
#sda is my hard disk device number, according to your system, it should be modified to the appropriate device number
then take a look at the partitions above sda with the p command, delete all Linux native and swap partitions with the d command (NTFS \ fat32 are for Windows, needless to say you wouldn’t dare to touch them), then write to the partition table with the w command, then double-click Install Ubuntu icon again, enter the installation process, everything is ok.
recently, there are too many things in my life, I have been wanting to learn Linux operating system well, but I have no time.
last night, ready to configure the FTP server, the results found that the virtual machine and the local network connection is not connected, baidu online once, the problem was quickly solved, so will solve the problem to share out.
>
1, use ifconfig command to check the RedHat network device (network interface card), found that eth0 network card did not start.
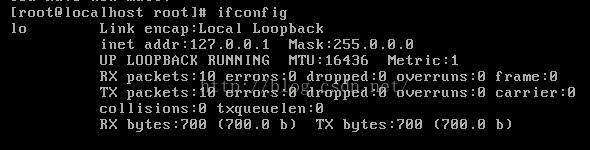
2. So I use the ifup eth0 command to enable the network interface eth0, and I realize that I cannot start today. failed; no link present. Check cable?”

solution:
1. The connection mode between the virtual machine and the machine is: host-only mode. I will not introduce the differences between several connection modes. If the previous connection was not host-only, the virtual machine will need to be restarted after the change.
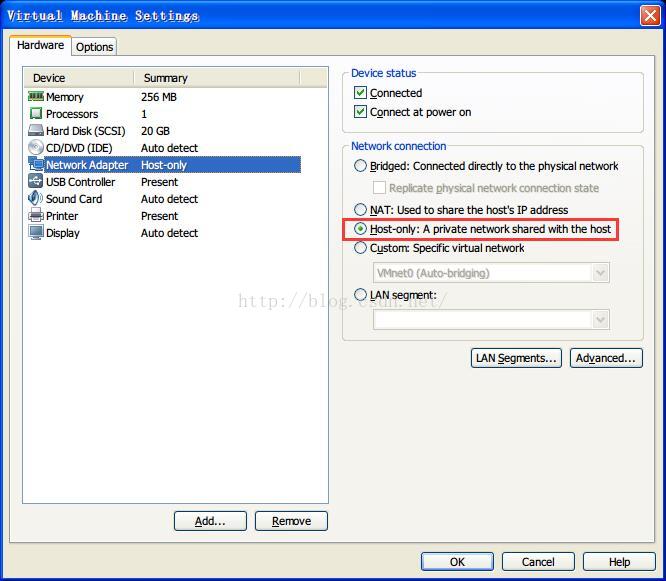
2. Start the two virtual network CARDS of the machine. 
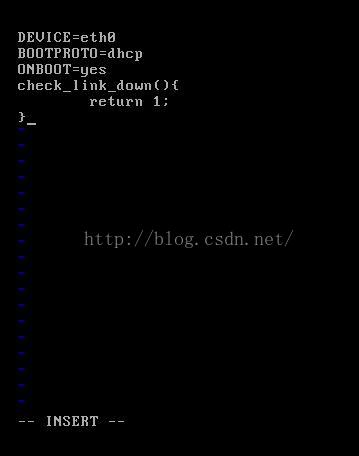
3. Add the following script in /etc/sysconfig/network-scripts/ifcfg-eth0:
check_link_down() {
return 1;
}
specific operation is as follows:
enter the following command:
[root@localhost root]# cd /etc/sysconfig/network-scripts/
[root@localhost network-scripts]# vi ifcfg-eth0
![]()
return 1;
check_link_down() {
return 1;
check_link_down() {
return 1;
check_link_down() {
return 1;
}
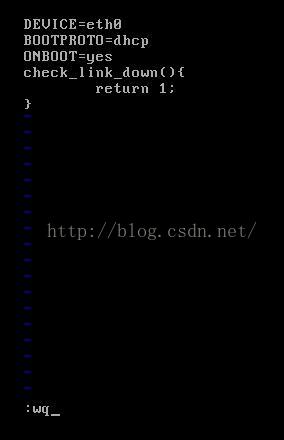
Next, restart the network (if it doesn’t work, restart the system!).
[root@localhost network-scripts]# ifup eth0
Determining IP information for eth0… done.
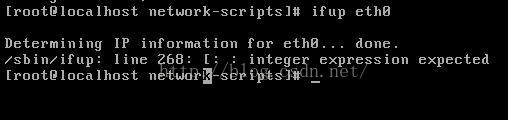
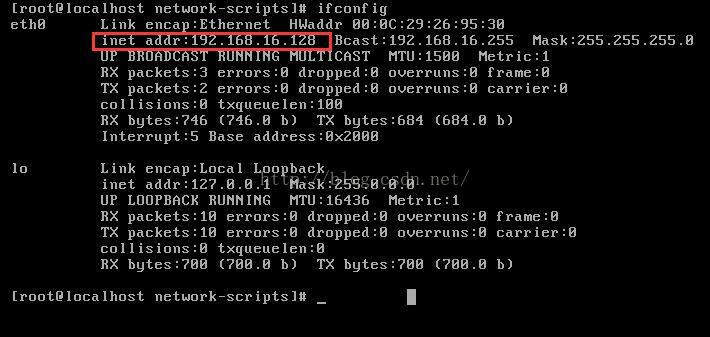
ok, see the above prompt indicates that it has been successful, you can check if you have got a valid IP by ifconfig.
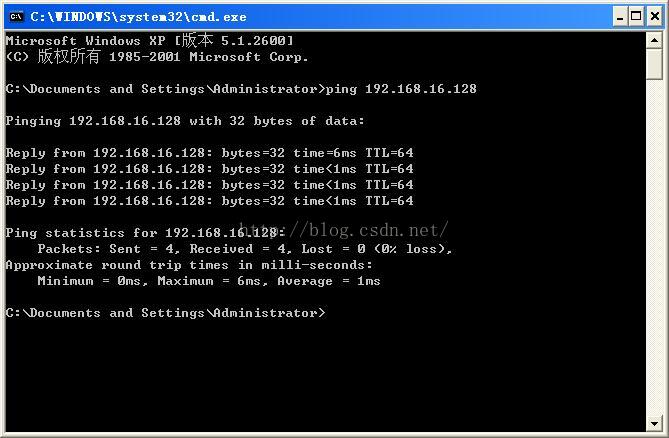
Finally, check on the machine to see if you can PING the Linux operating system in the virtual machine
[[email protected] config] #
# will default value instead of 4096 8192
[[email protected] config] # vim/etc/security/limits. D/20 – nproc. Conf
[[email protected] config] # egrep – v $| “^ ^ #”/etc/security/limits. D/20 – nproc. Conf
* soft nproc 8192
root soft nproc unlimited
[[email protected] config]# su-mform
Last login: Mon 16 14:16:49 CST 2018 on PTS /4
[[email protected] ~]$id
uid=1002(mform) gid=1003(mform) groups=1003(mform)
error scenario: this error occurs while using the gedit test.c command to edit a test.c document, but the document can open normally.
solution: not met this situation before, thought it was gedit program configuration file loaded to failure, restart the virtual machine directly, and then open the file will still appear this mistake, now is under the root, considering that may be caused by permission problems wrong, switch to the ordinary user directory, and restart the virtual machine, use again is not an error.
error message is as follows:
(gedit:4653): GLib-GIO-CRITICAL **: 01:46:10.281: g_dbus_proxy_new_sync: assertion 'G_IS_DBUS_CONNECTION (connection)' failed

(gedit:4653): dconf-WARNING **: 01:46:10.319: failed to commit changes to dconf: The connection is closed

(gedit:4653): dconf-WARNING **: 01:46:10.326: failed to commit changes to dconf: The connection is closed
Error creating proxy: The connection is closed (g-io-error-quark, 18)
Error creating proxy: The connection is closed (g-io-error-quark, 18)
Error creating proxy: The connection is closed (g-io-error-quark, 18)
Error creating proxy: The connection is closed (g-io-error-quark, 18)
Error creating proxy: The connection is closed (g-io-error-quark, 18)

(gedit:4653): dconf-WARNING **: 01:46:10.676: failed to commit changes to dconf: The connection is closed

(gedit:4653): dconf-WARNING **: 01:46:10.677: failed to commit changes to dconf: The connection is closed

(gedit:4653): dconf-WARNING **: 01:46:10.679: failed to commit changes to dconf: The connection is closed

** (gedit:4653): WARNING **: 01:50:22.009: Set document metadata failed: Setting attribute metadata::gedit-position not supported

(gedit:4653): dconf-WARNING **: 01:50:22.031: failed to commit changes to dconf: The connection is closed
problem overview
about this problem, the blogger encountered in the process of virtual machine migration. After the migration, the network needs to be reallocated. After the configuration is completed, when the network service is restarted, the error is reported: “Job for network. Service failed because the control process exited with error code. See “systemctl status network. Service” and “journalctl-xe” for details
as follows:

to check the network status, enter the command “systemctl status net.service”, as shown in the figure below:
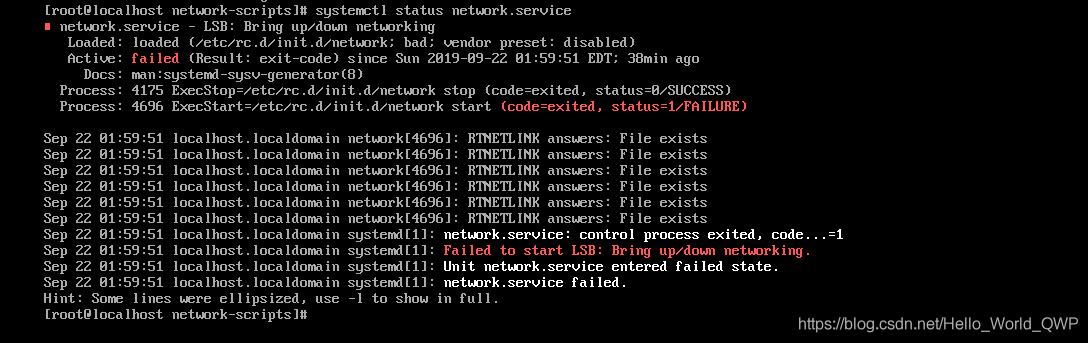
network service failed to start!!
solution
check for a while, finally found is an extra network configuration file, as shown in the figure below:

the reason is caused by the old file web services launch failure, delete the old file, found again to restart the network service, altogether OK
1. Delete old file and enter the command “rm-rf ifcfg-ens33.old”;
2. Restart the network service, enter the command “systemctl restart net.service”;
3. To check whether the network service has been started successfully, enter the command “systemctl status net.service”, as shown in the figure below:

supplement
on December 16, 2019
the usual virtual machine network mode is NAT bridging mode, so the virtual machine related services need to be started, as shown in the figure below:
the first one is automatically assigned IP address, the second one is network bridging NAT, these two must be started, otherwise the virtual machine network will not be able to use.
well, the solution for Job for network. Service failed because the control process exited with error code. See “systemc “has been written here.
.
.
The
| as: | hua wang |
| contact the author: | [email protected] |
| to source: | CSDN (Chinese Software Developer Network) |
| the original article: | https://blog.csdn.net/Hello_World_QWP/article/details/101162295 |
| copyright statement: | this article is the original blogger article, please be sure to indicate the source of the blog when reprinting! |
premise: an FTP server has been set up on ali cloud (CentOs8.1 system), and the FTP server has also been set to passive mode
open Windows command window, type FTP, use FTP related instructions to connect to the FTP server, found that the connection can be successful, but when using ‘ls’ or’ dir ‘command times the following error:
200 PORT command successful. Consider using PASV.
425 Failed to establish connection

you can see that there is a saying on the Internet that you can type quote PASV, but if you test it it doesn’t use
, right
see stackoverflow there is a post, said Windows command line FTP. Exe does not support passive mode access FTP, if you must use passive mode access, or use other passive mode FTP client, such as WinSCP FTP client
reference articles: https://stackoverflow.com/questions/19516263/200-port-command-successful-consider-using-pasv-425-failed-to-establish-connec 】 【
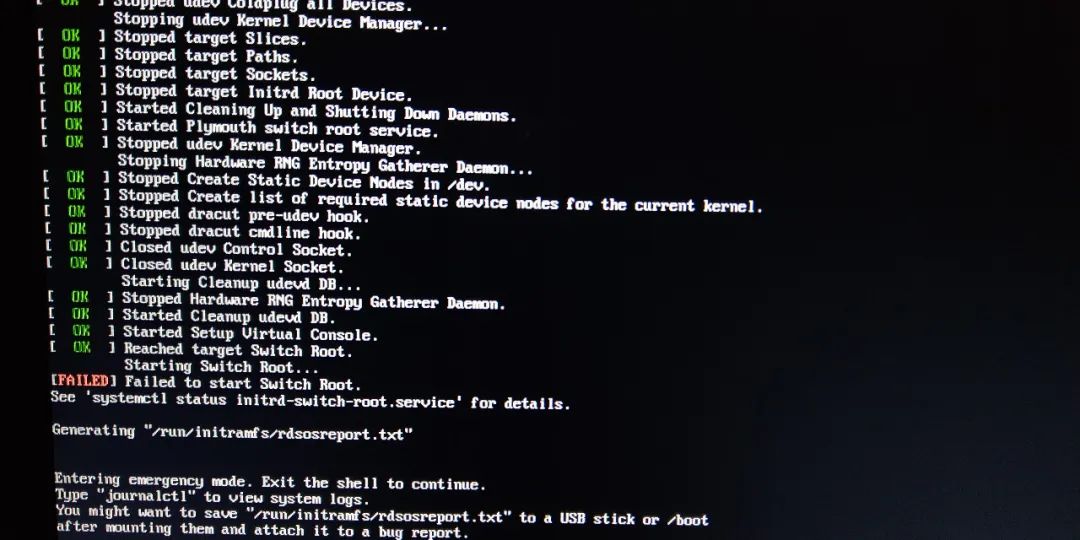
boot today found CentOS8.1 system can not boot!! I recall that I updated some system packages yesterday. At that time, the updated system was not restarted, and the updated system was not detected. It was an oversight!
take a closer look at the log and it turns out that the Switch Root is wrong, as shown below:
prompt error log generation, a simple look, want to get the U disk first, then follow up.
is inserted into the U disk, no device is detected, exit is performed, and sda is identified after repeated twice. As shown below:
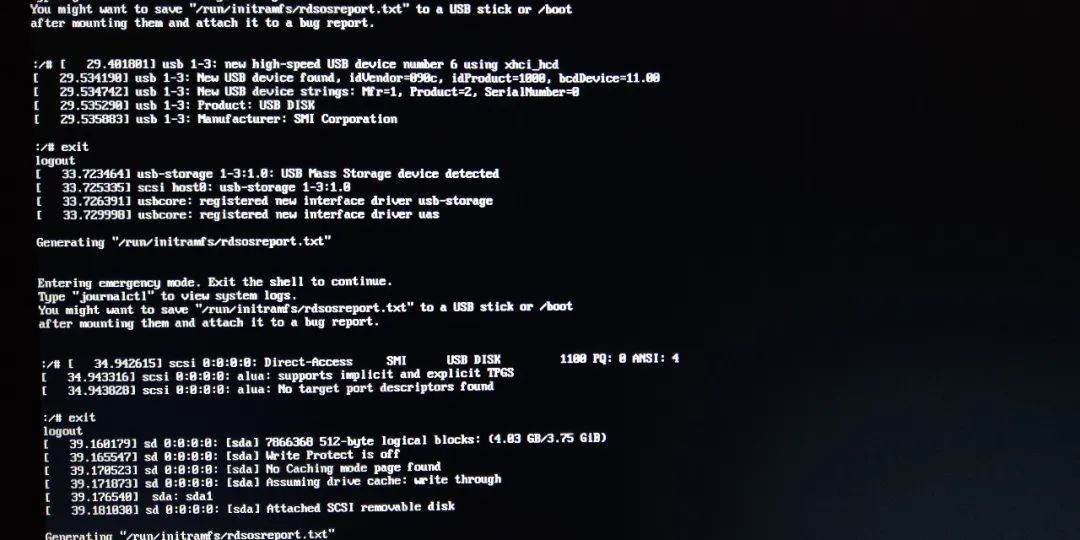
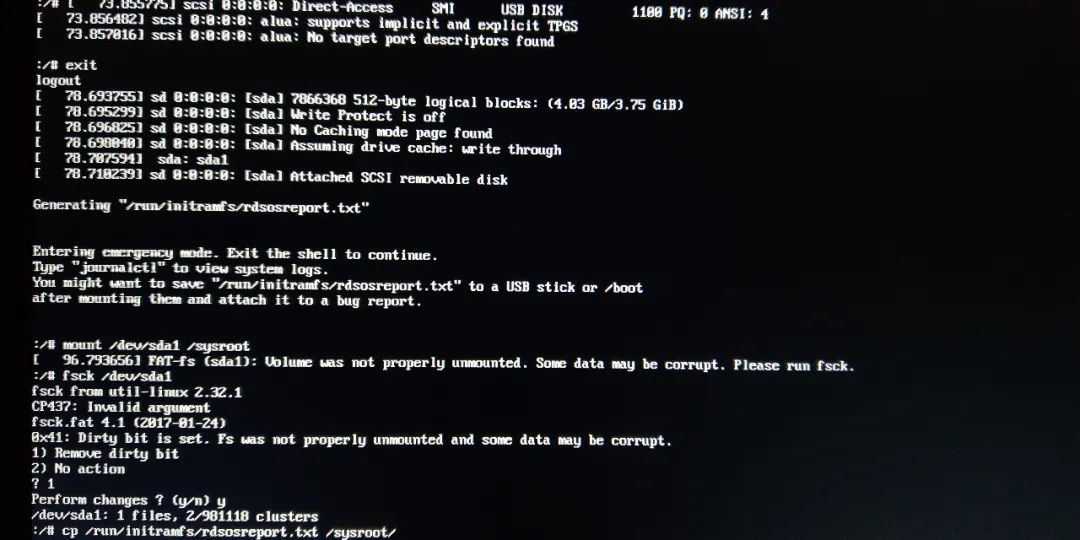
then U disk mounted to/sysroot, prompt data to test with U disk,, FSCK detection, the log file/run/initramfs/rdsosreport. TXT is copied to the U disk, and then uninstall U disk. As shown below:
try manually mounting CentOS8 system disk to /sysroot and find the partition mount corresponding to CentOS8. As shown below:
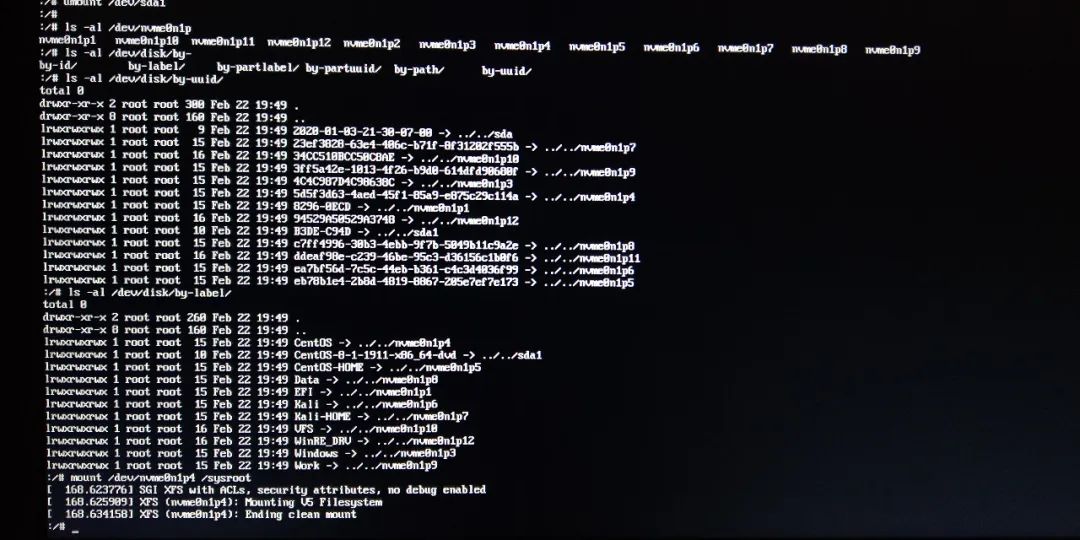
then exit and the system starts normally! Fortunately, it’s not a big problem.
come in the system, think under the analysis of the cause, to fundamentally solve it…
open the log file rdsosreport.txt in the U disk, find the error fragment log analysis:
[ 79.300190] xxx systemd[1]: Reached target Switch Root.[ 79.300600] xxx systemd[1]: Starting Switch Root...[ 79.304948] xxx systemctl[2113]: Failed to switch root: Specified switch root path '/sysroot' does not seem to be an OS tree. os-release file is missing.[ 79.305456] xxx systemd[1]: initrd-switch-root.service: Main process exited, code=exited, status=1/FAILURE[ 79.305593] xxx systemd[1]: initrd-switch-root.service: Failed with result 'exit-code'.[ 79.305789] xxx systemd[1]: Failed to start Switch Root.[ 79.305811] xxx systemd[1]: initrd-switch-root.service: Triggering OnFailure= dependencies.[ 79.306342] xxx systemd[1]: Starting Setup Virtual Console...[ 79.364641] xxx systemd[1]: Started Setup Virtual Console.[ 79.365205] xxx systemd[1]: Started Emergency Shell.[ 79.365348] xxx systemd[1]: Reached target Emergency Mode.[ 79.380910] xxx systemd[1]: Received SIGRTMIN+21 from PID 1675 (plymouthd).
see the key record:
Failed to switch root: Specified switch root path '/sysroot' does not seem to be an OS tree. os-release file is missing.because the root path was not mounted successfully, /sysroot had no content, and the os-release file was not found.
, can you imagine if the os-release file for the system is gone?Open the /etc/cenos-release file and find the content, that’s not the problem with this file!
[root@server ~]# cat /etc/os-releaseNAME="CentOS Linux"VERSION="8 (Core)"ID="centos"ID_LIKE="rhel fedora"VERSION_ID="8"PLATFORM_ID="platform:el8"PRETTY_NAME="CentOS Linux 8 (Core)"ANSI_COLOR="0;31"CPE_NAME="cpe:/o:centos:centos:8"HOME_URL="https://www.centos.org/"BUG_REPORT_URL="https://bugs.centos.org/"CENTOS_MANTISBT_PROJECT="CentOS-8"CENTOS_MANTISBT_PROJECT_VERSION="8"REDHAT_SUPPORT_PRODUCT="centos"REDHAT_SUPPORT_PRODUCT_VERSION="8"
continue to search, efi directory to see centos related files are there any questions?The size of the GRUbenv file is zero. Is that the problem?!
[root@server ~]# ls -al /boot/efi/EFI/centos/total 5364drwx------. 3 root root 4096 Feb 21 23:01 .drwx------. 6 root root 4096 May 11 2019 ..-rwx------. 1 root root 134 Jun 7 2019 BOOTX64.CSVdrwx------. 2 root root 4096 Feb 5 09:46 fonts-rwx------. 1 root root 9570 Feb 13 22:08 grub.cfg-rwx------. 1 root root 0 Feb 21 23:01 grubenv-rwx------. 1 root root 1876872 Feb 5 09:46 grubx64.efi-rwx------. 1 root root 1160136 Jun 7 2019 mmx64.efi-rwx------. 1 root root 1205152 Jun 7 2019 shimx64-centos.efi-rwx------. 1 root root 1211224 Jun 7 2019 shimx64.efi
then edits the grubenv file and adds the following.
# GRUB Environment Blocksaved_entry=16611cc1c45441e1a5aa9fa702a005ff-4.18.0-147.5.1.el8_1.x86_64kernelopts=root=UUID=5d5f3d63-4aed-45f1-85a9-e875c29c114a ro resume=UUID=ddeaf98e-c239-46be-95c3-d36156c1b0f6 rhgb quietboot_success=0boot_indeterminate=0################################################################################################################################################################################################################################################################################################################################################################################################################################################################################################################################################################################################################################################################################################################################################################################################
main parameter description (do not write wrong! :
saved_entry:是默认的引导项kernelopts:root填写/分区的UUID,resume填写swap分区的UUID
restart, normal start, no more error. Problem solved!
============
Note: if you do not know how to edit this file, you can regenerate grub by executing the following:
[root@server EFI]# grub2-mkconfig -o /boot/efi/EFI/centos/grub.cfgGenerating grub configuration file ...Found Windows Boot Manager on /dev/nvme0n1p1@/EFI/Microsoft/Boot/bootmgfw.efiAdding boot menu entry for EFI firmware configurationdone
generates grubenv as follows, there will be some incomplete parameters oh.
# GRUB Environment Blockkernelopts=root=UUID=5d5f3d63-4aed-45f1-85a9-e875c29c114a ro resume=UUID=ddeaf98e-c239-46be-95c3-d36156c1b0f6 rhgb quiet################################################################################################################################################################################################################################################################################################################################################################################################################################################################################################################################################################################################################################################################################################################################################################################################
summary:
to calmly analyze problems, to learn to analyze and solve problems, this ability is very important.
systematically study, master the knowledge of a field is very necessary. The idea and process of solving the problem depends on your understanding of the system!
note: this article is original and shall not be reproduced on any platform without permission. For reprint, contact the author ~

sudo apt-get install gcc make perl
cd /media/$USER/<...>
sudo ./VBoxLinuxAdditions.run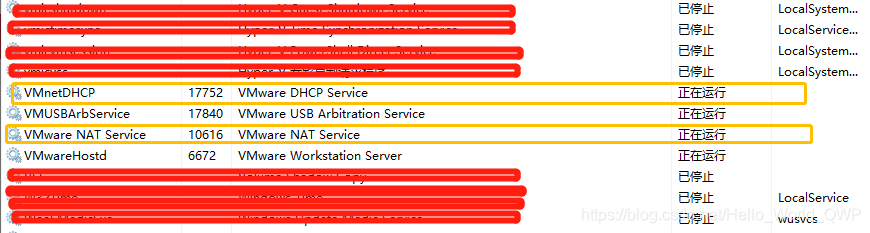
sudo rebootfirst step: enter your service, see vmware authorization service service will start

step 2: if the double-click service is started, see if it is started automatically. If not, change it to start automatically
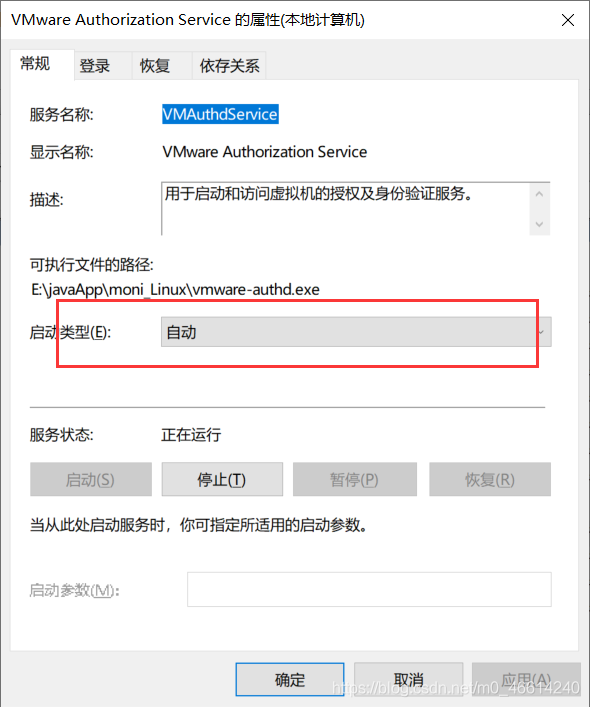
step 3: if none of this is a problem, check to see if the executable path is correct, perhaps because the folder has been changed so that it cannot find the execution path
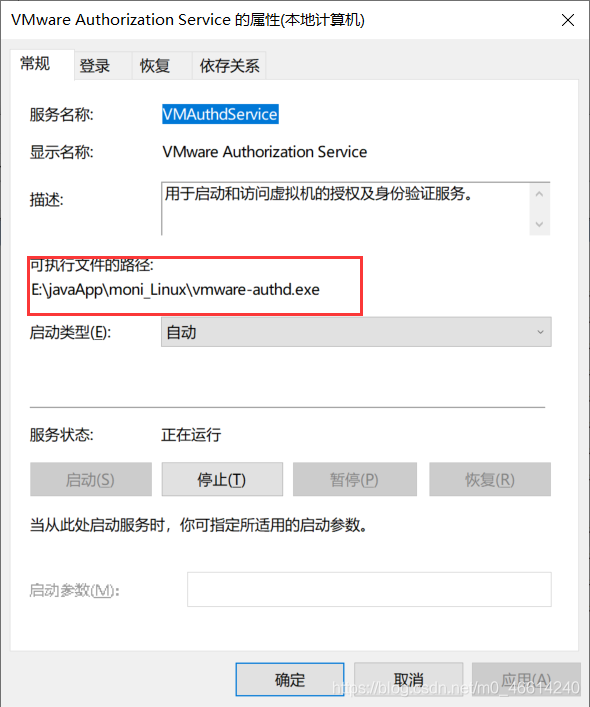
there are two ways to do it if the execution path is wrong:
the first: simple and crude uninstall reinstall
second path
first use the computer to search the registry to edit
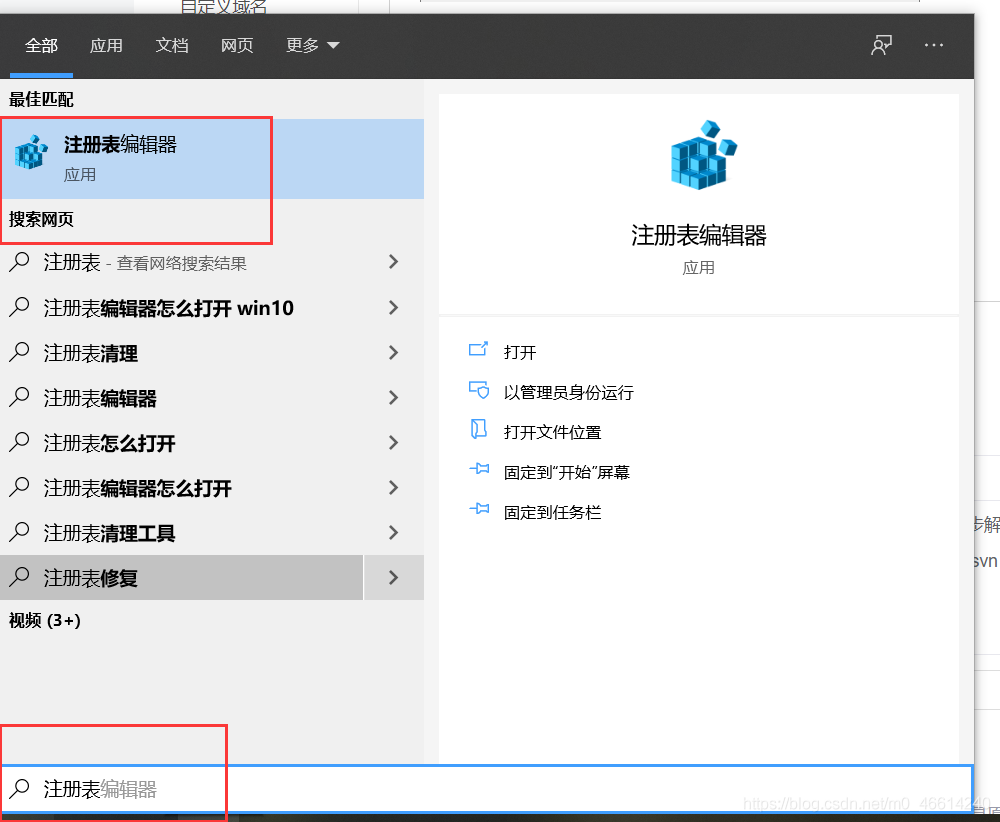
open according to the path :HKEY_LOCAL_MACHINE\SYSTEM\CurrentControlSet\Services vmware authorization service
modify the path to
of course I still recommend uninstall reinstall, but must be unloaded clean!
hope everyone can solve the problem!
execute/usr/local/apache/bin/apachectl start times wrong

centos使用Ambari搭建Hadoop集群
ambari --Confirm Hosts报错

Command start time 2018-08-13 10:32:23
bash: /var/lib/ambari-agent/bin/ambari-agent: Is a directory
('INFO 2018-08-10 11:03:19,614 NetUtil.py:70 - Connecting to https://node-1:8440/ca
ERROR 2018-08-10 11:03:19,618 NetUtil.py:96 - EOF occurred in violation of protocol (_ssl.c:579)
ERROR 2018-08-10 11:03:19,618 NetUtil.py:97 - SSLError: Failed to connect. Please check openssl library versions.
solution:
1. Check if OS openssl is the latest version, if not, please update.
[root@node-1 ~]# rpm -qa | grep openssl
openssl-1.0.1e-57.el6.x86_64
openssl-devel-1.0.1e-57.el6.x86_64

更新openssl
[root@node-1 ~]# yum update openssl

重启ambari-server
[root@node-1 ~]#  ambari-server restart
2. If not possible, modify /etc/pyth/cert-verification. CFG configuration file
verify=disablemodify /etc/ambari-agent/conf/ambari-agent.ini and add the following
in [security]
force_https_protocol=PROTOCOL_TLSv1_2restart ambari-agent
[root@node-1 ~]# ambari-agent restartreference:
https://community.hortonworks.com/questions/145/openssl-error-upon-host-registration.html