First, make sure that python2 or python3’s Adafruit_PCA9685 library has been downloaded. Then understand that the reason for this error is that Adafruit_PCA9685 could not find the external hardware, so think that you did not open I2C permissions (of course, make sure to open I2C permissions first), and then the error is usually in the following format
File "simpletest.py", line 17, in <module>
    pwm = Adafruit_PCA9685.PCA9685()
  File "/usr/local/lib/python3.7/dist-packages/Adafruit_PCA9685/PCA9685.py", line 81, in __init__
    self._device.write8(MODE1, mode1)
  File "/usr/local/lib/python3.7/dist-packages/Adafruit_GPIO/I2C.py", line 114, in write8
    self._bus.write_byte_data(self._address, register, value)
  File "/usr/local/lib/python3.7/dist-packages/Adafruit_PureIO/smbus.py", line 256, in write_byte_data
    self._device.write(data)
IOError: [Errno 121] Remote I/O error
At this time we only need to click on the File "/ usr/local/lib/python3.7/dist - packages/Adafruit_PCA9685/PCA9685 py", line 81, in __init__ self. _device. Write8 (MODE1, MODE1) to enter to PCA9685. Py files, the need to look at the red circle place address, use the command line.
Open the command line for raspberry PI Type B input
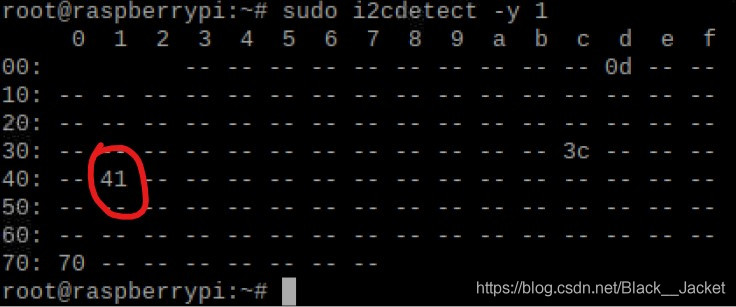
sudo i2cdetect -y 1
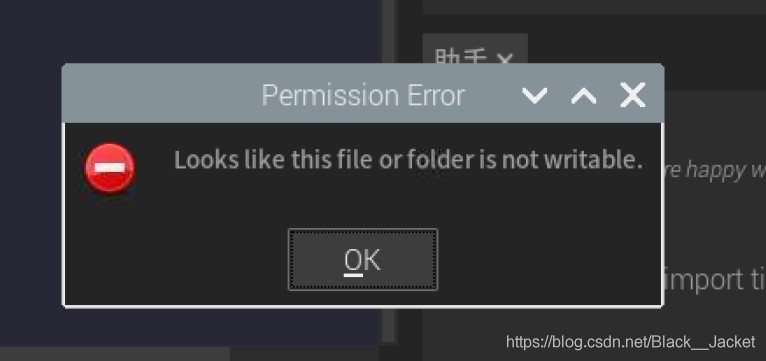
Type A is A change to 0 appears the 70 is gm's address, 41 is our module address some people is 20, or 40, and 0 d, and 3 c is my another equipment (raspberries pie intelligent housekeeper), if only to connect A device is good, look good, let's modify. Just open the PCA9685 py files address 0 x41 or 0 x40, etc., as the case may be, and then save the changes, then you will find no permissions, so you can open A command line input
su
Enter the password, go to root, copy the address of pCA9685.py just now (mine is 0x41), type CD and address, paste it to the command line, press enter, and go to that directory. if you are a python3.7 user you can use this one directly
cd /usr/local/lib/python3.7/dist-packages/Adafruit_PCA9685/
Py sudo chmod 777 pca9685.py modify permission then edit the pca9685.py file just now, modify the PCA9685_ADDRESS in it to the address you found by using sudo i2cdetect -y 1. then run it and try it!
Docker Can’t Connect to Docker Daemon After I update my Docker version to 0.8.0, I get an error message while entering sudo Docker version : when I update my Docker version to 0.8.0, I received an error message when I entered sudo docker version :
Client version: 0.8.0
Go version (client): go1.2
Git commit (client): cc3a8c8
2014/02/19 12:54:16 Can't connect to docker daemon. Is 'docker -d' running on this host?
And I’ve followed the instructions And entered command sudo docker-d , And I got this: I went into the command sudo docker-d , And I got this:
[/var/lib/docker|2462000b] +job initserver()
[/var/lib/docker|2462000b.initserver()] Creating server
open /var/lib/docker/aufs/layers/cf2414da53f9bcfaa48bc3d58360d7f1cfd3784e4fe51fbef95197709dfc285d: no such file or directory[/var/lib/docker|2462000b] -job initserver() = ERR (1)
2014/02/19 12:55:57 initserver: open /var/lib/docker/aufs/layers/cf2414da53f9bcfaa48bc3d58360d7f1cfd3784e4fe51fbef95197709dfc285d: no such file or directory
How do I solve the problem? how do I solve this problem?
# 1/f,
Reference: https://stackoom.com/question/1Tlln/Docker cannot connect to the docker daemon
# 2 floor Do a ps aux>4 grep docker Do a ps aux>5 grep dockerps aux>6 grep docker0 to see if the daemon is running.1 2 3 ps aux>7 grep Docker to see if the daemon is running. If not run /etc/init.d/docker start If not run /etc/init.d/docker start
The # 3 floor I had the same problem – “Can’t connect to docker daemon.” I had the same problem – “Can’t connect to docker daemon.” (except I didn’t get any ‘file not found’ errors on trying to start the server.) (except I didn’t get any ‘file not found’ errors on trying to start the server.) ‘ps’ showed that “/usr/bin/ docker-d “was still running ‘ps’ showed “/usr/bin/ docker-d” was still running I realised that I “d never later succeeded in running the server myself Mr. I realized that I never really succeeded in running the server. Every attempt had produced each attempt produced
...
2014/03/24 21:57:29 pid file found, ensure docker is not running or delete /var/run/docker.pid
So I belatedly realised that installing docker had maybe registered the daemon with upstart, which had started it for me. So I belatedly realized installation docker may have already registered with the upstart daemon, this has already started it for me. Hence, trying to kill the daemon to manually restart it fails (operation not permitted). so, try to terminate the daemon to manually restart it failed (operation is not allowed). So I did a So I did a So I made a
sudo kill -9 <PID>
on the daemon process. on the daemon. Another daemon immediately took its place, and this new one DOES now let my CLI client connect: Another daemon now lets my CLI client connect:
$ sudo docker info
Containers: 0
Images: 0
Driver: aufs
 Root Dir: /var/lib/docker/aufs
 Dirs: 0
WARNING: No memory limit support
WARNING: No swap limit support
# 4 floor I have similar problem. I have similar problem. I had to logout and login again to shell because I have just installed Docker and following command didn’t show in my environment. I had to logout and login the shell again because I had just installed Docker and the following commands were not shown in my environment.
export DOCKER_HOST=127.0.0.1:4243 >> ~/.bashrc
The # 5 floor The best way to find out according to Docker isn ‘t working will be to run The daemon manually. find The Docker not work is The best way to manually run daemons.
$ sudo service docker stop
$ ps aux | grep docker  # do this until you don't see /usr/bin/docker -d
$ /usr/bin/docker -d
The Docker daemon logs to STDOUT, so it will start spitting out whatever it’s doing. Docker daemon logs to STDOUT, so it will start spitting out whatever it’s doing.
Here was what my problem was: this is my problem :
[8bf47e42.initserver()] Creating pidfile
2015/01/11 15:20:33 pid file found, ensure docker is not running or delete /var/run/docker.pid
This was because the instance had been cloned from another virtual machine. This is because the instance has been cloned from another virtual machine. I just had to remove the pidfile, and everything worked afterwards. I just need to delete the pidfile, and everything worked afterwards. Of course, instead of blindly assuming this will work, I ‘d suggest running the daemon manually one more time and reviewing the log output for any other errors before starting the service back up. of course, I suggest that don’t blindly assume that this will be effective, I suggest to manually run again daemon, And check the log output for any other errors before starting the service backup.
# 6 building , I got the same problem., , I got the same problem. In CentOS 6.5: In CentOS 6.5:
ps aux |grep `cat /var/run/docker.pid`
If it shows no Docker daemon exists, then I type: If it shows no Docker daemon exists, then I type:
docker -d
and Then press Ctrl + D0 to stop Docker. Because we use the -d option, Docker will run as daemon. Because we use the -d option, Docker will run as daemon. Now we can do: Now we can do:
service docker start
Then I can do a docker pull centos. Then I can do a docker pull centos. That’s all. . NOTE: If these do not work, you can try yum update, and then repeat these again, because I yum install before these. NOTE: If these don’t work, you can try yum update and then repeat these as I did before yum install.
#!/bin/sh
RESOURCE_NAME=maf.jar
CONFIG_PATH=/maf/maf-service
#Stop
tpid=`ps -ef|grep $RESOURCE_NAME|grep -v grep|grep -v kill|awk '{print $2}'`
if [ ${tpid} ]; then
echo 'Stop Process...'
kill -15 $tpid
fi
sleep 5
#Closed
tpid=`ps -ef|grep $RESOURCE_NAME|grep -v grep|grep -v kill|awk '{print $2}'`
if [ ${tpid} ]; then
echo 'Kill Process!'
kill -9 $tpid
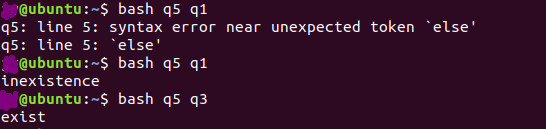
else
echo 'Stop Success!'
fi
tpid=`ps -ef|grep $RESOURCE_NAME|grep -v grep|grep -v kill|awk '{print $2}'`
if [ ${tpid} ]; then
echo 'App is running.'
else
echo 'App is NOT running.'
fi
rm -f tpid
nohup java -Dspring.config.location=$CONFIG_PATH/application.properties -jar $RESOURCE_NAME > nohup.out 2>&1 &
echo $! > tpid
echo Start Success!
tail -f nohup.out
Note: 1. -dspring.config. location: Specify the configuration file
For yML type configuration files, you simply place them in the sibling directory of the JAR without specifying them
2. Grep -v Grep eliminates the row
Dlogging.config=/data/apps/maf/ maf-Yunyan /logback.xml
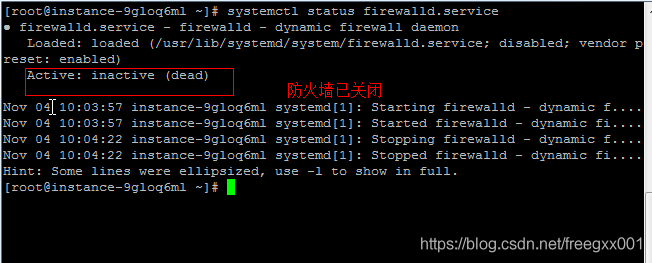
View the firewall command: SystemCTL Status Firewalld.Service
Execute the close command: SystemCTl stop firewalld.Service
Disable firewall auto-start command: SystemCTl disable Firewalld.Service
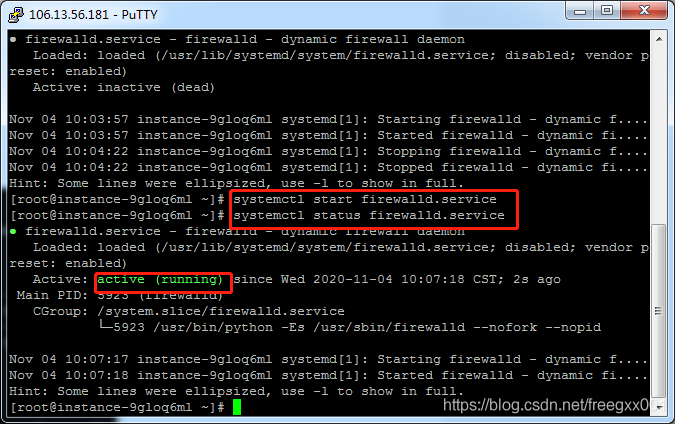
Systemctl Start Firewalld.Service
Firewall starts with the system: SystemCTL enable Firewalld.Service
Open the firewall
The following warnings appear under Ubuntu
dbint – warning **: 00:56:56.503:Error retrieving accessibility bus address:org.freedesktop.DBus.Error.ServiceUnknown:name org.a11y. the bus is not being served by any. service file.
How to Fix
Linux installation of VMWare under a problem, recently due to project needs, we have to Fedora8 system to install a virtual machine, the above run a Windows Server 2003, after a hard time to find a Linux version of VMWare, after installation, every time you start the virtual machine will report.
Unable to change the power state of the virtual machine: internal error.
This is an error.
At first I thought there was a problem with the vmware settings, but I finally found the answer on the Internet:
I encountered this problem when running a Vmware workstation under Ubuntu Jaunty. I get an error when shutting down the machine via an NX session.
It’s the result of a zombie ‘vmware-vmx’ process running. All you need to do is kill the process. This command sends ‘signal 9’ to the process. When sent to the process, SIGKILL causes the process to terminate immediately. Contrary to SIGTERM and SIGINT, this signal cannot be captured or ignored. More info:More sigkill info.
After that, I was able to start the virtual machine without any problems.
To tell you the truth, online articles are the same, no one can solve, all is to say that the memory is good, but there is no teaching can not clean the small white… = =
The problem is that the server system is full, and the temporary file directory specified by mysql is full, which is roughly what this means.
Now let’s solve the problem that /dev/vda1 is full, and I actually have no idea where /dev/vda1 is or what it is, but I later learned that this is a virtio-block type device.
Talk about it:
A line beginning with ‘c’ indicates that the device is a character device, and a line beginning with ‘b’ indicates that it is a block device.
/dev/vda and /dev/vDB are both virtio-block devices, while /dev/sda is an SD, or SCSI, device.
On the whole!
First login server: Execute DF-H means:
Check the disk usage space of a server, and find that the disk has been used 100%(this is the graph after I solved the problem, it has been restored to normal, the remaining 42% is enough).
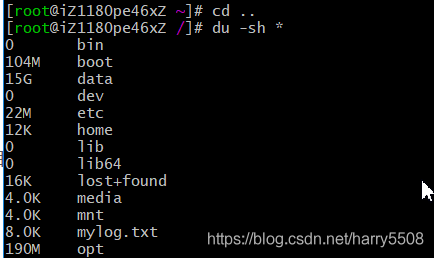
1, CD to the root directory, du-sh * to see which directory takes up a lot of space, some up to a dozen G, so you should keep an eye on this directory
2, CD takes up a lot of memory directory, continue du-sh *
Found data directory incredibly 15G, enter the data directory: CD data
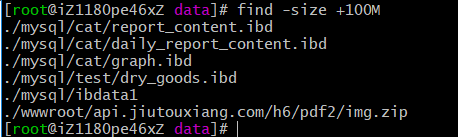
Then look for the large file:
File search command:
find -size +100M
This means to find files larger than 100M. M is Megabyte
You can also query the folder footprint to show the total space occupied by the directory:
Use: DU-h –max-depth=1/path
For example, du-h –max-depth=1 /var
This is to see which folder takes up the most memory in the directory
If you want to locate a large file:
ls -lhS
This is to display the file from large to small
3. Repeat the first two steps and decide whether to delete or remove them according to the actual situation
4. You can clear the log if it is too large
Run command:
cat /dev/null > file.log
Pro test, catalina.out in mysql folder can be deleted, execute:
echo “” > catalina.out
This log file is usually large.
5, if the package is too large, do not need to be able to uninstall
Perform unload
Rmp-e software name
Or delete
Rm-rf folder name
6, the large file is almost deleted, again DF-H, disk space can be reserved for a little half, absolutely perfect solution to the mysql 1030 problem!
Error: file ‘/boot/grub/ i386-PC/Normal.mod ‘not found
The partition was formatted when installing The Ubuntu system. After the installation, the boot error appeared: file ‘/boot/ GRUB/i386-PC/Normal.mod ‘not found
grub rescue> Interface,
I tried ls (HD0, MSDOS1) (HD0, MSDOS2) to find the Linux partition, but my computer’s ls (HD0, MSDOS1) returned unknown filesysem, so I could not find the corresponding Linux partition
So we did it in a different way:
Repair with the Boot Repair tool,
Use a usb flash drive with Ubuntu to boot, insert the usb flash drive in the way of installing the system, press ESC (or F11, F12 depending on your computer model) to launch the usb flash drive, and then select TRY Ubuntu (do not install Ubuntu) to enter the Ubuntu system:
1. Connect to the network
2. Open the terminal
3. Enter a command
sudo add-apt-repository ppa:yannubuntu/boot-repair & & sudo apt-get update
sudo apt-get install -y boot-repair & & boot-repair
4, click repair, complete, restart the computer is good Attached is the Boot Repair website with detailed instructions
https://sourceforge.net/p/boot-repair/home/Home/
The status quo described
In the afternoon, I found that the connection between my Xshell and the server node was inexplicably broken. After checking the system log, I found a large number of following errors:
May 15 17:58:08 yanta sshd[15213]: error:key_read: uudecode AAAAB3NzaC1yc2...........
The solution
After querying the solution on the network, it is found that the IP in error and the string in the corresponding error message can be found in the file /root/.ssh/known_hosts, and it is ok to delete it . However, after checking the information on the server again, it is found that there is no corresponding one, and the encoded string is completely different.
After looking at /root/.ssh/authorized_keys, I find that one of the keys is consistent with the error message, so I first backup the file:
# cp authorized_keys authorized_keys.bk
After careful examination of the key, it was found that a complete key was originally divided into several parts, leading to the incomplete key when SSH login, so there was no error message after re-copying and pasting the key information on this machine.
[atguigu@hadoop102 .ssh]$ ssh-keygen -t dsa
Generating public/private dsa key pair.
Enter file in which to save the key (/home/atguigu/.ssh/id_dsa):
Enter passphrase (empty for no passphrase):
Enter same passphrase again:
Your identification has been saved in /home/atguigu/.ssh/id_dsa.
Your public key has been saved in /home/atguigu/.ssh/id_dsa.pub.
The key fingerprint is:
25:0a:23:7f:a7:f0:d1:78:f6:59:57:e3:cc:78:49:d0 atguigu@hadoop102
The key's randomart image is:
+--[ DSA 1024]----+
|             ..  |
|              .E |
|  . o   . .    o.|
|   o o + o    *.o|
|    o = S   ...* |
|     + * . o ..  |
|      o   o      |
|                 |
|                 |
+-----------------+
[atguigu@hadoop102 .ssh]$ ssh-copy-id hadoop103
/usr/bin/ssh-copy-id: ERROR: No identities found
After regenerating the key pair, it was copied to another machine, HadoOP103 times made the following mistake:
/usr/bin/ssh-copy-id: ERROR: No identities found
The reason mentioned online is that no key pair has been generated.
Obviously, I am not the reason, as mentioned below:
Then it is found that the public key path is missing and can be added through -i:
$ ssh-copy-id -i ~/.ssh/id_dsa.pub user@remote_ip
I tried it, and I solved it
[atguigu@hadoop102 .ssh]$ ssh-copy-id -i ~/.ssh/id_dsa.pub atguigu@hadoop103
atguigu@hadoop103's password:
Now try logging into the machine, with "ssh 'atguigu@hadoop103'", and check in:

  .ssh/authorized_keys

to make sure we haven't added extra keys that you weren't expecting.

[atguigu@hadoop102 .ssh]$ ssh-copy-id -i ~/.ssh/id_dsa.pub atguigu@hadoop104
atguigu@hadoop104's password:
Now try logging into the machine, with "ssh 'atguigu@hadoop104'", and check in:

  .ssh/authorized_keys

to make sure we haven't added extra keys that you weren't expecting.

[atguigu@hadoop102 .ssh]$ ssh hadoop104
Last login: Fri Dec 28 03:39:18 2018 from 192.168.31.1
[atguigu@hadoop104 ~]$ exit
logout
Connection to hadoop104 closed.
[atguigu@hadoop102 .ssh]$ ssh hadoop103
Last login: Fri Dec 28 03:39:18 2018 from 192.168.31.1
[atguigu@hadoop103 ~]$ exit
logout
Connection to hadoop103 closed.
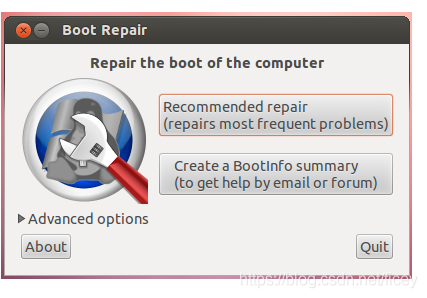 Attached is the Boot Repair website with detailed instructions