Modify the eclipse.ini , modify the location of the virtual machine, and change all the text similar to the following to “- VM”
C:/Program Files/Java/jdk1.8.0_ 51/bin/ javaw.exe “For – VM
C:/Program Files/Java/jdk1.8.0_ 51/bin
Modify the eclipse.ini , modify the location of the virtual machine, and change all the text similar to the following to “- VM”
C:/Program Files/Java/jdk1.8.0_ 51/bin/ javaw.exe “For – VM
C:/Program Files/Java/jdk1.8.0_ 51/bin
Problem Description: the error appears in the Tomcat/bin directory, execute/ shutdown.sh ,./ startup.sh When the Tomcat server is restarted or shut down.
Cause analysis: Linux lost Java in the running memory_ Home and JRE_ Environment variable parameters of home
Solution:
Step 1: add Java environment variable parameters
Step 2:
source /etc/profileHow to Solve Error: There are no resources that can be added or removed from the server.
Solution.
Select the project right click-->properties-->Project Facets-->
Check Dynamic Web Project and java, etc. will be fine.
The following error occurred today while compiling a Java program.
No enclosing instance of type Main is accessible. Must qualify the allocation with an enclosing instance of type Main (e.g. x.new A() where x is an instance of Main).
The source code I originally wrote looked like this
public class Main
{
class Dog
{
private String name;
private int weight;
public Dog(String name, int weight)
{
this.setName(name);
this.weight = weight;
}
public int getWeight()
{
return weight;
}
public void setWeight(int weight)
{this.weight = weight;}
public void setName(String name)
{this.name = name;}
public String getName()
{return name;}
}
public static void main(String[] args)
{
Dog d1 = new Dog("dog1",1);

}
}
When this error occurred, I didn’t quite understand it.
After learning from other people’s explanation, I suddenly realized.
In the code, my dog class is an internal class defined in main. The dog inner class is dynamic, while my main method is static.
Just as static methods cannot call dynamic methods.
There are two solutions:
Method 1
Define the inner class dog as a static class.
Method 2
Define the inner class dog outside the main class.
//Get the height of the status bar by reflection, the return is the height of the status bar
    public int getStatusHeight(){
        try {
            Class<?> c = Class.forName("com.android.internal.R$dimen");
            Object o = c.newInstance();
            Field field = c.getField("status_bar_height");
            int x = (int) field.get(o);
            return mContext.getResources().getDimensionPixelOffset(x);
        } catch (Exception e) {
            e.printStackTrace();
            return 0;
        }
}Local/etc/SSH/SSH_ Config, use root to add
Ciphers aes192-cbc,aes256-cbc
When we put the WordPress program in the root of the space in the form of a folder, we need to add the name of the folder when visiting the website http://www.xxx.com/wordpress , you can’t access it by using the domain name directly. The solution is as follows:
1. First of all, in the program (in/var/www/HTML/WordPress), the“ index.php ”Copy a copy to the root directory of the website (/ var/www/HTML), and then open it. The default format is as follows:
require( dirname( __FILE__ ) . ‘/wp-blog-header.php’ );
2. In fact, we just need to add the folder name of your program to the path
example:

require( dirname( __FILE__ ) . ‘./wordpress/wp-blog-header.php’ );


Generally, you can go to the previous step to perform the third step.

If you find that the site opens blank after saving, just change the above sentence to the following:

require(‘./wordpress/wp-blog-header.php’);
3. After saving, you can open the program by directly accessing your domain name
But after such modification, when you open a page in the website, there is WordPress in the address bar. You need to make the following modifications:
To the installation background of WordPress, in the general settings
In the “site address (URL)” column, remove the WordPress after the address, as follows:
WP in database_ Make corresponding changes in options:
change to the following form
Siteurl:  http://xxx.xxx.xxx/wordpress
Home:  http:/xxx.xxx.xxx/
Reference 1
reference 2
The order and association of the ontouch, onclick, onlongclick events of button:
1.ontouch returns false
first, the down event of the ontouch event occurs. At this time, if you press and hold for a long time, the onlongclick event will be triggered;
then, the up event of the ontouch event will occur. After the up, the onclick event will be triggered.
2. ontouch returns true
first, the down event of ontouch event occurs, and then the up event of ontouch event occurs; during this period, onclick and onlongclick events are not triggered
3. ontouch: down returns true, up returns false: the result is the same as the second.
Mechanism analysis:
in ontouch events, the return value of the down event marks whether the event is a click event (returns false, which is a click event; returns true, which is not recorded as a click event), while the up event marks the end time of the event, which is to judge whether it is a long press.
As long as down returns true, the system will not record this event as a click event, and the onclick or onlongclick event will not be triggered. Therefore, even if false is returned when up, the system will not continue to trigger the onclick event.
4. ontouch: down returns false, up returns true:
first, the down event of ontouch event occurs, at this time:
long press to trigger the onlongclick event, and then the up event of ontouch event occurs, over.
Short press to trigger the up event of ontouch first. After a certain time, the onlongclick event will be triggered automatically.
Mechanism analysis:
in ontouch events, the return value of the down event marks whether the event is a click event (returns false, which is a click event; returns true, which is not recorded as a click event), while the up event marks the end time of the event, which is to judge whether it is a long press.
When down returns false, the event is marked as a click event, while up returns true, it means that the event has not been finished, that is, it has been pressed for a long time. When the critical time of pressing for a long time is reached, the long press event will be triggered naturally, while the onclick event will not be triggered to 0
public class ImageZoomActivity extends Activity implements OnTouchListener {
   private static final String TAG = "Touch";
   // These matrices will be used to move and zoom image
   Matrix matrix = new Matrix();
   Matrix savedMatrix = new Matrix();

   // We can be in one of these 3 states
   static final int NONE = 0;
   static final int DRAG = 1;
   static final int ZOOM = 2;
   int mode = NONE;

   // Remember some things for zooming
   PointF start = new PointF();
   PointF mid = new PointF();
   float oldDist = 1f;
 private ImageView view;
 private boolean keyUpDown=false;
 private int timer=0;

   /* (non-Javadoc)
 * @see android.app.Activity#onCreate(android.os.Bundle)
 */
@Override
   public void onCreate(Bundle savedInstanceState) {
      super.onCreate(savedInstanceState);
      requestWindowFeature(Window.FEATURE_NO_TITLE);
      setContentView(R.layout.touch);
      view = (ImageView) findViewById(R.id.imageView);
      Intent intent=getIntent();
//      Drawable drawable=loadImgByFilePath(intent.getStringExtra("toZoom"));
      view.setImageURI(Uri.parse(intent.getStringExtra("toZoom")));
      view.setOnTouchListener(this);
   }

 private Handler clickHandler = new Handler(){
  @Override
  public void handleMessage(Message msg) {
   if(msg.what==0){
    keyUpDown=true;
    keyUpDownListener();
   }else if(msg.what==1){
    keyUpDown=false;
    if(timer<=1)
     ImageZoomActivity.this.finish();
    else timer=0;
   }
  }
 };
 private int keyUpDownListener() {
  new Thread(){
   public void run(){
    while(keyUpDown){
     try {
      sleep(200);
      timer++;
      Log.d("info","timing:timer="+timer);
     } catch (InterruptedException e) {
      e.printStackTrace();
     }
    }
   }
  }.start();
  return timer;
 }

   @Override
   public boolean onTouch(View v, MotionEvent event) {
      ImageView view = (ImageView) v;

      // Dump touch event to log
//      dumpEvent(event);

      // Handle touch events here...
      switch (event.getAction() & MotionEvent.ACTION_MASK)
      {
      case MotionEvent.ACTION_DOWN:
         savedMatrix.set(matrix);
         start.set(event.getX(), event.getY());
         Log.d(TAG, "mode=DRAG");
        clickHandler.sendEmptyMessage(0);
         mode = DRAG;
         break;
      case MotionEvent.ACTION_POINTER_DOWN:
         oldDist = spacing(event);
         Log.d(TAG, "oldDist=" + oldDist);
         if (oldDist > 10f) {
            savedMatrix.set(matrix);
            midPoint(mid, event);
            mode = ZOOM;
            Log.d(TAG, "mode=ZOOM");
         }
         break;
      case MotionEvent.ACTION_UP:clickHandler.sendEmptyMessage(1);
      case MotionEvent.ACTION_POINTER_UP:
         mode = NONE;
         Log.d(TAG, "mode=NONE");
         break;
      case MotionEvent.ACTION_MOVE:
         if (mode == DRAG) {
            // ...
            matrix.set(savedMatrix);
            matrix.postTranslate(event.getX() - start.x,
                  event.getY() - start.y);
         }
         else if (mode == ZOOM) {
            float newDist = spacing(event);
            Log.d(TAG, "newDist=" + newDist);
            if (newDist > 10f) {
               matrix.set(savedMatrix);
               float scale = newDist/oldDist;
               matrix.postScale(scale, scale, mid.x, mid.y);
            }
         }
         break;
      }

      view.setImageMatrix(matrix);
      return true; // indicate event was handled
   }

   /** Determine the space between the first two fingers */
   private float spacing(MotionEvent event) {
      float x = event.getX(0) - event.getX(1);
      float y = event.getY(0) - event.getY(1);
      return FloatMath.sqrt(x * x + y * y);
   }

   /** Calculate the mid point of the first two fingers */
   private void midPoint(PointF point, MotionEvent event) {
      float x = event.getX(0) + event.getX(1);
      float y = event.getY(0) + event.getY(1);
      point.set(x/2, y/2);
   }
}
PS: if ontouch returns true or false, you can try to return it
super.onTouchEvent(event)
Most of the solutions found by Baidu are as follows:
The final solution is to install grub as usual. If grub fails in the last step, it will be skipped and the installation will end. Then find a Ubuntu live. After the U disk is booted and started, connect to the Internet and install * * OOT repair (there is a tutorial on the Internet) to repair grub foolishly. After repairing and restarting, you can enter the new system.
I have to say that the boot repair artifact has helped me solve grub problems for many times. It’s better than any other method, and I don’t need to type those messy commands
But I tried, but I still couldn’t. in the end, I changed the galaxy Kirin community version. This time, the installation was completely normal, and there was no such error.
It is said that 32-bit system can also be installed, and there will be no error. Only 64 bit system will fail to install grub. (I didn’t try this)
After being bothered by this bug for a long time, the system was finally installed.
Only today did I know that it was my own manual partition that would cause this problem. If it was automatic partition, it would not cause this problem! Pit father, waste so much of my time!!!
First, log in as root with the terminal
sudo -iThen switch to the/etc/apt/directory and execute:
cd /etc/apt/Put the inside sources.list Copy it for security.
cp sources.list sources.list1The next step is to open it with vim sources.list , delete the original contents, and then add the following contents:
deb http://mirrors.163.com/ubuntu/ trusty main restricted universe multiverse

deb http://mirrors.163.com/ubuntu/ trusty-security main restricted universe multiverse

deb http://mirrors.163.com/ubuntu/ trusty-updates main restricted universe multiverse

deb http://mirrors.163.com/ubuntu/ trusty-proposed main restricted universe multiverse

deb http://mirrors.163.com/ubuntu/ trusty-backports main restricted universe multiverse

deb-src http://mirrors.163.com/ubuntu/ trusty main restricted universe multiverse

deb-src http://mirrors.163.com/ubuntu/ trusty-security main restricted universe multiverse

deb-src http://mirrors.163.com/ubuntu/ trusty-updates main restricted universe multiverse

deb-src http://mirrors.163.com/ubuntu/ trusty-proposed main restricted universe multiverse

deb-src http://mirrors.163.com/ubuntu/ trusty-backports main restricted universe multiverse
Finally, execute: apt get update.
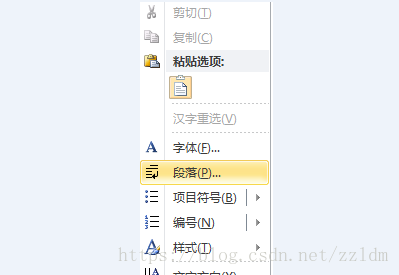
1. Select the paragraph and right-click to open it.

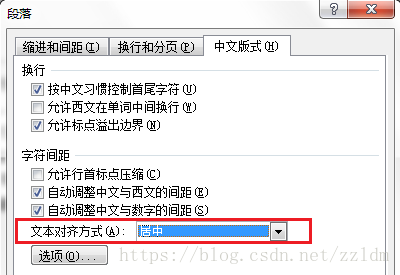
2. Find the Chinese plate – text alignment, select the center, then it is OK, the formula has been aligned with the text.

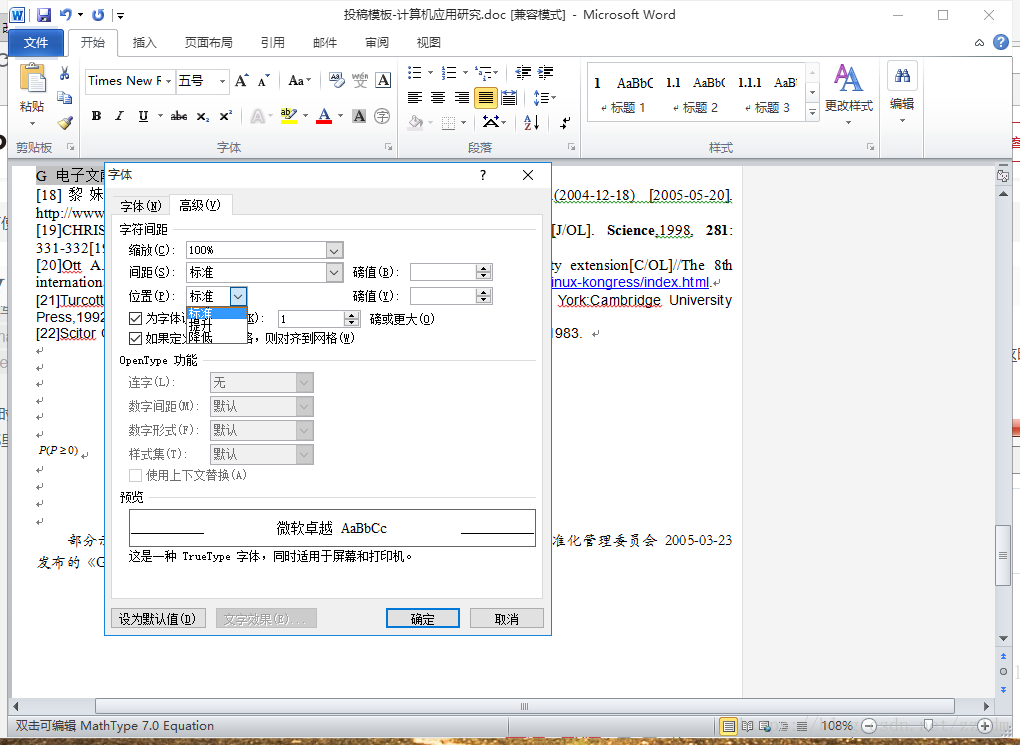
3. If some formulas are not aligned with the text at this time, you can select the formula, and then select the appropriate option from the start – & gt; font – & gt; advanced position, and you can successfully adjust it.

cd '/etc/yum.repos.d/'

curl 'https://copr.fedorainfracloud.org/coprs/scx/libtiff4/repo/epel-7/scx-libtiff4-epel-7.repo' > 'scx-libtiff4-epel-7.repo'

curl 'https://copr.fedorainfracloud.org/coprs/scx/rawtherapee/repo/epel-7/scx-rawtherapee-epel-7.repo' > 'scx-rawtherapee-epel-7.repo'

yum install 'rawtherapee'
Reference
source