[SSL: CERTIFICATE_VERIFY_FAILED] certificate verify failed (_ssl.c:645)
Error reporting on Linux machines:
"bad handshake: Error([('SSL routines', 'SSL3_GET_SERVER_CERTIFICATE', 'certificate verify failed')],)"
The small procedure is as follows:
#!/bin/python

import requests
from requests.auth import HTTPBasicAuth
from pprint import pprint

my_url = 'https://192.168.12.34/nodes'

def main():
    try:
        r = requests.get(my_url,
                         auth=HTTPBasicAuth('username', 'passw0rd'))

        pprint(r.status_code)
        pprint(r.json())
    except Exception as ex:
        print("Exception: {ex}".format(ex=ex))


if __name__ == '__main__':
    main()
The solution, it turns out, is to add verify=False to the parameters of the GET function
The root cause is that the certificate given by the site under test is considered questionable, so verify=False is required to pass the error.
, however, is not enough, because with verify=False, a large section of warning is printed out for each connection, indicating that the connection is secure. How can you disable this message if it is secured?Add a sentence to: requests. Packages. Urllib3. Disable_warnings ()
final code is as follows:
#!/bin/python

import requests
from requests.auth import HTTPBasicAuth
from pprint import pprint

my_url = 'https://192.168.12.34/nodes'

def main():
    try:
        requests.packages.urllib3.disable_warnings()
        r = requests.get(my_url,
                         auth=HTTPBasicAuth('username', 'passw0rd'),
                         verify=False)

        pprint(r.status_code)
        pprint(r.json())
    except Exception as ex:
        print("Exception: {ex}".format(ex=ex))


if __name__ == '__main__':
    main()
nginx: [error] open() "/var/run/nginx/nginx.pid" failed (2: No such file or directory)
Or maybe it’s not running Nginx,
The first time I made an error: it did not run, so I directly executed the refresh configuration.
My second mistake:
Question:
After restarting the virtual machine, restarting Nginx will report an error: open() “/var/run/nginx/nginx.pid” failed (2: No such file or directory)
Solutions:
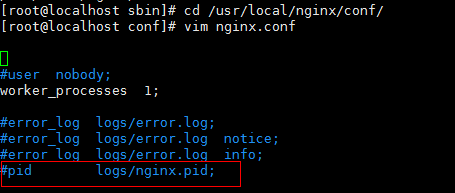
(1) Enter CD /usr/local/nginx/conf/ directory and edit the configuration file nginx.conf;
(2) Where there is a comment in the configuration file: # PID logs/nginx.pid;
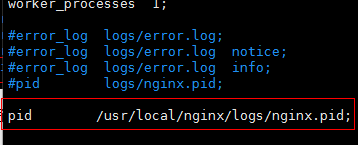
(3) the annotation, go out and amended as: pid/usr/local/nginx/logs/nginx pid;
(4) Create the logs directory under /usr/local/nginx: mkdir /usr/local/nginx/logs
(5) start nginx service:/usr/local/nginx/sbin/nginx
How to Fix Error137 (net::ERR_NAME_RESOLUTION_FAILED)
Under CMD, enter NetSH WinSock Reset as administrator and restart the computer.
Failed to load Main-Class manifest attribute from when the jar file is running
First of all, I would like to share with you a tutorial on artificial intelligence of Giant cow giant cow, which I found by accident. The course is not only zero basis, easy to understand, but also very funny humor, and from time to time there are connotation jokes, like reading a novel, haha ~ I am learning, I think it is too great, so to share with you! Click here to jump to the tutorial
Failed to load main-class manifest Attribute from… , this is due to the program is not set up to run the entry program.
Right-click on your JAR file, select Open mode — Winrar — to open the Meta-INF folder, and double-click on the MANIFEst.MF file inside. When you open it, you will see that there is only manifest-Version: 1.0 and no main-class: XXX configuration.
The solution —
Reopen your Eclipse, select the project that requires Export, right-click Export, and select Java –JAR File
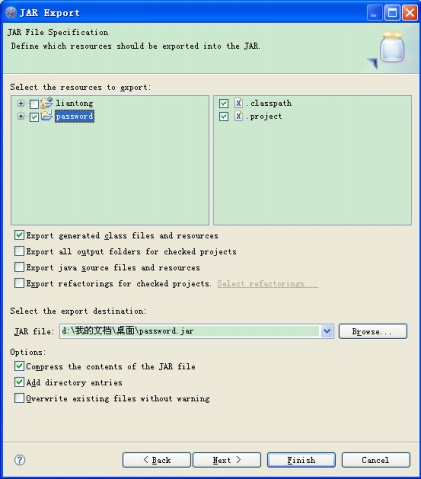
After selecting the items you want to export, click Next – Next and go to the following page:
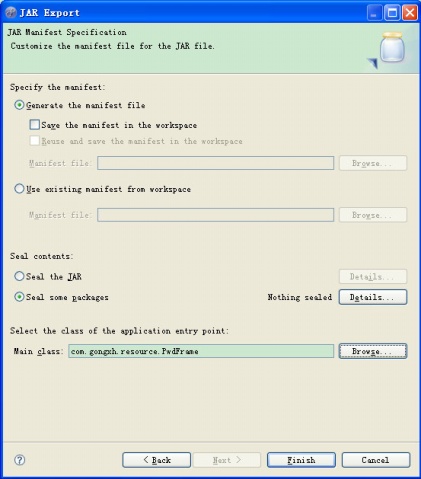
Notice the Main class :(you definitely don’t have any text), click Browse, select your Main function, and then finish.
Browse the artificial intelligence tutorial
RegOpenKeyEx returns error value 5
import win32api
import win32con
key = win32api.RegOpenKey(win32con.HKEY_LOCAL_MACHINE,’SOFTWARE’,0,win32con.KEY_ALL_ACCESS)
error reporting pywintypes.error: (5, ‘RegOpenKeyEx’, ‘xbe\ xbe\xf8\xb7\xc3\ xca\xa1\xa3’)
then the positioning problem occurred in win32con.key_all_access, which was due to the willingness of the registry access to be denied, so the access permission needed to be increased, by the following methods:
the first method:
WIN7 has administrator privileges:
1. Right-click computer, go to administration, and find users and groups.
2. Find administrators, right-click to bring up the property, and remove the check mark before “this account is disabled”.
back to the desktop
3. Create a new “notepad” and copy as follows:
Windows Registry Editor Version 5.00
[HKEY_CLASSES_ROOT\*\shell\runas]
@=” administrator takes ownership”
“NoWorkingDirectory”=””
[HKEY_CLASSES_ROOT\*\shell\runas\command]
@=”cmd.exe /c takeown /f \”%1\” & & icacls \”%1\” /grant administrators:F”
“IsolatedCommand”=”cmd.exe /c takeown /f \”%1\” & & icacls \”%1\” /grant administrators:F”
[HKEY_CLASSES_ROOT\exefile\shell\runas2]
@=” administrator takes ownership”
“NoWorkingDirectory”=””
[HKEY_CLASSES_ROOT\exefile\shell\runas2\command]
@=”cmd.exe /c takeown /f \”%1\” & & icacls \”%1\” /grant administrators:F”
“IsolatedCommand”=”cmd.exe /c takeown /f \”%1\” & & icacls \”%1\” /grant administrators:F”
[HKEY_CLASSES_ROOT\Directory\shell\runas]
@=” administrator takes ownership”
“NoWorkingDirectory”=””
[HKEY_CLASSES_ROOT\Directory\shell\runas\command]
@=”cmd.exe /c takeown /f \”%1\” /r /d y & & icacls \”%1\” /grant administrators:F /t”
“IsolatedCommand”=”cmd.exe /c takeown /f \”%1\” /r /d y & & icacls \”%1\” /grant administrators:F /t”
and then save as win7 to get administrator privileges. Reg, suffix must be.reg
imports the saved registry information, thus gaining WIN7 administrator rights.
right click on the folder and “administrator takes ownership” will appear
the second method:
ctrl+r
input lusrmgr. MSC
user — double-click administrator to uncheck the “account disabled” check
logout
select administrator account to log in
OpenProj can’t open or prompt “Failed to load Java VM Library” error solution
http://www.huangshaotian.com/technical/others/openproj%E6%89%93%E5%BC%80%E4%B8%8D%E4%BA%86%E6%88%96%E8%80%85%E6%8F%90%E7%A4%BAfailed-to-load-java-vm-library%E7%9A%84%E9%94%99%E8%AF%AF%E7%9A%84%E8%A7%A 3%E5%86%B3%E6%96%B9%E6%A1%88.html
The remote server returned an error: (417) Expectation failed
Today I did a little demo using the Search API on Twitter. Create a new project and write the following test code directly in the Page_Load of the test page.
     protected void Page_Load(object sender, EventArgs e)
        {
string urlPost = "http://search.twitter.com/search.json";

string postData = "q=twitterapi";
            UTF8Encoding encoding = new UTF8Encoding();
byte[] byteData = encoding.GetBytes(postData);

            HttpWebRequest request = (HttpWebRequest)WebRequest.Create(urlPost);
            request.Method = "POST";
            request.ContentType = "application/x-www-form-urlencoded";
            request.ContentLength = byteData.Length;

            Stream requestStream = request.GetRequestStream();
            requestStream.Write(byteData, 0, byteData.Length);
            requestStream.Close();

            HttpWebResponse response = (HttpWebResponse)request.GetResponse();

            Stream receiveStream = response.GetResponseStream();

            StreamReader readStream = new StreamReader(receiveStream, Encoding.UTF8);

            Response.Write("Response stream received.");
            Response.Write(readStream.ReadToEnd());
            response.Close();
            readStream.Close();
        }
Unfortunately, The error “The remote Server has returned an Error: (417) taught failed” appeared.
At first, I thought it was the “great Firewall”, but it was still the same after connecting to THE VPN, so I went online to find a solution, and finally I found the reason.
“This error can be caused by a client network environment (Don’t Support “100 continue”). Add the following to the program’s configuration file and give it a try.” The original address: http://0e2.net/post/1184.html
<configuration>
<system.net>
<settings>
<servicePointManager expect100Continue="false" />
</settings>
</system.net>
</configuration>
Test, success!!
Reproduced in: https://www.cnblogs.com/aimarAgt/archive/2011/08/17/2143177.html
reason 442 failed to enable virtual adapter
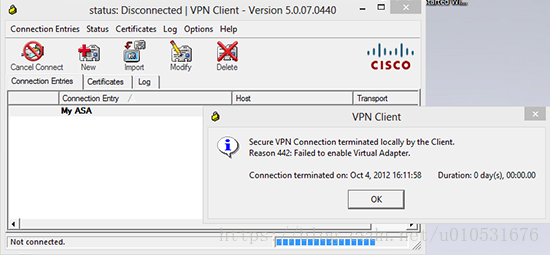
Let me tell you about my situation. I originally solved it once and could connect it back to the company, but when I was promoted to Win 10 1709 yesterday, I saw a reminder that Cisco VPN was not safe, and then the VPN service was removed. Then the Cisco VPN was fixed in the control panel and 442 appeared when connected.
Post a link that might help you solve the problem:
1. https://supportforums.cisco.com/t5/vpn/reason-442-failed-to-enable-virtual-adapter-windows-7-64-bit/td-p/1782751
2. https://blog.csdn.net/gotomic/article/details/8113536
The third one is the original link to solve my problem, registry problem: Solved
Solution steps:
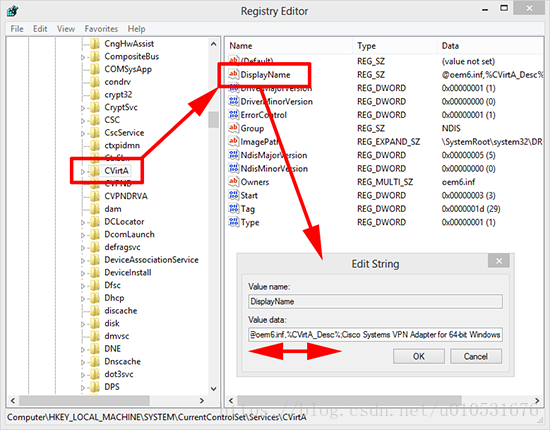
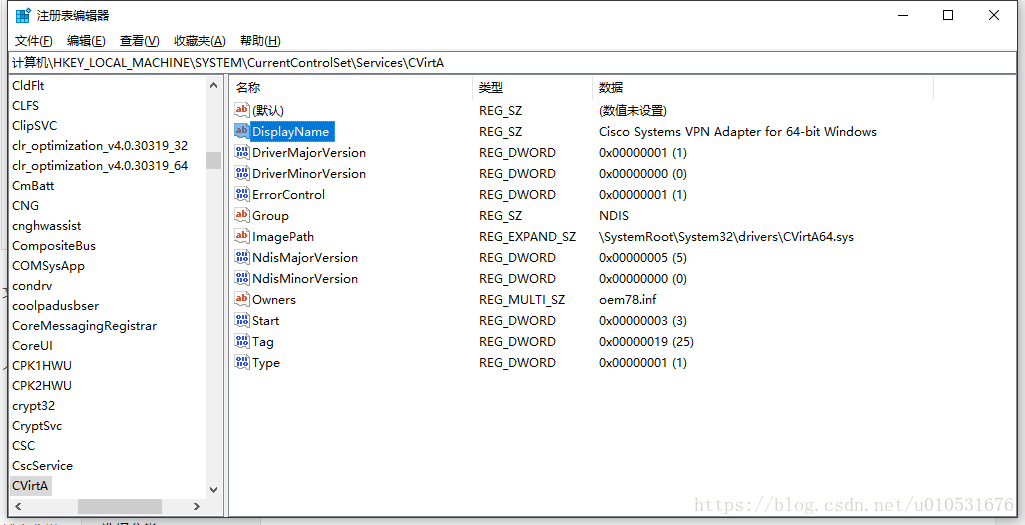
1. Open registry center (Win + R, enter regeidt);
2. Locate HKEY_LOCAL_MACHINE\SYSTEM\CurrentControlSet\Services\CVirtA in the registry, double-click “DisplayName” on the right, and delete all characters on the left side of “Cisco Systems VPN Adapter for 64-bit Windows”;
3. Open vpnGUi.exe;
Someone who wants to solve a problem.
An error is reported when the laptop is turned on: image failed to verify with * access denied* press any key to continue
1. Press F2 to enter the BIOS (laptop hotkeys are different) and find Boot–& GT; secure boot–> To: disabled – & gt; OS Mode Selection has been changed to CSM OS.
2. In the advanced – & gt; Fast BIOS Mode is changed to disable.
3. Save and exit.
Two, if this preloaded is the Win8, and is a newer model, so when you want to remove the Win8, install the Win7 system will encounter problems.
problem number one is that the secure boot is not turned off, so you need to go to the BIOS and turn off secure boot.
problem two, is because the new machine win8 start way for UEFI, is Intel comes in to begin to promote the new standard, and can’t directly support to win7. You need to change the boot mode to both or Legathy in the BIOS
Windows 10 critical_service_failed solution
First of all, turn it on
After an error message is sent, the system will collect information and start it again. After repeated for two times, the repair program will be started.
At this point, select Troubleshooter – Advanced Options – Startup Settings – Restart
After restarting, press the numeric key 7 or F7 – select disable driver mandatory signature
It can be turned on normally
Disable driver signature completely
Steps are as follows:
1, in the right click on start button, select “command prompt (administrator)”
2, execute the following command (copy, click the right mouse button in the command prompt to complete paste, then press the enter key) :
bcdedit. Exe/set nointegritychecks on
3, command, instantaneous has been completed to restore the default validation, execute the following command:
bcdedit.exe /set nointegritychecks off
4, and with the command line to close the signature, first shutdown (note is not restart), and then start again, you do not need to press F7 to disable
Reference: http://tieba.baidu.com/p/5855560956#121663170628l
An error is reported when an android phone visits the app webpage: net::ERR_PROXY_CONNECTION_FAILED
Net ::ERR_PROXY_CONNECTION_FAILED
mobile phone access app embedded HTML web page error:
net::ERR_PROXY_CONNECTION_FAILED
is the original mobile network set the agent, as long as you remove the agent is ok
The request failed with HTTP status 401: Unauthorized. SSRS 2008
This Error occurs in SSRS 2008, which is generally a username and password Error during access.
Reproduced in: https://www.cnblogs.com/coreni/archive/2011/08/25/2153448.html