method:
- switch to root account sudo
- before exit 0 add the execute command 0 sudo python /xx/xx/xx. Py
1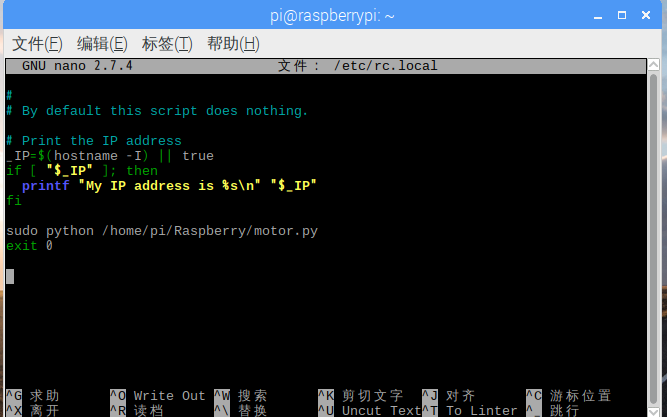
- save the restart can see the effect after
modify rc.local file sudo nano /etc/rc.local
method:
modify rc.local file sudo nano /etc/rc.local
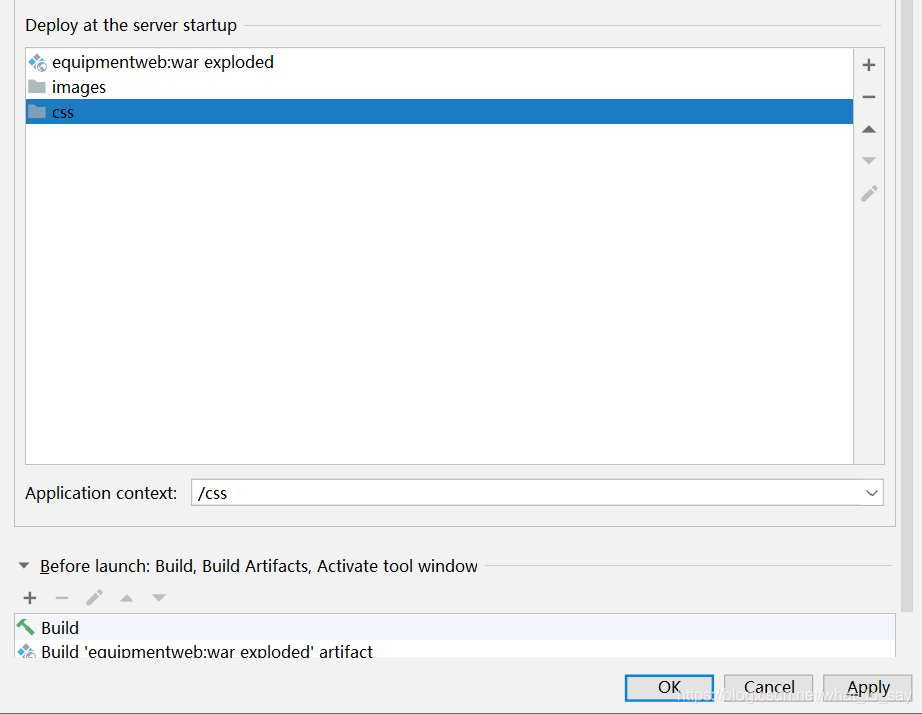
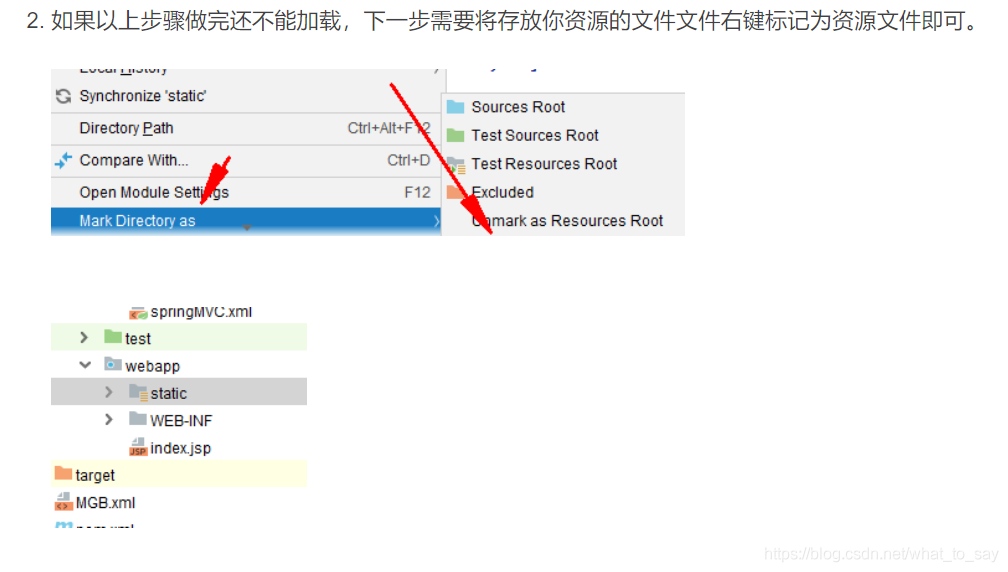
after the deployment of SSM often unable to load image resources or CSS style, but should do all did, change web. XML, applicationContext. XML what of, is a fan of

solution:
where tomcat is deployed
 the two add
apply and then you’re done
there is another untested method:
first of all, I want to make it clear that the tool is not wrong, I’m sure your hair is wrong, yes, it’s me, let’s look at my fault
SQL: Insert into T_ADMINISTRATIVE (A_ID, s_ID, A_import_TZZl, A_import_tz_remark, A_import_file_route, A_expert_Lzzl, A_expert_Lz_remark, a_expert_file_route, A_risk_pgzl, A_risk_pgremark, A_risk -file_route, ssh_zl, ssh_remark, ssh_file_route, A_node_status, a_del_status) values (?,?,?,?,?,?,?,?,?,?,?,?,?,?,?,?)
### Cause: com.mysql.jdbc.exceptions.jdbc4.MySQLSyntaxErrorException: You have an error in your SQL syntax; Check the manual that corresponds to your MySQL server version for the right syntax to use near ‘- file_route, ssh_zl,
ssh_remark, ssh_file_route, a_node_status,
a_de’ at line 4
insert increase error, at the beginning because it was a SQL statement problem, until finally confirm that it is not SQL problem, go back to the table you created (created garbage)
file-route. File_route. All right, just rebuild it.
svn: E230001: Server SSL certificate verification failed: certificate issued
literally means that the server’s SSL certificate validation failed.
solution:
execute SVN ls on terminal https://*/ SVN / (your project address)
and then the terminal will ask you to choose R, t, or p. P stands for accept
after we enter p, press enter, and then the computer user’s password and SVN account password will be prompted to input, according to the prompt operation line
input is completed, press enter to do
1. Current python version:

2. Use PIP to install QT5:
pip install pyqt5

Pyqt5-tools: PIP install pyqt5-tools

4. Check whether QT was installed successfully:

from PyQt5 import QtWidgets, QtGui
import sys

app = QtWidgets.QApplication(sys.argv)
window = QtWidgets.QWidget();
window.show()
sys.exit(app.exec_())
pops out the following interface :
Pycharm related configuration :
1. Add external Tools
open Settings – & gt; Tools-> External Tools click “+”

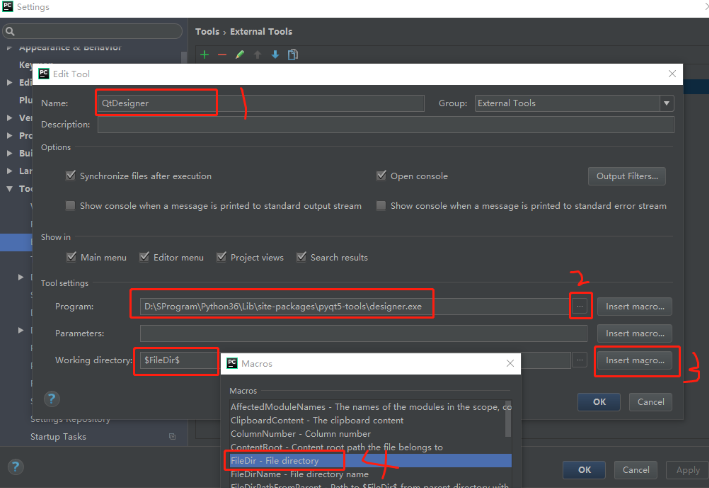
2. Add QtDesigner
set
as shown below
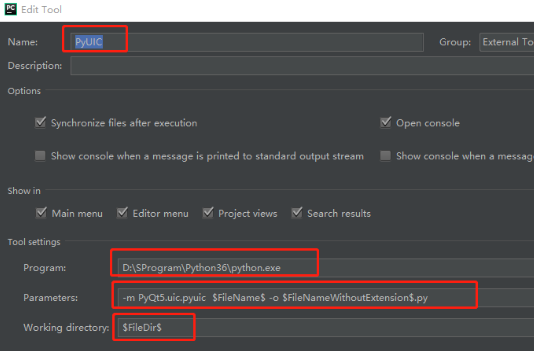
3. Add PyUIC
is set as shown below.
Parameters: -m pyqt5.uic. Pyuic $FileName$-o $FileNameWithoutExtension$.py
Parameters: -m pyqt5.uic. Pyuic $FileName$-o $FileNameWithoutExtension$.py
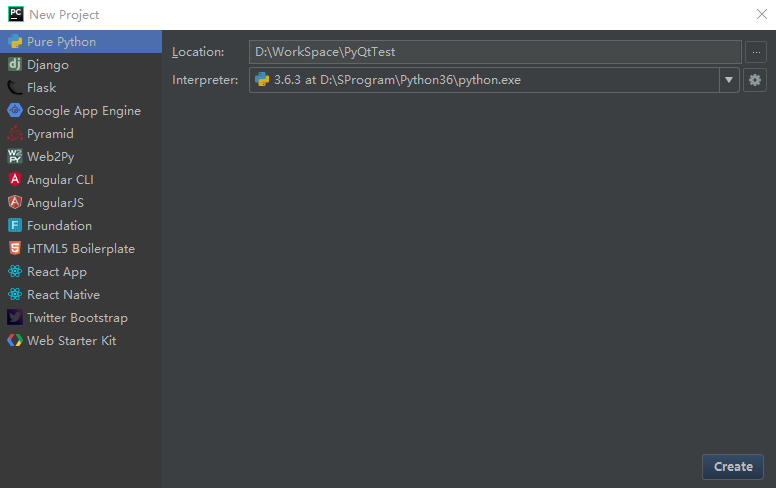
3. Create a new PyQt demo and create a project
as shown below
Open QtDesigner
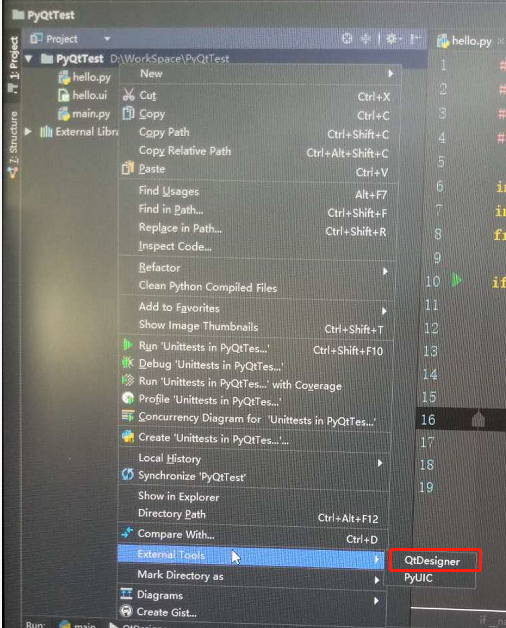
open Qt interface as shown in the figure below
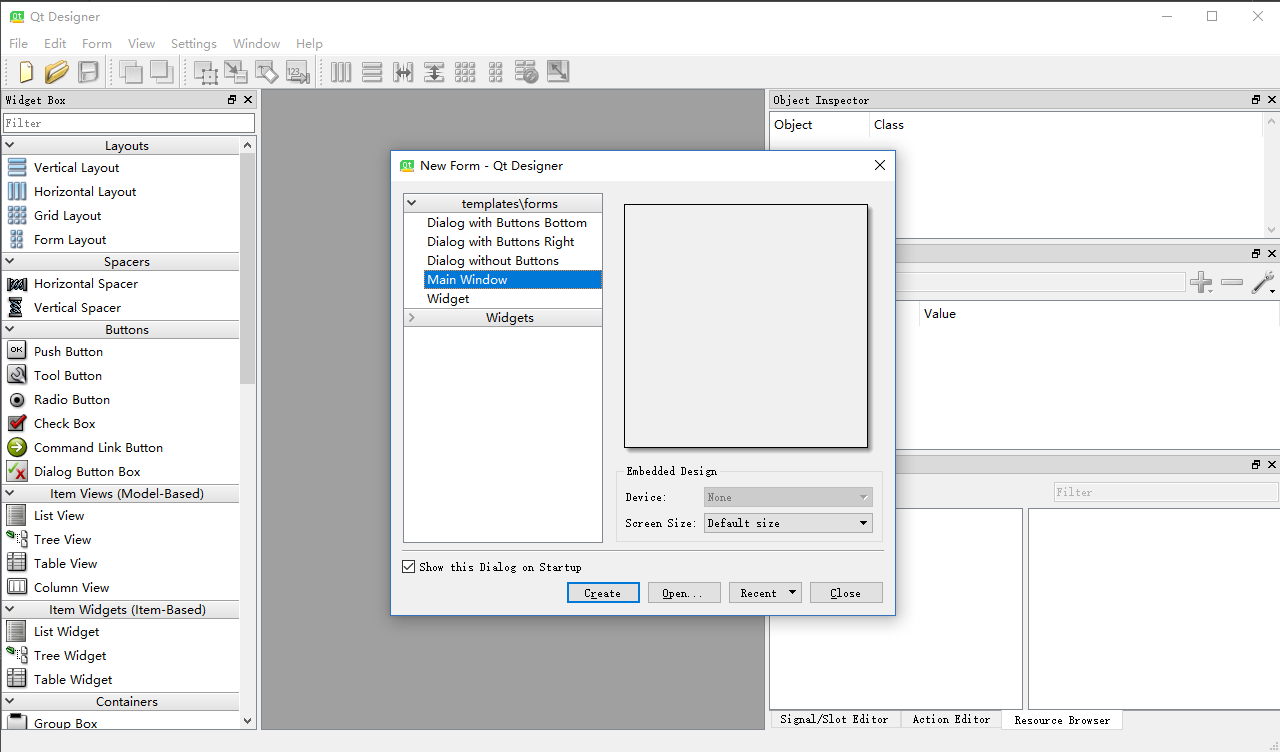
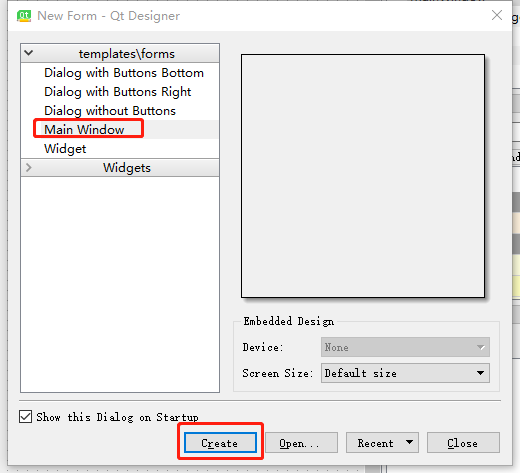
create a Main Window
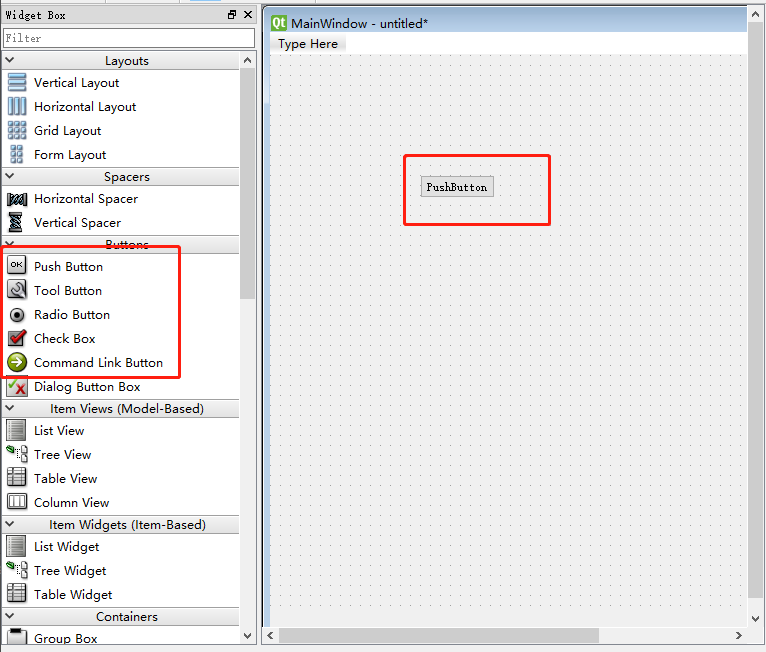
as shown in the figure, you can add your own component
as needed
save
as shown
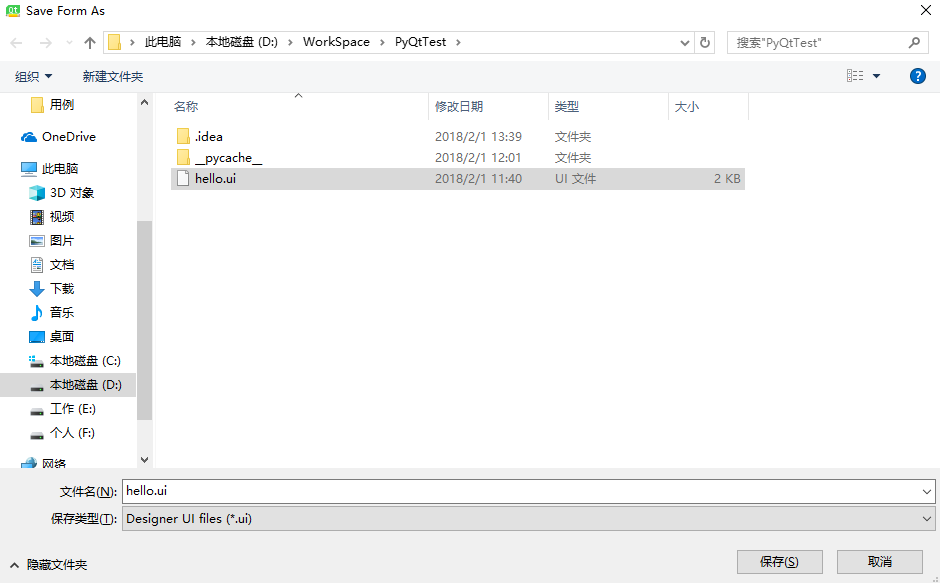
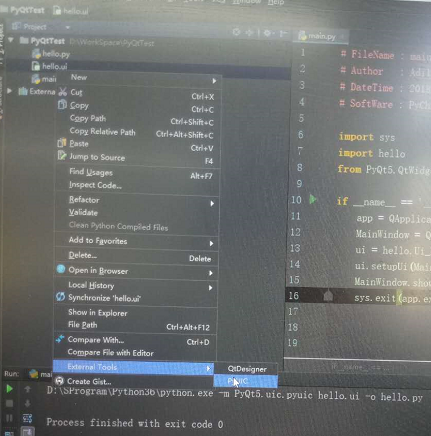
as shown below, use PyUIC to convert hello. UI file to hello.py
and here’s what I did:
# -*- coding: utf-8 -*-
from helloworld import Ui_MainWindow
from PyQt5 import QtCore, QtGui, QtWidgets
import sys


class query_window(QtWidgets.QMainWindow):
    def __init__(self):
        QtWidgets.QMainWindow.__init__(self)
        self.ui = Ui_MainWindow()
        self.ui.setupUi(self)
        self.ui.pushButton.clicked.connect(self.query_formula)
        # 给button 的 点击动作绑定一个事件处理函数


    def query_formula(self):
        pass
        # 此处编写具体的业务逻辑

if __name__ == '__main__':
    app = QtWidgets.QApplication(sys.argv)
    window = query_window()
    window.show()
    sys.exit(app.exec_())