Tag Archives: ProgrammerAH

How to use vimdiff to solve conflict?

Below is the sample procedure to use vimdiff for resolve merge conflicts. Based on this link
Step 1: Run following commands in your terminal

git config merge.tool vimdiff
git config merge.conflictstyle diff3
git config mergetool.prompt false

This will set vimdiff as the default merge tool.
Step 2: Run following command in terminal

git mergetool

Step 3: You will see a vimdiff display in following format

  +----------------------+
  |       |      |       |
  |LOCAL  |BASE  |REMOTE |
  |       |      |       |
  +----------------------+
  |      MERGED          |
  |                      |
  +----------------------+

These 4 views are

LOCAL – this is file from the current branch
BASE – common ancestor, how file looked before both changes
REMOTE – file you are merging into your branch
MERGED – merge result, this is what gets saved in the repo

You can navigate among these views using ctrl+w. You can directly reach MERGED view using ctrl+w followed by j.
More info about vimdiff navigation here and here
Step 4. You could edit the MERGED view the following way
If you want to get changes from REMOTE

:diffg RE  

If you want to get changes from BASE

:diffg BA  

If you want to get changes from LOCAL

:diffg LO 

Step 5. Save, Exit, Commit and Clean up
:wqa save and exit from vi
git commit -m "message"
git clean Remove extra files (e.g. *.orig) created by diff tool.

fatal error: Python.h: No such file or directory compilation terminated.

When installing pot module, an error was found as follows:

sudo pip3 install pot
The directory '/home/wdong/.cache/pip/http' or its parent directory is not owned by the current user and the cache has been disabled. Please check the permissions and owner of that directory. If executing pip with sudo, you may want sudo's -H flag.
The directory '/home/wdong/.cache/pip' or its parent directory is not owned by the current user and caching wheels has been disabled. check the permissions and owner of that directory. If executing pip with sudo, you may want sudo's -H flag.
Collecting pot
  Retrying (Retry(total=4, connect=None, read=None, redirect=None, status=None)) after connection broken by 'NewConnectionError('<pip._vendor.urllib3.connection.VerifiedHTTPSConnection object at 0x7f68b137e320>: Failed to establish a new connection: [Errno 101] Network is unreachable',)': /packages/28/4b/7aaa1f840a359f5953dd378e0237fa8faf9b0a415ff7282b7375fbe68d27/POT-0.5.1.tar.gz
  Downloading https://files.pythonhosted.org/packages/28/4b/7aaa1f840a359f5953dd378e0237fa8faf9b0a415ff7282b7375fbe68d27/POT-0.5.1.tar.gz (720kB)
    100% |████████████████████████████████| 727kB 90kB/s 
Requirement already satisfied: numpy in /usr/local/lib/python3.5/dist-packages (from pot) (1.16.2)
Requirement already satisfied: scipy in /usr/local/lib/python3.5/dist-packages (from pot) (1.2.1)
Requirement already satisfied: cython in /usr/local/lib/python3.5/dist-packages (from pot) (0.29.6)
Requirement already satisfied: matplotlib in /usr/local/lib/python3.5/dist-packages (from pot) (3.0.3)
Requirement already satisfied: cycler>=0.10 in /usr/local/lib/python3.5/dist-packages (from matplotlib->pot) (0.10.0)
Requirement already satisfied: kiwisolver>=1.0.1 in /usr/local/lib/python3.5/dist-packages (from matplotlib->pot) (1.0.1)
Requirement already satisfied: python-dateutil>=2.1 in /usr/local/lib/python3.5/dist-packages (from matplotlib->pot) (2.8.0)
Requirement already satisfied: pyparsing!=2.0.4,!=2.1.2,!=2.1.6,>=2.0.1 in /usr/lib/python3/dist-packages (from matplotlib->pot) (2.0.3)
Requirement already satisfied: six in /usr/lib/python3/dist-packages (from cycler>=0.10->matplotlib->pot) (1.10.0)
Requirement already satisfied: setuptools in /usr/local/lib/python3.5/dist-packages (from kiwisolver>=1.0.1->matplotlib->pot) (40.8.0)
Installing collected packages: pot
  Running setup.py install for pot ... error
    Complete output from command /usr/bin/python3 -u -c "import setuptools, tokenize;__file__='/tmp/pip-install-hp2npzwa/pot/setup.py';f=getattr(tokenize, 'open', open)(__file__);code=f.read().replace('\r\n', '\n');f.close();exec(compile(code, __file__, 'exec'))" install --record /tmp/pip-record-ebdwbzel/install-record.txt --single-version-externally-managed --compile:
    running install
    running build
    running build_py
    creating build
    creating build/lib.linux-x86_64-3.5
    creating build/lib.linux-x86_64-3.5/ot
    copying ot/dr.py -> build/lib.linux-x86_64-3.5/ot
    copying ot/__init__.py -> build/lib.linux-x86_64-3.5/ot
    copying ot/gromov.py -> build/lib.linux-x86_64-3.5/ot
    copying ot/da.py -> build/lib.linux-x86_64-3.5/ot
    copying ot/plot.py -> build/lib.linux-x86_64-3.5/ot
    copying ot/utils.py -> build/lib.linux-x86_64-3.5/ot
    copying ot/datasets.py -> build/lib.linux-x86_64-3.5/ot
    copying ot/stochastic.py -> build/lib.linux-x86_64-3.5/ot
    copying ot/bregman.py -> build/lib.linux-x86_64-3.5/ot
    copying ot/optim.py -> build/lib.linux-x86_64-3.5/ot
    copying ot/smooth.py -> build/lib.linux-x86_64-3.5/ot
    creating build/lib.linux-x86_64-3.5/ot/gpu
    copying ot/gpu/__init__.py -> build/lib.linux-x86_64-3.5/ot/gpu
    copying ot/gpu/da.py -> build/lib.linux-x86_64-3.5/ot/gpu
    copying ot/gpu/utils.py -> build/lib.linux-x86_64-3.5/ot/gpu
    copying ot/gpu/bregman.py -> build/lib.linux-x86_64-3.5/ot/gpu
    creating build/lib.linux-x86_64-3.5/ot/lp
    copying ot/lp/__init__.py -> build/lib.linux-x86_64-3.5/ot/lp
    copying ot/lp/cvx.py -> build/lib.linux-x86_64-3.5/ot/lp
    creating build/lib.linux-x86_64-3.5/ot/externals
    copying ot/externals/__init__.py -> build/lib.linux-x86_64-3.5/ot/externals
    copying ot/externals/funcsigs.py -> build/lib.linux-x86_64-3.5/ot/externals
    running build_ext
    building 'ot.lp.emd_wrap' extension
    creating build/temp.linux-x86_64-3.5
    creating build/temp.linux-x86_64-3.5/ot
    creating build/temp.linux-x86_64-3.5/ot/lp
    x86_64-linux-gnu-gcc -pthread -DNDEBUG -g -fwrapv -O2 -Wall -Wstrict-prototypes -g -fstack-protector-strong -Wformat -Werror=format-security -Wdate-time -D_FORTIFY_SOURCE=2 -fPIC -Iot/lp -I/usr/local/lib/python3.5/dist-packages/numpy/core/include -I/tmp/pip-install-hp2npzwa/pot/ot/lp -I/usr/include/python3.5m -c ot/lp/emd_wrap.cpp -o build/temp.linux-x86_64-3.5/ot/lp/emd_wrap.o
    cc1plus: warning: command line option ‘-Wstrict-prototypes’ is valid for C/ObjC but not for C++
    ot/lp/emd_wrap.cpp:28:20: fatal error: Python.h: No such file or directory
    compilation terminated.
    error: command 'x86_64-linux-gnu-gcc' failed with exit status 1
    
    ----------------------------------------
Command "/usr/bin/python3 -u -c "import setuptools, tokenize;__file__='/tmp/pip-install-hp2npzwa/pot/setup.py';f=getattr(tokenize, 'open', open)(__file__);code=f.read().replace('\r\n', '\n');f.close();exec(compile(code, __file__, 'exec'))" install --record /tmp/pip-record-ebdwbzel/install-record.txt --single-version-externally-managed --compile" failed with error code 1 in /tmp/pip-install-hp2npzwa/pot/

Solutions:

sudo apt-get install python-dev   # for python2.x installs
sudo apt-get install python3-dev  # for python3.x installs


Solve the problem of testing redis cluster“ java.lang.NumberFormatException : For input string: “ [email protected]@17002 “And so on

Solve the test times redis cluster “Java. Lang. A NumberFormatException: For input string:” 7003 @ 17003… 7002@17002″ and other anomalies…
1. Problem Description:

About redis5.0 cluster mode, through the client test code debugging quote “the Exception in the thread” main “Java. Lang. A NumberFormatException: For input string:” 7003 @ 17003… 7002@17002″, details of the log are as follows:

Exception in thread "main" java.lang.NumberFormatException: For input string: "7003@17003"
    at java.lang.NumberFormatException.forInputString(NumberFormatException.java:65)
    at java.lang.Integer.parseInt(Integer.java:492)
    at java.lang.Integer.valueOf(Integer.java:582)
    at redis.clients.util.ClusterNodeInformationParser.getHostAndPortFromNodeLine(ClusterNodeInformationParser.java:40)
    at redis.clients.util.ClusterNodeInformationParser.parse(ClusterNodeInformationParser.java:14)
    at redis.clients.jedis.JedisClusterInfoCache.discoverClusterNodesAndSlots(JedisClusterInfoCache.java:40)
    at redis.clients.jedis.JedisClusterConnectionHandler.initializeSlotsCache(JedisClusterConnectionHandler.java:50)
    at redis.clients.jedis.JedisClusterConnectionHandler.<init>(JedisClusterConnectionHandler.java:31)
    at redis.clients.jedis.JedisSlotBasedConnectionHandler.<init>(JedisSlotBasedConnectionHandler.java:17)
    at redis.clients.jedis.JedisCluster.<init>(JedisCluster.java:51)
    at redis.clients.jedis.JedisCluster.<init>(JedisCluster.java:35)
    at redis.clients.jedis.JedisCluster.<init>(JedisCluster.java:26)
    at redis.clients.jedis.JedisCluster.<init>(JedisCluster.java:30)
    at com.xwood.redis.cluster.JedisClusterTest.main(JedisClusterTest.java:23)

2. Solutions
Because of the jedIS-2.7.0.jar version, changing to the Jedis-3.2.0.jar version will solve the problem, because the Redis5.0 version requires a high version driver package for the client.

Win10 must be optimized after installation to solve 100% disk occupation

01 Close home group
Control Panel – Admin tool – Service – HomeGroup Listener and HomeGroup Provider disabled.
Close the disk defragmentation, automatic maintenance scheduling tasks
Select disk C- properties – Tools – Optimize and defragment the drive – optimize – change Settings – deselect to run as planned.
03 Windows Defender off (as the case may be)
Control Panel – Windows Defender – Settings – Implement protection – Remove check and Administrator – Enable Windows Defender – Remove check.
Control Panel – Admin Tool – Services – Windows Defender Service disabled.
04 Close Windows Search
Control Panel – Admin Tool – Services – Windows Search disabled.
Set up the Superfetch service
Control panel – Management tool – Service – Superfetch – startup type – auto (delayed startup).
06 Clean the Windows.old folder
C disk – right click – Properties – Disk cleanup – select the previous Windows Installation check box – Confirm cleanup.
Set automatic login
Win+R – Enter Netplwiz – Cancel the option of having to enter your username and password when using your computer – then double-click on the account that requires automatic login – enter your password.
08 closed ipv6
Network sharing center – Network connection – Ethernet – Properties – Cancel ipv6.
09 Closing effects
System properties – Advanced – Performance – Settings – Visual effects – Turn off fade-in effects.
Close virtual memory
System Properties – Advanced – Performance – Settings, select “Advanced”, click “Change” in virtual memory, remove the check box of “Automatically manage the paging file size of drive”, click “No Paging File” below, click “Set” and “OK”.

Linux shell RM deletes all. O suffix files in the subdirectory

How it works: Use the pipe command to find the files you want to delete in your home directory, then construct the parameter list using “xargs” and run the command.
Example 1: Delete all files with the suffix O in the current directory including subdirectories of the current directory

find . -name "*.o"  | xargs rm -f

Example 2: Remove all bak suffix files including subdirectories under /root

find /root -name *.bak | xargs rm -f

Command details reference:
Linux Shell LS Xargs RM Combined Delete File
https://blog.csdn.net/whatday/article/details/104027935


DB2 encountered the problem of sqlcode = 911 lock table when updating record update

Recently encountered too many concurrent operations on the same table, often reporting 911 errors, resulting in a transaction rollback.
Find the source part of the error, found a piece of code close to the two UPDATE operations caused by
1. Update records according to the primary key
2. Update the record according to the phone number
Problem analysis:
Analyzing DB2’s locking mechanism, since DB2 defaults to the isolation level of CS, the principle is that the cursor locks the row change every row, which is sufficient for general applications, but if a full table scan is encountered, the CS mode locks a large number of rows in the table until the query is completed.
So when the transaction executes in step 1, it is row locked because the primary key has an index. Step 2 performs no index and the full table scan locks a large number of rows. When a row of step 1 needs to be locked, it will wait if it is occupied by a transaction, which generally does not cause problems.
This occurs when there is too much concurrency in Step 2. Because there is no index update record, a large number of rows of a table are locked each time, leading to the discovery that the lock is already locked when the next scan needs to be locked. This is when the problem occurs.
DB2 locking considerations:
Ø optimized query Sql, the establishment of appropriate indexes, makes it get indexing query, due to the scope of the index and sorting, can skip many other lines, line position to meet our need.
Ø use appropriate isolation level. Since DB2 defaults to the isolation level of CS, the principle is that the cursor locks the row change every row, which is sufficient for general applications, but if a full table scan is encountered, the CS mode locks a large number of rows in the table until the query is complete. So you can change it to UR mode, depending on your business needs, and it won’t lock any rows in the table. Or set the Isolation level in the JDBC (Isolation Levels)
Ø reasonable set the lock timeout parameter, it is mainly used to avoid the transaction being used for a long time, cause the lock and the connection cannot be freed, affect the concurrent systems. Can set up the DB parameter
Ø update operations must go index, otherwise it is easy to produce a deadlock. (check for updates and operation)
Ø avoid lock escalation phenomenon, when lock waits to achieve a certain degree (the number of row locks over loctList * percent of the lock list), would be a row lock upgraded to table locks, lock escalation. Because once a lock escalation occurs, the table is no longer locked to the row, and other transactions must wait for the lock to be released in order to access any row in the table.
modify Lock timeout (-1 means Lock timeout is not detected). In general, 10s is sufficient by default.

when the system has a serious lock wait, you can use the following SQL, Sql
db2 “select AGENT_ID,substr(STMT_TEXT,1,100) as statement,STMT_ELAPSED_TIME_MS from table(SNAPSHOT_STATEMENT(‘dbname’,-1)) as B where AGENT_ID in (select AGENT_ID_HOLDING_LK from Table (SNAPSHOT_LOCKWAIT(‘ dbname ‘,-1)) as A order by LOCK_WAIT_START_TIME ASC FETCH FIRST 20 ROWS ONLY) order by STMT_ELAPSED_TIME_MS DESC”
Thanks to the author of this article

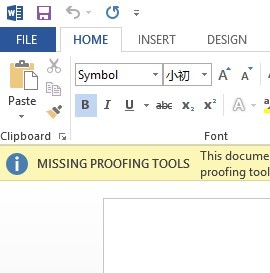
Solving word experienced an error trying to open the file in word

Recently, just throw all of systems and software upgrade, the system reached the office also upgraded to Windows server2012 office2013, but a strange question, is what I had written in office2010 doc document, use office2013 to open it, at first thought that the document is broken, get on my friend’s computer (I give him a pack is an), his computer can normal open the my documents, So I wonder if my new system is missing some DLL-Files.com DLL or something, but I have checked my COMPUTER DLL-Files.com software.
After struggling with baidu for a long time during the day, I finally found the problem, which was still in the setting of Office (because it was the setting that could not be accessed by the unsafe files of Office 2013, it was just my personal idea).
 
Solutions:
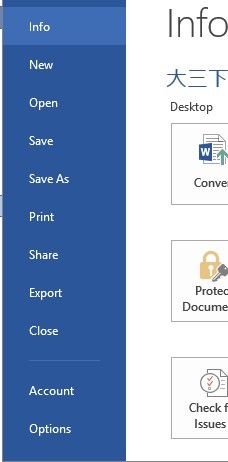
Open any office document and select File

Then select Options from the content called out

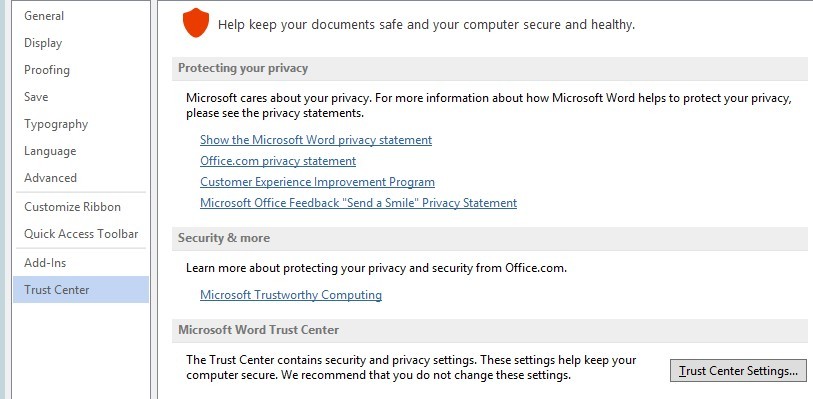
A new Settings screen will be brought up. For example, select the Trust Center option and click on Trust Center Settings on the right.

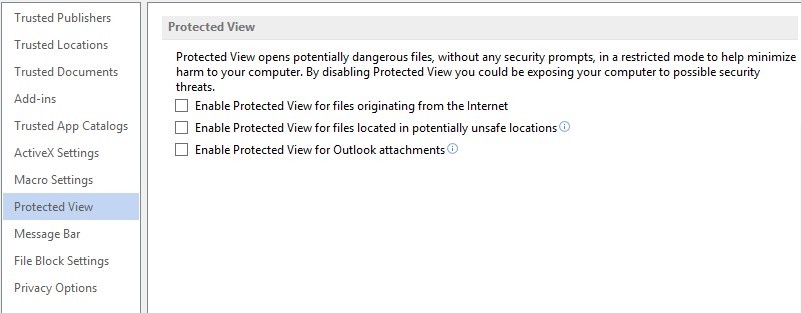
At this time, there is a new interface, as follows:

Let’s select Protected View, remove all the check marks, confirm the application, and then reopen the document that we couldn’t open. What do you find?Ha ha

Reproduced in: https://www.cnblogs.com/Jimmy009/archive/2012/09/10/2679534.html