Tag Archives: ProgrammerAH

JavaScript to achieve image rotation effect

JavaScript implements the image rotation effect
Process is as follows:
create a div element in the body, two pictures in the div definition, add links to images, and set up the hyperlink tag a name attribute value of I.

<div id="tabs">
        <a name="i" href="#"><img src="images/1.jpg" width="100%" height="350px" alt=""></a>
        <a name="i" href="#"><img src="images/2.jpg" width="100%" height="350px" alt=""></a>
    </div>

The CSS part:

 #tabs{
            width:100%;
            height: 350px;
            overflow: hidden;
            float: left;
            position: relative;
        }

Javascript parts:
application document object getElementsByName () way to get the name attribute value for the I element, and then create a custom function changeimage (), the application of the setInterval () method, to do this every few seconds changeimage () function, control the rotation time.

Invalid host header error in Vue using peanut shell agent

In the root directory of the project of the package. The json file “dev” : “webpack dev – server – the content – base./- open – the inline – hot — compress – history – API – fallback – config build/webpack dev. Config. Js” add – behind the host 192.168.1.5 (fill in your own IP address). This is because the new version of webpack-dev-server checks the hostname by default for security reasons, and breaks access if the hostname is not in the configuration. You can add the following webpack-dev-server configuration to webpack.base.config.js in the build directory: devServer: {disableHostCheck: true,},

package.json And package- clock.json The difference between

Json versus package.json
Json is the configuration file generated when building a project, which contains the configuration information needed for the project, as well as various dependencies, including name and version number; It is divided into development dependencies and operation dependencies. ^ Refers to other updated versions after the current major version

{
  "name": "managenmet",
  "version": "0.1.0",
  "private": true,
  "scripts": {
    "serve": "vue-cli-service serve",
    "build": "vue-cli-service build",
    "lint": "vue-cli-service lint"
  },
  "dependencies": {
    "core-js": "^3.6.5",
    "vue": "^2.6.11"
  },
  "devDependencies": {
    "@vue/cli-plugin-babel": "~4.5.0",
    "@vue/cli-plugin-eslint": "~4.5.0",
    "@vue/cli-service": "~4.5.0",
    "babel-eslint": "^10.1.0",
    "eslint": "^6.7.2",
    "eslint-plugin-vue": "^6.2.2",
    "vue-template-compiler": "^2.6.11"
  },
  "eslintConfig": {
    "root": true,
    "env": {
      "node": true
    },
    "extends": [
      "plugin:vue/essential",
      "eslint:recommended"
    ],
    "parserOptions": {
      "parser": "babel-eslint"
    },
    "rules": {}
  },
  "browserslist": [
    "> 1%",
    "last 2 versions",
    "not dead"
  ]
}

Json is the latest version dependency automatically generated after NPM installIt is used to record the version number of the current project dependency and cannot be changed. When you delete node_modules or modify package.json and execute NPM install, the current project dependencies will be updated to the appropriate version according to the rules

Linux Tomcat accessing files on the server

 
It took a long time for the IT novice to figure IT out, especially the first one, which he tried unsuccessfully for a long time, was to restart the Tomcat server
 
The first method is to modify the server.xml file in the conf directory
In & lt; Host> I’m going to add in the tag

< Context path=”/upload2″ reloadable=”true” docBase=”/test/t2″/>
Path is the path you type in the browser and DocBase is the actual path to your server folder
After the change, you need to cut back to the bin directory and restart Tomcat:
To shut down Tomcat./shutdown. Sh
Open the Tomcat./startup. Sh
 
FTP then forwards an image to the server’s /test/t2/ directory
In the browser through the URL access, preceded by the server public network IP or domain name

 
The second method: create a new configuration file in conf/Catalina/localhost (recommended)
In the/usr/local/tomcat/conf/Catalina/localhost (if the directory does not exist, create) to create a file ` upload. XML ‘
& lt; ?The XML version = “1.0” encoding = “utf-8”?>
< Context path=”/upload” reloadable=”true” docBase=”/home/admin”/>

br> N>
The fil>e and path values must be the same
This approach does not require a restart of the Tomcat server

Win7 system build PHP + MySQL + Apache environment + deploy ECSHOP project

Installation environment background: Win7 x64 bit system, build PHP+MySQL+Apache environment, to achieve ECSHOP project development.
>
>
>
>
>
>
>
> Tip: The VC ++14 runtime is required to run php.exe
2. Download and install MySQL with user name ‘root’; The root password. I won’t go into too much here;
3, Download apache_http_server_2.4.12_jisuxia, unzip it, run httpd.exe will report an error; Change the conf/httpd.conf file;
Note the following points (do not carry Spaces in the middle of the installation file directory) :
${SRVROOT} ${SRVROOT} ${SRVROOT} ${SRVROOT} ${SRVROOT} ${SRVROOT} ${SRVROOT “D: /…”
3.2 Set the path (absolute path), such as LoadModule actions_module D:/ HTTPD /modules/mod_actions.so

${SRVROOT} ${SRVROOT} ${SRVROOT} ${SRVROOT}
4. The above steps have prepared the environment for compiling PHP files, but Apache and PHP have not been fully configured correctly. Next, we need to configure the configuration files on both sides.
PHPIniDir = PHPIniDir; PHPIniDir = PHPIniDir; PHPIniDir = PHPIniDir; PHPIniDir = PHPIniDir; PHPIniDir = PHPIniDir; PHPIniDir = PHPIniDir; PHPIniDir = PHPIniDir; #BEGIN PHP INSTALLER edits-remove ONLY ON UNINSTALL #php_flag display_errors ON #php_value error_reporting 2039 #END PHP INSTALLER EDITS – REMOVE ONLY ON UNINSTALL
4.2 Copy the php.ini-development file in the PHP installation directory and rename it to php.ini and edit and set it
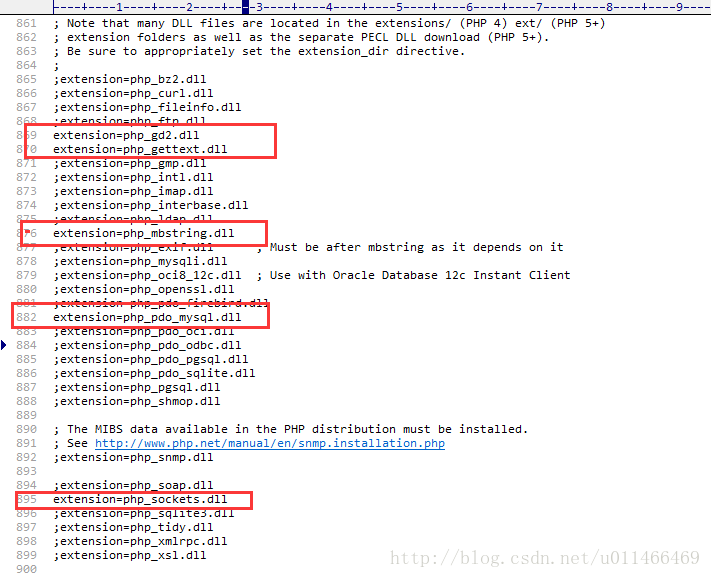
extension_dir < Absolute path>; = “D:/php7/ext” and date.timezone = PRC; Just remove the comments in the following figure; php_mysql.dll

5, OK, the above PHP + MySQL + Apache environment has been set up. Next download the ecshop source package; Unzip only the Upload section;
The HTTPD startup service will open the project file htdocs by default. Place the uncompressed upload into the htdocs directory and change its name to ecshop.
6, CMD command window to add HTTPD. Exe services to the services list, CD to the apache/bin directory: first HTTPD. Exe -k install
7, http://localhost:80/ecshop/index.php to install deployment ecshop projects; Sc delete service name < Delete services>;
Return cls_image::gd_version(); return cls_image::gd_version(); return cls_image::gd_version(); Non-static gd_version(), in which the :: operation requires a static method; Find a solution online: Replace this piece of content; I didn’t succeed! Declare a static method with gd_version() in the cls_image file; Lib_installer $jpeg_enabled = ($gd_info[‘JPG Support’]) $jpeg_enabled = ($gd_info[‘JPEG Support’];
9, the above questions, on the Internet to find answers are not successful!
Strict Standards: Non-static method cls_image::gd_version() should not be called statically in E:\web\shopex\includes\lib_base.php on line 346
This error occurs with PHP versions above 5.3.
On line 346, we find that the gd_version() method does not declare static static, so it fails:
return cls_image::gd_version();
To:
$p = new cls_image();
return $p-> gd_version();
Directory permissions to detect a red can not be written ECSHOP project directory permissions are not enough CHMOD-R 777 ECSHOP
 
10. Download XAMPP software and integrate PHP + Tomcat + Apache + MySQL; One key installation, ECSHOP no error!
http://localhost:80/ecshop/index.php installation is complete! Database MySQL + administrator XUP2012 + commodity category + close message verification code;
http://localhost/ecshop/admin login background management
11, Integrated MySQL + Tomcat, want to copy all the original installed software to the corresponding MySQL + Tomcat directory of XAMPP;
Note Tomcat’s environment variables and change the path; C: ProgramData\MySQL\MySQL Server 5.5\ Data C: ProgramData\MySQL\ Server 5.5\ Data
C: ProgramData\MySQL\MySQL Server 5.5\ Data = C: ProgramData\MySQL\MySQL Server 5.5\ Data = C: ProgramData\MySQL\ Server 5.5\ Data
 
CLS_TEMPLAR.php (CLS_TEMPLAR.php) : error caused by CLS_TEMPLAR.php (CLS_TEMPLAR.php) : error caused by CLS_TEMPLAR.php
Deprecated: preg_replace(): The /e modifier is Deprecated, use preg_replace_callback instead…. Return preg_replace_callback(“/{([^\}\{\n]*)}/”, function($r) {return $this->; select($r[1]); }, $surce Strict Standards: Only variables should be passed by reference in D:\ XAMPP… 7C0D8828A2FA23C669A5614F73F3AE8A

Linux view current date and time

View and modify the Linux time zone

    view the current time zone command: “date – R” modify Settings Linux server time zone method

    A command: “tzselect”
    Method B is limited to RedHat Linux and CentOS
    command: “TimeConfig”
    Dpkg-reconfigure TzData for Debian
    : “dpkg-reconfigure”

      Copy the corresponding time zone file and replace the system time zone file; Or create the link file
      cp /usr/share/zoneinfo/

      The main

      when

      area

      /

      The main time zones /

      Primary time zone/secondary time zone /etc/localtime

    For example, use Asia/Shanghai (+8) when setting China time zone.
    cp /usr/share/zoneinfo/Asia/Shanghai /etc/localtime
    Second, the time to view and modify Linux
    The

      command to check the time and date “the date”
      2. Set a time and date
      for example, to set the system date into a command on November 3, 2009
      Command: “date-s 11/03/2009”
      Set the system time to 5:55:55 p.m
      Command: “Date -s 17:55:55”

        to write the current date and time into the BIOS, to avoid failure after restart
        command: “hwclock – w
        Note:
        date
        You can see the current date and time directly without adding arguments
        Cal
        can be viewed directly without parameter
        Reproduced in: https://www.cnblogs.com/Ivan-j2ee/p/3192875.html

How to solve the problem of no sound after Apple Mac recovers from sleep?

Has anyone come across this problem before?The MacBook Pro lifts the lid and returns from sleep, leaving the headphones and speakers silent and rebooting the Mac. Macz shows you a way to get sound without rebooting your computer.
steps
This is a Bug in Mac OS X, where the coreaudio daemon, “CoreAudiod,” has a problem.
1. If you can’t find “Terminal”, click on the magnifying glass icon in the upper right corner of the Mac screen and search.
2. Enter the SUDO killall coreaudiod command at the terminal and enter the password.
3. Just enter your password to log in to the computer. There is no * on the screen, it doesn’t matter.

@Detailed description and code demonstration of qualifier

note: this annotation is @qualifier.

The article directories
What does @Qualifier mean?1. @autowired infuses resources from the Spring container, but if it is an interface and there are two implementation classes inside the interface, if we need to use the methods of the interface, the system will not identify which implementation class we are using to implement it
conclusion


What does @Qualifier mean?
The modifier self-understanding is a supplement to @autowired, why do I think it is a supplement?Since we all know that the annotation follows @autowired, For the sake of understanding, I will consider it as a supplement. The keynote will be set here, and then we will see what kind of supplement it is.
Ii. Specific instructions
1.@Autowired is an injection of resources from the Spring container, but if it is an interface with two implementation classes in it, the system will not recognize which implementation class we are using if we need to use the methods of the interface
code as follows (example) :

    @Autowired
//    @Qualifier("PersonSeriverImpl2")
    private PersonSeriver personSeriver;
    public void eats() {
     personSeriver.eat();
    }

Look @ the Qualifier (” PersonSeriverImpl2 “)
the
I am comments yet my PersonSeriver has two implementation class, then I now run the program will offer the following wrong
under Caused by: org. Springframework. Beans. Factory. NoUniqueBeanDefinitionException: No qualifying bean of type ‘com. Itheima. Seriver. PersonSeriver’ available: expected single matching bean but found 2: personSeriverImpl, personSeriverImpl2
translation probably mean:
caused by the following reasons: Org. Springframework. Beans. Factory. NoUniqueBeanDefinitionException: no type is’ com. Itheima. Seriver. PersonSeriver qualified Bean: ‘expectations with a single match Bean, but found the 2: personSeriverImpl, personSeriverImpl2
that is to say, now into two resources, with which the resources to achieve it?The error is then reported, which is when our @Qualifier is needed to resolve the problem

    go to your implementation class and add the name @service (” PersonSeriverImpl2 “) and get the annotation off the @qualifier (” PersonSeriverImpl2 “), which is the interface method that your method needs to call
    well, we’ll run our program again and it’s OK

conclusion
here is a one-sentence summary of the @qualifier annotation :
needs to inject service in Controller so how does my server have two implementation classes to distinguish between the two impls, we need to apply the @qualifier annotation, which provides a way to resolve this conflict