Tag Archives: liunx

PHP file download, download failed, nginx open() nginx / fastcgi_ temp/2/10/0000000102“ failed (13: Permission denied)

summary

The file download failed when testing the project

Check the problem

After investigation, it is found that nginx gives error information
open() "/ home/server/nginx/fastcgi_ Temp/2/10/0000000102 "failed (13: permission denied) while reading upstream
nginx prompts us that we do not have permission to operate

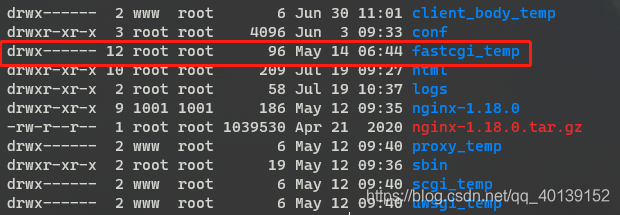
and then we enter the directory /home/server/nginx to check fastcgi_ Temp file owner, our name is the root user of root group

we will check the user group and user name of nginx worker again

ps -ef | grep nginx
# We can see that the worker process of nginx is the www user
root 80246 1 0 10:37 ?       00:00:00 nginx: master process /home/server/nginx/sbin/nginx
www 80247 80246 0 10:37 ?       00:00:00 nginx: worker process
root 82877 82840 0 13:56 pts/7 00:00:00 grep --color=auto nginx
# View the group that the www user is in, and the members of the group
groups www
# Ours is the www user of the www user group
www:www

solve the problem

When we download, the nginx worker process is sending the fastcgi_ Temp does not have permission to write to the cache
so we just need to give fastcgi_ The start-up user with the permission of nginx to modify the temp directory WWW: www

chown -R www:www fastcgi_temp/

Solutions to errors in installing xunsearch engine in centos8.0

When I need to apply full-text search engine to some small projects, I prefer to use xunsu because it is convenient to deploy and easy to call. Today, when I install xunsu for the customer’s deployment system, I reported an error (rarely encountered an error). I spent some time looking up the information, finally solved it, and shared my experience

The first reason is positioning. I have installed xunsu on at least five or six CentOS hosts, and the previous installation has been completed smoothly. Therefore, it should be because there is something wrong with xunsu itself, which is more likely related to the running environment. After a look, this machine is currently installed with CentOS 8.0, and the systems I installed before are all 7. X, so it is most likely related to the operating system It has something to do with the version of the system.

The information in the installation interface is as follows:

bufferevent_openssl.c:237:2: note: (near initialization for 'methods_bufferevent')
bufferevent_openssl.c:228:19: error: storage size of 'methods_bufferevent' isn't known
 static BIO_METHOD methods_bufferevent = {
                   ^~~~~~~~~~~~~~~~~~~
make[2]: *** [Makefile:793: bufferevent_openssl.lo] Error 1
make[2]: Leaving directory '/usr/local/src/xunsearch-full-1.4.14/libevent-2.0.21-stable'
make[1]: *** [Makefile:857: install-recursive] Error 1
make[1]: Leaving directory '/usr/local/src/xunsearch-full-1.4.14/libevent-2.0.21-stable'
make: *** [Makefile:1182: install] Error 2

It seems that there should be an error in the compilation process, which is more difficult. Because this is the code written in C, I can’t directly change its source code, so I can only start from what causes the compilation error. After various queries, I found that a netizen once encountered this problem. The following is the content quoted from this netizen:

The cause of this problem and the solution ideas are as follows.
The reason is that libevent 2.0.x requires openssl < 1.1.0
Several common Linux distributions have upgraded their openssl systems to 1.1.0+
That is, libevent 2.1.x+ is required
And libevent 2.1.x has changed the header file... If you do not change the system openssl version.
Then you can manually download a libevent-2.1.11-stable.tar.gz
convert to bz compressed format (libevent-2.1.11-stable.tar.bz2)
Put it into packages, remembering to delete the original libevent

I didn’t refer to him for the following specific steps, because the xunsu version I used is different from his, and the specific solution is different from his, so let’s continue with my solution process: First of all, download the 2.1. X version of libevent installation package. You can search libevent directly, and then download it on the official website. Most of the time, the official link is on GitHub. If you download it with WGet directly on Linux system, it’s a bit slow. In this case, you can download it on our own browser first, and then upload it through winscp, which is faster. The version I downloaded is libevent2.1.12. The download link is: https://github.com/libevent/libevent/releases/download/release-2.1.12-stable/libevent-2.1.12-stable.tar.gz

After downloading, upload it to the server and put it in the xunsearch directory. My directory is/usr/local/SRC /, then decompress the file and recompress it into bz2 format. The reference code is as follows:

//Unpack libevent first (in order to compress it into the desired format)
tar -zxvf libevent-2.1.12-stable.tar.gz
//compress to bz2 format, which is the format supported by the XunSuo installer
tar -cjf libevent-2.1.12-stable.tar.bz2 libevent-2.1.12-stable
// copy to the packages folder under xunsearch
cp libevent-2.1.12-stable.tar.bz2 xunsearch-full-1.4.15/packages/
// go to the package installation directory and remove the libevent package that comes with it (xunsearch1.4.15 comes with 2.0.X)
cd xunsearch-full-1.4.15/packages/
rm -f libevent-2.0.X
//return to the previous folder (i.e. the root directory of the Xunsearch installation package), then execute setup.sh and you're done.
// XunSoo will automatically check for the libevent package in the installer file, if it doesn't find it, it will report an error, if it finds it, it will automatically unpack and compile it.
cd ..
./setup.sh

Then the installation process is happily completed

Configure glut in Ubuntu and implement basic OpenGL experiment on CodeBlocks platform

1. First, install GLUT. I selected “Download FreeGLUT” to install the command procedure:
http://freeglut.sourceforge.net/docs/install.php
$sudo apt-get install libxi-dev: error: X11/extensions/ xinput. h: No such file or directory
//after the installation, my computer inside the/usr/local/include/lib folder and set up some reference libraries and header files, etc

2. Configure Codeblocks:
Open Codeblocks, select the GLUT project, select New, enter the project name, and you will be prompted to specify the installation path for GLUT. You can specify it directly to /usr/ (I specified /usr/local/). If both of the above files are present, you should be able to set up the project without any problems.
in the end, one more thing, is to compile time there will be a mistake about Xxf86vm. Right-click on the project to open the project properties window and see the “Project Settings” TAB. Click on the “project ‘s build
Options “, then click on the “Linker Settings” TAB and delete the reference to xxf86VM to compile correctly.
3. Another easy way (just use Vim directly)
1). Install build-essential sudo apt-get Install build-essential // Install autotool
2). Install OpenGL sudo apt-get Install FreeGLUT 3-dev //
3). Use the command: : GCC simple.c-lGlut-o Simple at compile time
Where simple.c can use:

/*
 * GLUT Shapes Demo
 *
 * Written by Nigel Stewart November 2003
 *
 * This program is test harness for the sphere, cone
 * and torus shapes in GLUT.
 *
 * Spinning wireframe and smooth shaded shapes are
 * displayed until the ESC or q key is pressed.  The
 * number of geometry stacks and slices can be adjusted
 * using the + and - keys.
 */

#ifdef __APPLE__
#include <GLUT/glut.h>
#else
#include <GL/glut.h>
#endif

#include <stdlib.h>

static int slices = 16;
static int stacks = 16;

/* GLUT callback Handlers */

static void resize(int width, int height)
{
    const float ar = (float) width/(float) height;

    glViewport(0, 0, width, height);
    glMatrixMode(GL_PROJECTION);
    glLoadIdentity();
    glFrustum(-ar, ar, -1.0, 1.0, 2.0, 100.0);

    glMatrixMode(GL_MODELVIEW);
    glLoadIdentity() ;
}

static void display(void)
{
    const double t = glutGet(GLUT_ELAPSED_TIME)/1000.0;
    const double a = t*90.0;

    glClear(GL_COLOR_BUFFER_BIT | GL_DEPTH_BUFFER_BIT);
    glColor3d(1,0,0);

    glPushMatrix();
        glTranslated(-2.4,1.2,-6);
        glRotated(60,1,0,0);
        glRotated(a,0,0,1);
        glutSolidSphere(1,slices,stacks);
    glPopMatrix();

    glPushMatrix();
        glTranslated(0,1.2,-6);
        glRotated(60,1,0,0);
        glRotated(a,0,0,1);
        glutSolidCone(1,1,slices,stacks);
    glPopMatrix();

    glPushMatrix();
        glTranslated(2.4,1.2,-6);
        glRotated(60,1,0,0);
        glRotated(a,0,0,1);
        glutSolidTorus(0.2,0.8,slices,stacks);
    glPopMatrix();

    glPushMatrix();
        glTranslated(-2.4,-1.2,-6);
        glRotated(60,1,0,0);
        glRotated(a,0,0,1);
        glutWireSphere(1,slices,stacks);
    glPopMatrix();

    glPushMatrix();
        glTranslated(0,-1.2,-6);
        glRotated(60,1,0,0);
        glRotated(a,0,0,1);
        glutWireCone(1,1,slices,stacks);
    glPopMatrix();

    glPushMatrix();
        glTranslated(2.4,-1.2,-6);
        glRotated(60,1,0,0);
        glRotated(a,0,0,1);
        glutWireTorus(0.2,0.8,slices,stacks);
    glPopMatrix();

    glutSwapBuffers();
}


static void key(unsigned char key, int x, int y)
{
    switch (key)
    {
        case 27 :
        case 'q':
            exit(0);
            break;

        case '+':
            slices++;
            stacks++;
            break;

        case '-':
            if (slices>3 && stacks>3)
            {
                slices--;
                stacks--;
            }
            break;
    }

    glutPostRedisplay();
}

static void idle(void)
{
    glutPostRedisplay();
}

const GLfloat light_ambient[]  = { 0.0f, 0.0f, 0.0f, 1.0f };
const GLfloat light_diffuse[]  = { 1.0f, 1.0f, 1.0f, 1.0f };
const GLfloat light_specular[] = { 1.0f, 1.0f, 1.0f, 1.0f };
const GLfloat light_position[] = { 2.0f, 5.0f, 5.0f, 0.0f };

const GLfloat mat_ambient[]    = { 0.7f, 0.7f, 0.7f, 1.0f };
const GLfloat mat_diffuse[]    = { 0.8f, 0.8f, 0.8f, 1.0f };
const GLfloat mat_specular[]   = { 1.0f, 1.0f, 1.0f, 1.0f };
const GLfloat high_shininess[] = { 100.0f };

/* Program entry point */

int main(int argc, char *argv[])
{
    glutInit(&argc, argv);
    glutInitWindowSize(640,480);
    glutInitWindowPosition(10,10);
    glutInitDisplayMode(GLUT_RGB | GLUT_DOUBLE | GLUT_DEPTH);

    glutCreateWindow("GLUT Shapes");

    glutReshapeFunc(resize);
    glutDisplayFunc(display);
    glutKeyboardFunc(key);
    glutIdleFunc(idle);

    glClearColor(1,1,1,1);
    glEnable(GL_CULL_FACE);
    glCullFace(GL_BACK);

    glEnable(GL_DEPTH_TEST);
    glDepthFunc(GL_LESS);

    glEnable(GL_LIGHT0);
    glEnable(GL_NORMALIZE);
    glEnable(GL_COLOR_MATERIAL);
    glEnable(GL_LIGHTING);

    glLightfv(GL_LIGHT0, GL_AMBIENT,  light_ambient);
    glLightfv(GL_LIGHT0, GL_DIFFUSE,  light_diffuse);
    glLightfv(GL_LIGHT0, GL_SPECULAR, light_specular);
    glLightfv(GL_LIGHT0, GL_POSITION, light_position);

    glMaterialfv(GL_FRONT, GL_AMBIENT,   mat_ambient);
    glMaterialfv(GL_FRONT, GL_DIFFUSE,   mat_diffuse);
    glMaterialfv(GL_FRONT, GL_SPECULAR,  mat_specular);
    glMaterialfv(GL_FRONT, GL_SHININESS, high_shininess);

    glutMainLoop();

    return EXIT_SUCCESS;
}

To complete.

Several methods of deleting all empty lines in text under Linux

Method 1: Use Grep
grep -v ‘^\s*$’ test.txt
Note: -v means to reverse the matching result and the regular expression matches the blank line. (Blank lines can include whitespace characters such as space TAB characters)
Method 2: Use SED
sed ‘/^\s*$/d’ test.txt
Note: D stands for delete the line
Method 3: Use AWK
awk NF test.txt
Note: NF represents the number of fields in the current row. If the line is blank, the number of fields is 0, which is interpreted as false by AWK, so it will not be output.
 
All three of these methods can handle blank lines containing whitespace characters (Spaces, tabs, etc.).
 
Method 4: If blank lines are caused by ‘\n’, you can also use the tr command to remove them
tr -s ‘\n’ < test.txt
Note: -s represents the compression of multiple consecutive characters into a character. In this case, multiple ‘\n’ is compressed into a ‘\n’ to remove empty lines.
A weakness of method 4: If the first line is empty, the first line cannot be removed
The level is limited, if has the improper place, also hoped corrects!