Tag Archives: ProgrammerAH

Anaconda builds a new environment and installs sklearn, numpy and other modules

Under Anaconda we already have gluon’s environment
Now I want to build an environment for TensorFlow,

2. Install Tensorflow
TensorFlow currently only supports Python 3.5 on Windows.
(1) open Anaconda Prompt and input tsinghua warehouse image, so that the update will be faster:

conda config --add channels https://mirrors.tuna.tsinghua.edu.cn/anaconda/pkgs/free/
conda config --set show_channel_urls yes

12
(2) Also use Anaconda Prompt to create a Python3.5 environment with the name of TensorFlow. Type the following command:

conda create -n tensorflow python=3.5

1
Run start menu -> Anaconda3 - & gt; Anaconda Navigator, click the left Environments, you can see that the environment of tensorflow has been created.


(3) TensorFlow environment is started in Anaconda Prompt:

activate tensorflow

1

Note: when not using tensorflow, close the tensorflow environment with the command: deactivate

After installing the environment, we go to the folder we want to run, such as CD TensorFlow
Then activate tensorFlow

The TensorFlow environment is fine, but tensorFlow is not installed,
conda insatll tensorflow
And in the environment to install jupyter Notebook, NUMpy and other modules
conda install jupyter notebook
conda install scikit-learn

From https://blog.csdn.net/u010858605/article/details/64128466

Notepad + + install JSON format plug-in

Download the corresponding version of the JsonViewer plug-in zip:
64: https://github.com/zbeboy/Jsonviewer2/releases
32: https://sourceforge.net/projects/nppjsonviewer/?source=typ_redirect
Unzip the package, copy the jsonviewer2.dll (64-bit) or nppjsonviewer.dll (32-bit) file to the plugins directory under the notepad++ installation directory, and then restart notepad++

Paste the data you want to format into notepad++, then click on the top plugin -> JSON Viewer—> Format JSON allows you to Format JSON data

BibTeX: How to cite a website

BibTeX: How to cite a website

With the increasing importance of the internet for scientific research, need increases for properly citing online resources. Unfortunately, when the main LaTeX citation machinery 
BibTeX was created, this was not to be foreseen; this is why there is to date no canonical way to cite, say, a website. Different workarounds have emerged, using for example some trickery with the 
@MISC type (see below), but the right way™ hasn’t been found yet.

This could change with the advent of 
biblatex. Its new entry type 
@ONLINE is supposed to contain references to web resources and doesn’t give room for confusion anymore.

With the BibTeX entry


@ONLINE{Doe:2009:Online,
author = {Doe, Ringo},
title = {This is a test entry of type {@ONLINE}},
month = jun,
year = {2009},
url = {http://www.test.org/doe/}
}

and the LaTeX file


\documentclass{article}

\usepackage{biblatex}
\bibliography{test. bib}

\title{BibTeX Website citatations with the \textsf{biblatex}~package}
\date{}

\begin{document}

\maketitle
\nocite{Doe:2009:Online}
\printbibliography

\end{document}

one gets a nicely typeset list of references.

Note that there are plenty of more options and entry types in the biblatex package, such as (the currently unused)
@AUDIO and 
@VIDEO.

Because of its supposedly large impact on the (La)TeX community, the author of biblatex still declares the package as ‘beta’ which is why it is not included in TeXlive, for example. Should you for this or some other reason be unable to install biblatex, there are (inferior) alternatives to use for URL citations in a reference list.

Alternatives
Using the natbib package The natbib package extends the functionality of regular bibtex to a certain degree, and allows for website citations as well. There is no specific entry type for online resources, but 
@MISC
@OTHER, and 
@BOOKLET work quite well.


@BOOKLET{Doe:2009:Booklet,
title = {This is a test entry of type {@BOOKLET}},
author = {Doe, John},
month = jun,
year = {2009},
url = {http://www.test.org/doe/}
}

@MISC{Doe:2009:Misc,
author = {Doe, Paul},
title = {This is a test test entry of type {@MISC}},
month = jun,
year = {2009},
url = {http://www.test.org/doe/}
}

@OTHER{Doe:2009:Other,
author = {Doe, Brian},
title = {This is a test entry of type {@OTHER}},
month = jun,
year = {2009},
url = {http://www.test.org/doe/}
}

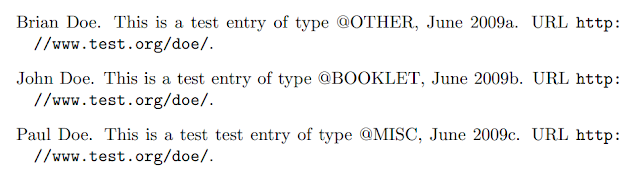
Note that standard bibstyles (such as 
plain) will not typeset the 
url key contents of the individual entries; it is required to use one of natbib’s own entries, e.g. 
plainnat.


\documentclass{article}

\usepackage{natbib}
\bibliographystyle{plainnat}

\usepackage{url}

\title{BibTeX Website citations with the \textsf{natbib} package}
\date{}

\begin{document}

\maketitle
\nocite{Doe:2009:Other,
Doe:2009:Misc,
Doe:2009:Booklet}
\bibliography{test}

\end{document}

Using the url package The most elemental way to include web references is via the 
howpublished key of the 
@MISC entry. Use

@MISC{Doe:2009:Misc,
author = {Doe, George},
title = {This is a test test entry of type {@MISC} and `howpublished'},
month = jun,
year = {2009},
howpublished={\url{http://www.test.org/doe/}}
}

and

\documentclass{article}
\bibliographystyle{plain}

\usepackage{url}

\begin{document}

\nocite{Doe:2009:Misc}
\bibliography{mybib}

\end{document}


Uninstall ManyCam with WindowsUninstaller.Org Removal Tips

Do you got to force uninstall ManyCam you don’t want out of your computer?Do you want to do this because when you start removing the software it didn’t go away?If this can be the case then I suggest that you read this article carefully.
How you can Force Uninstall
First of many, click Start and to choose settings.
Then go to the control panel.
In the control panel, click on Add/Remove software programs.
Now you’ll see a listing of programs that’s installed on your pc.
Check your number, and select the program.
Click on uninstall and confirm that you’d like to uninstall the program.
Once the software has been removed, restart your pc. Then you’ll need a program that will easily do a force uninstall for the unwanted program.
If these steps didn’t work then your best option is to get uninstall software program.
Software to Power Uninstall
These days you will find so many software programs around that will do this. However, many of them are totally junks and totally unreliable. Therefore it’s highly recommended that if you wish to uninstall ManyCam by force, then use a professional tool.
With a uninstall tool you are able to guarantee that the ManyCam and another programs you don’t want get deleted from your computer by 3 easy ways.
This uninstaller will uninstall ManyCam you don’t want, and then it scans your registry and drivers to see if there are files left from the program which has been deleted.
https://plus.google.com/100165709190349652485/about
http://howto-uninstall.windowsuninstaller.org/
http://karlaaubin.typepad.com/
http://www.uninstallgeek.com/
http://www.windowsuninstaller.org/forums/index.php

How to use matlab xlswrite

Take matrix A=[1, 2, 3, 4;5, 6, 7, 8] as an example for introduction
Case 1:
Enter data into the specified EXCEL, without specifying the workbook or cell location
Enter xlswrite(‘1.xlsx’,A) in the MATLAB main window and press enter and we will see in excel 1.xlsx and sheet1 as follows

Note: 1 If you put Sheet2 before Sheet1, the data will be written to Sheet2.
2 When this command is executed, the Excel being written should be in the closed state.
Example 2:
Type xlswrite(‘1.xlsx’,A,2) in the main window into the specified sheet without specifying A cell, and press enter

We are putting A matrix in the second sheet. And we need to be careful because we are in sheet3 and not Sheet2.

    example 3 write the data to the specified sheet, specify the location, enter xlswrite(‘1.xlsx’,A,3,’C5′) in the main window of MATLAB, enter

We will see in Sheet2 in the third position that matrix A was written from c5 cell. We could also have written xlswrite(‘1.xlsx’,A,3,’ c5 :F6′). Same result, but the former is simpler and more convenient.

From: http://www.taody.com/zhishi/93f9803fea09f4e0e56f555a.html

To change the theme and font of your pychar

Use Pycharm together for coding to protect your eyes
1. Click the icon of Pycharm in your MAC Navigation Bar as shown in the figure below:

2. Select the item Preferences, as shown in the figure below (choose “Preference”) :

Click on the appearance shown in the figure, and select the theme on the right to change the theme (click “appearance”, and then click “theme” in the right part) ~
Note: Default– Black words with white background; Darcula– White Words with black background
3. To change the font, click Editor -&gt in the left option; General-> If you want to change the size of the Font: Editor -> General-> The Font) ~
 
Hope you have a good experence when Coding

UE4 solves lighting need to be rebuilt

1. Open ‘World Settings’.
2. Goto ‘Lightmass’ category.
3. Check ‘Force No Precomputed Lighting’.
4. A popup will appear. Press ‘OK’.
5. Press ‘Build All’ or ‘Build Lighting Only’. Static Lighting will be crack. That’s OK.
6. Save the map.
7. Reload the map. Open another map and open the map or double click the map in content browser.
8. Lightmaps will be 0 in Lightmass categoty. If not, load the map again.
9. Uncheck ‘Force No Precomputed Lighting’.
10. Save the map.
11. Press ‘Build All’ or ‘Build Lighting Only’.
12. Solved

How to root Motorola G6 play

#How to root Moto G6 play and install android8.0
##Tool : use fastboot , adb ,Twrp , Magsik
#The first step
#install android8.0
##1. download android8.0 ROM (zip file)
###Link android8.0 ROM url -> https://mirrors.lolinet.com/firmware/moto/jeter/official/USC/
##2. unzip android8.0 ROM
##3. install android8.0
##from android8.0 ROM select boot. img , recovery. img ,system.img

*fastboot devices 


*fastboot flash recovery recovery.img


*fastboot flash boot boot.img


*fastboot flash system system.img


#step1


*fastboot flash bootloader bootloader.img


*fastboot flash vendor vendor.img


#step1

##step1 parts :can be optionally added

*fastboot reboot

#The second step
##unlock bootloader
##1. use phone connect Internet
##2. select develper to open usb debug and unlock OME key
##3. adb reboot bootloader
##4. fastboot oem get_unlock_data
##5. Now copy the “unlock_data” –>for example:
###(bootloader) Unlock data:
###(bootloader) 3A15680129901052#
###(bootloader) 5A4C343232354E443958006D6F746F2067280000#
###(bootloader) 3A88611E52CEF6C3BD1AB5D9473BC32A1FBAD850#
###(bootloader) 9ECEF441000000000000000000000000
##6.delete each lines (bootloader) and stitching the rest of each line ->for example:
3A15680129901052#5A4C343232354E443958006D6F746F2067280000#3A88611E52CEF6C3BD1AB5D9473BC32A1FBAD850#9ECEF441000000000000000000000000
##7. Login account of Motoroal
###1)Apply for a registration account
###2)Reference step Link-> https://www.teamandroid.com/2018/08/06/unlock-bootloader-moto-g6-play-plus/
###Account registration is successful !
##8. Now go to the Motorola unlock Page To Get the Unlock Code->Link Url
https://motorola-global-portal.custhelp.com/app/standalone/bootloader/unlock-your-device-b
##9. unlock bootloader
###1)Look at current interface option 6 is: Check if your device can be unlocked by pasting this string in the field below, and clicking “Can my device be unlocked?”
###2)Now copy the string(step 6 stitched string) from Notepad to the box shown on the website (Check Screenshot below)
###3)Once you click the “Can my Device be unlocked?” you will receive a mail with unlock key.
###4)Now copy the unlock key and type the following command and enter.
*fastboot oem unlock UNLOCK_KEY
###5)Here UNLOCK_Key is the place where you have to paste the unlock key which you copied from the email.
##That’s it! Your device will unlock. hah! Have fun!
#The third step
#Root
##1. download Twrp. img and Magsik.zip
##2. install Twrp

*fastboot flash boot Twrp.img

##3.install Magsik

*adb push local Magsik.zip  /tmp


*click Install in Twrp interface


*install Magsik.zip 

###display successful
##4. reboot phone
#Now This phone is root success

Bcdboot command line parameter options

BCDBoot Command-Line Options
BCDBoot is a command-line tool used to configure the boot files on a PC or device to run the Windows operating system. You can use the tool in the following scenarios:
Add boot files to a PC after applying a new Windows image.  In a typical image-based Windows deployment, use BCDBoot to set up the firmware and system partition to boot to your image. To learn more, see Capture and Apply Windows, System, and Recovery Partitions. Set up the PC to boot to a virtual hard disk (VHD) file that includes a Windows image.  To learn more, see Boot to VHD (Native Boot): Add a Virtual Hard Disk to the Boot Menu. Repair the system partition.  If the system partition has been corrupted, you can use BCDBoot to recreate the system partition files by using new copies of these files from the Windows partition. Set up or repair the boot menu on a dual-boot PC.  If you’ve installed more than one copy of Windows on a PC, you can use BCDBoot to add or repair the boot menu. File Locations

In Windows and Windows Preinstallation Environment (WinPE) %WINDIR%\System32\BCDBoot.exe
In the Windows Assessment and Deployment Kit (Windows ADK): C:\Program Files (x86)\Windows Kits\10\Assessment and Deployment Kit\Deployment Tools\amd64\BCDBoot\BCDBoot.exe

Supported operating systems BCDBoot can copy boot environment files from images of Windows 10, Windows 8.1, Windows 8, Windows 7, Windows Vista, Windows Server 2016 Technical Preview, Windows Server 2012 R2, Windows Server 2012, Windows Server 2008 R2, or Windows Server 2008. How It Works To configure the system partition, BCDBoot copies a small set of boot-environment files from the installed Windows image to the system partition. BCDBoot can create a Boot Configuration Data (BCD) store on the system partition using the latest version of the Windows files:
BCDBoot creates a new BCD store and initialize the BCD boot-environment files on the system partition, including the Windows Boot Manager, using the %WINDIR%\System32\Config\BCD-Template file. New in Windows 10: During an upgrade, BCDBoot preserves any other existing boot entries, such as debugsettings, when creating the new store. Use the /c option to ignore the old settings and start fresh with a new BCD store. If there is already a boot entry for this Windows partition, by default, BCDBoot erases the old boot entry and its values. Use the /m option to retain the values from an existing boot entry when you update the system files. By default, BCDBoot moves the boot entry for the selected Windows partition to the top of the Windows Boot Manager boot order. Use the /d option to preserve the existing boot order. On UEFI PCs, BCDBoot can update the firmware entries in the device’s NVRAM:
BCDBoot adds a firmware entry in the NVRAM to point to the Windows Boot Manager. By default, this entry is placed as the first item in the boot list. Use the /p option to preserve the existing UEFI boot order. Use /addlast to add it to the bottom of the boot order list. Command-Line Options The following command-line options are available for BCDBoot.exe. BCDBOOT <source> [/l <locale>] [/s <volume-letter> [/f <firmware type>]] [/v] [/m [{OS Loader GUID}]] [/addlast or /p] [/d] [/c]

Option Description
<source> Required. Specifies the location of the Windows directory to use as the source for copying boot-environment files. The following example initializes the system partition by using BCD files from the C:\Windows folder: Copy

bcdboot C:\Windows
/l <locale> Optional. Specifies the locale. The default is US English (en-us). The following example sets the default BCD locale to Japanese: Copy

bcdboot C:\Windows /l ja-jp
/s <volume letter> Optional. Specifies the volume letter of the system partition. This option should not be used in typical deployment scenarios. Use this setting to specify a system partition when you are configuring a drive that will be booted on another computer, such as a USB flash drive or a secondary hard drive. UEFI:
BCDBoot copies the boot files to either the EFI system partition, or the partition specified by the /s option. BCDBoot creates the BCD store in the same partition. By default, BCDBoot creates a Windows Boot Manager entry in the NVRAM on the firmware to identify the boot files on the system partition. If the /s option is used, then this entry is not created. Instead, BCDBoot relies on the default firmware settings to identify the boot files on the system partition. By the UEFI 2.3.1 spec, the default firmware settings should open the file: \efi\boot\bootx64. efi in the EFI System Partition (ESP). BIOS:

    BCDBoot copies the boot files to either the active partition on the primary hard drive, or the partition specified by the /s option. BCDBoot creates the BCD store in the same partition.

The following example copies BCD files from the C:\Windows folder to a system partition on a secondary hard drive that will be booted on another computer. The system partition on the secondary drive was assigned the volume letter S: Copy

bcdboot C:\Windows /s S:

The following example creates boot entries on a USB flash drive with the volume letter S, including boot files to support either a UEFI-based or a BIOS-based computer: Copy

bcdboot C:\Windows /s S: /f ALL
/f <firmware type> Optional. Specifies the firmware type. Valid values include UEFIBIOS, and ALL.
On BIOS/MBR-based systems, the default value is BIOS. This option creates the \Boot directory on the system partition and copies all required boot-environment files to this directory. On UEFI/GPT-based systems, the default value is UEFI. This option creates the \Efi\Microsoft\Boot directory and copies all required boot-environment files to this directory. When you specify the ALL value, BCDBoot creates both the \Boot and the \Efi\Microsoft\Boot directories, and copies all required boot-environment files for BIOS and UEFI to these directories. If you specify the /f option, you must also specify the /s option to identify the volume letter of the system partition. The following example copies BCD files that support booting on either a UEFI-based or a BIOS-based computer from the C:\Windows folder to a USB flash drive that was assigned the volume letter S: Copy

bcdboot C:\Windows /s S: /f ALL 
/v Optional. Enables verbose mode. Example: Copy

bcdboot C:\Windows /v
/m [{OS Loader GUID}] Optional. Merges the values from an existing boot entry into a new boot entry. By default, this option merges only global objects. If you specify an OS Loader GUID, this option merges the loader object in the system template to produce a bootable entry. The following example merges the operating-system loader in the current BCD store that the specified GUID identifies in the new BCD store: Copy

bcdboot c:\Windows /m {xxxxxxxx-xxxx-xxxx-xxxx-xxxxxxxxxxxx}
/addlast Optional. Specifies that the Windows Boot Manager firmware entry should be added last. The default behavior is to add it first. Cannot be used with /p. Copy

bcdboot C:\Windows /addlast
/p Optional. Specifies that the existing Windows Boot Manager firmware entry position should be preserved in the UEFI boot order. If entry does not exist, a new entry is added in the first position. Cannot be used with /addlast. By default, during an upgrade BCDBoot moves the Windows Boot Manager to be the first entry in the UEFI boot order. Copy

bcdboot C:\Windows /p
bcdboot C:\Windows /p /d
/d Optional. Preserves the existing default operating system entry in the {bootmgr} object in Windows Boot Manager. Copy

bcdboot C:\Windows /d
/c Optional. Specifies that any existing BCD elements should not be migrated. New for Windows 10: By default, during an upgrade, BCD elements such as debugsettings or flightsigning are preserved. Copy

bcdboot C:\Windows /c

Repair the system partition If the system partition has been corrupted, you can use BCDBoot to recreate the system partition files by using new copies of these files from the Windows partition.

    Boot your PC to a command line. For example, boot to the Windows installation disk and press Shift+F10, or boot to Windows PE (WinPE: Create USB Bootable drive). Use Diskpart to determine which drive letter contains your Windows partition and system partition (diskpart, list vol, exit). Optional: Format your system partition: format (drive letter of your system partition) /q Add a boot entry for your Windows partition: bcdboot D:\Windows Reboot the PC. Windows should appear.

Set up or repair the boot menu on a dual-boot PC When setting up a PC to boot more than one operating system, you may sometimes lose the ability to boot into one of the operating systems. The BCDBoot option allows you to quickly add boot options for a Windows-based operating system. To set up a dual-boot PC:

    Install a separate hard drive or prepare a separate partition for each operating system. Install the operating systems. For example, if your PC has Windows 7, install Windows 10 onto the other hard drive or partition. Reboot the PC. The boot menus should appear with both operating systems listed. If both operating systems aren’t listed:

      Open a command line, either as an administrator from inside Windows, or by booting to a command line using the Windows installation media and pressing Shift+F10, or by booting to Windows PE (WinPE: Create USB Bootable drive). Add boot options for a Windows operating system. Copy

      bcdboot D:\Windows
      

      Reboot the PC. Now, the boot menu will show both menu options.

Troubleshooting For information about repairing the boot files on a PC with Windows XP and a more recent version of Windows such as Windows 7, see the Microsoft Knowledge Base Article 2277998. Related topics Capture and Apply Windows, System, and Recovery Partitions Configure BIOS/MBR-Based Hard Drive Partitions Configure UEFI/GPT-Based Hard Drive Partitions BCDedit Bootsect Command-Line Options Diskpart Command line syntax