Recently, HP P2055d laser printer (produced in November 2009) has been installed at the customer’s office. The hardware environment is as follows: PC: Dell OptiPlex 360, and another Fujitsu DPK 8600E ticket printer. P2055d is connected to PC via USB data cable. Software environment: The operating system, Windows XP SP2, USES the driver disk attached. After the installation of the operating system and the driver, the HP P2055d printer will be installed. After the installation of the driver, the test page will be printed, OK; Then, the Fujitsu DPK8600E was installed. After the installation was completed, everything worked fine. As a result, the P2055d hung up.
— — — — — — — — — — — — — — — — — — — — — — — — — — — error message started the author add (visit) — — — — — — — — — — — — — — — — — — — — — — — — — — — —
PCL XL error
Subsystem: KERNEL
Error: IllegalOperatorSequence
Operator: EndSession
Position: 7
— — — — — — — — — — — — — — — — — — — — — — — — — — — — — — — — — — — — — — — — — — — — — — — — — — — — — — –// error message end I (visit)
Using the built-in test function of the machine, the printer can work normally, but it cannot communicate with the PC normally. Uninstall and reinstall the driver and all associated software, and the problem remains. Helpless, call HP customer service, customer service staff told the problem cannot be determined, can only use the following methods to try. Because the telephone is far from the machine, it is not convenient to operate. After two calls to customer service, the P2055d can finally be printed. The operation method is listed here for later use.
1. Change the advanced options for the first time
1) Right-click the printer and select “Print Preference…” in the window that pops up. , as shown in Figure 1.
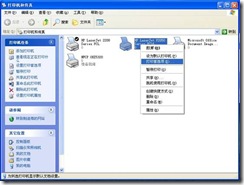
Figure 1
2) Open the print preferences window as shown in Figure 2
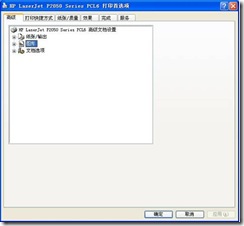
Figure 2
3) Expand “Graph” and select “Download as Soft Font” from the drop-down list of “True Type Font” below (Figure 3)
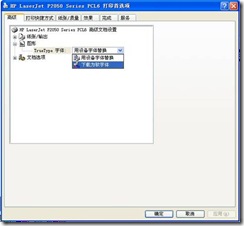
Figure 3
4) Expand Document Options a Printer Functions and change the drop-down list of Send True Type as bitmap to Enabled (Figure 4).
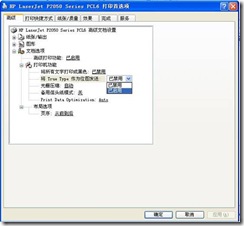
Figure 4.
5) Then, change the “Print Data Optimization” drop-down list to “Optimize for Text and Vector,” apply “–” Optimize “(Figure 5).
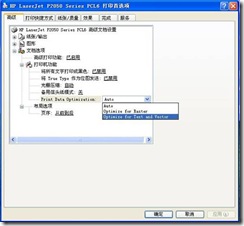
Figure 5
To be on the safe side, I restarted the machine and printer (actually shutting down the computer and then shutting down the printer).
2. Try again and change the driver
As the problem was not solved, the author turned to HP customer service again (every time I played HP customer service, I had to wait, I didn’t know whether HP service was too good or HP product quality was wrong). The author was told to replace it with a 2200 driver, so I tried again.
1) Open the “Printer and Fax” window (start A to set A printer and fax), and click “File” A to “Add Printer” in turn, as shown in Figure 6.
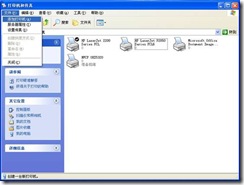
Figure 6.
2) Open the “Add Printer Wizard” window as shown in Figure 7, and click “Next”.
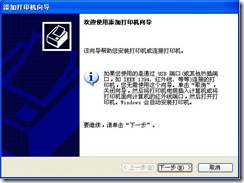
Figure 7.
3) Remove the selection of “Automatic Detection and Installation of plug and play Printer” in the window shown in Figure 8, and click “Next”.
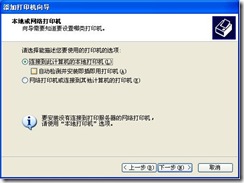
Figure 8.
4) In the “Select Printer Ports” window, select “USB001” (Figure 9) from the following port drop-down list and click “Next”.
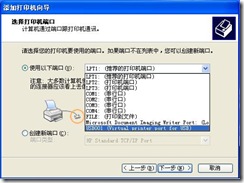
Figure 9.
5) In the “Install Printer Software” window, select “HP” from the list of manufacturers, and the printer select “HP LaserJet 2200 Series PCL”, and click “Next” to add the printer.
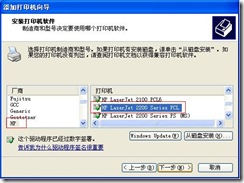
Figure 10.
After adding this printer, print the document and test page OK. The original 2055D printer system will be installed automatically. It is recommended to set this 2200 printer as the default printer. At this point, the “PCL XL error” problem is resolved.
When the operating system was reinstalled, the printer was installed directly in accordance with Plan 2, and everything was fine.
— — — — — — — — — — — — — — — — — — — — — — — — — — — error message started the author add (visit) — — — — — — — — — — — — — — — — — — — — — — — — — — — —
PCL XL error
Subsystem: KERNEL
Error: IllegalOperatorSequence
Operator: EndSession
Position: 7
— — — — — — — — — — — — — — — — — — — — — — — — — — — — — — — — — — — — — — — — — — — — — — — — — — — — — — –// error message end I (visit)
Using the built-in test function of the machine, the printer can work normally, but it cannot communicate with the PC normally. Uninstall and reinstall the driver and all associated software, and the problem remains. Helpless, call HP customer service, customer service staff told the problem cannot be determined, can only use the following methods to try. Because the telephone is far from the machine, it is not convenient to operate. After two calls to customer service, the P2055d can finally be printed. The operation method is listed here for later use.
1. Change the advanced options for the first time
1) Right-click the printer and select “Print Preference…” in the window that pops up. , as shown in Figure 1.

Figure 1
2) Open the print preferences window as shown in Figure 2

Figure 2
3) Expand “Graph” and select “Download as Soft Font” from the drop-down list of “True Type Font” below (Figure 3)

Figure 3
4) Expand Document Options a Printer Functions and change the drop-down list of Send True Type as bitmap to Enabled (Figure 4).

Figure 4.
5) Then, change the “Print Data Optimization” drop-down list to “Optimize for Text and Vector,” apply “–” Optimize “(Figure 5).

Figure 5
To be on the safe side, I restarted the machine and printer (actually shutting down the computer and then shutting down the printer).
2. Try again and change the driver
As the problem was not solved, the author turned to HP customer service again (every time I played HP customer service, I had to wait, I didn’t know whether HP service was too good or HP product quality was wrong). The author was told to replace it with a 2200 driver, so I tried again.
1) Open the “Printer and Fax” window (start A to set A printer and fax), and click “File” A to “Add Printer” in turn, as shown in Figure 6.

Figure 6.
2) Open the “Add Printer Wizard” window as shown in Figure 7, and click “Next”.

Figure 7.
3) Remove the selection of “Automatic Detection and Installation of plug and play Printer” in the window shown in Figure 8, and click “Next”.

Figure 8.
4) In the “Select Printer Ports” window, select “USB001” (Figure 9) from the following port drop-down list and click “Next”.

Figure 9.
5) In the “Install Printer Software” window, select “HP” from the list of manufacturers, and the printer select “HP LaserJet 2200 Series PCL”, and click “Next” to add the printer.

Figure 10.
After adding this printer, print the document and test page OK. The original 2055D printer system will be installed automatically. It is recommended to set this 2200 printer as the default printer. At this point, the “PCL XL error” problem is resolved.
When the operating system was reinstalled, the printer was installed directly in accordance with Plan 2, and everything was fine.