Tag Archives: ProgrammerAH

Two lines of code to solve your vs flashback problem

If you are a new programmer using VS, your code may be fine, but when you run the program, the DOS box will flash back.
At this point, add two lines of code to the end of the program to solve your flashback problem

Getchar ();
system(“pause”);

Ex. :
Ninety-nine multiplication tables
#include< stdio.h>
int main()
{
int i, j, m;
for (i = 1; i < = 9; i++)
{
for (j = 1; j < = i; j++)
{
m = i*j;
printf(“%d*%d=%d\t”, i, j, m);
}
printf(“\n”);
}
getchar();
system(“pause”);
return 0;
}

Solution of vs program flashback problem

As you would expect in the following program, the control is out of control in a flash after running, so we are now going to solve this problem in our code in the following ways

1. The getchar ()

This statement is to wait for user input, implementation program pause

2.system(“pause”)

This statement causes the system command program to pause, so adding this statement before return 0 causes the program to pause

3. The while (true)

This is easy to understand, but it may not be appropriate for some applications

4. Run the program using Ctrl+F5

In VS, because we built the project originally, it was an empty project

> Properties of the project> “Configuration properties”>> “linker”> Subsystem The item “subsystem” in “System” is changed to “Console”

After doing this, press Ctrl+F5 again and the program will end up in the console screen

The solution of flashing back after the end of console program running

If you compile successfully in the console program, flash back after display, you can not see the result of the situation, may be due to compiler configuration problems.
Solution:
The

    project – & gt; Property – & gt; Configure properties ->; The linker – & gt; System – & gt; Subsystem – & gt; SUBSYSTEM:CONSOLE adds “/SUBSYSTEM:CONSOLE” link option. Then start execution (without debugging).

    > You can also keep a console application on the console interface by using getchar or system (” pause “) at the end of the program. Do not append the final return statement. If not, exit. This will display “Press any key to continue..” or “Press any key to continue…” when running to this point. .

Solution of OpenGL window flicker in MFC framework

From https://blog.csdn.net/niusiqiang/article/details/43116153
This is because OpenGL has its own function glClear to refresh the background, so Windows should not be allowed to refresh the background of the window. Otherwise, when the window needs to be redrawn, Windows automatically sends WM_ERASEBKGND first, and the default handler uses a white background brush. When the background color used by OpenGL is not white, there is a flicker of white in the drawing. This is especially true when doing animation.
Therefore, the configuration step is missing one step. Activate the message of WM_ERASEBKGND in the MFC program after the configuration step is completed
Message processing of the parent window class is disallowed in the function. It simply returns a TRUE. Return CView::OnEraseBkgnd(PDC)
You should now change this to return TRUE to solve the splash screen problem.

Reproduced in: https://www.cnblogs.com/redips-l/p/9039555.html

Drawing cube with OpenGL

Define an array, put all eight vertices in the array, and then specify each vertex using a pointer, rather than using direct data. This avoids the need to consider a lot of data when specifying vertices, thus reducing the possibility of code errors.
//the cube to save eight points to an array in
static const GLfloat vertex_list [] [3] = {
0.5 f, 0.5 f, 0.5 f,
//…
};
glBegin(GL_LINE_STRIP);
glVertex3fv (vertex_list [0]).
glVertex3fv (vertex_list [2]).
glVertex3fv (vertex_list [3]).
glVertex3fv (vertex_list [1]).

//…
glEnd();

changes, although the code to get longer, but it is easy to read. It’s easy to see that the four vertices 0, 2, 3, and 1 form a square.
a little observation can be found, we use a lot of glVertex3fv function, each one is only one of the vertex sequence number is different, so we can define an array of serial number, put all the serial number is in. This makes the code much simpler.
//cube will save eight points to an array of
static const GLfloat vertex_list [] [3] = {
0.5 f, 0.5 f, 0.5 f,
0.5 f to 0.5 f, 0.5 f, f
– 0.5, 0.5 f to 0.5 f,
0.5 f, 0.5 f, 0.5 f,
– 0.5 f to 0.5 f, 0.5 f,
0.5 f to 0.5 f, 0.5 f,
0.5 f, f 0.5, 0.5 f,
};
static const GLint index_list[][4] = {
static const GLint index_list[]
0, 2, 3, 1,
0, 4, 6, 2,
0, 1, 5, 4,
4, 6, 7, 5,
1, 3, 7, 3,
2, 6, 7, 7,};

int i, j;
glBegin(GL_LINE_STRIP)
glBegin(GL_LINE_STRIP);
for(i=0; i< 6;
for(j=0; j=0; j=0; j< 4. + + j)// each side has four vertices, cycle four times
glVertex3fv (vertex_list [index_list [I] [j]]).
glEnd();

This gives us a more mature version of how to draw a cube. The data and code are basically separate. All the vertices are put in one array, and the number of the vertices is put in another array, and the code to draw the cube from these two arrays is very simple.

faces counter clockwise, faces away from us clockwise, we have the index_list array above.

An example of 3D data modeling based on VB6 + OpenGL

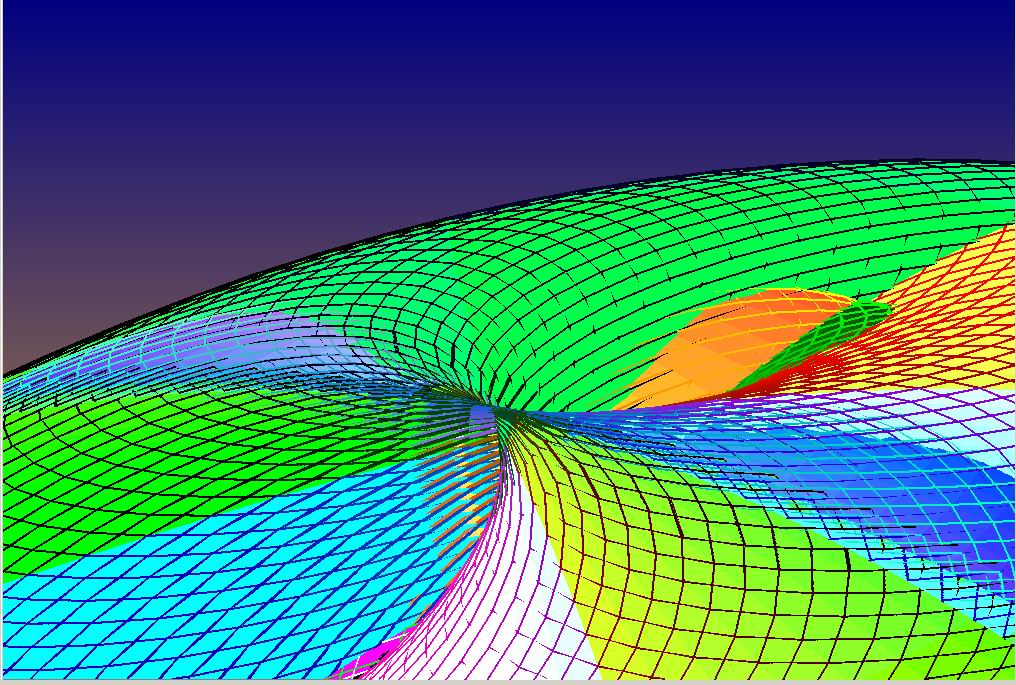
‘Draw n pieces of quadrilaterals to form a continuous color body (three-dimensional polar coordinates):

Dim vx(0 To 3), vy(0 To 3), vz(0 To 3) ‘four vertex coordinates

Dim AD (0 To 3), bd(0 To 3) ‘four-vertex factor

AD (0) = 0: AD (1) = 1: AD (2) = 1: AD (3) = 0.

bd (0) = 0: bd: (1) = 0 bd (2) = 1: bd (3) = 1:

gluLookAt 0, 0, 0.005, 0, 0, 0, 1, 0, 1 ‘perspective (eyes, center, vertex)

glScalef 0.35, 0.35, 0.35 ‘object zoom

Dim x, y, z1, z2, DLT, v As Single

DLT = 0.25

glLineWidth 0 ‘line thick

glpointSize 0

glPushName 6

For bk = -3.2 To 3.2step DLT

For ak = -3.2 To 3.2step DLT

glBegin GL. GL_QUADS

For I = 0 To 3

the av = ak + AD (I) * DLT: bv = bk + bd DLT (I) *

glColor3f (1 – Sin (bv))/2, (1 – Sin (av Xor bv))/2, (1 + Sin (bv))/2 ‘set the current color

‘v = Format(“0.00”, v)

‘bv = Format(“0.00”, bv)

‘use expressions: expr1 = “2 * sin (” & amp; bv & “) “” ‘EvaluateExpr (expr1)’

‘initial: lmda (0) = 1: lmda (1) = 1: lmda (2) = 1: lmda (3) = 1: lmda (4) = 1: lmda (5) = 1: lmda (6) = 1: lmda (7) = 1: lmda (8) = 1: lmda (9) = 1

‘= = = = = = = = = = = = = = = = = = = = = = = = = = = = = = = = =

‘s vc1 = Tan (av/3.5 – bv/8) ‘& lt; < < = = = = = = = = = = = = =

vc2 = Tan (bv/3.5 av/8) ‘& lt; < < = = = = = = = = = = = = =

vc33 = 1 * Sin (av – bv) ‘& lt; < < = = = = = = = = = = =

ag (I) = Cos Cos (av) * *’s vc1 (bv)

vy (I) = Sin (av) * Cos * vc2 (bv)

vz(I) = Sin(bv) * vc3

‘= = = = = = = = = = = = = = = = = = = = = = = = = = = = = = = = = =

Next


glVertex3f vx (0), vy (0), vz (0)

glVertex3f vx (1), vy (1), vz (1)

glVertex3f vx (2), vy (2), vz (2)

glVertex3f vx (3), vy (3), vz (3)


‘>

glVertex3f vx (3), vy (3), vz (3)

glVertex3f vx (2), vy (2), vz (2)

glVertex3f vx (1), vy (1), vz (1)

glVertex3f vx (0), vy (0), vz (0)

glEnd

‘”‘ — — — — — — — — — — — — — — — the product calculation, strives for the unit normal vector — — — — — — — — — — — — — — — — —

c = vx (0) – ag (1) : b = vy (0) – vy (1) : a = vz (0) – vz (1)

g = vx (2) – ag (1) : f = vy (2) – vy (1) : e = vz (2) – vz (1)

fx0 = (a * f – b * e)

fy0 = (e * c – a * g)

fz0 = (b * g-f * c)
fz0 = (b * g-f * c)

m = Sqr ((a – b * f * e) ^ 2 + (c – e * a * g) ^ 2 + (g – b * f * c) ^ 2)

fx = fx0/m: fy = fy0/m: fz = fz0/m

‘”‘ — — — — — — — — — — — — — — — — — — — — — — — — — — — — — — –


“>

glBegin GL_LINES

glColor3f (1 + Sin (bv))/2, (1 – Sin (av) + bv)/2, (1 – Sin (bv))/2 ‘set the current color

glVertex3f vx (0), vy (0), vz (0)

glVertex3f vx (0), 1.05 * 1.05 * vy (0), 1.05 * vz (0) ‘unified toward the outside

glVertex3f vx(0) -0.12 * fx, vy(0) -0.12 * fy, vz(0) -0.12 * fz

glEnd

“>

‘glBegin GL_LINES

‘glColor3f (1 + Sin (av))/2, (1 + Sin (av Xor bv))/2, (1 – Sin (av))/2’ set the current color

‘glVertex3f vx(3), vy(3), vz(3)

‘glVertex3f vx(1), vy(1), vz(1)

‘glVertex3f vx(2), vy(2), vz(2)

‘glVertex3f vx(0), vy(0), vz(0)
‘ glVertex3f vx(0), vy(0), vz(0)

‘glEnd

Next

Next

glPopName

Solve the problem of flash back in VS2010

Sometimes we will find that VS2010 will flash back, and we will not see the results after the program is executed. There are two solutions to this problem.

Solution a:
Add system(“pause”) before the program ends (before return);  
This is the pause instruction for the system and it’s going to pause and it’s not going to continue, so it’s not going to go back.

Scheme 2:
Steps to implement in VS: Project ->; Property – & gt; Configure properties ->; Connector – & gt; System – & gt; Select the console for the subsystem.

Vs output flashback

To modify the project configuration, right-click on the project, select Properties from the right-click menu, and then select “Configuration Properties –>” from the list to the left of the pop-up dialog. The linker – & gt; System “, and then in the list on the right, in the first “subsystem” value, select “Console (/SUBSUSTEM:CONSOLE)”
As shown in the figure below:

How to solve the problem that the console window disappears in a flash after visual studio 2017 runs

“Press any key to continue with Visual Studio 2017” will not appear in the console window after running the program using Ctrl+F5. “Or” Please press any key to continue.” The main reason for this is that an “Empty Project” is used to build the Project instead of a “Win32 Console Application”.
At this point, just select “Project”>” The attribute “& gt; It will appear as shown in the image below, then select “System”> SUBSYSTEM “, changing “SUBSYSTEM” to “/SUBSYSTEM: CONSOLE”; I can solve

Flash back record of vs2017 installation process


Of stroke vs_Enterprise. The exe running to flash back, as shown can’t install might have been caused by the following problems:
1, original vs installer damaged; C:\Program Files (x86)\Microsoft Visual Studio Installer;
2, not compatible with the existing system;
: change the vs_enterpree. exe property for compatibility (compatible with your system and open with the administrator);

2、 Solutions to the problem of flash back in vs2017

1,
“Project1.exe” (Win32): “C:\Users\Administrator\Documents\Visual Studio 2017\Projects\Project1\Debug\Project1.exe” has been loaded. Loaded symbol.
“project1.exe” (Win32): “C:\Windows\SysWOW64\ntdll.dll” has been loaded. The PDB file could not be found or opened.
“project1.exe” (Win32): “C:\Windows\SysWOW64\kernel32.dll” has been loaded. The PDB file could not be found or opened.
“project1.exe” (Win32): “C:\Windows\SysWOW64\ kernelbase.dll” has been loaded. The PDB file could not be found or opened.
“project1.exe” (Win32): “C:\Windows\SysWOW64\msvcp140d.dll” has been loaded. The PDB file could not be found or opened.
“project1.exe” (Win32): “C:\Windows\ Syswow64 \ VCruntime140d.dll” has been loaded. The PDB file could not be found or opened.
“project1.exe” (Win32): “C:\Windows\SysWOW64\ ucrtbase.dll” has been loaded. The PDB file could not be found or opened.
“project1.exe” (Win32): “C:\Windows\SysWOW64\api-ms-win-core-timezone-l1-1-0.dll” has been loaded. The PDB file could not be found or opened.
“project1.exe” (Win32): “C:\Windows\SysWOW64\api-ms-win-core-file-l2-1-0.dll” has been loaded. The PDB file could not be found or opened.
“project1.exe” (Win32): “C:\Windows\SysWOW64\api-ms-win-core-localization-l1-2-0.dll” has been loaded.
“project1.exe” (Win32): “C:\Windows\SysWOW64\api-ms-win-core-localization-l1-2-0.dll” has been loaded. The PDB file could not be found or opened.
“project1.exe” (Win32): “C:\Windows\SysWOW64\api-ms-win-core-synch-l1-2-0.dll” has been loaded. The PDB file could not be found or opened.
“project1.exe” (Win32): “C:\Windows\SysWOW64\ api-ms-win-core-processThreads-l1-1-1.dll” has been loaded. The PDB file could not be found or opened.
“project1.exe” (Win32): “C:\Windows\SysWOW64\api-ms-win-core-file-l1-2-0.dll” has been loaded. The PDB file could not be found or opened.
program “[1176] project1.exe” has exited with a return value of 0 (0x0).
Solutions:
Step 1. Tick
tool ->; Options – & gt; Debugging – & gt; Conventional – & gt; Start source server support;

Start the source server to support the following three columns without checking;
>
>
>
>
Step 2. Tick
tool ->; Options – & gt; Debugging – & gt; Symbols – & gt; Microsoft Symbol Server;

Make sure
is selected in the pop-up dialog box;
Second problem: Flash back problem
Add system(“pause”) to the last line of code; Can be