Category Archives: JavaScript

Vue-cli2 sub environment packaging

1. Configure environment variables with cross Env and install cross env

 npm install cross-env –save-dev 

2. Create a new file in the config file testProd.env.js The contents are as follows

'use strict'
module.exports = {
  NODE_ENV: '"testProd"',
  ENV_CONFIG: '"testProd"'
}

3. Create a new file in the config file prod.env.js The contents are as follows

 'use strict'
 module.exports = {
  NODE_ENV: '"production"',
  ENV_CONFIG: '"prod"'
}

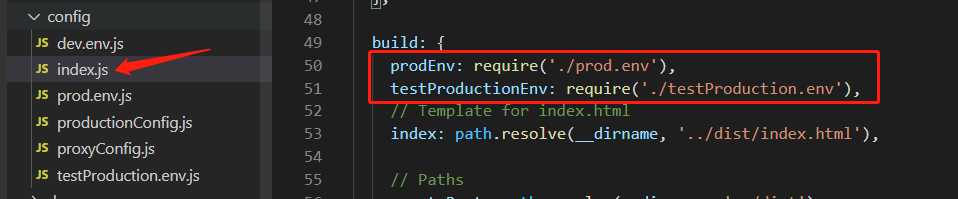
4. Modify the configuration/ index.js file

Add the following code:

prodEnv: require('./prod.env'),
testProdEnv: require('./testProd.env')

5. Modify bulid/ webpack.prod.conf . JS file

//const env = require('../config/prod.env'); //Annotate this line
const env = config.build[process.env.env_config + 'Env'] //change to this code

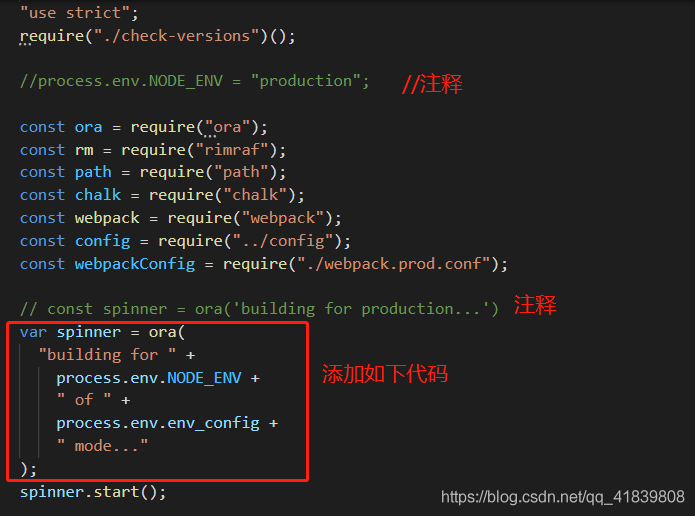
6. Modify build/ build.js file

//process.env.NODE_ENV = "production";  //Annotate this line
//const spinner = ora('building for production...')  //Annotate this line and change to these codes below
var spinner = ora(
  'building for ' +
    process.env.NODE_ENV +
    ' of ' +
    process.env.env_config +
    ' mode...'
)  

7. Modification package.json And packing command

 "build": "cross-env NODE_ENV=prod env_config=prod node build/build.js",
 "build:testProd": "cross-env NODE_ENV=testProd env_config=testProd node build/build.js"

CSS to achieve dynamic display of picture text by mouse touch

CSS to achieve dynamic display of picture text by mouse touch

These days, I want to prepare a small gift for my girlfriend, so I want to develop a website to express my love to her. Let’s have a try!

In fact, this is to add another page to your original page. As long as you define the scrolling speed with transition, let’s take a look.

<!DOCTYPE html>
<html>
	<head>
		<meta charset="utf-8" />
		<style>
			* {
			  box-sizing: border-box;
			}
			
			body{
				margin: 0;
				font-family: Arial;
				padding: 10px;
				background: #f1f1f1;
			}
			
			.clearfix {
			  overflow: auto;
			}
			.shadow_box{
				box-shadow: 0px 3px 10px 1px #888888;
			}
			.up-leader {
			  background-color: #333; 
			  list-style-type: none;
			  text-align: center;
			  position:sticky;
			  margin: 0;
			  padding: 0;
			  border-radius: 10px;
			  z-index: 10;
			}
			
			.up-leader li:not(.dropdown) {
			  display: inline-block;
			  font-size: 20px;
			  padding: 20px;
			  z-index: 10;
			}
			.up-leader li a, .dropbtn{
				display: inline-block;
				  color: white;
				  text-align: center;
				  padding: 14px 16px;
				  text-decoration: none;
			}
			.up-leader li.dropdown{
				display: inline-block;
				font-size: 20px;
			    padding: 20px;
			}
			
			.dropdown-content {
			  display: none;
			  position: absolute;
			  background-color: #f9f9f9;
			  min-width: 160px;
			  box-shadow: 0px 8px 16px 0px rgba(0,0,0,0.2);
			  z-index: 1;
			}
			
			div.dropdown-content a {
			  color:#000000;
			  padding: 12px 16px;
			  text-decoration: none;
			  display: block;
			  text-align: left;
			}
			.dropdown-content a:hover {background-color: #f1f1f1;}
			.dropdown:hover .dropdown-content {
			  display:block;
			}
			div.sticky{
				
				position: sticky;
				top: 0;
				
				background:azure;
				text-align: center;
				
				
			}
			.img1{
				float:left;
				clear:both;
				position:static;
				
				display: flex;
				justify-content: center;
				opacity: 0.8;
				overflow: auto;
				
			}
			
			.side-leader ul{
				
				list-style-type: 0;
				margin-top: 10px;
				padding: 0;
				width: 7%;
				height: 170%;
				background-color:#333 ;
				box-shadow: 0px 0px 1px 0px #888888;
				position:absolute;
				overflow: auto;
				border-radius: 25px;
				float: left;
				z-index: 4;


			}
			
			.side-leader ul li a{
				display: block;
				color:white;
				padding: 8px 16px;
				text-decoration: none;
				font-family:"黑体";
				
			}
			li:hover{
				background-color: #555;
				color: white;
				
			}
			
			.leftcolumn{
				
			    float: left;
			    width: 8%;
				
			}
			.midcolumn {   
			  float: left;
			  width: 50%;
			}
			
			/* 右列 */
			.rightcolumn {
			  float: left;
			  width: 42%;
			  background-color: #f1f1f1;
			  padding-left: 20px;
			}
			.avercolumn{
			  float: left;
			  width: 50%;
			  background-color: #f1f1f1;


			}
			.aver_column{
			  float: left;
			  width: 49%;
			  background-color: #f1f1f1;
			  margin-left: 1%;
			  
				
			}
			.aver2column{
			  float: left;
			  width: 68%;
			  background-color: #f1f1f1;
			  
				
			}
			.aver3column{
			  margin-left: 2%;
			  width: 27%;
			  
			  background-color: #f1f1f1;
			  padding-left: 20px;
			  box-shadow:2px 2px 10px 0px #888888 ;
			  
			  
			  display: inline-block;
			}
			
			/* 伪图像 */
			.fakeimg1 {
			  /*background-color: #aaa;*/
			  width: 852px;
			  background: url(img/6.jpg);
			  box-shadow:1px 3px 15px 1px #888888 ;
			  
			
			  padding: 20px;
			}
			.fakeimg2{
				background: url(img/5.jpg);
				box-shadow:1px 3px 15px 1px #888888 ;
				
			}
			.imgall{
				box-shadow:1px 3px 15px 1px #888888;
			}
			/* 为文章添加卡片效果 */
			.card {
			  background-color: white;
			  padding: 20px;
			  margin-top: 20px;
			  /*box-shadow: 0px 0px 1px 0px #888888;*/
			}
			/* 清除列之后的浮动 */
			.row:after {
			  content: "";
			  display: table;
			  clear: both;
			}
			
			/* 页脚 */
			.footer {
				margin: 20%;
			  
			  text-align: center;
			  background: white;
			  
			}
			#myImg {
			  border-radius: 5px;
			  cursor: pointer;
			  transition: 0.3s;
			}
			
			#myImg:hover {opacity: 0.7;}
			
			/* The Modal (background) */
			.modal {
			  display: none; /* Hidden by default */
			  position: fixed; /* Stay in place */
			  z-index: 1; /* Sit on top */
			  padding-top: 100px; /* Location of the box */
			  left: 0;
			  top: 0;
			  width: 100%; /* Full width */
			  height: 100%; /* Full height */
			  overflow: auto; /* Enable scroll if needed */
			  background-color: rgb(0,0,0); /* Fallback color */
			  background-color: rgba(0,0,0,0.9); /* Black w/ opacity */
			}
			
			/* Modal Content (image) */
			.modal-content {
			  margin: auto;
			  display: block;
			  width: 80%;
			  max-width: 1500px;
			}
			
			/* Caption of Modal Image */
			#caption {
			  margin: auto;
			  display: block;
			  width: 80%;
			  max-width: 700px;
			  text-align: center;
			  color: #ccc;
			  padding: 10px 0;
			  height: 150px;
			}
			
			/* Add Animation */
			.modal-content, #caption {  
			  animation-name: zoom;
			  animation-duration: 0.6s;
			}
			
			@keyframes zoom {
			  from {transform: scale(0.1)} 
			  to {transform: scale(1)}
			}
			
			/* The Close Button */
			.close {
			  position: absolute;
			  top: 15px;
			  right: 35px;
			  color: #f1f1f1;
			  font-size: 40px;
			  font-weight: bold;
			  transition: 0.3s;
			}
			
			.close:hover,
			.close:focus {
			  color: #bbb;
			  text-decoration: none;
			  cursor: pointer;
			}
			
			/* 100% Image Width on Smaller Screens */
			@media only screen and (max-width: 700px){
			  .modal-content {
			    width: 100%;
			  }
			}
			
			.container {
			  position: relative;
			  left: 60px;
			  float: inherit;
			  text-align: center;
			  width:71%;
			  z-index:0;
			}
			
			.image {
			  display: block;
			  
			  
			  height: auto;
			}
			
			.overlay {
			  text-align: center;
			  position: absolute;
			  bottom: 0;
			  left: 0;
			  right: 0;
			  background-color:#888888;
			  opacity: 0.7;
			  overflow: hidden;
			  width: 0;
			  height: 100%;
			  transition: 0.5s ease;
			}
			
			.container:hover .overlay {
				
			  width: 100%;
			}
			
			.text{
				text-align: center;
				top: 50%;
				font-family: "微软雅黑";
			}
		</style>
		<title>XR官网</title>
	</head>
	
	
	<body>
		
		<div class=" clearfix shadow_box">
			<a  href="#1">
			<img class="img1"  src="img/下载.jpg"   width=1920px height=900px>
			
			</a>
		</div>
		<div class="sticky" style="z-index: 10;">
			<a name="1" >
			<ul class="up-leader"  >
			  <li><a href="https://blog.csdn.net/XRTONY?spm=1000.2115.3001.5343" >Home</a></li>
			  <li><a href="#news">News</a></li>
			  <li><a href="https://blog.csdn.net/XRTONY?spm=1000.2115.3001.5343">Contact</a></li>
			  <li class="dropdown">
			  	<a class="dropbtn" href="index.html">Our World</a>
			  	 <div class="dropdown-content">
			        <a href="https://blog.csdn.net/XRTONY?spm=1000.2115.3001.5343">Link 1</a>
			      	<a href="#">Link 2</a>
			      	<a href="#">Link 3</a>
			    </div>
			  </li>
			</ul>
			</a>
			</div>
			<div class=" side-leader ">
			<ul >
				<li><a href="https://blog.csdn.net/XRTONY?spm=1000.2115.3001.5343">核心科技</a></li>
				<li><a href="index.html">党政板块</a></li>
				<li><a href="index.html">经营情况</a></li>
				<li><a href="index.html">未来发展</a></li>
				<li><a href="index.html">联系我们</a></li>
			</ul>
			
		  </div>
		<div style="">
			<div class="leftcolumn">
				<p></p>
			</div>
			<div class="midcolumn">
				<div class="card">
					<h2>title1</h2>
					<h5>hello world1</h5>
					<div class="fakeimg1" style="height:300px;"></div>
				</div>
				<div class="avercolumn card">
					<h2>title2</h2>
					<h5>hello world2</h5>
					<div class="fakeimg2" style="height:300px;"></div>
				</div>
				<div class="aver_column card">
					<h2>title3</h2>
					<h5>hello world3</h5>
					<div class="container" style="height:300px;text-align: center;">
						<img  class="imgall image" src="img/u=140318467,4274089430&fm=26&gp=0%20(1).jpg" style="height: 300px;text-align: center;"/>
						<div class="overlay">
						    <div class="" style="">
						    <h3 style="padding-top: 50%;font-family: '微软雅黑';">就不给你吃,休想哈哈哈,呐~不哭哭哦~我们一起恰恰哈~</h3>
						    </div>
						  </div>
					</div>
				</div>
				<div class="card" style="float: left;width: 100%; margin-top: 1%;height: 100%;margin-right: 1%;">
					<video width=100% height=100% controls="controls" <!--autoplay="autoplay"-->>
					  <source src="/i/movie.ogg" type="video/ogg" />
					  <source src="img/Europa%20Universalis%20IV%202021-03-02%2010-03-59_Trim.mp4" type="video/mp4" />
					  <source src="/i/movie.webm" type="video/webm" />
					  <object data="/i/movie.mp4" width="320" height="240">
					    <embed width=100% height=100% src="img/Europa%20Universalis%20IV%202021-03-02%2010-03-59_Trim.mp4" />
					  </object>
					</video>
				</div>
				
					
				</div>
				
				
			</div>
			<div class="rightcolumn">
				<div class="card">
					<h2>title1</h2>
					<h5>hello world1</h5>
					<div class="fakeimg2" style="height:300px;"></div>
				</div>
				<div class="aver2column card">
					<h2>title2</h2>
					<h5>hello world2</h5>
					<div class="fakeimg2" style="height:300px;"></div>
				</div>
				<div class="aver2column card" style="">
					<img src="img/u=1814211770,2732480941&fm=26&gp=0.jpg%20" id="myImg" style="height:100%;widows: 100%;"/>
				</div>
				<div id="myModal" class="modal">
				  <span class="close">×</span>
				  <img class="modal-content" id="img01">
				  <div id="caption"></div>
				</div>
				
				<script>
				// Get the modal
				var modal = document.getElementById('myModal');
				
				// Get the image and insert it inside the modal - use its "alt" text as a caption
				var img = document.getElementById('myImg');
				var modalImg = document.getElementById("img01");
				var captionText = document.getElementById("caption");
				img.onclick = function(){
				  modal.style.display = "block";
				  modalImg.src = this.src;
				  captionText.innerHTML = this.alt;
				}
				
				// Get the <span> element that closes the modal
				var span = document.getElementsByClassName("close")[0];
				
				// When the user clicks on <span> (x), close the modal
				span.onclick = function() { 
				  modal.style.display = "none";
				}
				</script>
				
				
				<div class="aver3column card" style="height: 1000px; ">
					<h2>title</h2>
					<h5>hello world11</h5>
					<div class="fakeimg2" style="height:300px; src: ;"></div>
				</div>
				
				
			</div>
			</div>
			<div style="padding-bottom: 1000px;">
				<p>
					
				</p>
			</div>


		</div>


	</body>
</html>

How to Set Time Zone in Golang

About me

Article launch | my blog | welcome to pay attention

Go language time.Now () returns the local time zone

time.Now().Format("2006-01-02 15:04:05")

Time setting custom time zone

var cstSh, _ = time.LoadLocation("Asia/Shanghai") //ShangHai
fmt.Println("SH : ", time.Now().In(cstSh).Format("2006-01-02 15:04:05"))

There is a problem with load location. It depends on IANA time zone database (tzdata for short). Generally, Linux system has it, but windows system does not. Therefore, if the go environment is not installed in the windows system, an error will be reported by calling loadlocation.

The current solutions include:

1. We can put the tzdata file into our own program directory, and then let the time package load the time zone file from our own program directory.

The file directory can be set through the environment variable. In the main method:

os.Setenv("ZONEINFO", '/home/tz/data.zip')

Then call the loadlocation method.

Download tzdata

2. Use time zone mode recommended mode

var cstZone = time.FixedZone("CST", 8*3600)       // East 8 District
fmt.Println("SH : ", time.Now().In(cstZone).Format("2006-01-02 15:04:05"))

Global settings

If you want to set the global time zone configuration, what should you do?

main.go Add an initialization method (at the main function)

func initInMain() {
	var cstZone = time.FixedZone("CST", 8*3600) // East 8 District
	time.Local = cstZone
}

Assign the defined time zone instance to the time.Local

Recommended reading

Redis: a new open source charging tool

Star’s top engineer skill map on GitHub

Chinese programmers are most likely to send wrong words

Recommended! Markdown icon Index Website

Uncaught (in promise) NavigationDuplicated: Avoided redundant navigation to crrent location: “/home“

In Vue project, when repeatedly clicking route, the console will report an error:

Uncaught (in promise) NavigationDuplicated: Avoided redundant navigation to crrent location: “/home”

The online solution is to add the following code in the router folder:

// src/router/index.js

const VueRouterPush = Router.prototype.push
Router.prototype.push = function push (to) {
  return VueRouterPush.call(this, to).catch(err => err)
}

However, errors are still reported in the compilation process.

Finally, a solution is found

itemClick() {
  // Original code: this.$router.replace(this.path)
  // Add .catch(err=>err) after the code for route jumping
  // either the replace or push method will work
  this.$router.replace(this.path).catch(err=>err)
}

ArcGIS API for JavaScript Error Uncaught(in promise): TypeError: xxx is not a constructor

preface

When using ArcGIS API JavaScript, the following errors are reported:

Cause of error

When we use require to import related packages when using ArcGIS API, the parameters in the following functionshould be consistent with the order of packages in require , otherwise the above errors will be caused.

Vue cannot read property ‘xxx’ of undefined solutions

Problem scenario

Use {} text interpolation to display content through cascade. In the following code, foo returns through the back-end interface.
Before the back-end content returns, the console will not read the property ‘xxx’ of undefined.

<div>
  <h1>{{ foo.title }}</h1>
  <p>{{ foo.description }}</p>
</div>

Solution

<div>
  <h1 v-if="foo.title">{{ foo.title }}</h1>
  <p v-if="foo.description">{{ foo.description }}</p>
</div>

perhaps

<div>
  <template v-if="foo">
    <h1>{{ foo.title }}</h1>
    <p>{{ foo.description }}</p>
  </template>
</div>

perhaps

new Vue({
  foo: {
    title: '',
    description : ''
  },
  created(){
    // Calling the back-end interface
  }
})

Please transfer a valid prop path to form item

 <el-form-item v-for="(item, index) in formData.picSize" :key="item.title" :label="item.title" class="yydh-bili">
                <el-form-item
                    :prop="'item.' + index + '.width'"
                    :rules="picRules"
                >
                    <el-input v-model="item.width" style="width: 80px; margin-right: 10px;"></el-input>
                    <span>:</span>
                </el-form-item>
                <el-form-item
                    :prop="'item.' + index + '.height'"
                    :rules="picRules"
                >
                    <el-input v-model="item.height" style="width: 80px; margin-right: 10px;"></el-input>
                </el-form-item>
</el-form-item>


<script>
formData: {
                picSize: [
                    {
                        name:'ACTIVITYBIGSIZE',
                        title: 'title1',
                        width: 4,
                        height: 3,
                    },
                    {
                        title: 'title2',
                        width: 4,
                        height: 3,
                    },
                ],
}

</script>

The solution is to change the definition of the form’s data proformitemsize

 <el-form-item v-for="(item, index) in formData.picSize" :key="item.title" :label="item.title" class="yydh-bili">
                <el-form-item
                    <!--Im here-->
                    :prop="'picSize.' + index + '.width'"
                    :rules="picRules"
                >
                    <el-input v-model="item.width" style="width: 80px; margin-right: 10px;"></el-input>
                    <span>:</span>
                </el-form-item>
                <el-form-item
                     <!--Im here-->
                    :prop="'picSize.' + index + '.height'"
                    :rules="picRules"
                >
                    <el-input v-model="item.height" style="width: 80px; margin-right: 10px;"></el-input>
                </el-form-item>
</el-form-item>

[Weex]Error in creating project NPM: unable to load file D:\program files\nodejs\node_ global\ weex.ps1 Because scripts are not allowed to run on this system.

Use weex to create a new app and find NPM error:

npm : The file D:\Program Files\nodejs\node_global\weex.ps1 could not be loaded because running scripts is disabled on this system. For more information, see https:
/go.microsoft.com/fwlink/?LinkID=135170 in about_Execution_Policies.
Location Line:1 Character: 1
+ npm run dev
+ ~~~
    + CategoryInfo          : SecurityError: (:) [],PSSecurityException
    + FullyQualifiedErrorId : UnauthorizedAccess

Because it is forbidden to run scripts on this system, that is to say, you do not have permission

get-ExecutionPolicy
// Output: Restricted
// Restricted

Restricted means that the state is prohibited. Give permission:

Set-ExecutionPolicy -Scope CurrentUser

// At the prompt, enter.
RemoteSigned

Verify:

get-ExecutionPolicy
// Output: RemoteSigned

Then recreate the project.

How to introduce iconfont into uni-app

There are two ways to introduce iconfont into uniapp, one is introduced locally, the other is introduced online.

Let’s talk about the method of online introduction. Create your own project in iconfont, and then add some icons,

Select Unicode and copy the code. Then download the code to the local and find it in it iconfont.css We only use this one. After we get CSS, we put it into our uniapp project and post the code to replace the previous code

stay app.vue Introduce CSS file into

It’s easy to use

We can see that the above method is still introduced into the external chain. We generally don’t like it. We always feel that it’s not safe, so the local one is more appetizing

The iconfont file contains iconfont.ttf 、 iconfont.css , will iconfont.ttf File transpose Base64.
Recommended translation tool address: https://www.giftofspeed.com/base64-encoder/

Then open it iconfont.css File, modify the @ font face part, paste the converted Base64 code to the corresponding location, and set the code as follows:

@font-face { font-family: "iconfont";
 src: url(data:font/truetype;
charset=utf-8;
base64,Converted base64 content) format('truetype'); } .iconfont { display: inline-block; }

Finally, it is in the project App.vue Introduced in iconfont.css file

<style> @import "./font/iconfont.css"; </style>

How to use it in any component:

<view class="iconfont icon-XXX"></view>

How to open a page in a new window by Vue router

1. <router link>tag to open a new window:

The official document says that the V-link directive has been replaced by a new & lt; router link & gt; component directive, which has been completed by the component in Vue 2.

Note: <router link> does not support target = "_Blank ", if you want to open a new tab, you must use the <a> tab.

But in fact, vue2 version of <router link>supports target = “_The “blank” attribute (tag = “a”) is as follows:

1 <router-link target="_blank" :to="{path:'/home',params:{id:'8'}}">open home in a new page</router-link>

2. Programming navigation:

Sometimes it is necessary to realize page Jump in click event or function, so you can use the example method of router to realize it by writing code.

What we often use is$ router.push And$ router.go However, after vue2.0, this method does not support the properties of new window opening. This is the time to use this$ router.resolve , as follows

 1    goToLoanOrderDetail(loanOrderId, userId) {
 2       let routeData = this.$router.resolve({
 3         name: 'orderDetail',
 4         params: { loanOrderId, userId }
 5       });
 6       window.open(routeData.href, '_blank');
11     }

Just click the event to call this method

How to Block a frame with origin from accessing a cross origin frame

When the iframe is nested in different port numbers or even different IP addresses, an error is reported when the parent page calls the method of the child page

SecurityError: Blocked a frame with origin from accessing a cross-origin frame…

Cause of the problem

Under different port numbers, the traditional iframe nested method cannot be used.

document.getElementById("mainFrame").contentWindow.xxxx();

Cause

Homologous security policy
you can’t use JavaScript to access an <iframe>, if you can, it will be a huge security flaw. Prevent scripts from trying to access frames with different sources for the same source policy browser.

If at least one part of the address is not reserved, the source is considered different:

<protocol>://<hostname>:<port>/path/to/page.html

To access an iframe, the protocol, host name, and port must be the same as the domain.

Examples

Here’s what happens when you try to access the following URL

http://www.example.com/home/index.html

URL                                            RESULT 
http://www.example.com/home/other.html         -> Success 
http://www.example.com/dir/inner/another.php   -> Success 
http://www.example.com:80                      -> Success (default port for HTTP) 
http://www.example.com:2251                    -> Failure: different port 
http://data.example.com/dir/other.html         -> Failure: different hostname 
https://www.example.com/home/index.html.html   -> Failure: different protocol 
ftp://www.example.com:21                       -> Failure: different protocol & port 
https://google.com/search?q=james+bond         -> Failure: different hostname & protocol

How to Fix

Although the same origin policy prevents scripts from accessing the content of different origin sites, if you have both pages, you can use to window.postmessageand its related message events send messages between two pages to solve this problem.

On the main page:

var frame = document.getElementById('your-frame-id'); 
frame.contentWindow. postMessage (data, '*');

data can be string, boolean, number, array, object

In the iframe subpage
window. addEventListener ('message', function(event) { 
    //event.data gets the data passed to it
});

Note: the PostMessage of the parent page triggers the addeventlistener